Veigel BHA23-016 User manual

Installation and
Operating Instructions
Veigel eClassic RHD
Hand Control
Commander
Art. no. BHA23-016
www.veigel-automotive.de
Rehamotive

Document no. 250603
Created 2021-07-01
Name Schulz
Revised
Version 1
Subject to technical modications without prior
notication and to errors.
Reproduction, even in part, only permitted with
permission from Veigel GmbH + Co. KG.

Contents
1-1
Revision history .................................................................................................. 1-2
Symbols used ..................................................................................................... 1-3
General information ..................................................................................2-1
General safety information.................................................................................. 2-1
Safety information.....................................................................................2-3
Product description...................................................................................3-1
Function of VEA electronics kit ........................................................................... 3-1
Function of the Veigel Commander .................................................................... 3-2
Hand control scope of delivery ........................................................................... 3-3
Type plate ........................................................................................................... 3-3
VEA electronics kit scope of delivery .................................................................. 3-4
Block diagram ..................................................................................................... 3-5
Intended use ....................................................................................................... 3-6
Assembly....................................................................................................4-1
Safety information............................................................................................... 4-1
Tightening torques .............................................................................................. 4-1
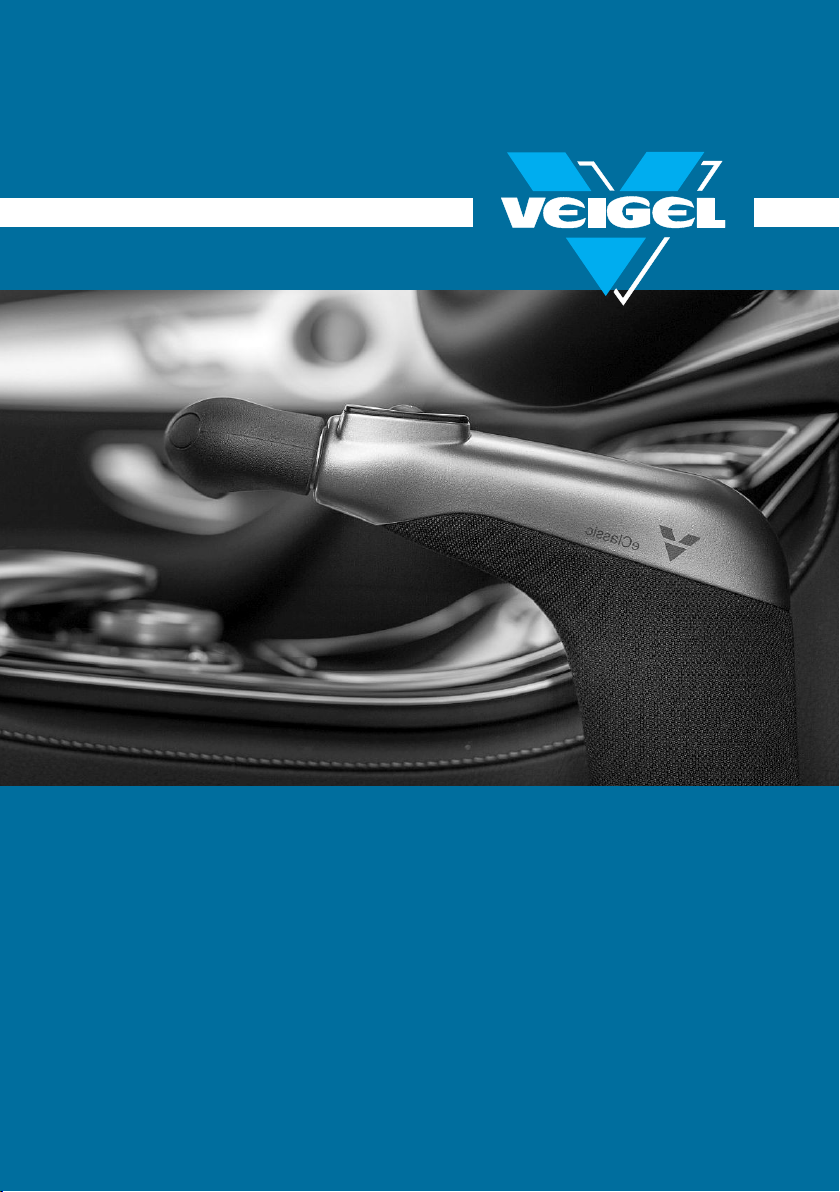
Assembling the eClassic III hand control ........................................................... 4-2
Assembling the brake rods ................................................................................. 4-3
Adjusting the brake rods ..................................................................................... 4-4
Adjusting the lateral tilt........................................................................................ 4-5
Assembling the covers........................................................................................ 4-6
Connecting the universal adapter ....................................................................... 4-7
Accelerator pedal signal/pin assignment ............................................................ 4-8
Assembling the VEA ........................................................................................... 4-9
VEA functional check .......................................................................................... 4-9
Teaching in the VEA.......................................................................................... 4-10
Button with integrated status LED .....................................................................4-11
Checking the function ........................................................................................4-11
Laying the cables...............................................................................................4-11
Operation....................................................................................................5-1
Safety information............................................................................................... 5-1
Operation ............................................................................................................ 5-2
Brake lock function ............................................................................................. 5-3
Operation of the electronic switchover................................................................ 5-4
Veigel Commander ............................................................................................. 5-7
Standard functions of the arrow buttons ............................................................. 5-8
Standard functions of the V button ..................................................................... 5-9
Safety information............................................................................................. 5-10
Maintenance and care...............................................................................6-1
Safety information............................................................................................... 6-1
Maintenance/care ............................................................................................... 6-1
Transport, storage and disposal ..............................................................7-1
Transport and storage......................................................................................... 7-1
Disposal .............................................................................................................. 7-1
Installation record .....................................................................................8-1

1-2
Contents
Revision history
Edition Revisions Chapter
01 / 2021-07-01 Initial version

Contents
1-3
Symbols used
The following symbols are used in these operating instructions:
This symbol refers to information that, if not observed, will pose a risk to your
health or the functionality of the device.
This symbol refers to important additional information, tips and recommendations.
Individual images contained in these instructions may deviate from the driving
aid you received.
Thank you for
choosing this high-quality Veigel product!
Veigel hotline
Telephone: +49 (0) 7941 60585-0
Fax: +49 (0) 7941 60585-20
E-mail: info@veigel-automotive.de
Web: http://www.veigel-automotive.de/
Veigel GmbH + Co. KG
Verrenberger Weg 36
74613 Öhringen, Germany

1-4
Contents
Blank page for your notes

Safety information
2-1
Observe the following in particular during assembly:
• Installationandmaintenanceworkmayonlybeperformedbyspecialiststa
usingsuitabletools.
• Pleasereadtheseinstallationandoperatinginstructionscarefullybeforein-
stallingthehandcontrol.
• Passtheinstallationandoperatinginstructionsforthehandcontrolontothe
customer,togetherwithanypartscerticate,whenyouhandoverthevehicle.
• Observetheapplicableaccidentpreventionandsafetyprovisionswhenin-
stallingandmaintainingthehandcontrol.
• Onlyaccessoriesobtainedfromthemanufacturermaybeusedwiththehand
control.
General safety information
Thehandcontrolisapre-assembledcomponentthatcomesreadytoinstall.It
wasdesignedandbuiltinlinewiththeharmonisedstandardsthatmustbeob-
servedaswellasfurthertechnicalspecications.Consequently,itisastate-of-
the-artproductandprovidesthebestpossiblelevelofsafetywhileinoperation.
Thehandcontrolleftthefactoryinaawlessconditionintermsoftechnical
safety.
However,safetycanonlybeachievedinpracticeifalltherequiredactionshave
beentaken.Thepersonresponsibleforoperationhasadutytoplantheseac-
tionsandmonitortheirimplementation.
The hand control must not be used as an aid for getting into the vehicle.
General information

2-2
Safety information
Observe the following in particular as a user:
• Complywithgenerallyacceptedcodesofpracticewhenusingandoperating
thehandcontrol.
• Observetheapplicableaccidentpreventionandsafetyprovisionswhenop-
eratingthehandcontrol.
If this information is not observed, this will void the warranty, the manufac-
turer’s liability and, in certain situations, the type approval of the vehicle.
As a consequence, no claims can then be made against us.
The driving aid features built-on parts and levers that will restrict the space
available on the driver’s side to a certain extent once installed.
The complete operating and installation instructions must always be carried in
the vehicle.

Safety information
2-3
Please read this safety information carefully.
• It is recommended for disabled drivers who are unfamiliar with
using the hand control to practise at a driver training area or
similartherstfewtimestheydrivethevehicle.
• Thehandcontrol,includingtherodsintheinstallationkit,willrestrictthespace
availableandtheadjustmentrangeoftheseatforthedriver,whetherthey
aredisabledorable-bodied.Therefore,extremecaremustbetakenwhen
drivingthevehicle.
Ifadisableddriverhasreducedmobilityintheirlegs,apedalcovermustbe
ttedovertheacceleratorandbrakepedals.Thisistopreventthedriveroper-
atingorjammingthepedalsaccidentally.
The responsible expert at TÜV or DEKRA decides whether a pedal cover
is required and documents the decision in an expert report. This expert
report forms the basis for a corresponding entry on the driver’s licence.
Thispedalcoverisnotsuppliedwiththehandcontrolortheinstallationkit.The
pedalcovermustbeorderedseparatelyforthevehicletypeinquestion.
It is not permitted to modify or attach additional parts to the hand control,
dashboard or centre console.
Therefore, you must not install mobile phone cradles or similar here, for
example.
Only people who are familiar with the hand control and have been instructed
in how to use it may drive the vehicle using this hand control.
Safety information

2-4
Safety information
The brake lock button (see "Brake lock function") is a starting aid and does
not replace operation of the standard parking brake (handbrake). When
getting out of the vehicle, do not use this button to secure the vehicle’s pos-
ition on uphill/downhill slopes; internal leaks and discharge of the vehicle
battery mean this but ton in no way guarantees a permanent locking eect.
Always apply the standard parking brake and set the selector lever to "P"
when parking.
Driverswhorelyonlockingthebrakepedalmustbeabletodosoandareper-
mittedtousetheselockingdevices.Otherdriverswhoarecapableofoperating
thevehicleinthestandardwayarenotpermittedtousetheselockingdevices.
Thisisbecausethestateoftheartforstandardvehiclesrequiresdierenttech-
nicalsolutions.
Applies only to installation kits where the seat forward-back adjustment
limit can be modied:
In certain vehicle types, if the seat is in a high position and is then moved for-
wards, this can activate the hand control. Therefore, do not change the position
of the device that is attached to restrict the seat movement; this is to ensure that
the seat movement range remains limited.

3-1
Product description
Product description
The hand control is a tried-and-tested solution that has been tted in thousands
of vehicles over the years. It combines a perfectly positioned control handle
with user-friendly operation, maximum interior safety and optimum operational
reliability:
• The handle position allows the driver to keep their arm completely relaxed,
while the ergonomic shape and the material used mean the handle feels
pleasant to hold.
• The accelerator handle is rotated by moving the lower arm, which prevents
the joint complaints that other rotating handles can cause.
• The accelerator and brakes are completely separate movements; the driver
can accelerate before releasing the brake when driving o on steep hills
and/or with a heavy vehicle load. The completely stable hand lever ensures
that disabled drivers with a weak upper body can still have a secure grip.
• Thanks to the special lever geometry, braking requires little force. The brake
lock button is conveniently positioned in front of the accelerator handle.
• The position inside the vehicle has been specially developed to prevent haz-
ards (to knees, for example) caused by assembly underneath the steering
column and to create no obstruction for the driver when getting into the
vehicle.
• Robust rods for operating the brakes guarantee maximum operational
reliability.
Function of VEA electronics kit
The VEA electronics kit consists of a cable assembly, which is connected to the
original accelerator pedal via the safety electronics.
Before setting o, the driver must decide whether they will use the original
accelerator pedal or the Veigel additional accelerator.
The electronics make it impossible to switch between the original accelerator
pedal and the Veigel additional accelerator while driving.
The driver can depress the original accelerator pedal fully and it will have no
function.
If the original accelerator pedal is activated, then the Veigel additional acceler-
ator will have no function.
Do not install and operate the VEA-type electronics kit in Groupe PSA
vehicles.

3-2
Product description
Type plate
The type plate and factory number are important when it comes to uniquely
identifying the scope of delivery.
Unique order number
Unique serial number of the driving aid
Type designation
Please enter the factory number of the driving aid here:
Factory no.: . . . . . . . . . . . . . . . . . . .
The type plate is stuck to the hand control’s base plate.
Fig. 3-1: Hand control scope of delivery
Hand control scope of delivery
Veigel GmbH + Co. KG 74613 Öhringen
Type: HA Version:
Type designation:
Factory no.: xxxxxx-xxx
Article no.: BHAxx
Veigel
Commander
Accelerator
Brake lock button
Cover 1
Side trim
panel
Trim panel
for top sec-
tion
Cover 2

3-3
Product description
VEA electronics kit scope of delivery
Fig. 3-2: VEA electronics kit scope of delivery
Item Description Art. no.
1VEA electronics kit 230645
2eClassic UNI cable assembly 230639
1
2
1
1

3-4
Product description
VEA block diagram
TEACH-IN
ECU
Toggle
switch
Original
accelerator
pedal eClassic
After
TEACH-IN
unplug
is not used
GND
Terminal 15
Terminal 30
to
vehicle
Vehicle-specic
adapter
original
acc.
secondary
acc.
Cable set
230639
Vehicle-
specic
adapter

3-5
Product description
An installation kit is required to install the hand control.
This installation kit contains all the parts you will need to install the hand control
in your vehicle and connect it to the pedals via rod parts.
The parts are mostly assembled at fastening points already available inside
the vehicle. The vehicle will only need to be drilled in a few exceptional cases.
Please observe the installation instructions supplied with these installation kits
and the “Assembly” section in these installation and operating instructions.
Intended use
The hand control is used to operate the accelerator and brake pedals in vehicles
with an automatic gearbox.
It must only be used by drivers with a suitable disability. The requirement to use
the device must be indicated on the driver’s licence.

4-1
Assembly
Assembly
Safety information
Tightening torques
The tightening torques as specied by the vehicle manufacturer apply when
converting vehicles using Veigel driving aids.
Unless otherwise stated in the text, the usual DIN tightening torques provided
in the table below apply for Veigel parts.
• Installation and maintenance work may only be performed by specialist sta
using suitable tools.
• Please read these operating instructions carefully before installing the hand
control.
• Pass the operating instructions on to the customer, together with the install-
ation instructions for the installation kit and any parts certicate, when you
hand over the vehicle.
• Observe the applicable accident prevention and safety provisions when
installing and maintaining the hand control.
• Only accessories obtained from us may be used with the hand control.
• Structural modications to the hand control may only be performed following
consultation with the manufacturer.
• If the hand control is installed in an authorised workshop, the installation record
must be lled in (see appendix). If it is installed at the factory, a separate
installation record will be prepared and archived at the factory.

4-2
Assembly
Using the two M8x16 fil-
lister-head screws with lock
washers underneath, screw the
eClassic onto the base rail provided
in the installation kit.
Tightening torque 25 Nm
Fig. 4-1: Assembling the hand control
Assembling the eClassic III hand control
Required standard parts:
2x llister-head screw M8-8.8
2 x lock washer 8.4
1x securing clip for ball socket
Required parts:
eClassic BHA23-016 hand control
Cover 1
Cover 2
Brake pipe (supplied with the installation kit)

4-3
Assembly
Fig. 4-2: Assembling the brake pipe
Screw the M10 threaded pin of the
brake pipe provided in the install-
ation kit all the way into the articu-
lated lug on the hand control.
Secure with the lock nut.
Tightening torque 20 Nm
Assembling the brake rods
Fig. 4-3: Adjusting the clevis
When delivered, the clevis is
mounted in the middle position.
If there is not much room in the
footwell, the clevis position can be
moved up or down.
This enables you to adjust the
force ratio for the brake rods to the
perfect setting.
To move the cable head, carefully
pull the side trim panel apart from
the bottom.
Move the clevis and re-assemble
the trim panel.

4-4
Assembly
There are certain exceptional installation kits in which the brake rod, not the
brake pipe, is attached to the hand control.
Therefore, read the installation instructions for your installation kit
carefully.
Since not all brake pipes curve in exactly the same way, it is important for them
to be accurately aligned with the hand control.
Observe the installation instructions for your installation kit. Check that the push
rods move freely.
With the engine running, use the
two M12 lock nuts to adjust the
length of the brake rods.
Adjust the play in the rods to
between a minimum of 1 mm and
a maximum of 2 mm.
Only adjust the brake rods when the engine is running.
Make this adjustment extremely carefully. The only way to prevent a grinding
brake causing damage to the brake system is to ensure the brake rods are
adjusted correctly.
Note that the brake pedal is in a dierent position when the engine is running
and when it is at a standstill.
Fig. 4-4: Adjusting the brake rods
Once you have adjusted the rods, you will need to forcefully apply the brake
several times. This may cause the pedal connection to move a little. Therefore,
you must check the setting once again and re-adjust it if necessary.
Adjusting the brake rods

4-5
Assembly
Adjusting the lateral tilt
You must adjust the lateral tilt very carefully to ensure the hand control
will work perfectly.
The adjuster allows you to optimise
the hand control's lateral tilt so it is
ideal for the space actually avail-
able in the driver's footwell.
To adjust the lateral tilt, loosen the
llister-head screws only slightly.
Adjust the lateral tilt to the
perfect setting, then tighten the
llister-head screws in an altern-
ating sequence.
Tightening torque 35 Nm
Fig. 4-5: Adjuster
Table of contents
Other Veigel Automobile Accessories manuals