Vemus Kilitronik miniK 10 User manual

unique electronic cam lock
OPERATING MANUAL
cabinets lockers boxes
Please read this
manual before using
the miniK10

Page 2
INDEX
Introduction....................................................................................................................... 3
Description ....................................................................................................................... 4
Password Types ............................................................................................................... 4
Operating Modes .............................................................................................................. 4
Locker Mode (Multiple User Mode)................................................................................. 4
Personal Mode.................................................................................................................. 5
• Opening With User Password................................................................................. 5
• Changing User Password ....................................................................................... 5
What If Forget The Passwords........................................................................................ 5
Service Password............................................................................................................. 6
• Opening With Service Password............................................................................ 6
• Changing Service Password................................................................................... 6
Master Password.............................................................................................................. 6
• Opening With Master Password ............................................................................. 6
• Changing Master Password.................................................................................... 6
Programming The miniK10.............................................................................................. 7
Accessing The Program Menu........................................................................................ 7
Program Table................................................................................................................... 7
Programming Option Denitions.................................................................................... 8
Changing The Battery ...................................................................................................... 8
Maintenance...................................................................................................................... 9
General Warnings............................................................................................................. 9
Cams.................................................................................................................................. 9
Other.................................................................................................................................. 9
Light And Audio Notication ......................................................................................... 10
Limited Warranty ............................................................................................................ 10
Liability Limits ................................................................................................................ 10
Technical Specications................................................................................................ 10
Quick Info.........................................................................................................................11

Page 3
1. Red LED
2. Green LED
3. Keypad
4. Lock Body
5. Closing Position
6. Knob Indicator
7. Opening Position
8. Knob
9. Mounting Nut
10. Lock Body
11. Battery Cover
12. Battery Cover Screw
13. ID Label
14. Hand Knob Frame
15. Cam
16. Cam Screw
17. Cylinder Nut
INTRODUCTION
Front Back

Page 4
DESCRIPTION:
miniK10 electronic cabinet lock with master/manager code, personal use
functionality, and up to 10 years battery life. miniK10 can be installed for both
right and left hand installations - anywhere that needs exibility of master/
manager codes. The eco-friendly miniK10 offers both convenience of far
lessfrequent battery changes and a more
environmentally friendly solution.
PASSWORD TYPES:
The miniK10 has three potential password levels -
1. User password
2. Service password (must activate in Program 5.1)
3. Master password
The user and master passwords should be changed prior to installation
and tested. Write down new passwords and keep in a safe place. It is not
possible to open lock if you forget your password.
OPERATING MODES:
The miniK10 can operate in two different modes:
1. Personal Mode - Fixed password. The user will open lock each time with
the same own password.
2. Locker Mode (factory default) - user enters in their code when lock is in
unlocked position and rotates handle to lock. Upon returning uses same code
to open. Next user can repeat the process with their own unique password.
LOCKER MODE (MULTIPLE USER MODE)
In locker mode, opening and closing with a password process is same as
Personal User. However, each time lock is in open position, each user enters
in their own unique 4-digit code to lock and then use that the same code to
again open the MiniK10. Popular application is for gym lockers.
NEW USER PASSWORD
Lock is open, rst user enters in <3-4-2-8> and closes lock. They return
and enter the same <3-4-2-8> to open the lock. Lock is open, next user
enters in their code of <7-8-5-2>, closes lock and so on.

Page 5
ATTENTION:
By default, the miniK10 is set to Locker Mode. The miniK10 can easily be set
to Personal Mode with either of the two below steps:
1. Before battery tab is removed, hold down key, pull the tab and
key the key pressed 3 seconds
2. Convert lock to Personal Mode at any time by entering in
MasterCode 1 0
PERSONAL MODE
• OPENING WITH USER PASSWORD:
1) Enter your 4-digit user password.On rst use factory default is <1-0-1-0>
2) Rotate handle within 5 seconds to opening direction and there will be a
conrmation beep.
• CHANGING USER PASSWORD:
If personal mode is selected (default), press and old password.
Press button again and enter new 4-digit user password. Press button
again and approve new password. You will get a conrmation beep and
green LED light will blink.
Locker Mode (Multiple User):
Use Master code to unlock and turn handle to open position. Lock is now
ready for next user to enter in their unique code.
Personal User Mode:
1) Use master code to reset the lock to factory defaults.
MasterCode 4 0
2) Default user code is now < 1-0-1-0 > and can be changed.
USER PASSWORD
OLD USER NEW USER
Below illustrations show
examples of lock installed for
right handed door. Lock can be
installed for left or right handed
NOTE: WHAT HAPPENS IF USER FORGETS THEIR PASSWORD?

Page 6
SERVICE PASSWORD: By default, service password is not active. Activate with
Program 5.1. Service password allows lock to be opened only and none of lock
features can be programmed.
• OPENING WITH SERVICE PASSWORD: Default <1-0-1-0-1>
If service password function is active, 1) press button and enter current
5-digit service password and press button. 2) Rotate handle within 5 second
to opening direction. You will get a conrmation beep from lock and green LED
light will blink.
• CHANGING SERVICE PASSWORD:
When you have selected service password in program menu, press button
twice and enter current 5-digit service password. Press button again and
enter new 5-digit service password. Press button again and approve new
password. You will get a conrmation beep from lock and green LED lights will
blink.
• MASTER PASSWORD: Opens lock and grants access to all programming
features.
OPENING WITH MASTER PASSWORD: Default <1-0-1-0-1-0>
1) Press the button and enter current 6-digit master password and press
button. 2) Rotate handle within 5 seconds to opening direction. You will get a
conrmation beep from lock and green LED light will blink.
• CHANGING MASTER PASSWORD: Set new master password and test BE-
FORE installing lock. Press button twice, and then enter old 6-digit master
password. Press button again and enter new 6-digit master password. Press
button again and approve new password. You will get a conrmation beep
from lock.
SERVICE PASSWORD
MASTER PASSWORD
OLD SERVICE NEW SERVICE

Page 7
PROGRAMMING THE miniK10
The miniK10 can be customized from factory default settings tailored to your needs.
ACCESSING THE PROGRAM MENU:
Press the button and then enter the 6-digit master password. Press the button.
The Red and Green led’s will blink alternately. Press the program and selection numbers
repeatedly.
0 1
Explanation:
0-1 Restores factory default settings:
Prog. No 1-1: Locker mode operation (Multiple user operation)
Prog. No 2-1: Audible beeps and conrmations
Prog. No 3-0: Penalty operation is not active
Prog. No 4-0: Sets user password to factory default
Prog. No 5-0: Service password is not active
Prog. No 6-1: Closing without password active
Prog. No 7-0: Warning of open door is not active
Prog. No 8-0: Resetting user password is not active
Prog. No 9-0: Blocking of the lock is not active
10Personal Operation (individual operation)
1Locker Mode Operation (multiple user)
20Mute operation except for warnings
1Audible operation- button feedback, warnings and conrmations
30Penalty passive
1Penalty active (lock blocked for 5 min. if wrong code entered 3 times)
40Sets user default code to factory default (for forgotten combinations)
1-
50Service password is passive
1Service password is active
60Closing with password required is active
1Closing without password is active (for personal usage)
70Warning of door open is passive
1Warning of door open is active (beeps 8 times every 5 sec.)
80Resetting user password is passive (if service password is active)
1Resetting user password is active (if service password is active)
90Blocking of the lock is passive (if service password is active)
1Blocking of the lock is active after using service password (if it is active)
Program Table
NOTE: To the right would change to
password being required to close lock MASTER PASSWORD PROG.
NO
SELECT.
NO
6 0
PROG.
SELECT.

Page 8
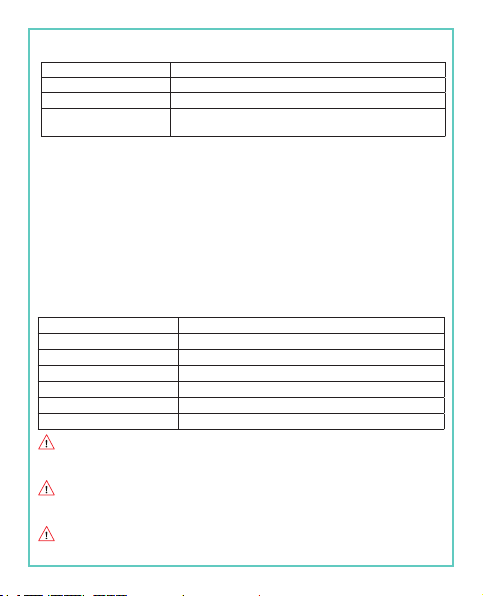
PROGRAMMING OPTION DEFINITIONS:
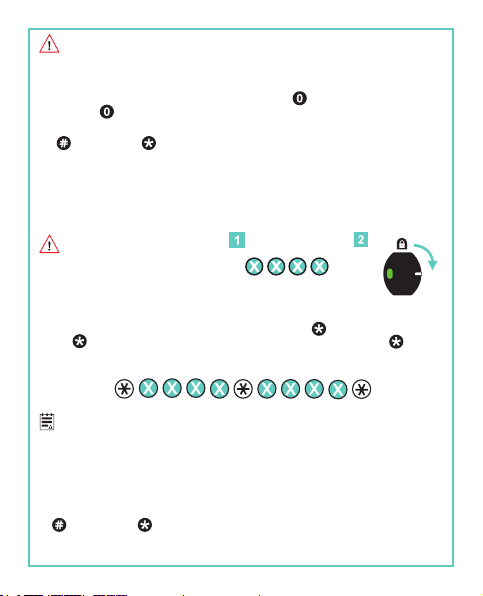
CHANGING THE BATTERY:
Lock operates on a 3V lithium coin cell CR2450 battery located on back side of
device. Remove screw located on cover of battery and replace it with new battery.
Battery life is up to 10 years. The red LED light blinks 5 times after each operation
when battery is low and it is possible to open and close lock for 100-150 times
after you get the initial low battery warning.
0
Restoring factory settings: All factory default settings are restored (see program
menu). User password becomes <1-0-1-0> and master password becomes
<1-0-1-0-1-0>.
1
Locker mode: Factory default is Personal mode. Personal mode allows one 4-digit
code to be entered that would remain the same code for one user. Locker mode is
for multiple users whereby each user walks up to an open miniK10 and enters in their
own unique code to close the lock and then to open it again. When open, next user
enters in a new code, etc.
2Audible volume control: All audio warnings can be turned off if mute operation is
selected (except warning beeps).
3
Penalty operation: Prevents tampering of lock by unauthorized people. Lock is
blocked for 5 min if wrong password is entered three times consecutively. Factory
default is that this feature is not active.
4User code reset: Sets user factory default to <1-0-1-0>.
5
Service password: Lock can be opened with service password if user password is
forgotten. Factory service default password is <1-0-1-0-1>. No programming features
can be accessed with service password. Factory default is that this feature is not
active.
6Closing modes: Factory default - miniK10 does not require a password to lock. The
other option is it can require a password to lock.
7Door open warning: After door is open for one minute, lock gives an audible warning
to user with 8 beeps every 5 sec to notify user that the door has been left open.
8
Resetting user password: If the lock is opened with service password (and service
password is active), user password can be reset. (see program #5 on service
passwords). Factory default is that the service password access does not allow the
user password to be reset (only opens up the lock).
9
Blocking the lock: If lock opened with service password, it can be blocked from
further user password access.This would. insure service password is only used
to access locks for emergency lockouts. Master password access would then be
required to set up user password again (0-1 Factory default reset). Factory default
is that this feature is passive.

Page 9
MAINTENANCE:
- Clean front of lock with a mild damp cloth with detergent if needed.
- Do not use any hard or scratching cleanser.
- Do not clean with chemical materials that melt plastic (thinner, acetone, etc.)
- Be careful not to spill water on lock.
GENERAL WARNINGS:
- Read manual before using lock.
- Periodically check nuts and screws to be tightened.
- Do not over-tighten nuts or screws. Do not use an electric screw gun during
installation unless equipped with a torque adjuster.The maximum torque on
the cylinder screw is 2Nm.
- Set and test user and master password prior to installing the lock
- Change all default passwords with your own passwords.
- Common sense, but we must say it... Do not keep the passwords in the
cabinet where the lock is being installed!
- It is not possible to open lock if installed and you forget the user and master
password.
- Lock gives a warning beep when incorrect passwords have been entered
in repeatedly.
- Not possible for front side of lock to be opened by breaking or trying to force
open lock.
- Use CR2450 3.0V Lithium batteries.
- Remember that battery consumption is high
when programs 2, 3, and 7 are active.
CAMS:
- Two cams are included
- Cams can be placed at
increments of 90 degrees
- The Stop Cam (#4) in installation
instructions can be positioned for
turning the cam clockwise or counter-clockwise
OTHER:
Battery failure override- The miniK10 has 2 external nodes surrounding the red and
green indicator lights where an external battery can be connected long enough to
enter in the correct code to open the lock allowing new batteries to be installed.
ATTENTION!
In case of any failure, inform the vendor in writing of the detailed description of the
failure. In case of any intervention in the device, such as attempting to repair the
device, the device gets OUT OF WARRANTY.
Cam
Placement
7/8” Straight Cam
22mm
1-1/2” Straight Cam
38mm

Page 10
LIMITED WARRANTY:
Kilitronik offers a one year limited warranty all products to be free from
manufacturing defects in materials and workmanship. This warranty does
not cover the battery, lost combinations or damages caused by improper
mounting, improper or unreasonable use.
LIABILITY LIMITS:
This is a limited warranty and is in lieu of all other warranties (including
the implied warranties of merchantability and tness for use) and under no
circumstances shall Kilitronik be liable for any incidental or consequential
damages or losses.
TECHNICAL SPECIFICATIONS:
ATTENTION: (*) (Battery life may vary in accordance with battery brand,
programming parameters and environmental conditions of the product
is used.)
ATTENTION: Remember to write down your passwords after
programming and prior to installing lock.It is not possible to open lock if it
is in installed and you forget your passwords.
ATTENTION: miniK10 is made for only interior usage.
Weight 71 g (2.5 oz) (excluding cam and mounting)
Key Pad Silicone Keypad with metal dome
Operating Temperature +10 / +50 °C (50 - 122 °F)
Storage Temperature +0 / +60 °C (32 - 140 °F)
Operating Moisture 20% - 80% Rh (without condensation)
Replaceable Battery 3V Lithium CR2450
Battery Life (*) up to 10 years (for 10 uses a day)
LIGHT AND AUDIO NOTIFICATION:
Password is accepted Green LED blinks with 2 repeated audio warnings.
Wrong password Red LED blinks with 4 repeated audio warnings.
Low batterty Red LED blinks 5 times after each operation.
Lock is open 1 min after door is opened, lock gives audible warning
8 times every 5 sec.

QUICK INFO
OPENING WITH USER MASTER PASSWORD
OPENING/CLOSING WITH USER PASSWORD
DEFAULT PASSWORDS
CHANGING MASTER PASSWORD
CHANGING USER PASSWORD
Opening direction depends on which to type of door miniK10 is installed. All opening
illustrations depict right handed door installation. Page 11
ATTENTION:
These are default
settings by the
factory. Once they
are changed, be
sure to write down
your new code!

Vemus Endüstriyel Elektronik San. Ve Tic. Ldt. Şti.
NOSAB Zeytin C.14 16220 Nilüfer / BURSA
+ 90 224 411 10 30
+ 90 224 411 10 31
and are trademarks of VEMUS Endüstriyel Elektronik Ltd. Şti. Rev.01 011 580 0425
www.kilitronik.com
Hospitals
Spa
and
Baths
Schools
In
Mailboxes
Sports Halls
Staff Lockers
unique electronic cam lock
Table of contents
Other Vemus Lock manuals