Vemus Kilitronik MiniK 10p User manual

unique electronic cam lock
cabinets lockers boxes
Please read this
manual before using
the miniK 10p

INDEX
Introduction
Initial Setup
Assign Master Card
Selecting Operation Option Of The mini K10p
Assign or Delete Service Cards
Assign User Card / Cards
Deleting User Card
Operating Instructions
Individual Operation With Card To Lock / Unlock
One Time Use Operation With Card To Lock / Unlock
Cardless Individual Operation
- Change Password
- Unlock With Password
- Unlock With Cards
- Lock With Password
- Lock With Cards
Cardless One Time Use Operation
- Lock With Password
- Lock With Card
- Unlock With Password
- Unlock With Cards
Programming Instructions
Light And Audio Warnings
Program Table
Maintenance
General Warnings
Limited Warranty
Liability Limits
Technical Specifications
Thank You
Quick Info
3
4
4
4
5
5
5
6
6
6-7
7
7
7
7
8
8
8
8
8
9
9
10-11
11
12
13
13
14
14
14
14
15

INTRODUCTION
1. Red LED
2. Green LED
3. Keypad
4. Lock Body
5. Closing Position
6. Handle Indicator
7. Opening Position
8. Handle
9. Mounting Nut
10. Lock Body
11. Battery Cover
12. Battery Cover Screw
13. ID Label
14. Hand Knob Frame
15. Cam
16. Cam Screw
17. Cylinder Nut
Page 3
7
Back
Front
11
12
15
9
14
16
17
13
10
DESCRIPTION:
Besides the stylish and enriching design of the K10P cabinet lock, there are
various features that make the lock different from others, such as allowing to
use with wet hands, easy and quick installation at wood and steel cabinets, easy
application at existing cabinets, easy application at right/left cabinet doors, higher
battery life with very low energy consumption, high reliability and operating with
a contactless card.

USAGE:
Contactless card lock can be used with three types of cards: “User Card, Service
Card and Master Card”. Also, the lock can be used with a password by selecting
the user card free operation. Service card is passive by default. You should
center the card when holding over the handle to enable accurate reading. Since
the device enters the sleep mode to offer low energy consumption, you need to
wake the lock up by pressing any button before each operation.
INITIAL SETUP:
•
Assign Master card:
1- Press , two tone beep is heard.
2- And then present the master card to the handle until one tone beep is heard
and green led blinks.
•
Selecting Operation option of the mini K10p:
1- Press , present the master card to the handle and press , green
and red leds blink.
2- Press 1 for selecting operation options. And then
Press 0 for Individual operation with card.
Press 1 for One time use operation with card.
Press 2 for cardless Individual operation.
Press 3 for cardless One time use operation.
12
12
Page 4
This step is valid if there
is no assigned Master
Card before.

•
Assign/Delete Service card / cards: (If you don't need to use any service
card, skip this step)
1- Press , present the master card to the handle and press , green
and red leds blink.
2- Press 5 for selecting service card assign / delete option. And then
Press 0 for All service cards are deleted.
Press 1 for Assignment of 1. service card.
Press 2 for Assignment of 2. service card.
Press 3 for Assignment of 3. service card.
•
Assign User card / cards : (If you don't need to use any user card, skip this
step, when individual operation with card option is selected)
1- Press and then present master card to the handle, press again.
2- Then enter the sequence number of user card
3- Present that card to lock.
•
Deleting User card: (If you don't need to use any user card, skip this step,
when individual operation with card option is selected)
1- Press and then present master card to the handle, press .
2- Then enter the sequence number of user card.
13
2
Sequence
Number
12
Sequence
Number
Page 5
12

OPERATING INSTRUCTIONS
Individual operation with card (if selected)
To Unlock:
1- Press any number button for wake the lock up.
2- Present any assigned user card / master card / service card to the
handle in 3 seconds
3- turn the handle to the unlocked position.
To Lock:
1- Press any number button for wake the lock up.
2- Present any assigned user card / master card to the handle
in 3 seconds
3- Turn the handle to the locked position.
One time use operation with card (if selected)
To Lock:
1- Press any number button for wake the lock up.
2- Present any card / master card to the handle in 3 seconds
3- Turn the handle to the locked position.
31 2
Page 6

To Unlock:
1- Press any number button for wake the lock up.
2- Present any card / master card / service card to the handle in 3seconds
3- Turn the handle to the unlocked position.
Cardless individual operation (if selected)
Change Password: (default “1010”)
1- Press and then enter the old password by pressing number buttons,
press again.
2- And then enter the new password by pressing number button, press
To Unlock with Password: (default “1010”).
1- Enter the user password. 2- Turn the handle to the unlocked position.
To Unlock with Cards:
1- Press button for wake the lock up.
2- Present master card / service card to the handle in 3 seconds
3- Turn the handle to the unlocked position.
31 2
NEW PASWORD
OLD PASSWORD
1 2
32
2
1
USER PASSWORD
Page 7

To Lock with Password: (default “1010”).
1- Enter the user password. 2- Turn the handle to the locked position.
To Lock with Card:
1- Press button for wake the lock up.
2- Present master card to the handle in 3 seconds
3- Turn the handle to the locked position.
Cardless one time use operation (if selected)
To Lock with Password: (default “1010”)
1- Enter the new password. 2- Turn the handle to the locked position.
To Lock with Card:
1- Press button for wake the lock up.
2- Present master card to the handle in 3 seconds
3- Turn the handle to the locked position.
2 3
2
ONE TIME PASSWORD
1
2
1
USER PASSWORD
2 3
1
Page 8

To Unlock with Password:
1- Enter the same password with locking operation.
2- Turn the handle to the unlocked position.
To Unlock with Cards:
1- Press button for wake the lock up.
2- Present master card / service card to the handle in 3 seconds
3- Turn the handle to the unlocked position.
2
1
ONE TIME PASSWORD
31 2
Page 9
The unlocking direction depends on the type of door where miniK 10p
is used. All locking and unlocking illustrations depict right handed door
installation.

Page 10
PROGRAMMING INSTRUCTIONS
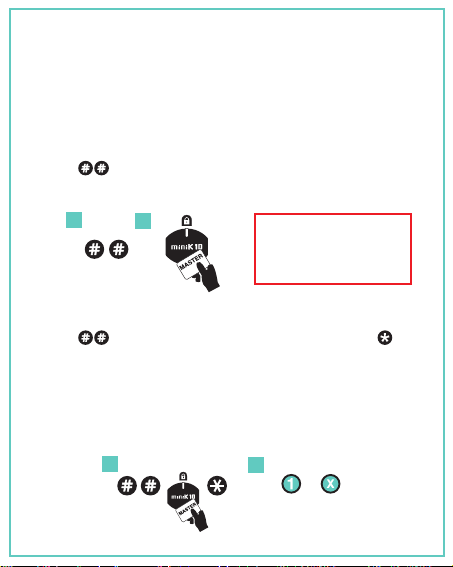
1- Press , present the master card and then press , green and red
leds blink.
2- Enter the program number to be customized and then enter the selected
settings number. (Press Program Number and then Selection Number)
Restore Default Settings: Press 0 - 1
Default Settings are :
One time use operation with card, audible operation, penalty operation is not
active, service card is not active, locking with password, door open warning is
not active, resetting user password with service card usage is not active, blocking
the lock is not active.
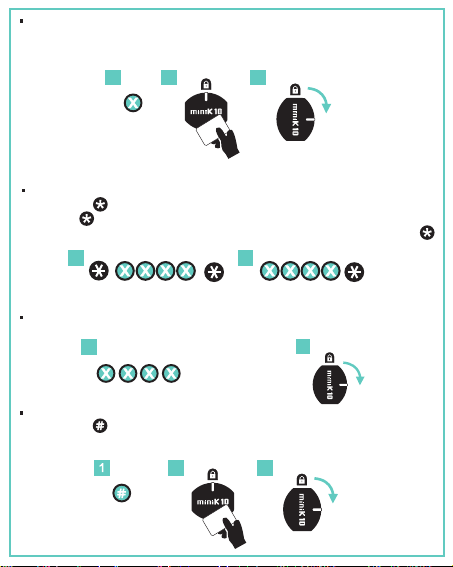
Mute Operation: Press 2 - 0
All audio warnings can be turned off if mute operation is selected (except
warning beeps).
Audible Operation: Press 2 - 1
Button feedback, warnings and confirmation are audible.
Penalty Operation: Press 3 - 1
Prevents tampering of lock by unauth orized people. Lock is blocked for 5
minutes if wrong password / card is entered three times consecutively.
Factory default is that this feature is not active. Press 3 - 0
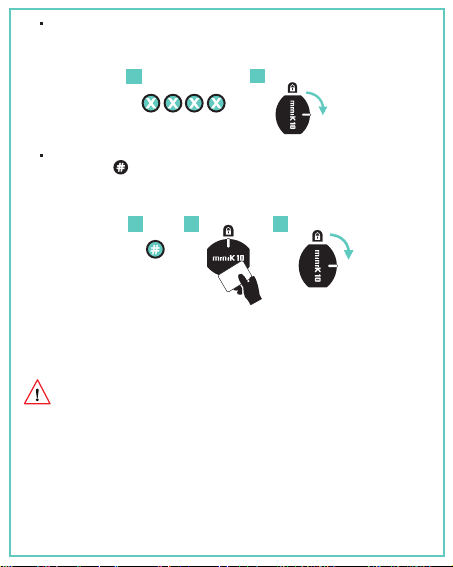
Delete All User Cards: Press 4 - 0
It deletes all user cards assigned in the Individual operation with card option.
Reset User Password: Press 4 - 1
User password is restored to default “1010” in the Cardless individual operation
option.
12

Locking with password / card: (1) Press 6 - 0
Locking operation require a password / card to lock.
Automatic Locking (without password/card): (1) Press 6 - 1
Locking operation does not require a password / card to lock.
Warning of open door : (1) Press 7 - 1
After door is open for one minute, lock gives an audible warning to user with 8
beeps every 5 seconds to notify user that the door has been left open.
Factory default is that this feature is not active. Press 7 - 0
Resetting User Password with Service card usage: (1), (2) Press 8 - 1
When the lock is unlocked with the service card, the user password is reset.
The user password is restored to default, which is “1010”.
Factory default is that this feature is not active. Press 8 - 0
Blocking the lock : (2) Press 9 - 1
If lock opened with service card, it can be blocked from further user card
access.This would insure service card is only used to access locks for emergency
lockouts. Master card access would then be required to set up user card again.
Factory default is that this feature is not active. Press 9 - 0
(1): valid for individual operation with card or cardless individual operation options.
(2): valid if any service card is active.
LIGHT AND AUDIO WARNINGS:
Password/card is accepted :Green LED blinks with 2 repeated audio warnings.
Wrong password / card : Red LED blinks with 4 repeated audio warnings.
Low batterty : Red LED blinks 5 times after each operation.
Lock is open : 8 audio warnings every 5 seconds after one
minute of opening the lock.
Page 11

0 1
Program No
Option
Factory Settings
Prg No 1-1: One time use operation with card
Prg No 2-1: Audible beeps and confirmations
Prg No 3-0: Penalty operation PASSIVE
Prg No 4-0: Delete all user card
Prg No 5-0: Service card PASSIVE
Prg No 6-0: Locking with password
Prg No 7-0: Warning of open door PASSIVE
Prg No 8-0: Resetting User Password with Service card usage PASSIVE
Prg No 9-0: Lock block PASSIVE (if service card is active)
Delete all user cards.
0
0
1
0
1
Penalty ACTIVE
Mute Operation
Audible Operation
Penalty PASSIVE
0
1
Individual Operation with card
One time Use Operation with card (locker mode for multiple user)
Cardless Individual Operation
Cardless One time use Operation (locker mode for multiple user)
User password is restored to default, which is “1010”.
1
1
0
1
0
1
0
1
0
1
0
Block the Lock PASSIVE (if service card is active)
Block the Lock ACTIVE (if service card is active)
Service Card PASSIVE / DELETE
Assignment of 1.Service Card
Locking with Password
Automatic Locking
Warning of door open PASSIVE
Warning of door open ACTIVE
Resetting User Password with Service card usage PASSIVE
Resetting User Password with Service card usageACTIVE
Assignment of 2.Service Card
Assignment of 3.Service Card
Page 12

MAINTENANCE:
- Clean front of lock with a mild damp cloth with detergent if needed.
- Do not use any hard or scratching cleanser.
- Do not clean with chemical materials that melt plastic (thinner, acetone, etc.)
- Be careful not to spill water on lock.
GENERAL WARNINGS:
CAMS:
- Two cams are included-
- Cams can be placed at
increments of 90 degrees
- The Stop Cam (#4) in
installation instructions
can be positioned for turning
the cam clockwise or counter-clockwise
OTHER:
Battery failure override- The miniK 10 has 2 external nodes surrounding the red
and green indicator lights where an external battery can be connected long enough
to enter in the correct code to open the lock allowing new batteries to be installed.
ATTENTION!
In case of any failure, inform the vendor in writing of the detailed description of
the failure. In case of any intervention in the device, such as attempting to repair
the device, the device gets OUT OF WARRANTY.
- Read manual before using lock.
- Periodically check nuts and screws to be tightened.
- Do not over-tighten nuts or screws. Do not use an electric screw gun during
installation unless equipped with a torque adjuster.The maximum torque on
the cylinder screw is 25Nm.
- Set and test user and master password prior to installing the lock
- Change all default passwords with your own passwords.
- Common sense, but we must say it... Do not keep the passwords in the
cabinet where the lock is being installed!
- It is not possible to open lock if installed and you forget the user and master
password.
- Lock gives a warning beep when incorrect passwords have been entered
in repeatedly.
- Not possible for front side of lock to be opened by breaking or trying to force
open lock.
- Use CR2450 3.0V Lithium batteries.
- Remember that battery consumption is high when programs 2, 3, and 7 are
active.
Cam
Placement
7/8" Straight Cam
22mm
1-1/2" Straight Cam
38mm
Page 13

Congratulations for making this eco-friendly choice! By purchasing
a miniK10, you will prevent additional batteries going to the landfills
over the next 10 years. With its smart technology, the miniK10
only requires one battery over a 10 year period. (*)This period
may be reduced according to battery performance, environmental
conditions and frequency of use.
Thank you
LIMITED WARRANTY:
Kilitronik offers a one year limited warranty all products to be free from
manufacturing defects in materials and workmanship. This warranty does
not cover the battery, lost combinations or damages caused by improper
mounting, improper or unreasonable use.
LIABILITY LIMITS:
This is a limited warranty and is in lieu of all other warranties (including the
implied warranties of merchantability and fitness for use) and under no
circumstances shall Kilitronik be liable for any incidental or consequential
damages or losses.
ATTENTION: (*)(Battery life may vary in accordance with battery brand ,
programming parameters and environmental conditions of the product is
used.)
ATTENTION: Remember to write down your passwords after programming
and prior to installing lock.It is not possible to open lock if it is in installed and
you forget your passwords.
ATTENTION: miniK 10 is made for only interior usage.
TECHNICAL SPECIFICATIONS:
2.5 oz (71 g) (excluding cam and mounting)
20% - 80% Rh (without condensation)
Battery Life (*) 10 years (for 10 uses a day)
Weight
Key Pad
Operating Temperature
Storage Temperature
Operating Moisture
Replaceable Battery
Silicone Keypad with metal dome
14 - 158 F (-10 - 70 C)
3V Lithium CR2450
32 - 122 F (0 - 50 C)
Page 14

QUICK INFO
If cardless individual operation option or cardless one time use operation option is
selected , you should press button at first to lock and unlock by using the master
card.
LOCKING
/
UNLOCKING WITH USER CARD
LOCKING
/
UNLOCKING WITH MASTER CARD
12
12
12
12
Page 15

www.kilitronik.com
Hospitals
Spa
and
Baths
Sports Halls
In
Mailboxes
Staff Lockers
Schools
eco-friendly
Vemus Endüstriyel Elektronik San. Ve Tic. Ldt. fiti.
NOSAB . Zeytin C.14 16140 Nilufer / BURSA
Phone : 90 224 411 10 30
Fax : 90 224 411 10 31
011 580 0505 15.02.05
unique electronic cam lock
in every area of life
Table of contents
Other Vemus Lock manuals
Popular Lock manuals by other brands

Major Manufacturing
Major Manufacturing HIT-66-200 instructions

LEHMANN
LEHMANN M300 LEGIC L043-A01 operating instructions

COMPX
COMPX Stock Locks C3535 Dimensional drawing

Schlage
Schlage F-Series installation instructions

Windsor
Windsor 1331 Fitting instructions

National Cabinet Lock
National Cabinet Lock C8108 Dimensional drawing