Venturer PLV76198E User manual

19” LCD TV
PLV76198E
OWNER’S MANUAL
PLV76198S23E10 IB ENG.indd 1 9/8/2009 9:57:23 AM

GB - 2
CAUTION:
•DANGER OF EXPLOSION IF BATTERY IS
INCORRECTLY REPLACED. REPLACE ONLY
WITHTHESAMEOREQUIVALENTTYPE.
•TO PREVENT ELECTRIC SHOCK, MATCH
WIDE BLADE OF PLUG TO WIDE SLOT OF WALL
OUTLET,THENFULLYINSERT.
• USE OF CONTROLS OR ADJUSTMENTS OR
PERFORMANCE OF PROCEDURES OTHER THAN
THOSE SPECIFIED MAY RESULT IN HAZARDOUS
RADIATIONEXPOSURE.
WARNING:
• Toreducetheriskofreorshockhazard,donotexpose
thisunittorainormoisture.
• Mainplugisusedasdisconnectdeviceanditshould
remainreadilyoperableduringintendeduse.
• Theunitshallnotbeexposedtodrippingorsplashing
andthat noobjects lledwith liquids,such asvases,
shallbeplacedonunit.
• In order to disconnected the unit from the mains
completely,theACpowercordshouldbedisconnected
fromthemainssocketoutletcompletely.
• Batteryshallnotbeexposedtoexcessiveheatsuchas
sunshine,reorthelike.
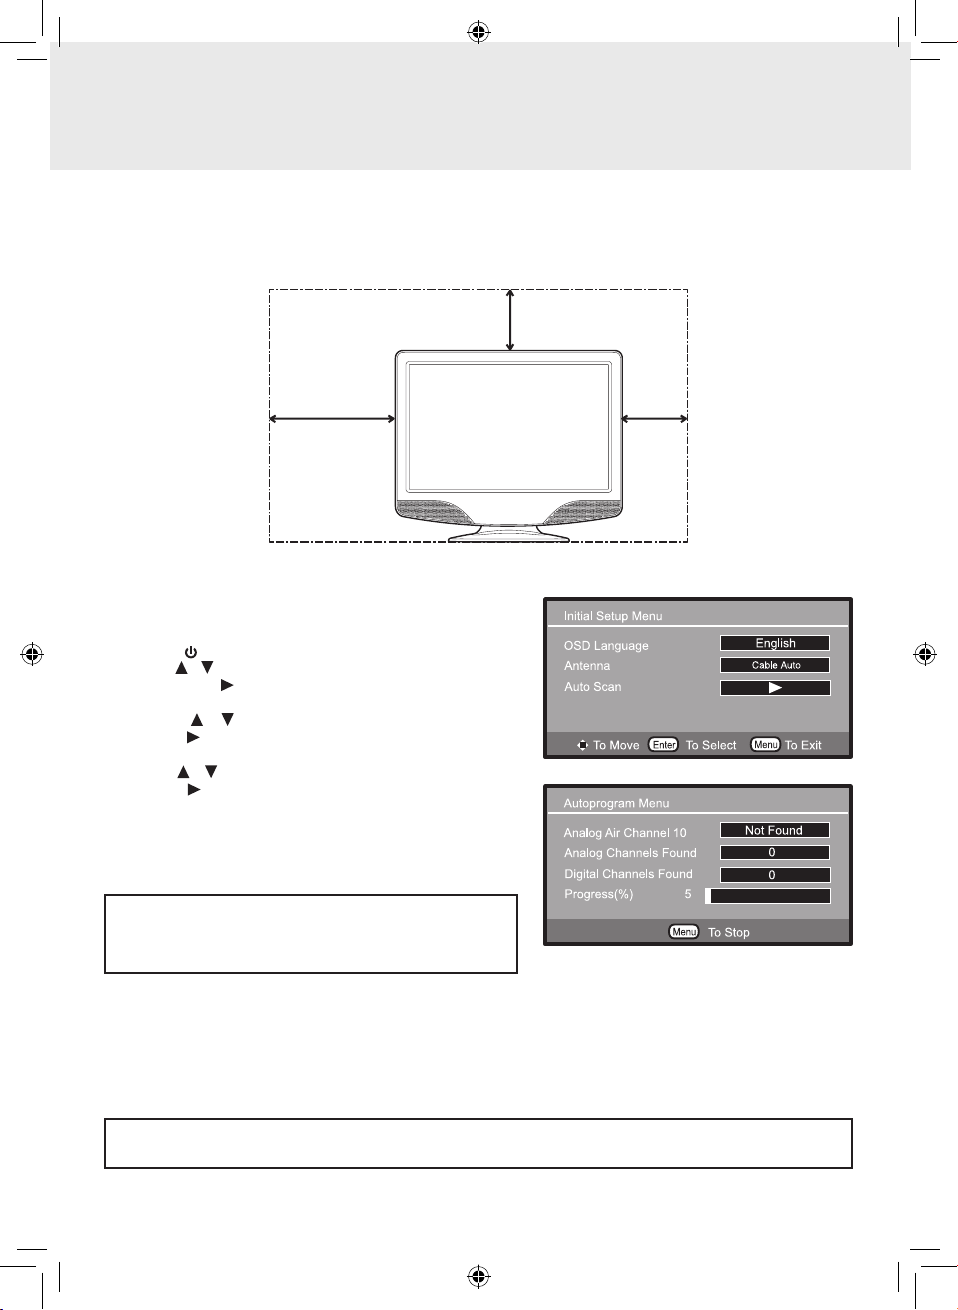
PLACEMENT INFORMATION
• Donotusethisunitinplaceswhichareextremelyhot,
cold,dustyorhumid.
• Do not restrict the air ow of this unit by placing it
somewhere with poor air ow, by covering it with a
cloth,byplacingitonbeddingorcarpeting.
SAFETY INFORMATION
• WhenconnectingordisconnectingtheACpowercord,
grip the plug and not the cord itself. Pulling the cord
maydamageitandcreateahazard.
• Whenyouarenotgoingtousetheunitforalongperiod
oftime,disconnecttheACpowercord.
CONDENSATION INFORMATION
• Whenleftinaheatedroomwhereitiswarmanddamp,
water droplets or condensation may form inside the
equipment.Whenthereiscondensationinsidetheunit,
theunitmaynotfunctionnormally.Lettheunitstandfor
1-2hoursbeforeturningthepoweronorgraduallyheat
theroomandlettheunitdrybeforeuse.
RATING PLATE LOCATION
Theratingplateislocatedontherearoftheunit.
FCC STATEMENTS
This device complies with Part 15 of the FCC Rules.
Operationissubjecttothefollowingtwoconditions:(1)This
device may not cause harmful interference, and (2) This
device must accept any interference received, including
interferencethatmaycauseundesiredoperation.
Thisequipmenthasbeentestedandfoundtocomplywith
thelimitsforaClassBdigitaldevice,pursuanttoPart15
of the FCC Rules. These limits are designed to provide
reasonable protection against harmful interference in a
residentialinstallation.Thisunitgenerates,usesandcan
radiate radio frequency energy and, if not installed and
used in accordance with the instructions, may cause
harmful interference to radio communication. However,
there is not guarantee that interference will not occur in
a particular installation. If this unit does cause harmful
interference to radio or television reception, which can
bedeterminedbyturningtheunitoffandon,theuseris
encouraged to try to correct the interference by one or
moreofthefollowingmeasures:
- Reorientorrelocatethereceivingantenna.
- Increasetheseparationbetweentheunitandreceiver.
- Connecttheunitintoanoutletonacircuitdifferentfrom
thattowhichthereceiverisconnected.
- Consult the dealer or an experienced radio/TV
technicianforhelp.
- Shieldedcablesmustbeusedwiththisunittoensure
compliancewiththeClassBFCClimit.
- This television receiver provides display of television
closed captioning in accordance with Section 15.119
oftheFCCrules.
SAFETY PRECAUTIONS
WARNING:Changesormodicationstothisunit
notexpresslyapprovedby theparty responsible
for compliance could void the user authority to
operatetheunit.
DO NOT EXPOSE THIS UNIT TO RAIN OR MOISTURE
AVIS RISQUE DE CHOC ÉLECTRIQUE -NE PAS OUVRIR
The lightning flash with an arrowhead symbol,
within the equilateral triangle, is intended to
alert the user to the presence of uninsulated
"dangerous voltage" within the product's
enclosure that may be of sufficient magnitude
to cause an electric shock.
The exclamation point within the equilateral
triangle is intended to alert the user to
the presence of important operating and
maintenance (servicing) instructions in this
owner manual.
caution
RISK OF ELECTRIC SHOCK
DO NOT OPEN
WARNING: TO REDUCE THE RISK OF ELECTRIC
SHOCK, DO NOT REMOVE COVER (OR BACK).
NO USER-SERVICEABLE PARTS INSIDE. REFER
SERVICING TO QUALIFIED PERSONNEL.
The symbol for Class II
(Double Insulation)
PLV76198S23E10 IB ENG.indd 2 9/8/2009 9:57:24 AM

GB - 3
1) Readtheseinstructions.
2) Keeptheseinstructions.
3) Heedallwarnings.
4) Followallinstructions.
5) Donotusethisapparatusnearwater.
6) Cleanonlywithadrycloth.
7) Donotblockanyventilationopenings.Installinaccordancewiththemanufacturer’sinstructions.
8) Do not install near any heat sources such as radiators, heat registers, stoves, or other apparatus (Including
ampliers)thatproduceheat.
9) Donotdefectthesafetypurposeofthepolarizedorgrounding-typeplug.Apolarizedplughastwobladeswith
onewiderthantheother.Agroundingtypeplughastwobladesandathirdgroundingprong.Thewidebladeorthe
thirdprongisprovidedforyoursafety.Iftheprovidedplugdoesnottintoyourwalloutlet,consultanelectrician
forreplacementoftheobsoleteoutlet.
10) Protectthepowercordfrombeingwalkedonorpinchedparticularlyatplugs,conveniencereceptacles,andthe
pointwheretheyexitfromtheapparatus.
11) Onlyuseattachments/accessoriesspeciedbythemanufacturer.
12) Useonlywiththecart,stand,tripod,bracket,ortablespeciedbythemanufacturer,orsoldwith
theapparatus.Whenacartisused,usecautionwhenmovingthecart/apparatuscombinationto
avoidinjuryfromtip-over.
13) Unplugthisapparatusduringlightningstormsorwhenunusedforlongperiodsoftime.
14) Referall servicingto qualied service personnel. Servicingis requiredwhen theapparatus hasbeen damaged
inanyway,suchasthepowercordorplugisdamaged,liquidhasbeenspilledorobjectshavefallenintothe
apparatus,theapparatushasbeenexposedtorainormoisture,doesnotoperatenormally,orhasbeendropped.
IMPORTANT SAFETY INSTRUCTIONS
PLV76198S23E10 IB ENG.indd 3 9/8/2009 9:57:24 AM

GB - 4
TABLE OF CONTENTS
SAFETY PRECAUTIONS ............. 2
IMPORTANT SAFETY
INSTRUCTIONS........................... 3
TABLE OF CONTENTS ................ 4
QUICK INSTALLATION ................ 5
TURNINGONTHEUNITFORTHEFIRST
TIME..............................................................5
ACCESSORIES ............................ 6
GETTING STARTED ..................... 6
USINGTHEREMOTECONTROL.................6
CONTROL REFERENCE
GUIDE ....................................... 7-8
REMOTECONTROL.....................................7
TV..................................................................8
CONNECTIONS ..................... 9-10
CONNECTINGATVANTENNA/CABLE/
SATELLITE.....................................................9
CONNECTINGTOAVCR/CAMCORDER/
VIDEOGAMESYSTEM/CABLE/SATELLITE
SYSTEM........................................................9
CONNECTTHEPOWERCORD..................10
USING HEADPHONES .............. 10
INSTALLATION........................... 11
INSTALLING/REMOVINGTHEBASE
STAND.........................................................11
MOUNTINGONTHEWALL........................11
TV SETUP ............................. 12-13
PICTUREMENU..........................................12
AUDIOMENU..............................................12
TVMENU.....................................................13
SETUPMENU.............................................13
TROUBLESHOOTING GUIDE.... 14
MAINTENANCE ......................... 14
LIMITED WARRANTY ........... 15-16
PLV76198S23E10 IB ENG.indd 4 9/8/2009 9:57:24 AM

GB-5
QUICK INSTALLATION
Whenyouturnonyourtelevisionsetforthersttime,besuretoplaceitonasolidstablesurface.Toavoiddanger,do
notexposetheTVtowater,oraheatsource(e.g.lamp,candle,radiator).Donotobstructtheventilationgridattherear
andbesuretoleavesufcientgapsaroundtheunitasshown.
1.Connect an antenna or Cable TV COAX cable to the TV's
antennainputjack.
2.Connectthepowercord.
3.Pressthe /ONbuttontoturnontheunit.
4.Usethe / buttontohighlightOSD Language,thenpress
the ENTER or button to select the menu language from
English/Español/Français.
5.Press the / button to highlight Antenna, then use the
ENTERor buttontoselect“Air”,“CableSTD”,“CableHRC”,
“CableIRC”or“CableAuto“.
6.Use the / button tohighlightAuto Scan, thenpressthe
ENTERor buttontoconrm.
7.The unit will immediately search all channels for those with
adequatesignalstrengthandstorethosechannelswithsignals
inmemory.Theunitwilltakeafewminutestonishautoscan
and after this is completed, the unit will switch to the rst
channelfound.
TURNING ON THE UNIT FOR THE FIRST TIME
Thersttimeyouturnontheunit,theunitwillenterthesetupmode.Youcaneasilyfollowthepromptmessageonthe
screentocompletebasicTVsettings.
MakesuretheTVantennaorCATVcablehasbeenconnectedproperlytotheTVantennainputjackontherearof
thesystem.
IfyousubscribetoCableTVService,werecommendyoupick
"CableAuto",howeveryoumightndyougetimprovedresults
using"CableSTD","CableIRC",or"CableHRC"-theseare
differentstandardsusedbyvariousCableSystems.
2 3/8”
2 3/8”
7 7/8”
PLV76198S23E10 IB ENG.indd 5 9/8/2009 9:57:24 AM

GB - 6
ACCESSORIES
PLEASE CHECK AND IDENTIFY THE SUPPLIED ACCESSORIES.
Remotecontrol(withbatteries)............................................................................................................................ x1
GETTING STARTED
USING THE REMOTE CONTROL
• Pointtheremotecontrolattheremotesensorlocatedontheunit.
• When there is a strong ambient light source, the performance of the infrared remote sensor may be degraded,
causingunreliableoperation.
• Therecommendedeffectivedistanceforremoteoperationisabout16feet(5meters).
BATTERY REPLACEMENT
Whenthebatteriesbecomeweak,theoperatingdistanceoftheremotecontrolisgreatlyreducedandyouwillneedto
replacethebatteries.
CAUTION:
Dangerofexplosionifbatteryisincorrectlyreplaced.Replaceonlywiththesameorequivalenttype.
WARNING:
•Donotdisposeofbatteriesinare.Batteriesmayexplodeorleak.
•Batteriesshallnotbeexposedtoexcessiveheatsuchassunshine,reorthelike.
TO INSTALL THE BATTERIES
1.Openthebatterydoor. 2.Insert2xAAAbatteries
NOTES
• Iftheremotecontrolisnotgoingtobeusedforalongtime,removethebatteriestoavoiddamagecausedbybattery
leakagecorrosion.
• Do not mix old and new batteries. Do not mix ALKALINE, standard (CARBON-ZINC) or rechargeable (NICKEL-
CADMIUM)batteries.
• Alwaysremovebatteriesassoonastheybecomeweak.
• Weakbatteriescanleakandseverelydamagetheremotecontrol.
PLV76198S23E10 IB ENG.indd 6 9/8/2009 9:57:24 AM

GB - 7
CONTROL REFERENCE GUIDE
1) MUTEButton
Presstoturnoffthesound.
2) MENUButton
Presstodisplaytheon-screenmenuorswitchbackto
thepreviousmenuscreen.
3) CURSOR( , , , )Buttons
Use to highlight selections on a menu screen and
adjustcertainsettings.
ENTERButton
Conrmselectiononamenuscreen.
4) DISPLAYButton
Presstodisplayinformationonthecurrentchannel.
5) VOL+/VOL-Button
Presstoincrease/decreasethevolume.
6) LASTCH
Press to switch repeatedly between the last two
channelsdisplayed.
7) STANDBY/ONButton
PresstoturnONtheunitorputitinSTANDBY(OFF)
mode.
8) FUNCTIONButton
PresstoswitchbetweenTV/AV.
9) LCDMODEButton
PresstoSelectfrompresetscreendisplaysettingsto
matchthetypeofshowyouarewatching.
10) CH /CH Buttons
Presstoselectthechannelupwardordownward.
11) NUMERICButtons
Press to enter numbers or go directly to a specic
channel.
12) •[dot]Button
Press to enter digital sub-channels with the numeric
buttons(i.e.11.3or12-1).
REMOTE CONTROL
PLV76198S23E10 IB ENG.indd 7 9/8/2009 9:57:24 AM

GB - 8
1. AUDIOIN(Left/Right)/VIDEOINjacks
2. /ONbutton
Turnstheunitonandoff.
3. MENUbutton
Enterstheon-screenTVmenu.
4. FUNCTIONbutton
SelectsTV/AV.
5. CH /CH buttons
PresstoconrmselectionsontheTVmenuscreenand / tochangeTVchannels.
6. VOL+/VOL-controls
Adjuststhevolumelevelandhighlightsselections(Left&Right)ontheTVmenuscreen.
7. ColorLCDscreen
8. Remotesensor
Pointtheremotecontrolhere.
Standbyindicator
9. Removablestand
10. Powercord
11. Headphonesjack
12. TVANTENNAterminal
ConnectsaTVantennaorCATVcable.
CONTROL REFERENCE GUIDE
TV
2
3
6
9
10
11 12
7
8
4
5
1
PLV76198S23E10 IB ENG.indd 8 9/8/2009 9:57:25 AM

GB-9
CONNECTIONS
CONNECTING A TV ANTENNA
Toviewtelevisionchannelscorrectly,asignalmustbereceivedfromoneofthefollowingsources:
- Anindoororoutdooraerialantenna
- Acablesystem
- Asatellitesystem
NOTE
Foroptimalreceptionofover-the-airTVbroadcasts,werecommendthatyouuseanexternalxedantenna.Ifusing
anindoorantenna,pleaseensurethatyoupurchaseanantennawithsufcientabilitytoreceivesignalsinyourhome.
Orientationandlocationoftheantennaistypicallycriticalforbestresults–youmayndthatplacementoftheantenna
nearawindow,orinanelevatedlocation,improvesperformance.
CONNECTING TO A VCR / CAMCORDER / VIDEO GAME SYSTEM / CABLE / SATELLITE
SYSTEM
ConnectanAUDIO/VIDEOcable(notincluded)asshown:
MakesureyouconnectthecablefromtheAUDIO/VIDEOOUTjackoftheotherequipmenttoAUDIO/VIDEOINjack
ofthisunit.
NOTE
Pleaserefertotheconnectedequipment’susermanualformoreinformation.
PLV76198S23E10 IB ENG.indd 9 9/8/2009 9:57:25 AM

GB - 10
CONNECTIONS
CONNECT THE POWER CORD
• ConnecttheACpowercordintoawalloutlet.
• Pressthe /Ibuttonontheunitorremotecontroltoturnontheunit.
NOTE
• BesuretheACpowercordisdisconnectedandallfunctionsareoffbeforemakingconnections.
• Makesurethatallthecomponentsareconnectedcorrectly.
• Topreventelectricalshock,matchwidebladeofplugtowideslotofwalloutlet,thenfullyinsert.
• Whenyouarenotgoingtousetheunitforalongperiodoftime,disconnectthepowercord.
USING HEADPHONES/EARPHONES
• Turndownthevolumebeforeconnectingheadphones/earphonestotheunit,thenadjustthevolumetoyourdesired
level.
• Whenheadphones/earphonesareconnected,nosoundwillcomefromthefrontspeakers.
NOTE
Avoidlisteningtosoundathighlevelsforprolongedperiodsoftime.Thismaybeharmfultoyouandmaycausehearing
loss.
Headphones/earphones
(1/8" [3.5mm] diameter plug)
PLV76198S23E10 IB ENG.indd 10 9/8/2009 9:57:25 AM

GB - 11
INSTALLATION
MOUNTING ON THE WALL
This unit is VESA-compliant, and is designed to be wall-mounted with a VESA-compliant 3” x 3” (75mm x 75mm)
mountingkitdesignedforat-panelTVs(soldseparately).Mountthisunitaccordingtotheinstructionsincludedinthe
mountingkit.
NOTE
Removethebasestandbeforemountingtheunitonthewall.
INSTALLING / REMOVING THE BASE STAND
WARNING:TheLCDDisplayisveryfragile,andmustbeprotectedatalltimeswhenremovingthebasestand.Besure
thatnohardorsharpobject,oranythingthatcouldscratchordamagetheLCDdisplay,comesintocontactwithit.
Do NOTexertpressureonthefrontoftheunitatanytimebecausethescreencouldcrack.
1.Disconnectallcablesorcordsconnectedtotheunit.
2.Laytheunitdownonaatsurfacewiththebacksidefacingup.Pleasemakesuretoplaceasoftcushionedmaterial
(suchasapilloworthickpieceoffoam)beneaththescreen.
3.Toinstallthebasestand,placethebasestandonthe
mountingslot,pushthestandtillitlocks.
4.Toremovethebase stand,keeppressingthelocking
areaofthebasestandandpulldownwardstorelease
thebasestand.
PLV76198S23E10 IB ENG.indd 11 9/8/2009 9:57:25 AM

GB - 12
TV SETUP
PictureMode: Selectfrompresetscreendisplaysettingstomatchthetypeofshowyouarewatching(Standard,
Soft,Movie&Personal).
Contrast: Adjustthecontrastofpicture.Thedarkportionsofthepicturebecomericherindarknessandthe
lightportionsbecomebrighter.
Brightness: Adjusttobrightenordarkenthewholepicture.
Sharpness: Adjustthesharpnessleveltoimprovedetailinthepicture.
Color: Adjustthecolorofthepicture.
Tint: Adjustnaturalskintonesinthepicturequality.
AspectRatio: Selectfrompresetaspectratiotomatchthetypeofshowyouarewatching(Full-screen,4:3,
Zoom,Wide&Auto*).*AutoisforDTVonly.
ColorTemperature: Adjustthe3colortemperatureofthepicture.ChoosefromNormal(balanced),Warm(redwhite)
orCool(bluewhite)modes.
AUDIO MENU
1.PresstheMENUbutton.
2.Usethe or buttontoselectAudiosetting.
3.PressENTERor buttontohighlightAudioMode,thenuse
the or buttontoselectotheroptions(AudioLanguage,
MTS,Bass,Treble&Balance).
4.UsetheENTERor buttontomakeadjustment.
5.Repeatsteps3to4toadjustotheroptions.
6.Press buttontoreturntothepreviousmenu.
7.ToexittheTVSETUPMENUandreturntothenormalscreen,
presstheMENUbutton.
PICTURE MENU
1.PresstheMENUbutton.
2.PressENTERor buttontohighlightPictureMode.
3.Use the or button to select other options (Contrast,
Brightness, Sharpness, Color, Tint, Aspect Ratio & Color
Temperature).
4.UsetheENTERor buttontomakeadjustment.Thescreenwill
adjusttoyourselectedsettingimmediately.
5.Repeatsteps3to4toadjustotheroptions.
6.Press buttontoreturntothepreviousmenu.
7.To exit the TV SETUP MENU and return to the normal screen,
presstheMENUbutton.
AudioMode: Selectfrompresetaudiosettings(Standard,Movie,Music&Personal)tomatchthetypeofshowyou
arewatching.
AudioLanguage:SelectfromEnglish/Spanish/French.(Availablefordigitalchannelsifmultipleaudiolanguagesare
broadcasted.)
MTS(MultiChannelTelevisionSound):SelectStereo/SAP(SecondaryAudioProgram)/Mono.
Bass: Adjustthebassrange.
Treble: Adjustthetreblerange.
Balance: Adjustthebalanceleveltowardtheleftorrightspeakers.
Note:
SomeTVstationsbroadcastaudioinmorethanonelanguage,theSAP(SecondaryAudioPrograms)featureallows
youtolistentothis,ifavailable.
PLV76198S23E10 IB ENG.indd 12 9/8/2009 9:57:26 AM

GB - 13
TV SETUP
TV MENU
1.PresstheMENUbutton.
2.Usethe or buttontoselectTVsetting.
3.PressENTER or buttontohighlightAntenna, then usethe
or buttontoselectotheroptions(DTVSignal,AutoScan,Auto
ScanAddCH,ChannelSkip&ChannelLabels).
4.UsetheENTERor buttontomakeadjustment.Thescreenwill
adjusttoyourselectedsettingimmediately.
5.Repeatsteps3to4toadjustotheroptions.
6.Press buttontoreturntothepreviousmenu.
7.To exit the TV SETUP MENU and return to the normal screen,
presstheMENUbutton.
NOTE
ChannelNo.: 2-69ChannelforAir,1-135ChannelforCATV.
Antenna: Select“Air, Cable STD, Cable HRC, Cable IRC & Cable Auto” toreceive over-the-airsignal /
cablesignal.
DTVSignal: Displaythesignalstrength(fordigitalTVchannelsonly).
AutoScan: Searchforavailablestationsandstoretheminmemory.
AutoScanAddCH: Searchformoreavailablestationsandaddtheminmemory.Thestationsstoredbeforearestill
kept.
ChannelSkip: Skipweakchannelsandthechannelsyoudon’tlike.
ChannelLabels: Displayandeditthechannellabel.
SETUP MENU
1.PresstheMENUbutton.
2.Usethe or buttontoselectSetupsetting.
3.Press ENTER or button to highlight Time Setting, then use
the or buttontoselectotheroptions(TimeSetting,Sleep
Timer, Password Setting, Parental Control, Closed Caption,
OSDLanguage&Reset).
4.UsetheENTERor buttontomakeadjustment.
5.Repeatsteps3to4toadjustotheroptions.
6.Press buttontoreturntothepreviousmenu.
7.ToexittheTVSETUPMENUandreturntothenormalscreen,
presstheMENUbutton.
TimeSetting: Selecttosetthetimemanuallyorautomatically.
SleepTimer: SettheLCDTVtoturnitselfoffwithinacertaintime(Off/5min/10min/15min/30min/60
min/90min/120min).
PasswordSetting: Entera4-digitpassword.Onceentered,thescreenwillpromptyoutoenternewpasswordand
conrmyournewpassword.
ParentalControl: Enterthe4-digitpasswordtosettheparentalcontrol.(Ifyouforgotthepassword,enter“8888”
tounlocktheparentalcontrol.)
OSDLanguage: SelectthemenulanguagefromEnglish/Español/Français.
Reset: Resetthedefaultsettings.
CLOSED CAPTION
CCMode: SelectclosedcaptionOn,OfforCCon
Mute.
AnalogClosedCaption: Selecttheanalogclosedcaption.
DigitalClosedCaption: Selectthedigitalclosedcaption.
DigitalCaptionStyle: Select Custom to activate the caption
styleitemsandsetyourdesireddetailed
settings.
Note : This function only works on programs broadcast with
captions.
PLV76198S23E10 IB ENG.indd 13 9/8/2009 9:57:26 AM

GB - 14
CLEANING THE UNIT
• BesuretoturntheunitoffanddisconnecttheACpowercordbeforemaintainingtheunit.
• Wipetheunitwithadrysoftcloth.Ifthesurfacesareextremelydirty,wipecleanwithacloththathasbeendipped
inaweaksoap-and-watersolutionandwrungoutthoroughly.Wipewithadrycloth.
• Neverusealcohol,benzine,thinner,cleaninguidorotherchemicals.DoNOTusecompressedairtoremovedust.
MAINTENANCE
SYMPTOM CAUSE (AND REMEDY)
TROUBLESHOOTING GUIDE
• CheckthattheACpowercordisconnected.
• Theunitisnotturnedon.
• Removeanyobstaclesbetweentheremoteandtheunit.
• Usetheremoteneartheunit.
• Pointtheremoteattheremotesensorontheunit.
• Replacethebatteriesintheremotewithnewones.
• Checkthelocationoftheantennaandadjustitifnecessary.
• Makesuretheantennacableisrmlyconnected.
• Makesureallinputcablesarermlyconnected.
• CheckthePICTUREMENUwithintheTVSETUPMENU.
• ChecktomakesuretheprogramyouarewatchingisbroadcastinColorandnotBlack
&White.
• Makesuretheunitispluggedinandturnedon.
• MakesureTVmodeisselected.
• Tryanewchanneltocheckforpossiblestationtrouble.
• Makesuretheantennaisconnectedproperly.
• Increasethevolume.
• Makesuretheantennaoraudiovideosourcedeviceisworkingproperly.
• Makesureallcablesarermlyconnected.
• Checkforlocalinterference.
• Make sure there are no unshielded electrical devices nearby that are causing
interference.
• Turnofftheunitfor30minutes,thentryagain.
Nopower.
The remote does not
function.
TV
Bad Picture (snow,
multipe images,
distortion,blurry)
Blackandwhitepicture.
Nopictureorsound.
Colored patches of
picture.
Specicationsandappearancearesubjecttochangewithoutnotice.
PLV76198S23E10 IB ENG.indd 14 9/8/2009 9:57:26 AM

GB-15
VENTURERELECTRONICS(“VENTURER”)makesthefollowinglimitedwarranty.Thislimitedwarrantyextendstothe
originalconsumerpurchaserandislimitedtonon-commercialuseoftheproduct.
NINETY (90) DAY PARTS & LABOR WARRANTY
VENTURERproductspurchasedintheUnitedStatesarewarrantedtobefreefromdefectsinmaterialsorworkmanship
foraperiodofninety(90)daysfromthedateoftheiroriginalretailpurchase.Iftheunitfailstoconformtothiswarranty,
wewillservicetheproductusingneworrefurbishedpartsandproducts,atVENTURER’ssolediscretion.
Duringaperiodofninety(90)daysfromtheeffectivewarrantydate,VENTURERwillprovide,whenneeded,service
labortorepairamanufacturingdefectatitsdesignatedServiceCenter.ToobtainwarrantyserviceintheUnitedStates,
youmustrstcallourCustomerSupportCenterat1-866-444-6478or1-800-252-6123,duringthehourslistedinthe
boxbelow.ThedeterminationofservicewillbemadebyVENTURERCustomerSupport.PLEASEDONOTRETURN
YOURUNITTOVENTURERWITHOUTPRIORAUTHORIZATION.Neworremanufacturedreplacementsfordefective
partsorproductswillbeusedforrepairsbyVENTURERatitsdesignatedServiceCenterforninety(90)daysfromthe
effectivewarrantydate.Suchreplacementpartsorproductsarewarrantedforanadditionalninety(90)daysfromthe
dateofrepairorreplacement.The CustomerwillberequiredtoshiptheunittotheServiceCenterindicatedatthe
timeCustomerSupportiscontactedtomakethenecessaryrepairs.Thecustomerisresponsibleforalltransportation
chargestotheservicefacility.
PACKAGING AND SHIPPING INSTRUCTION
WhenyousendtheproducttotheVENTURERservicefacilityyoumustusetheoriginalcartonboxandpackingmaterial
oranequivalentasdesignatedbyVENTURER.
LIMITED WARRANTY
YourResponsibility
(1) Youmustretaintheoriginalsalesreceipttoprovideproofofpurchase.
(2) ThesewarrantiesareeffectiveonlyiftheproductispurchasedandoperatedintheU.S.A.orCanada.
(3) Warrantiesextendonlytodefectsinmaterialorworkmanship,anddonotextendtoanyproductorpartswhich
havebeenlostordiscarded,ordamagetoproductorpartscausedbymisuse,accident,improperoperationor
maintenance,oruseinviolationofinstructionsprovidedwiththeproduct,ortoproductwhichhasbeenaltered
ormodiedwithoutauthorizationofVENTURER,ortoproductsorpartsthereofwhichhavehadtheserialnumber
removedorchanged.
OUT OF WARRANTY
In the event your product requires repair after the limited warranty period has expired, please contact our
CustomerSupportCenterat1-866-444-6478, 1-800-252-6123 or www.venturer.com.
Hours: Monday-Thursday: 9am - 7pm, Friday: 9am - 5pm, Saturday: 9am - Noon, Eastern time.
Important:Youareresponsibleforanytransportation,shippingorinsurancerelativetothereturnofproductto
ourProductReturnsCenter.
LIMITED WARRANTY
PLV76198S23E10 IB ENG.indd 15 9/8/2009 9:57:26 AM

GB - 16
All warranties implied by state law, including the implied warranties of merchantability and tness for a particular
purpose, are expressly limited to the duration of the limited warranties set forth above. With the exception of any
warrantiesimpliedbystatelawasherebylimited,theforegoingwarrantyisexclusiveandinlieuofallotherwarranties,
guarantees,agreementsandsimilarobligationsofmanufacturerorsellerwithrespecttotherepairorreplacementof
anyparts.InnoeventshallVENTURERbeliableforconsequentialorincidentaldamages.
Noperson,agent,distributor,dealerorcompanyisauthorizedtochange,modifyorextendthetermsofthesewarranties
inanymannerwhatsoever.ThetimewithinactionmustbecommencedtoenforceanyobligationofVENTURERarising
underthewarrantyorunderanystatute,orlawoftheUnitedStatesoranystatethereof,isherebylimitedtoninety(90)
daysfromthedateofpurchase.Thislimitationdoesnotapplytoimpliedwarrantiesarisingunderstatelaw.
Thiswarrantygivesyouspeciclegalrightsandyoumayalsohaveotherrights,whichmayvary,fromstatetostate.
Somestatesdonotallowlimitationonhowlonganimpliedwarrantylasts,whenanactionmaybebrought,orthe
exclusionorlimitationofincidentalorconsequentialdamages,sotheaboveprovisionsmaynotapplytoyou.
Formoreinformationonotherproductsandservices,pleasevisitourwebsiteatwww.venturer.com.
Important:Alsokeepyour“BillofSale”asproofofpurchase.
Serialno...........................................................................Invoiceno.............................................................................
Datepurchased...............................................................Dealername.........................................................................
FORSERVICEANDREPAIR,PLEASEVISITwww.venturer.com
LIMITED WARRANTY
811-761991W030
PrintedinChina
Asconcernsgrowabouttheenvironmentalimpactofoutdatedelectronicproducts,
Venturer Electronics is committed to being a part of the solution. Free of charge,
Venturer Electronics customers can return qualifying units to us for recycling.
For more details, please visit our website at www.venturer.com/recycle or
call1-800-252-6123.
PLV76198S23E10 IB ENG.indd 16 9/8/2009 9:57:26 AM
Table of contents
Other Venturer LCD TV manuals

Venturer
Venturer PLV16100 User manual

Venturer
Venturer 15" LCD TV PLV7615H User manual

Venturer
Venturer PLT37260 User manual

Venturer
Venturer PLV16198 User manual

Venturer
Venturer PLV36220S1 User manual

Venturer
Venturer PLV36199S1 User manual

Venturer
Venturer PLV76198 User manual

Venturer
Venturer PLV76156 User manual

Venturer
Venturer PLV1615S User manual

Venturer
Venturer PLV3117i User manual