manuals.online logo
Brands
  1. Home
  2. •
  3. Brands
  4. •
  5. Versahaul
  6. •
  7. Automobile Accessories
  8. •
  9. Versahaul VH-TRIFOLD User manual

Versahaul VH-TRIFOLD User manual

Problems?Questions?Callusat(888)818-9915BNK,Inc.9341S.StRd.39 Winamac,IN46996
©Ezra Distributing, Inc.
Patent Pending
BNK, INC warrants the carrier and related components. This warranty applies to any part found to be defecve due to material and/or
workmanship when inspected at the factory of BNK, Inc., Winamac, IN. BNK Inc. will, at its opon, repair or replace defecve parts to the
original purchaser at no charge other than transportaon. Sale receipt as proof of date of purchase is required, which will be returned. BNK,
Inc. assumes no liabilty for labor charges made in performance of this warranty.
The warranty periods are as follows from date of purchase:
CARRIER FOR 1 YEAR, VOID IF: frame is broken or bent due to abuse. example: (underside scraped abusively)
ALL WARRANTIES ARE VOID IF: the carrier has been rented, used under abnormal condions, or subjected to abuse, misuse, neglect, or
improper maintenance.
All warranes should be handled at point of purchase unless other arrangements are made.
BNK, Inc. is not liable for any damage claim or liability claim, personal or otherwise resulng from operaon of this carrier in any way. All
transportaon charges for items returned for warranty evaluaon and/or replacement are to be borne by the customer.
For one (1) year from the date of purchase, BNK, Inc. will repair or replace for the original purchaser, without charge, any part or parts are
manufactured by BNK, Inc. and found, upon examinaon at our factory in Winamac, to be defecve in materials and/or workmanship.
All transportaon charges on parts submied for replacement under this warranty must be borne by the purchaser. This warranty does not
apply to parts not manufactured by BNK, Inc. Their manufacturer may warrant these items. This warranty does not apply to any part which
has been damaged by accident, alteraon, abuse, improper adjustment, normal wear, or any other cause beyond our control.
Use of replacement parts other than genuine BNK, Inc. parts may impair the safety of your machine and void this warranty.
THIS WARRANTY IS VOID UNLESS THE PRODUCT REGISTRATION CARD IS FILLED OUT COMPLETELY AND RETURNED TO THE FACTORY AT
WINAMAC, IN. WITHIN TEN (10) DAYS OF PURCHASE.
OUR WARRANTY COVERS OUR PRODUCT FOR ONE YEAR. WE ARE NOT ABLE TO EXCHANGE USED VERSAHAUL CARRIERS FOR REFUNDS OR
NEW CARRIERS.
IMPORTANT
LIMITED WARRANTY
The Limited Warranty on the VersaHaul Carrier.
Reflector
Reflector
1st Secon Assembly
2nd Secon Assembly
3rd Secon Assembly Main Tube
Pin Lock
1
/4” Cap Nut
5
/16” Rivet
Rubber Washer
1
/4” Rod
*See Figure 1
Figure 1
Name Plate
Main Support Tube
*See Figure 1
*See Figure 1
*See Figure 1
NOTE: Versahaul carriers are aached with your standard Hitch Pin (not included).
(2) Reflector
(1) An-Tilt Lock Bracket
(1) 1st Secon Assembly (1) 2nd Secon Assembly (1) 3rd Secon Assembly
(4) Pin Lock (4) Rubber Washer(4) 1
/4” Cap Nut (4) 5
/16” Cap Nut (4) 5
/16” Rivet
*Most parts come preassembled.
PARTS
3/8"Wrench
TOOLS
To avoid risk of injury to yourself and others on the highway and/or property damage, read and follow all instrucons accompanying this product as well as
specific warnings regarding weight limits, loading and handling, and roll over risks contained in your Vehicle Owner’s Manual and the Hitch Manufacturer’s
Manual.
WARNING
1. Read all instrucons for future reference.
2. Do not stand on the carrier.
3. Do not put the Versahaul carrier onto a 5th wheel trailer or any other
kind of trailer.
4. Carrier hitch pins and locking keys must be secured before each use.
5. Do not block taillights, safety equipment, or exhaust pipes.
6. Do not transport flammable/combusble items on Carrier.
7. Only use with a Class 2, 3 or 4 hitch. Most Class 3 hitches are limited to
500 lbs total hauling capacity, while Class 2 hitches are limited to 300 lbs.
8. VH-TRIFOLD carrying capacity is limited to 500 lbs. max. Your vehicle
suspension may further limit the hauling capacity of the carrier.
VH-TRIFOLD
www.versahaul.com
foldingcargocarrier
Problems?Questions?Callusat(888)818-9915FormoreinformationonyourVersaHaul,pleasevisitwww.versahaul.com
foldingcargocarrier
VH-TRIFOLDINSTRUCTIONDIAGRAM
The VH-TRIFOLD Cargo Carrier comes preassembled and is ready to go straight out of the box.
When first unpacked, the carrier will be in its fully folded posion. The carrier should be kept in
this posion when aaching it to the hitch of your vehicle.
ASSEMBLINGYOURVERSAHAUL
VH-TRIFOLD in unfolded posion. VH-TRIFOLD in folded posion.
Bolt Head Side View Top View
Hitch
Carrier Main Tube
If the An-Tilt Lock Bracket does not fit, use the An-Tilt Hitch Aachment
Bolt. The An-Tilt Hitch Aachment Bolt has a 7
/18” thread size, a 3
/8“ Allen
Head size, and a 5
/8” outer head size. Slide the Main Tube of the carrier into
the hitch receiver. Secure the Main Tube to the receiver with the An-Tilt
Bolt, Washer and Nut. The Bolt must be inserted into the 7
/16” hole, not the
5
/8” hole. Note: Do not put a washer at the bolt head, but rather at the nut.
The bolt head should be recessed into the receiver hole and be pung
pressure on the Main Tube of the Carrier inside the receiver.
Mount the three 3
/8” bolts to
the included An-Tilt Lock
Bracket. Insert bracket to the
main tube as shown.
Insert main tube into vehicle’s
receiver hitch and install hitch pin
(not included).
Put the bracket flush against the hitch collar. Tighten the center bolt unl it fits snugly
against the receiver hitch underside. Tighten the two side bolts; then re-ghten the center
bolt. Make sure all bolts are ght enough such than no slack exists between the main tube
and the hitch. Note: Road vibraon may cause bolts to loosen over me. Test by rocking the
carrier from the sides. Minor deformaon is normal on the contact area between the main
tube and the an-lt bracket.
AlternativeInstructions
ATTACHINGYOURVERSAHAUL
Step1 Step2
Step3
1.1 1.2
1.3 1.4
1.5 1.6
Before loading your carrier with cargo, it will need to be completely
unfolded. First unfold the 2nd and 3rd Secon Assemblies from the
1st Secon Assembly by liing upward on the poron of the folded
tray nearest the Main Tube (Figure 1.1); some force may be
required. Connue to unfold the assembly (Figure 1.2) unl it
comes to rest.
Li up on the 3rd Secon Assembly; some force may be required
(Figure 1.3) Unfold the 3rd Secon Assembly from the 2nd Secon
Assembly in the same manner as before (Figure 1.4).
Once the carrier is completely folded and laid out flat (Figure 1.5),
lock it into place by flipping the four sets of pin locks into the
horizontal locked posion (Figure 1.6). The pin locks are located
above each hinge point, two on each side of the carrier.
Main Tube
Li Up
Fold Down
Li Up
Fold Down
Pin Lock
UNFOLDINGYOURCARRIER
Folding the carrier works in the same manner as unfolding. First, make sure that all four sets of pin
locks are set to the vercal unlocked posion, as shown (Figure 2.1).
Begin by folding the 3rd Secon Assembly upward (Figure 2.2),
bringing it to rest on top of the 2nd Secon Assembly. Press down
firmly unl the 3rd Secon Assembly snaps into place (Figure 2.3).
2.1
2.5
Finally, fold the grouped 2nd and 3rd Secon Assemblies on top of
the 1st Secon Assembly (Figure 2.4). With all three secons
folded, press down firmly on folded tray unl the assembly snaps
into place (Figure 2.5).
Pin Lock
Fold Up
2.4
2.3
2.2
Fold Up
Push Down
Push Down
FOLDINGYOURCARRIER

Other Versahaul Automobile Accessories manuals

Versahaul MAGNUM TIE-DOWN STRAP User manual

Versahaul

Versahaul MAGNUM TIE-DOWN STRAP User manual

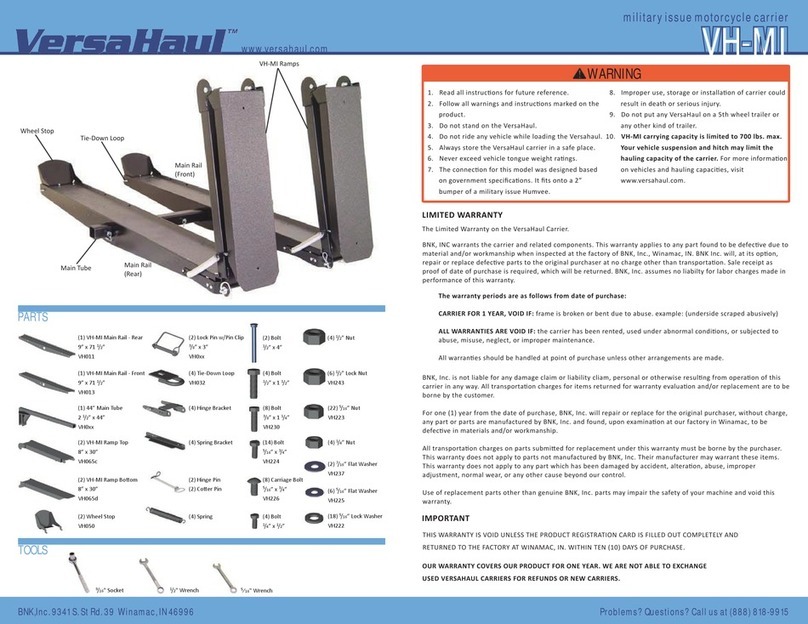
Versahaul VH-MI User manual

Versahaul

Versahaul VH-MI User manual

Popular Automobile Accessories manuals by other brands

Herd KW01 installation guide

Herd

Herd KW01 installation guide

Possl Campster instruction manual

Possl

Possl Campster instruction manual

Safe Fleet Prime Design FBM-1012 manual

Safe Fleet

Safe Fleet Prime Design FBM-1012 manual

Haba 4703220 manual

Haba

Haba 4703220 manual

Saab 400 106 662 installation instructions

Saab

Saab 400 106 662 installation instructions

Car Solutions qpi-lvtx-astm installation manual

Car Solutions

Car Solutions qpi-lvtx-astm installation manual

Havis-Shields KR-SB-800 Installation

Havis-Shields

Havis-Shields KR-SB-800 Installation

AutoMaxi Super Rider quick start guide

AutoMaxi

AutoMaxi Super Rider quick start guide

Opus Mongoose-Plus user guide

Opus

Opus Mongoose-Plus user guide

Crux BEECR-35 manual

Crux

Crux BEECR-35 manual

DVB LBBR-06 installation manual

DVB

DVB LBBR-06 installation manual

SSBC W123-A installation instructions

SSBC

SSBC W123-A installation instructions

Thule RAPID Fixpoint XT Fitting instructions

Thule

Thule RAPID Fixpoint XT Fitting instructions

Koso BA053001 instructions

Koso

Koso BA053001 instructions

DRAGONFIRE 18-1002 manual

DRAGONFIRE

DRAGONFIRE 18-1002 manual

Leitner ACS instructions

Leitner

Leitner ACS instructions

Volvo Penta 21573834 installation instructions

Volvo Penta

Volvo Penta 21573834 installation instructions

ALLIANCE BCK-001 installation guide

ALLIANCE

ALLIANCE BCK-001 installation guide

manuals.online logo
manuals.online logoBrands
  • About & Mission
  • Contact us
  • Privacy Policy
  • Terms and Conditions

Copyright 2025 Manuals.Online. All Rights Reserved.