VERTBAUDET Triocity+ User manual

Manuel d‘instructions
Instruction manual
Gebruiksaanwijzing
Anleitung
Manual de instrucciones
Istruzioni per l’uso
Manual de utilização
FR
EN
NL
DE
ES
IT
PT

FR
NOTE POUR L’UTILISATEUR
1. Ceci est un DISPOSITIF DE RETENUE POUR ENFANTS ISOFIX. Il est homologué
suivant le Règlement N°44, série 04 d’amendements, pour une utilisation dans un
véhicule équipé de système d’ancrages ISOFIX. Ce dispositif de retenu pour enfants
appartient à la catégorie «semi-universel», et peut-être installé aux places assises
des véhicules cités en Annexe donné avec cette notice. Ce dispositif peut aussi être
utilisable aux places assises d’autres véhicules.
2. Il pourra être installé dans les véhicules disposant de places homologuées comme
étant des positions ISOFIX, selon la catégorie du dispositif de retenue pour enfants et
du gabarit. Vérier la compatibilité de votre véhicule à l’aide du manuel de votre véhi-
cule ou auprès de votre revendeur.
3. Le groupe de masse et la classe de taille ISOFIX pour lesquels ce dispositif convient
est: Groupe 0+ (0-13kg), classe de taille ISOFIX D. Numéro d’agrément E13 44R
045154. En cas de doute, veuillez nous consulter.
CETTE BASE ISOFIX EST A UTILISER UNIQUEMENT AVEC LE SIEGE AUTO G0+ RE-
FERENCE 70303-0031/70303-0126/70303-0155/70303-0156/1059166/LB321I (Numéro
d’agrément ECE44 E13 44R 045153) VENDU SEPAREMENT.
DISPOSITIF DE
VERROUILLAGE
DU SIEGE AUTO :
MANETTE + BOUTON
PIED DE MAINTIEN
TELESCOPIQUE
BOUTON DE
REGLAGE DU
PIED
PINCE
ISOFIX
rétractable
D
i
MANETTE DE
REGLAGE DES
PINCES ISOFIX
IMPORTANT ! LIRE LES INSTRUCTIONS SUIVANTES AVEC ATTENTION AVANT UTILISATION. SI VOUS
NE RESPECTEZ PAS CES INSTRUCTIONS, LA SECURITE DE VOTRE ENFANT POURRAIT EN ETRE AFFEC-
TEE. INFORMATIONS À CONSERVER POUR DE FUTURS BESOINS DE RÉFÉRENCE. APRES CHAQUE LEC-
TURE, RANGER CE MANUEL D’UTILISATION DANS LA POCHETTE PREVUE A CET EFFET SITUEE SOUS
LA HOUSSE DU SIEGE-AUTO AU NIVEAU DE LA TETE (se référer à la notice complète du siège-auto).
CROCHETS DE
VERROUILLAGE DU
SIEGE AUTO (X4)
CONDITION D’UTILISATION DANS UN VEHICULE
Votre véhicule doit être équipé du système d’ancrage ISOFIX, Une liste non-
exhaustive de véhicule pouvant recevoir le dispositif Isox avec l’emplace-
ment correspondant est donnée en annexe de ce manuel.
La base ISOFIX ne devra jamais être installée sur un siège passager muni
d’un Air bag, à moins de le faire désactiver par un professionnel. Installer la
base uniquement sur un siège passager tourné vers l’avant du véhicule.
ATTENTION ! Ne pas installer la base sur un siège passager tourné vers l’arrière ou vers le côté.

FR
INSTALLATION AVEC LE SYSTEME
D’ANCRAGE ISOFIX
Les pinces ISOFIX vous permettent d’installer facilement
le système d’ancrage ISOFIX du véhicule lors de l’instal-
lation de la base ISOFIX dans votre véhicule.
Points d’ancrage ISOFIX
MISE EN PLACE DE LA BASE SUR UN SIEGE PASSAGER
Iº - Déplier le pied de maintien au maximum verticalement
à la base ISOFIX.
IIº - Extraire les pinces ISOFIX de leur logements en soulevant
la manette de réglage (a) située à l’avant de la base.
Si nécessaire accompagner d’une main les pinces ISOFIX
vers l’extérieur jusqu’à leur longueur maximum. Relâcher la
manette pour bloquer. (Schéma 1)
IIIº - Placer la base dans le siège passager du véhicule
équipé d’un système d’ancrage ISOFIX, pour le siège
passager avant pensez à désactivé ou faire désactivé le ou les
airbag équipant votre véhicule. (Schéma 2)
IVº - Glisser les 2 pinces ISOFIX entre le dossier et l’assise du
siège passager et les enclencher sur les points d’ancrage du
siège. Vous devez entendre un «clic» pour chacun des crochets
indiquant la mise en place correcte. Vérier que les pinces sont
bien xées. Les indicateurs de verrouillage sur chaque pince
doivent passer au vert. (Schéma 3)
Vº- Régler en hauteur le pied de maintien en appuyant
sur le bouton de réglage (b) jusqu’à ce que le pied touche
le plancher du véhicule. (Schéma 4) Le voyant (c) présent sur le
pied de maintien doit être au vert.
ATTENTION ! En utilisation, le pied
téléscopique doit toujours être entièrement
déplié et être placé dans la position la plus
verticale possible.
ASTUCE : Si vous placez votre base sur un
siège de véhicule dont le dossier est réglable,
allonger légèrement le dossier au début de la
mise en place. Une fois la base avec le siège
auto en place, relever le dossier à l’aide du
système de réglage prévu sur votre véhicule.
Cela assurera une xation optimale de votre base.
ATTENTION ! Avant toute utilisation, vérier
que la base est enclenchée solidairement sur
les points d’ancrage ISOFIX de votre véhicule.
Schéma 2
Système d’ancrage
ISOFIX
Schéma
1
I
II
a
Schéma 3
Schéma 4
Verrouillé - OUI!
voyant vert
voyant rouge
Non-verrouillé -
NON!
II I
b
cc
CLIC!
CLIC!
rouge
NON!
vert
OUI!
AVERTISSEMENT ! Toujours utiliser le pied de maintien lors
de la mise en place de la base dans le véhicule. Avant toute
utilisation, assurez-vous que le pied est à la bonne longueur et qu’il est
stable sur le sol. Le pied ne doit jamais appuyer contre le couvercle d’un compartiment de rangement
placé dans le plancher du véhicule. Le cas échéant, retirer si possible le couvercle du compartiment et
allonger le pied jusqu’à ce qu’il repose fermement sur le fond du compartiment.

FR
La poignée du siège-auto doit être réglée en
position 2 pour le transport. (**Position 2 (ver-
ticale) : conçue pour transporter le siège;
*Position 1 : quand le siège est en place dans
la base.)
Il est recommandé de se référer au manuel
d’utilisation complet du siège pour plus de
renseignements. (Schéma 5)
ATTENTION !
Avant toutes manipulations, assurez-vous que:
-
votre enfant est attaché à l’aide de son harnais dans le siège-auto pour
éviter tout risque de chute.
MISE EN PLACE DU SIEGE AUTO SUR LA BASE ISOFIX
- DOS A LA ROUTE - GROUPE 0+ (0-13kg, environ 0 à 6-9 mois)
Iº - Présenter le siège auto dos à la route
au dessus de la base et pousser vers le bas
pour placer les barres métallique de maintien
du siège auto dans les crochets de verrouil-
lage de la base (schéma 7).
IIº - Une fois le siège en place, appuyer sur
le bouton rouge (e) pour bloquer le système.
L’indicateur (f) vert apparaît pour conrmer le
verrouillage du siège. Vérier que le siège est
bien en enclenché à la base en tirant la poi-
gnée du siège-auto vers le haut. Il doit rester
solidaire de la base sur les quatre crochets
de verrouillage.
IIIº - Régler la poignée du siège auto en
position 1 : Voir la notice complète du siège
auto le réglage de la poignée.
CETTE BASE ISOFIX EST A UTILISER UNIQUEMENT AVEC LE SIEGE AUTO
G0+ REFERENCE 70303-0031/70303-0126/70303-0155/70303-0156/1059166/
LB321I (Numéro d’agrément ECE44 E13 44R 045153) VENDU SEPAREMENT.
*Position 1 **Position 2
Schéma 5
Schéma 6
(a)
I
II
ed
e
Schéma 7
e
fe
Réglage de la poignée
en position 1
Schéma 6
(b)
Les crochets de verrouillage de la base ISO-
FIX doivent être ouverts pour la mise place
du siège. Pour cela il faut que la bouton
rouge (e) soit à l’intérieur de son logement de
sécurité (Schéma 6 b) Pour cela, appuyer sur
le bouton(e) et pousser la manette(d) jusqu’à
ce que le bouton(e) rentre dans son loge-
ment. (Schéma 6 a)

FR
RETIRER LE SIEGE
DE LA BASE
AVERTISSEMENT: L’enfant doit rester attaché à l’aide de son harnais dans le
siège auto pendant toutes ses opérations, pour éviter tout risque de chute.
Iº - Régler la poignée du siège-
auto en position 2 (verticale).
IIº - Libérer les crochets de
verrouillage de la base :
- Appuyer sur le bouton rouge (e)
du dispositif de verrouillage et
simultanément pousser sur la
manette (d) fermement appuyé.
Le bouton (e) reste alors
enclenché dans son logement.
(Schéma 9)
- Soulever le siège auto avec vos
2 mains. (Schéma 10)
AVERTISSEMENT: Avant toute utilisation, vérier impérativement que le
siège est xé fermement dans la base en tirant la poignée du siège-auto
vers le haut.
Photo 8
II
Ajuster la base sur le siège en réglant la longueur
des pinces ISOFIX:
Soulever la manette de réglage (a) et en même temps
pousser la base vers
le dossier du siège passager
de votre véhicule jusqu’à ce que le siège-auto soit
bien calé contre le dossier du siège passager (photo 8).
ATTENTION ! Toujours vérier que
- les pinces ISOFIX sont solidement bloquées.
- le pied de maintien reste stable sur le sol.
- la base est enclenchée solidairement sur les points d’ancrage ISOFIX de votre
véhicule. L’indicateur se trouvant sur la patte du pied reste toujours au vert.
a
a
Poignée en
position 1
Schéma 9
I
II
ed
e
Schéma 10
Poignée en
position 2
Pince au plus long
Pince au plus court
I

FR
AVERTISSEMENT: Vous devez régulièrement vérier l’état géné-
ral de votre base, parties en plastique et parties mécaniques. Si
vous avez le moindre doute, prévenez immédiatement notre ser-
vice consommateurs. Il est recommandé de tenir la base à l’abri
du rayonnement solaire, pour éviter que votre enfant ne se brûle
à son contact.
RANGEMENT DE LA BASE
ENLEVER LA BASE DU SIEGE PASSAGER
Iº - Déclipser les pinces ISOFIX
en faisant coulisser -*vers vous
les boutons (g) se trouvant sur
chaque pince comme indiqué sur
le schéma 11.
IIº - Tirer la base vers vous délica-
tement.
Iº - Ranger les pinces ISOFIX : Avec une main
soulever la manette de réglage (a) se trouvant
sur l’avant de la base et simultanément avec
l’autre main glisser les 2 pinces ISOFIX en
même temps vers la base jusqu’à ce que vous
sentiez une résistance. (schéma 12)
IIº - Rabattre le pied de maintien
Schéma 12
I
II
a
Schéma 11
g
AVERTISSEMENT !
CONSIGNES ESSENTIELLES DE SECURITE
AVERTISSEMENT : Vous devez absolument lire attentivement la totalité de ce
manuel avant d’utiliser votre base Isox, de la mettre en place dans un véhicule,
an d’être parfaitement familier avec ce dispositif et éviter ainsi toutes mau-
vaises utilisations qui pourraient être extrêmement dangereuses.
- Ce dispositif est utilisable uniquement sur les sièges de véhicules comportant
une option ISOFIX comme spécié par le constructeur dans le manuel du véhi-
cule. Une liste non exhaustive des véhicules équipés ISOFIX avec les positions
possible d’installation de la base est donnée en annexe de ce manuel.
- Ne jamais laisser votre enfant sans surveillance dans le siège auto, dans le
véhicule. En utilisation, l’enfant doit être attaché à l’aide de son harnais dans le
siège-auto.

FR
- Les crans d’arrêt du siège passager ou de la banquette doivent être enclenchés.
- Remplacer le dispositif lorsqu’il a été soumis à des efforts violent dans un acci-
dent.
- Pour des raisons de sécurité, la base doit être xée dans le véhicule même si
vous ne transportez pas d’enfant. Veillez à ce que les bagages et autres objets
susceptibles de causer des blessures à l’enfant en cas de choc soient solidement
arrimés.
- Ne jamais utiliser ce dispositif sur un siège passager muni d’un airbag, à moins
de le faire désactiver par un professionnel. (Risque de mort ou de blessure grave).
Installer uniquement la base dans un siège passager tourné vers l’avant du véhi-
cule. Ne pas installer la base dans un siège passager tourné vers l’arrière. Ne pas
installer la base dans un siège passager tourné vers le coté.
- La base doit être installée de manière à éviter que dans des conditions normales
d’utilisation, aucune partie de la base ne puisse se coincer sous un siège mobile
du véhicule ou dans la porte du véhicule.
- Ne jamais utiliser cette base sans l’avoir solidement xée dans le siège du véhi-
cule. Pour proter de la sécurité de votre base n’ajoutez aucun accessoire et ne
modiez jamais la base d’aucune manière.
- La poignée du siège auto doit être impérativement placée dans la bonne position
(position 1) quand le siège auto est utilisé dans la base.
- Ce dispositif ne doit être utilisé qu’en combinaison avec un siège auto référence
70303-0031/70303-0126/70303-0155/70303-0156/1059166/LB321I de la classe
GROUPE 0+ respectivement de la marque Vertbaudet (numéro d’agrément ECE44
E13 44R 045153).
Lubriez régulièrement les parties mécaniques (articulations, crochets,…). Utilisez de pré-
férence un lubriant à base de silicone.
Nettoyez les parties en plastique avec un chion humide. Ne jamais utiliser de solvant,
détergent chimique ou de lubriant.
Laissez le produit à l’air libre, dans un environnement sec.
En cas de chute accidentelle de nourriture ou de boisson dans les parties mécaniques,
nettoyez la base avec de l’eau savonneuse et rincez. Lubriez ensuite les parties mécani-
ques et vérez leur fonctionnement.
Dans la mesure du possible, le produit doit être stocké dans un environnement doux à une
température comprise entre 8 et 30°C.
SOIN ET ENTRETIEN

EN
NOTICE
1.
This is an ISOFIX CHILD RESTRAINT SYSTEM. It is approved to Regulation No.44,04
series of amendments for general use in vehicles tted with ISOFIX anchorage systems.
This child restraint is classied for «semi-universal» use and is suitable for xing into
the seat positions of vehicles listed in the ANNEX to this instruction manual. Seat posi-
tions in other cars may also be suitable to accept this child restraint.
2. It will t vehicles with positions approved as ISOFIX positions (as detailed in the
vehicle handbook), depending on the category of the child seat and of the x ture.
Verify the compatibility of your vehicle with the aid of the vehicle handbook or with
your retailer.
3. The mass group and the ISOFIX size class for which this device is intended is: Group
0+ (0-13kg), size class ISOFIX D. ECE R44 approval number E13 44R 045154.
If in doubt, please consult us.
This ISOFIX base is intended for use only with G0+ car seat ref 70303-0031/70303-0126/70303-
0155/70303-0156/1059166/LB321I (ECE44 approval no. E13 44R 045153) , sold separately.
Locking system for
car seat xation :
Switch + button
Adjustable supporting
leg
Button for length
adjustment of sup-
porting leg
Reractable
ISOFIX clamps
D
i
Switch for
adjustment of
ISOFIX clamps
IMPORTANT ! READ THE FOLLOWING INSTRUCTIONS CAREFULLY BEFORE USE.
KEEP THESE INSTRUCTIONS FOR FUTURE REFERENCE. FAILURE TO FOLLOW THE GIVEN SAFETY
NOTES MAY RESULT IN SERIOUS INJURY. AFTER EACH READING, STORE THIS HANDBOOK IN THE
POCKET INTENDED FOR THIS PURPOSE WHICH CAN BE FOUND ON THE UNDERSIDE OF THE CAR
SEAT COVER (please refer to the handbook of the car seat).
Fixation hooks for
car seat (X4)
CONDITION OF USE IN VEHICLES
Your vehicle must be equipped with ISOFIX anchorage systems.
A list showing the car models and its corresponding seat which can accomo-
date this ISOFIX restraint system is given in the ANNEX to this instruction
manual.
The ISOFIX base must never be installed on passenger seats equipped with
active frontal AIRBAG, unless the airbag is deactivated by professional. Install
the base ONLY on forward-facing passenger seats of your vehicle.
BE CAREFUL ! Never install this restraint system on sideway- or rearward-facing passenger seats.

EN
ISOFIX ANCHORAGE SYSTEMES ON
VEHICLES
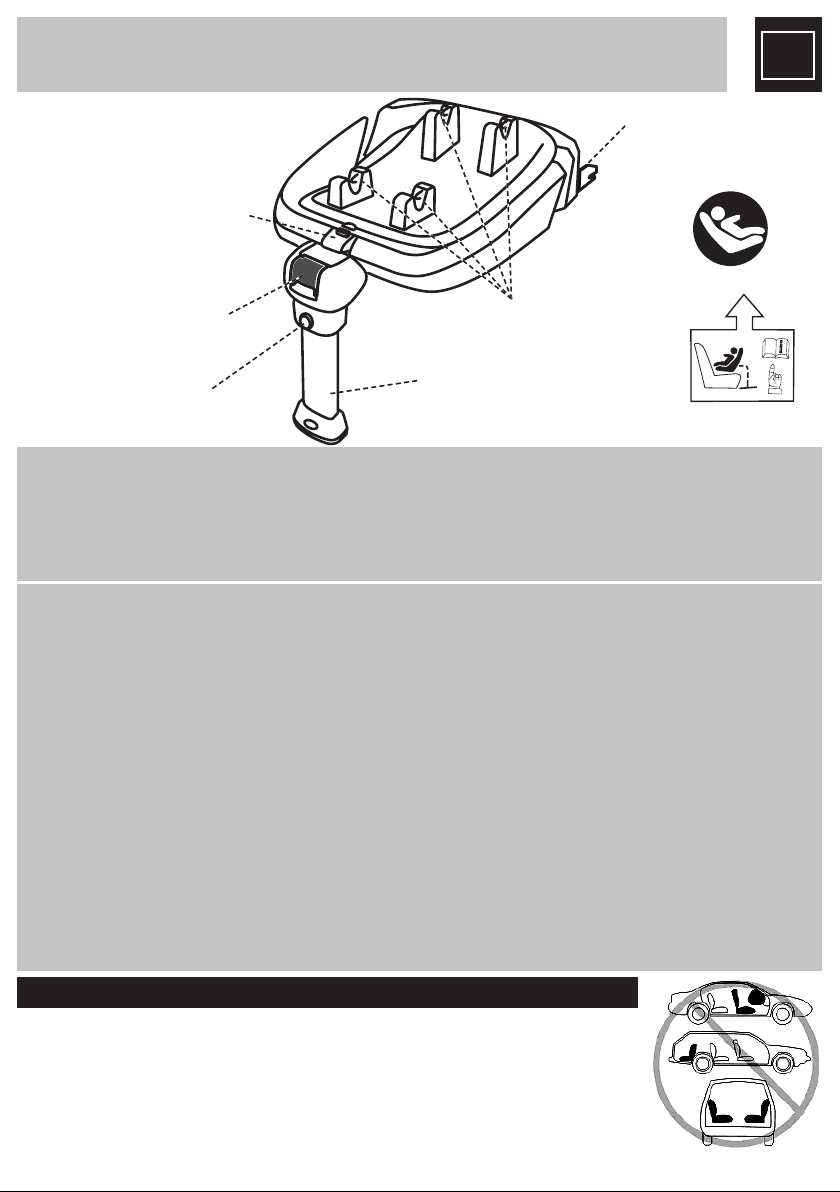
The ISOFIX clamps allows you to install the ISOFIX base
easily on your vehicle by attaching to the ISOFIX ancho-
rage system of your vehicle.
ISOFIX anchorage systems
INSTALLATION OF THE BASE ON PASSENGER SEAT
Iº - Straighten out the supporting leg to its greatest extend
until it is vertical to the ISOFIX base.
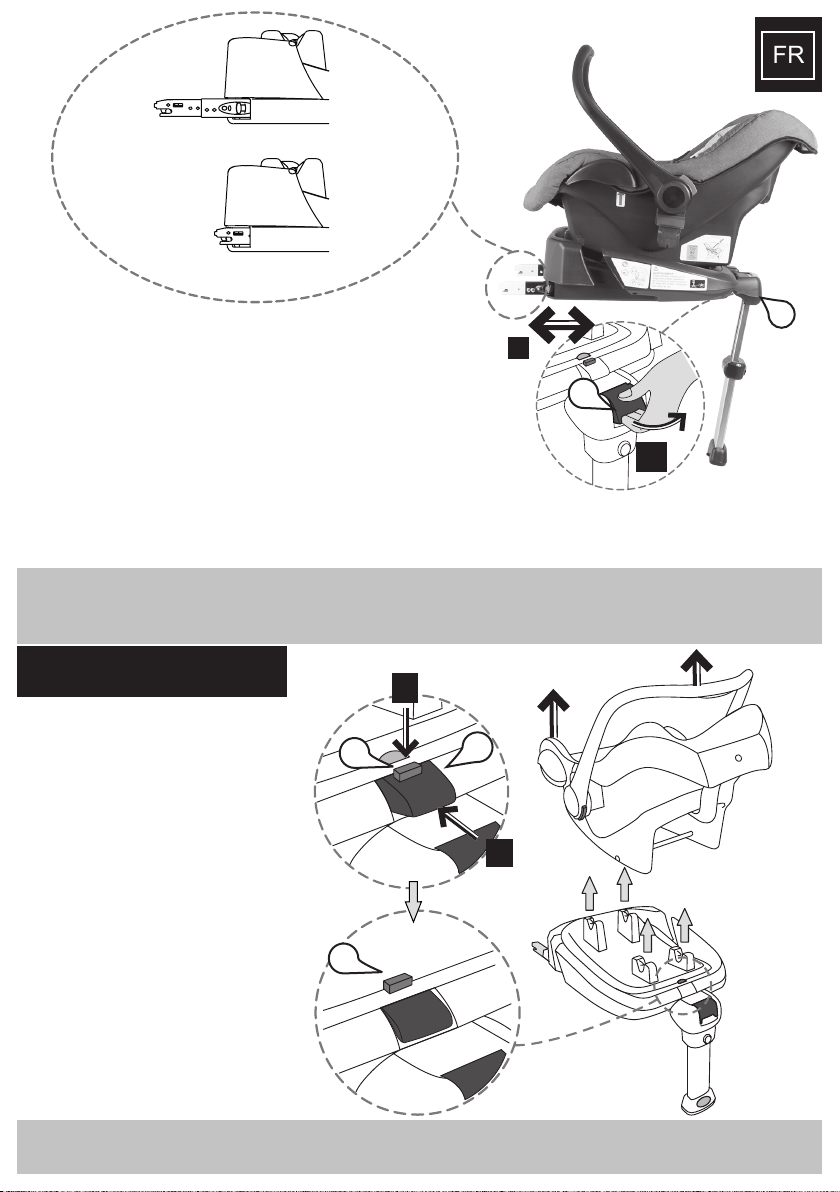
IIº - Release the ISOFIX clamps by pulling on the switch (a)
on the front of the base.
If necessary, help bringing out the ISOFIX clamps manually
while keeping pulling on the switch (a) until they reach the
maximum length. Release the switch. (Diagram 1)
IIIº - Place the base on the passenger seat of your vehicle
which is equipped with ISOFIX anchorage system. For front
passenger seat, ensure that its airbag(s) is deactivated by
professionals. (Diagram 2)
IVº - Slide the 2 ISOFIX clamps between the backrest and the
seat of the passenger seat and ax them to the anchorage
systems of the seat. You must be able to hear a «click» sound
emitted from each clamp if operations are correctly comple-
ted. Check that the clamps are well set in place. Indicator on
each clamp must change to GREEN colour. (Diagram 3)
Vº- Adjust the length of the supporting leg by pressing the
button (b) until that the leg touches the ground of the vehi-
cle.(Diagram 4) The indicator (c) on the supporting leg must
change to GREEN colour.
BE CAREFUL ! When in use, the supporting
leg must always be entirely straigtened out
and be placed as vertical as possible.
Tips : If you place your base on a passenger
seat of which the backrest is adjustable, slightly
recline the backrest at the beginning of the
insallation. Once the base along with the car
seat is well set in place, lift the backrest of the
passenger seat. This can ensure an optimal
xation of the child restraint system.
BE CAREFUL ! Before each time of use, check
that the base is solidly secured to the ISOFIX
anchorage points of your vehicle.
Diagram 2
ISOFIX anchorage
points
Diagram
1
I
II
a
Diagram 4
Green
LOCKED - YES!
RED
Unlocked - NO!
II I
b
cc
CLICK!
CLICK!
red
NO!
green
YES!
Diagram 3
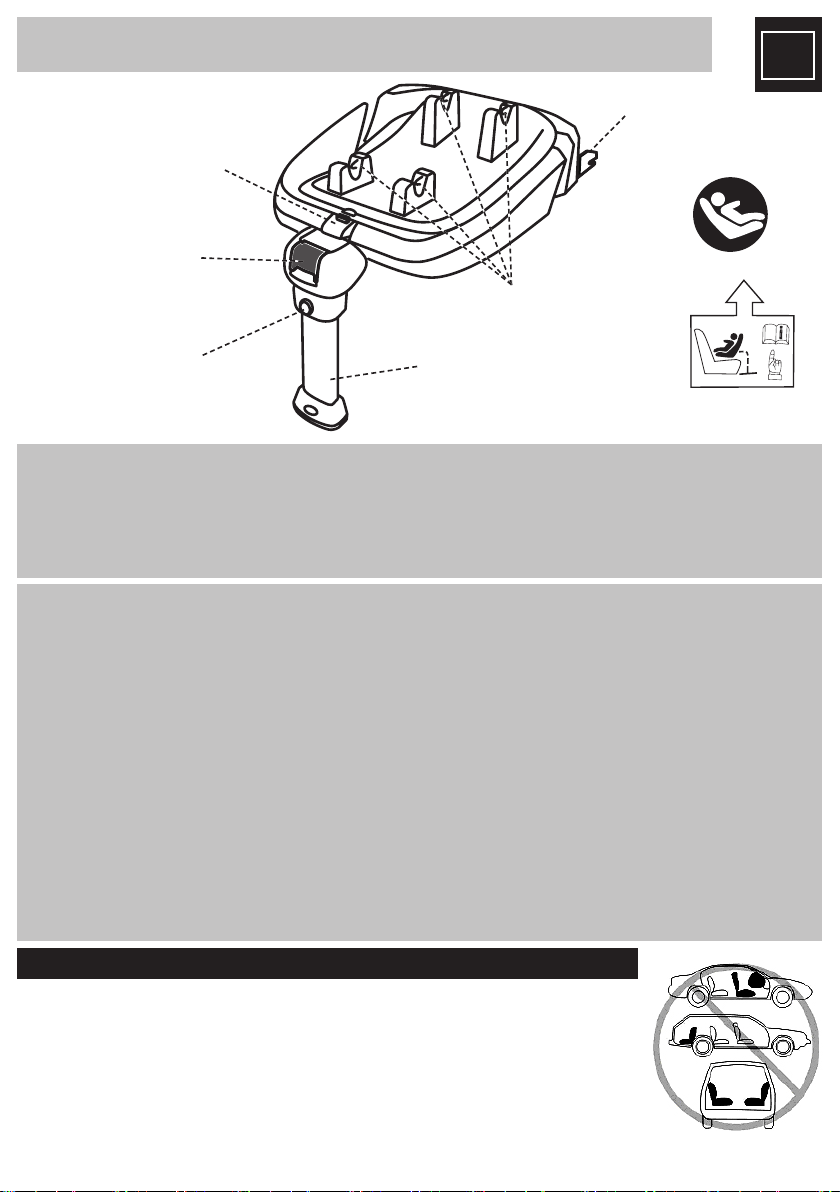
WARNING ! Always use the supporting leg during the instal-
lation of the base in the vehicle. Before each time of use, check
that the leg is well adjusted and that it stands stably on the ground.
The leg must never rest on the cover of the storage compartment on the ground of your vehicle. If
applicable, remove the cover of the com partment and extend the leg until it pushes rmly against the
bottom of the storage compartment.

EN
- the handle of the car seat must be adjusted
to position 2 for carry.
**Position 2 (vertical) : intended for transpor-
ting the car seat;
*Position 1 : when the car seat is in place on
the ISOFIX base.
It is recommended to refer to the instruction
manual of the car seat for more information.
(Diagram 5)
BE CAREFUL !
Before any manipulation, ensure that :
- your child is well secured in the car seat with the aid of the harness, to
avoid any risks of fall.
INSTALLATION OF CAR SEAT ON ISOFIX BASE Rearward-fa-
cing - group 0+ (0-13kg, 0 to 6-9 months approximately)
Iº - Present the car seat, rearward-facing,
onto the base and press it down until that all
the metallic xation bars of the car seat are
well blocked inside the xation hooks of the
ISOFIX base (Diagram 7).
IIº - Once the car seat is in place, press the
red button (e) to lock the system. The indi-
cator (f) in GREEN colour conrms the suc-
cessful installation of the car seat. Check that
the car seat is solidly attached to the base by
pulling upward the car seat on its handle. The
car seat must remain secured to the base by
the grasp of all 4 xation hooks.
IIIº - Adjust the car seat handle to position 1:
please refer to the complete handbook of the
car seat for instructions.
THIS ISOFIX BASE IS INTENDED FOR USE ONLY WITH G0+ CAR SEAT
REF 70303-0031/70303-0126/70303-0155/70303-0156/1059166/LB321I (ECE44 approval
number E13 44R 045153), SOLD SEPARATELY.
*Position 1 **Position 2
Diagram 5
Diagram 6
(a)
I
II
ed
e
Diagram 7
e
fe
Handle to be adjusted
to position 1
Diagram 6
(b)
- The xation hooks on the ISOFIX base must
be opened for accomodating the car seat.
Ensure that the red button (e) is blocked
inside the opening intended for this purpose
(Diagram 6 b). If this is not the case, press
the button (e) and meanwhile push the switch
(d) toward the base until that the button (e) is
well blocked in the opening. (Diagram 6 a)

EN
REMOVAL OF CAR SEAT FROM BASE
WARNING : Your child must remain secured in the car seat with the aid of the
harness during the course of all these operations to avoid any risks of fall.
Iº - Adjust the car seat handle to
position 2 (vertical).
IIº - Release the xation hooks of
the ISOFIX base :
- Press the red button (e) of the
locking system and simultaneous-
ly push the switch (d) toward the
base until that the button (e) is well
blocked in the opening. (Diagram
9)
- Lift the car seat with both hands.
(Diagram 10)
WARNING : Before use, verify imperatively that the car seat is rmly xed
on the ISOFIX base by pulling upward the car seat on its handle.
Photo 8
II
Adjust the position of the base in relation to the
passenger seat by regulating the length of the ISOFIX
clamps : Lift the switch (a) and meanwhile move the
ISOFIX base toward the backrest of the passenger seat of
your vehicle until that the car seat pushes against the
backrest of the passenger seat (photo 8).
BE CAREFUL ! Always ensure that the ISOFIX clamps are
solidly locked.
- the supporting leg rests stably on the ground. The indicator on the foot of the
supporting leg must alway appear GREEN.
- the base is solidly attached to the ISOFIX anchorage system of your vehicle.
a
a
Handle in
position 1
Diagram 9
I
II
ed
e
Diagram 10
Handle in
position 2
longest clamp position
shortest clamp position
I

EN
WARNING : You must regularly check the general status of your
ISOFIX base, ex. plastic parts and mechnical parts etc. If in
doubt, please contact us. It is recommended to keep the restraint
system from sun exposure to prevent your child from excessive
heat.
STORAGE OF BASE
REMOVAL OF BASE FROM PASSENGER SEAT
OF YOUR VEHICLE
Iº - Unfasten the ISOFIX clamps by
sliding the buttons (g) which can
be found on each clamp -*toward
yourself, as shown in Diagram 11.
IIº - Gently pull the ISOFIX base
toward yourself.
Iº - Arrange the ISOFIX clamps : With one
hand lift the switch (a) at the front of the
ISOFIX base and simultaneously with ano-
ther hand slide the 2 ISOFIX clamps into the
enclosure of the base until that you feel a
resistance. (Diagram 12)
IIº - Fold the supporting leg.
Diagram 12
I
II
a
Diagram 11
g
WARNING !
SAFETY NOTES TO BE RESPECTED IMPERATIVELY
WARNING : You must absolutely read the totality of this instruction manual before
using your ISOFIX base and setting it in place in vehicle, in order to be perfectly
familiar with the device and to avoid any misuses which can result in serious
injuries.
- This device is only usable on vehicle seats equipped with ISOFIX systems, as
specied by the car manufacturer in the handbook of your car. A incomprehensive
car tting list is given in annex to this manual, showing the car models which are
equipped with ISOFIX an chorage systems and their seats capable to accomodate
this base.
- Never leave your child unattended in the car seat or in the vehicle. When in use,
the child must always be secured in the car seat with the aid of the harness.

EN
- Locking devices of the passenger seat or of the bench seat mush be engaged.
- The restriant system should be replaced when it has been subject to violent
stress in an accident.
- For safety reasons, the base must be xed in the vehicle even if you are not
transporting your child. Any luggages or other objects liable to cause injuries in
the event of a collision shall be properly secured.
- To avoid risks of death or serious injury, never use this device on a passenger
seat equipped with airbag(s), unless it is deactivated by professional. Install
this base only on a forward-facing passenger seat. Never install the base on a
rearward- or sideway-facing vehicle seat.
- The base must be installed in the manner that, under normal condisions of use,
no part of the base would become trapped by a movable seat or in a door of the
vehicle.
- Never use this device without having secured it solidly on the pas senger seat of
your vehicle. To prot the most from your base from safety prospective, never add
any accessories or alter it anyway.
- The handle of the car seat must imperatively be adjusted to the correct position
(position 1) when the car seat is used in conjuction with the base.
- This device must only be used in conjunction with Group 0+ car seat ref 70303-
0031/70303-0126/70303-0155/70303-0156/1059166/LB321I under the brand Vert-
baudet (ECE44 approval number E13 44R 045153).
ubricate regularly the mechanical parts (ex isox clamps, articulation of legs... etc). Use
preferably silicone-based lubricant available in market. Clean the plastic parts with warm
damp cloth. Never use any solvent, chimical detergent or lubricants on any part of the
base.
Leave the product in open air to air-dry.
Should any food or drink accidentally drop into the mechanical parts, place the base in
lightly-soaped warm water and rince. Air dry. Lubricate the mechanical parts and check the
function of the base.
The product should be stored in mild environment of which the temperature is between 8ºC
and 30ºC. Avoid conditions lower than 0ºC or higher than 30ºC.
CARE AND MAINTENANCE

NL
NOTA
1. Dit is een ISOFIX KINDERBEVEILIGINGSSYSTEEM. Het werd goedgekeurd volgens de
Regel Nr. 44,04 reeks wetwijzigingen voor algemeen gebruik in voertuigen voorzien van
ISOFIX-bevestigingssystemen.
Deze kinderbeveiliging is geclassiceerd voor “semi-algemeen” gebruik en is geschikt
voor bevestiging in de zitplaatsen van voertuigen opgenoemd in de BIJLAGE van deze
gebruiksinstructies. Zitplaatsen in andere auto’s kunnen eveneens geschikt zijn voor de
installatie van deze kinderbeveiliging.
2. Het past in voertuigen met zitplaatsen goedgekeurd als ISOFIX-zitplaatsen (als bes-
chreven in de handleiding van het voertuig), volgens de categorie van de kinderstoel en
de bevestiging. Controleer de compatibiliteit van uw voertuig met behulp van de hand-
leiding van het voertuig of met uw dealer.
3. De groep en de ISOFIX-grootte categorie waarvoor dit product bestemd is is: Groep
0+ (0-13kg), groottecategorie ISOFIX D. ECE R44 goedkeuring nummer E13 44R 045154.
Neem contact met ons op in geval van twijfel.
Deze ISOFIX-basis is alleen bedoeld voor gebruik met G0+ autostoel ref 70303-0031/70303-0126/70303-
0155/70303-0156/1059166/LB321I (ECE44 goedkeuring nr. E13 44R 045153), afzonderlijk te koop
Vergrendeling voor
vastzetten van de
autostoel : schakelaar
+ knop
Verstelbare steunvoet
Knop voor de leng-
te-instelling van de
steunvoet
Verwijderbare
ISOFIX-klemmen
D
i
Schakelaar voor het
bijstellen van de
ISOFIX-klemmen
BELANGRIJK ! LEES DE VOLGENDE INSTRUCTIES ZORGVULDIG VOOR GEBRUIK. BEWAAR DEZE
INSTRUCTIES VOOR LATERE RAADPLEGING. ALS DEZE VEILIGHEIDSINSTRUCTIES NIET WORDEN
OPGEVOLGD KAN DIT LEIDEN TOT ERNSTIGE VERWONDINGEN. BEWAAR DEZE HANDLEIDING IN HET
HIERVOOR BESTEMDE VAK ONDERAAN DE HOES VAN DE AUTOSTOEL NA HET LEZEN (raadpleeg de
handleiding van de autostoel).
Bevestigingshaken
voor autostoel (X4)
GEBRUIKSVOORWAARDEN IN VOERTUIGEN
Uw auto moet uitgerust zijn met ISOFIX-bevestigingssystemen. Een lijst met de
automodellen en hun bijbehorende zitplaatsen waarop dit ISOFIX-beveiligingssys-
teem kan geplaatst worden wordt gegeven in de BIJLAGE van deze instructies.
De ISOFIX-basis mag niet geplaatst worden op passagiersstoelen met actieve
frontale AIRBAG, behalve indien de airbag gedeactiveerd werd door een vakman.
Plaats de basis ALLEEN op de naar voren gerichte passagierzitplaatsen in uw auto.
WEES VOORZICHTIG ! Plaats dit beveiligingssysteem nooit op zijdelings- of naar achter gerichte
passagierzitplaatsen.

NL
ISOFIX-BEVESTIGINGSSYSTEMEN OP
VOERTUIGEN
De ISOFIX-klemmen laten u toe de ISOFIX-basis gemakkelijk
te plaatsen op uw auto door ze te koppelen op het ISOFIX-be-
vestigingssysteem van uw auto.
ISOFIX-bevestigingssystemen
INSTALLATIE VAN DE BASIS OP DE PASSAGIERSTOEL
Iº - Stel de steunvoet in op de hoogste positie tot hij vertikaal is met
de ISOFIX-basis.
IIº - Ontgrendel de ISOFIX-klemmen door aan de schakelaar (a)
aan de voorkant van de basis te trekken. Indien nodig help ma-
nueel om de ISOFFIX-klemmen vrij te maken terwijl u verder
aan de schakelaar trekt (a) tot ze de maximum lengte
bereikt hebben. Laat de schakelaar los. (Schema 1)
IIIº - Plaats de basis op de passagierstoel van uw auto die
uitgerust is met het ISOFIX-bevestigingssysteem. Voor de
passagierstoel vooraan, zorg ervoor dat de airbag(s)
gedeactiveerd worden door een vakman. (Schema 2)
IVº - Schuif de 2 ISOFIX-klemmen tussen de rug en de zit van de
passagierstoel en bevestig ze op de bevestigingssystemen van
de stoel. U zult een “klik” horen van elke klem als de acties correct
uitgevoerd werden. Controleer dat de klemmen goed geplaatst zijn.
Het lichtje op elke klem moet GROEN worden. (Schema 3)
Vº- Stel de lengte van de steunvoet in door op de knop (b) te druk-
ken tot de voet de bodem van de auto raakt.(Schema 4) Het lichtje
(c) op de steunvoet moet GROEN worden.
VOORZICHTIG ! In gebruik moet de steunvoet altijd uitgestrekt
zijn en zo vertikaal als mogelijk geplaatst zijn.
Tips : Als u uw basis plaatst op een
passagierstoel met verstelbare rug, volstaat
het de rug simpelweg achterover te leunen
bij het begin van de installatie. Zodra de
basis en de autostoel op hun plaats zitten,
heft u de rug van de passagierstoel op.
Dit verzekert optimale bevestiging van het
kinderbeveiligingsysteem.
VOORZICHTIG ! Controleer voor elk gebruik
dat de basis stevig vastzit op de
ISOFIX-bevestigingspunten van uw auto.
Schema 2
Schema 1
I
II
a
Schema 3
Schema 4
lichtje GROEN
- Ja!
lichtje ROOD -
Neen!
II I
b
cc
KLIK!
KLIK!
rood
Neen!
groen
Ja!
OPGELET ! Gebruik altijd de steunvoet tijdens de
installatie van de basis in het voertuig. Voor elk gebruik,
controleer dat de voet goed ingesteld is and dat hij stevig op de
bodem staat. De voet mag nooit rusten op de hoes van het bergvak op de bodem van uw auto.
Indien nodig, verwijder de hoes van het vak en strek de voet tot hij stevig drukt op de bodem
van het opbergvak.
ISOFIX-bevesti-
gingssystemen

NL
- het handvat van de autostoel moet ingesteld
worden tot positie 2** voor het dragen.
<**Positie 2 (vertikaal) : bestemd voor het
vervoer van de autostoel ;
*Positie 1 : wanneer de autostoel op plaats zit
op de ISOFIX-basis.>
We raden u aan de handleiding van de
autostoel te raadplegen Voor meer informatie.
(Schema 5)
VOORZICHTIG !
Voor elk gebruik, zorg ervoor dat :
- uw kind stevig beveiligd is in de autostoel met behulp van de gordels
om elk valgevaar te vermijden
INSTALLATIE VAN AUTOSTOEL OP ISOFIX-BASIS
Naar achter gericht - groep 0+ (0-13kg, 0 tot 6-9 maand ongeveer)
Iº - Plaats de autostoel, naar achter gericht,
op de basis en druk het naar beneden tot alle
metalen bevestigingsstaven van de autostoel
vast zitten in de bevestigingshaken van de
ISOFIX-basis (schema 7).
IIº - Zodra de autostoel geplaatst is, druk op
de rode knop (e) om het systeem te vergren-
delen. Het GROENE lichtje (f) bevestigt dat
de autostoel goed geplaatst werd. Controleer
dat de autostoel stevig vastzit op de basis
door de autostoel bij zijn handvat omhoog te
trekken. De autostoel moet op de basis be-
vestigd blijven met de 4 bevestigingshaken.
IIIº - Stel het handvat van de autostoel in
positie 1: raadpleeg de handleiding van de
autostoel voor instructies.
DEZE ISOFIX-BASIS IS ALLEEN BESTEMD VOOR GEBRUIK MET G0+
AUTOSTOEL REF 70303-0031/70303-0126/70303-0155/70303-0156/1059166/LB321I
(ECE44 goedkeuring nummer E13 44R 045153), AFZONDERLIJK TE KOOP.
*Positie 1 **Positie 2
Schema 5
Schema 6
(a)
I
II
ed
e
Schema 7
e
fe
Handvat in positie 1
Schema 6
(b)
- De bevestigingshaken op de ISOFIX-basis
moeten open zijn om de autostoel te ont-
vangen. Zorg ervoor dat de rode knop (e) vast
staat in de juiste opening (schema 6b).
Indien dit niet het geval is, druk knop (e) en
ondertussen druk de schakelaar naar bene-
den (d) naar de basis toe tot de knop (e) vast-
zit in de opening. (Schema 6 a)

NL
VERWIJDEREN VAN AUTOSTOEL VAN
DE BASIS
OPGELET ! Uw kind moet beveiligd blijven in de autostoel met behulp van
de gordels tijdens alle handelingen om elk valgevaar te vermijden
Iº - Stel het handvat van de autostoel
in positie 2 (vertikaal).
IIº - Ontgrendel de bevestigingshaken
van de ISOFIX-basis :
- Druk de rode knop (e) van het ver-
grendelingsysteem en tegelijk druk de
schakelaar naar beneden (d) naar de
basis toe tot de knop (e) vastzit in de
opening. (Schema 9)
- Hef de autostoel op met beide han-
den. (Schema 10)
OPGELET ! Voor gebruik, moet u controleren dat de autostoel stevig vastzit
op de ISOFIX-basis door de autostoel bij zijn handvat omhoog te trekken.
Foto 8
II
IVº - Stel de positie van de basis in tegenover de
autostoel door de lengte van de ISOFIX-klemmen
aan te passen : Hef de schakelaar (a) en beweeg
ondertussen de ISOFIX-basis naar de rug toe van de
passagierstoel van uw auto tot de autostoel drukt tegen
de rug van de passagierstoel (foto 8).
VOORZICHTIG !
Zorg er steeds voor dat de ISOFIX-klemmen stevig vastzitten.
- de steunvoet rust stabiel op de bodem. Het lichtje op de steun moet steeds GROEN zijn.
- de basis is stevig bevestigd op het ISOFIX-bevestigingssysteem van uw auto.
a
a
Handvat in
positie 1
Schema 9
I
II
ed
e
Schema 10
Handvat in
positie 2
Pince au plus long
Pince au plus court
I

NL
WAARSCHUWING: U dient regelmatig de staat van uw ISOFIX-ba-
sis.
Indien u de minste twijfel hebt, verwittigt u onmiddellijk onze
klantendienst op het nummer dat vermeld staat op het garantie-
bewijs. Is het aanbevolen om uw ISOFIX-basis uit de zon te hou-
den. Zo kan uw kind zich niet verbranden.
RANGEMENT DE LA BASE
VERWIJDERING VAN DE BASIS
VAN DE PASSAGIERSTOEL VAN UW AUTO
Iº - Ontgrendel de ISOFIX-
klemmen door de knoppen (g) te
verschuiven die u vindt op elke
klem -*naar u toe, zoals aangege-
ven in schema 11.
IIº - Trek de ISOFIX-basis voor-
zichtig naar u toe.
Iº - Ranger les pinces ISOFIX : Avec une main
soulever la manette de réglage (a) se trouvant sur
l’avant de la base et simultanément avec l’autre
main glisser les 2 pinces ISOFIX en même temps
vers la base jusqu’à ce que vous sentiez une
résistance. (schema 12)
IIº - Rabattre le pied de maintien
Schema 12
I
II
a
Schema 11
g
WAARSCHUWING!
ESSENTIELE VEILIGHEIDSVOORSCHRIFTEN
WAARSCHUWING! U dient absoluut aandachtig deze totale gebruiksaanwijzing
te lezen voor u uw ISOFIX-basis gebruikt en plaatst in uw voertuig teneinde volle-
dig vertrouwd te zijn met uw product en zo een uiterste gevaarlijk foutief gebruik
te vermijden.
- Uw kind nooit alleen later zonder toezicht in zijn autozit of in de wagen.
- Steeds het harnas gebruiken en aanpassen aan het lichaam van uw kind. Om elk
risico van vallen te voorkomen, dient uw kind altijd vastgemaakt te worden.
- De inkepingen van stilstand van de passagierszetel of van de achterste zetel
dienen altijd ingeschakeld te zijn.
- De zetel dient niet meer gebruikt te worden na een ongeluk.

NL
- Uit veiligheidsoverwegingen dient de ISOFIX-basis vastgemaakt te worden in het
voertuig zelf, zelfs indien u geen kind vervoert. Let er op dat de bagage en andere
objecten die kunnen bewegen in geval van schok stevig vastgemaakt zijn.
- Gebruik de ISOFIX-basis nooit op een passagierszetel uitgerust met een airbag,
als deze niet uitgeschakeld is door een professional.
- De ISOFIX-basis niet installeren in een passagierszetel die naar achteren
gedraaid is. De ISOFIX-basis niet installeren in een passagierszetel die naar de
zijkant gedraaid is.
- De base dient geïnstalleerd te worden in normale gebruikscondities, geen enkel
gedeelte van de stoel kan vastgemaakt worden onder een mobiele stoel van het
voertuig of aan de deur van het voertuig.
- Om de veiligheid van uw base te verzekeren mag u geen enkel toebehoren toe-
voegen en de base op geen enkele manier aanpassen.
- Het handvat van de autozit moet absoluut in de goede positie (positie 1) worden
geplaatst als de autozit gebruikt wordt in het voertuig.
- DEZE ISOFIX-BASIS IS ALLEEN BESTEMD VOOR GEBRUIK MET G0+
AUTOSTOEL REF 70303-0031/70303-0126/70303-0155/70303-0156/1059166/LB321I
(ECE44 goedkeuring nummer E13 44R 045153), AFZONDERLIJK TE KOOP.
Smeer de mechanische elementen regelmatig (bv.isox-klemmen, voetverbindingen
enz...). Gebruik bij voorkeur silicone smeermiddelen in de handel. Reinig de plastic ele-
menten met een warme vochtige doek. Gebruik nooit solventen, chemische reinigingsmid-
delen of smeermiddelen op enig element van de basis.
Laat het product drogen in de open lucht.
Als er per ongeluk eten of drank terechtkomt in de mechanische elementen, plaatst u de
basis in een bad van warm water met een beetje zeep en spoel. Aan de lucht laten drogen.
Smeer de mechanische delen en controleer de functie van de basis.
Het product moet opgeborgen worden in een droge omgeving met een temperatuur tussen
8ºC en 30ºC. Vermijd temperaturen onder 0ºC of hoger dan 30ºC.
VERZORGING EN ONDERHOUD

DE
Diese Isox-Basis ist nur für die Verwendung mit dem G0+ Autositz Ref. 70303-0031/70303-0126/70303-
0155/70303-0156/1059166/LB321I (ECE44 Zulassungsnummer E13 44R 045153), separat verkauft, gedacht.
Verriegelungssystem
für die Befestigung
am Autositz Schalter
+ Druckknopf
Anpassbares Standbein
Druckknopf
zum Anpassen
der Länge des
Standbeins
Einklappbare
ISOFIX-Klam-
mern
D
i
Schalter zum Anpas-
sen der ISOFIX-Klam-
mern
WICHTIG! LESEN DIE FOLGENDE ANLEITUNG VOR DEM GEBRAUCH SORGFÄLTIG.
BEWAHREN SIE DIESE ANLEITUNG FÜR EINE ZUKÜNFTIGE VERWENDUNG AUF. WENN DIE BEIGE-
FÜGTEN SICHERHEITSHINWEISE NICHT BEFOLGT WERDEN, KANN DIES IN EINER SCHWEREN VER-
LETZUNG RESULTIEREN. NACH DEM LESEN DER ANLEITUNG BEWAHREN SIE DIESES HANDBUCH
IN DER FÜR DIESEN ZWECK VORGESEHENEN TASCHE AUF DER UNTERSEITE DER ABDECKUNG DES
AUTOSITZES AUF (bitte beziehen Sie sich auf das Handbuch des Autositzes).
Befestigungse-
lemente für den
Autositz (x 4)
NUTZUNGSBEDINGUNGEN IN FAHRZEUGEN
Ihr Fahrzeug muss mit den ISOFIX-Verankerungssystemen ausgestattet sein. Eine
Liste mit den Fahrzeugmodellen und den entsprechenden Sitzen, auf denen dieses
ISOFIX-Rückhaltesystem befestigt werden kann, bendet sich im ANHANG zu dieser
Anleitung.
Die ISOFIX-Basis darf nie auf Beifahrersitzen angebracht werden, die mit einem
aktivierten Front-AIRBAG ausgestattet sind, außer der Airbag wird von einem dafür
zuständigen Fachmann deaktiviert. Bringen Sie die Basis nur auf nach vorne
gerichteten Beifahrersitzen Ihres Fahrzeugs an.
VORSICHT! Bringen Sie diese Basis niemals auf zur Seite oder nach hinten gerichteten Beifahrersitzen an.
HINWEIS
1. DIES IST EIN ISOFIX-KINDERRÜCKHALTESYSTEM. Es ist gemäß der Bestim-
mung Nr. 44,04 Änderungsserie für allgemeine Verwendung in mit den ISOFIX-Ve-
rankerungssystemen ausgestatteten Fahrzeugen genehmigt.
Dieses Kinderrückhaltesystem ist für „eingeschränkten/halb-universellen“
Gebrauch klassiziert und ist geeignet, um in den Sitzpositionen der im ANHANG
dieser Anleitung genannten Fahrzeuge verwendet zu werden. Sitzpositionen in
anderen Fahrzeugen können unter Umständen auch für dieses Kinderrückhalte-
system geeignet sein.
2. Es passt in Fahrzeuge mit Sitzpositionen, die als ISOFIX-Positionen geneh-
migt sind (wie im Handbuch des Fahrzeugs beschrieben), je nach Kategorie des
Kindersitzes und der Befestigung. Überprüfen Sie mit Hilfe des Handbuches des
Fahrzeugs oder Ihres Händlers, ob Ihr Fahrzeug entsprechend kompatibel ist.
3. Die Gewichtsklasse und die ISOFIX-Größenklasse, für die diese Vorrichtung
entwickelt wurde, ist wie folgt: Gruppe 0+ (0-13 kg), Größenklasse ISOFIX D.
ECE R44 Genehmigungsnummer E13 44R 045154.
Wenn Sie Fragen haben, wenden Sie sich bitte an uns.
This manual suits for next models
1
Table of contents
Languages:
Other VERTBAUDET Car Seat manuals

VERTBAUDET
VERTBAUDET 1004235-0907 User manual

VERTBAUDET
VERTBAUDET FC38VBT User manual

VERTBAUDET
VERTBAUDET 1004247-0907 SA User manual

VERTBAUDET
VERTBAUDET 1-2-3 User manual

VERTBAUDET
VERTBAUDET FC91VBT User manual

VERTBAUDET
VERTBAUDET 1004234-0907 SA ISIZE 1/2/3 User manual

VERTBAUDET
VERTBAUDET Juniorsit+ Easyfix User manual