VEVOR DM-160C User manual

Model:DM-160C
Mini Grinder
UserManual


Mini Grinder
UserManual
This is theoriginal instruction, pleasereadall manual instructionscarefully beforeoperating.
VEVOR r
besubjecttotheproductyoureceived. Pleaseforgiveusthatwewon'tinform you againif
thereis any technology orsoftwareupdatesonourproduct.
01

INSTRODUCTION
Thisro
andremovingrustintightspacesorinaccessibleplaces.Thetoolcanbeusedonmostmetals,glass,
woodandceramics.F
exercisingtoomuchpressure.Asaguideline,usethetoolatlowspeedforalllargeaccessories,suchas
polishingforexample,andathighspeedforsmalleraccessoriessuchasthoseusedforengraving.
Forgrindingandengraving,holdthetoolasifitwereapen.
TECHNICAL SPECIFICATIONS
AvailableVoltages
Maximum Output
NoLoadSpeed
220-240V~ 50Hz
160W
8,000 -35,000 rpm
Max3.2mm dia.
Colletchuck capacity
SAFETY INSTRUCTIONS FOR ALL TOOLS
WARNING: Whenusingelectricpowertoo
adheredtoinordertoreducetheriskoffire,electricshockandper
PleaseReadTheFollowingCarefully:
1.KEEPWORKAREACLEAN.Untidy benchesandworkareasinviteinjuries.
2.CONSIDERWORKAREAENVIRONMENT.Donotusepowertoolsindamporwetlocations.
Donotexposepowertoolstorain.Keepworkareaswelllit.
3.GUARDAGAINSTELECTRICSHOCK.Preventbody contactwithgr
pipes,refrigeratorenclosures.
4.KEEPCHILDRENAWAY.Allvisitorsmustbekeptaway fromtheworkarea.Donotletvisitorscome
intocontactwiththetoolorextensioncord.
5.STOREIDLETOOLS.Whennotinuse,toolsmustbestor
6.DONOTFORCETHETOOL.Itwilldothejobinhandbetterandsaferattherateforwhichitwas
intended.
7.USETHERIGHTTOOL.Donotforceasmalltooltodothejobofaheavy-duty duty powertool.
Donotusethetoolforthepurposeitisnotintendedfor.
8.DRESSPROPERLY.Donotwearlooseclothingorjew
Glovesandnon-skidfootweararerecommendedwhenworkingoutdoors.Wearaprotectivehead
covertocontainlonghair.
02

9.USESAFETYGLASSES.Alsouseafaceandadustmasktoguardagainstdust
10.DONOTABUSETHECORD.Nevercar
Keepthecordaway fromheat,oilorsharpobjects.
11.SECUREYOURWORK.Useclampsoravicetoholdyourworkinposition.Itismuchsaferthanusing
yourhandanditfreesbothhandstooperatethetool.
12.DONOTOVERREACH.Keepproperfootingandbalanceatalltimes.
13.MAINTAINTOOLSWITHCARE.Keeptoolscleanforbetterandsaf
forlubricatingandchangingaccessories.K
14.DISCONNECTTOOLS.Whennotinuse,befor
15.REMOVEADJSUTINGKEYSANDWRENCHES.Havethehabittocheckandseethatkeysand
adjustingwrenchesareremovedfromthetoolbeforeturningiton.
16.AVOIDUNINTENTIONALSTARTING.Donotcar
theswitchisoffwhenpluggingin.
17.OUTDOOREXTENSIONCORDS.Whenthetoolisusedoutdoors,only useextensioncordsintended
foruseoutdoorsandsomarked.
18.STAYALERT.Watchwhatyouaredoing.Usecommonsense.Donotoperatethetoolwhenyou
aretired.
19.CHECKDAMAGEDPARTS.Beforeusingatool,protectivecover,orotherdamagedp
becarefully checkedtoensurethatthetoo
alignmentofmovingp
conditionthatmay affectthetool’soperation.
20.DONOTOPERA
atmospheres.Motorsinthesetoolsnormally spark,andthesparksmay ignitefumes.
MultifunctionPowerToo
Nev
theON/OFFswitch.Thetoolwillruncontinuously untiltheswitchisturnedtoOFFposition.
Thespeedcanbeadjustedwhilethetoolisrunning.
SpeedAdjustment
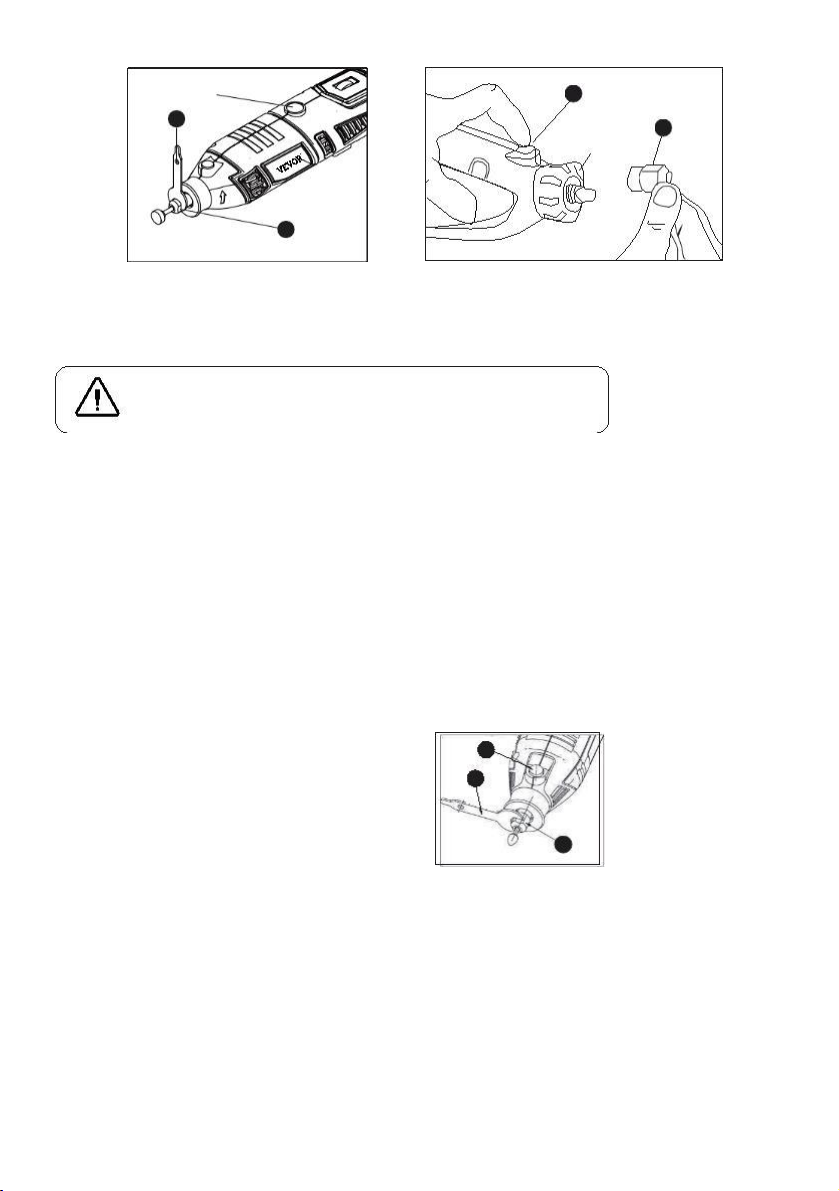
Themultifunctionpowertoolisequippedwithspeedcontrol.Donotchangethespeedwhilethetoolis
working.Thespeedswitchislocatedontherearofthetool.Turnittoincreaseorreducespeed.
Usethetoolatlowspeedforpolishingandsimilaroperations,butusehigherspeedfordrillingor
cuttingaction.
1.Thetoolshouldbeunpluggedwhenchangingaccessories.
2.Ifyoustallthetool,switchitoffimmediately.
3.Periodically checkthetightnessofyourcolletchuck,especially duringprolongeduseofthe
sameacces
4.Afteruse,alwaysdisconnectyourpowertool.
5.Dono
03

6.Donotleaveyourtoolunattendedwhileswitchedon.
7.Donotuseorstoreyourtoolindamporwetconditions.
Useful Hints& Tips
1.Yourro
cooldown.
2.Toensuresmoothrunning,thespindleshouldbeoiledperiodically.
3.Donotapply toomuchradialpressuretotheacces
grinding.By doingthisyouwillputastrainonthespindleandadversely affecttheprecisionofthetool.
4.Alwaysworkwithasensitivetouchsoasnottoimpedetheefficiency ofyourminitool.
5.Whendrillingmetal,alwaysmarkthedrillingpointwithacenterpunchfirst,sothatyourro
doesnotslip.
6.Alwaysensurethatyouhavemaximumcontactbetweentheacces
7.V
speedforengraving.
PlacingAccessoriesIntoTheTool
Alwaysswitchthetoolofffirst.Holdthelockingbuttonatthefrontofthetooldownandundothecollet
chuck(anti-clock
thecolletnutovertheco
shaftcontact.Thentightenupthecolletnut.(DONOTUSEPLIERS).
KNOW YOUR ROTARY TOOL
Beforeattemptingtouseany tool,familiarizeyourselfwithalloperatingfeaturesandsafety
requirements.
F
A
H
D
I
E
C
B
G
F
04

PART
DESCRIPTION
Shaftlock button
CaseLock
A
B
C
D
E
F
Collet
Colletnut
Colletwrench
Brushcap
G
H
I
On/OffSwitch
Speedcontrol dial
Powercord
FUNCTION DESCRIPTION
On/OffSwitch
Thisproducthasaneasy accesspowerSpeed
control switch(H)locatedatthebottomofthetool.
Needtoadjustthespeedoftheworkcanrotate
theGspeedswitch
HG
ReplacingCollets
Usingcolletsis themostpreciseway toholdanacces
andmaximum pressure,colletsstaytight.
1. Unplugthero
2. Pressandholdtheshaftlock button(A), androtatetheshaftwiththeprovidedcolletwrench (E)
until theshaftlock (A) engagestheshaft,preven
3. Withtheshaftlock (A) engaged,usethecolletwrench(E) toloosenthecolletnut(D), if neces
4. Removethecolletnut(D) andoldcollet(C) usingthecolletwrench(E), if neces
5.
6. Tightenthecolletnutwiththecolletwrench(E).
05

A
E
B
C
D
D
InstallingAccessories
WARNING
Donotpresstheshaftlockbutton(A)whilero
1.Unplugthero
2.Pressandholdtheshaftlockbutton(A),androtatetheshaftby handuntiltheshaftlockengages
theshaft,prev
3.Withtheshaftlockbuttonengaged,usethecolletwrench(E)toloosenthecolletnut(D),ifneces
4.itisengaged.
5.thecolletnut(D)withtheprovidedwrench(E)untiltheacces
Avoidexcesstighteningofthecolletnut(D).
RemovingAccessories
1.Unplugthero
2.Whentheshaftlock(A)isengaged, loosenthe
colletnut(D)withtheprovidedwrench(E).
A
E
3.Removetheacces
D
UsingMandrels
Themostcommontypesofmandreltousewiththistoolarethestandardmandrelwhichisusedwith
cuto
wheelsandpolishingdrums.Drummandrelsareusedwithsandingdrums.
TOINSTALL:
1.Unplugthero
2.Installthemandrel.
06

If UsingTheStandardMandrel:
1.Pressandholdtheshaftlockbutton(A).
2.intotheslotontopofthemandrelandunscrew.
3.Removemandrelscrewandwasher.
4.Placedesiredacces
andalignacces
5.theacces
NOTE: Themandrelwashershouldbeplacedbetweenthemandrelscrewandtheacces
*Tightenusingprovidedwrench.
If UsingTheDrum Mandrel:
1.Align appropriately sizedsandingdrumovermandrelandpushdowntocompletely coverdrumend
ofmandrel
2.onthedrummandrelheadtoexpandthedrumandsecurely holdthesandingdruminplace.
If UsingTheScrewMandrel:
1.Alignthedesiredacces
2.Screwacces
BalancingAccessories
Forprecisionwork
slightly loosenthecolletnutand turntheacces
thero
Continueadjustinginthisfashionuntilthebestbalanceisachieved.Replaceaccessoriesifthey become
damagedorunbalanced.
SpeedControl
Thero
Toselecttherightspeedforeachjob,useapracticepiece
ofmaterial.
Va
speedtofindthebestspeedfortheacces
areusingandthejobtobedone.Usetheindicatormark
abovethespeedcontroldial(H)tosetthebestspeedfor
thejob.Thespeedcontroldial(H)isnumberedfrom1to6.
Forexample,aspeedsettingof1isapproximately 8,000
RPM,andaspeedsettingof6isapproximately 35,000RPM.
RefertotheSpeedDialSettingstabletodeterminethe
properspeedbasedonthematerialbeingworkedandthe
typeofacces
H
07

SPEED SETTING FOR ROTARY ACCESSORIES
Soft
Hard
Aluminum,
brass, etc.
Shell,
stone
Function
Picture
Plastic
Steel
Ceramic
Glass
/
Description
wood
wood
Grinding
wheel
15000-
35000
15000-
35000
15000-
35000
15000-
35000
15000-
35000
15000-
35000
15000-
35000
Diamond
Grinding
Needle
Polished
Deburr
20000-
35000
20000-
35000
20000-
35000
/
/
/
/
/
Sanding
band
15000-
35000
15000-
35000
15000-
35000
15000-
35000
15000-
35000
15000-
35000
15000-
35000
/
/
15000-
35000
15000-
35000
15000-
25000
Drilling
Drill bits
/
/
/
/
Wool felt
wheel
12000-
17000
12000-
17000
12000-
17000
12000-
17000
12000-
17000
/
/
/
Polishing
Sanding
paper
12000-
20000
12000-
20000
12000-
20000
12000-
20000
/
/
/
/
/
/
/
Stainless
brush
8000-
15000
8000-
15000
8000-
15000
8000-
15000
8000-
15000
Cleaning
Cutting
Cutoff
wheel
25000-
35000
25000-
35000
25000-
35000
25000-
35000
/
/
/
/
Switch
Setting
1
2
3
4
5
5
8000-
11000
RPM
29000-
35000
RPM
Speed
Range
11000-13000RPM
14000-16000RPM
17000-20000RPM
22000-28000RPM
08

RULES OF OPERATING SPEEDS
Thebestway todeterminethecorrectspeedforworkonany materialistopracticeforafewminutes
onapieceofscrap,evenafterreferringtotheSpeedDialSettingstables.Youcanquickly learnthata
slowerorfasterspeedismoreeffectivejustb
atdifferentspeeds.
Whenworkingwithascrappieceofplastic
y
optimumworkingspeedwithoutmeltingtheworkpiece.
frictionofthetoolgeneratesheatandcausestheplastictomelt.
Slow-speedoperation(15,000RPMorless)isusually bestforpolishingoperationsusingthefelt
polishingaccessories,delicatewoodc
speedstoavoidwiredischargefromtheholder.Allowthetooltodotheworkforyouwhenusinglower
speedsettings.
Higherspeedsarebetterfordrilling,c
inwood.Hardwoods,metalsandglassalsorequirehigh-speedoperation.
NOTE:
1.Plasticandmaterialsthatcouldmeltatlowtemperaturesshouldbecutatlowspeeds.
2.Softwoodshouldbecutathighspeed.
3.Aluminum,tin,copper,lead,andzincalloysmay becutatany speed,dependingonthetypeof
cuttingbeingdone.Useparaffinorothersuitablelubricantsonthecuttertopreventthecutmaterial
fromadheringtothecutt.
CUTTING GUIDE
Thecuttingguidecomescompletely assembledandready touseonavariety ofmaterialsupto20mm
thick.Alwaysholdthetoolfirmly,usingaslowsteady pressuretoguidethetoolthroughyourwork.
Thespeedofthetoolwilldothework.
IMPORTANT: Alwayscutinclockwisedirectionexceptwhenfollowingatemplate(outletbox),
thencutincounter clockwisedirection.
InstallationInstructionOfTheCuttingGuideAttachment
Step1&2.Removethecolletnutandthenthehousingcapfromtheendofyourro
Step3.Placethecolletnutloosely ontheendofthero
Tightencolletnut.
Step4.ThreadtheCuttingGuideAttachmentontotheexposedhousingthreadsonthero
Step5.Adjusttheattachmenttothedesiredcuttingdepth.
09

Step.1
Step.2
B
3
1
2
Step.3
Step.4
4
2
Step.5
ShieldRo
Thero
fromtheuserwithoutint
left-handgrippositionsandworkstodeflectdebrisonavariety ofapplications,includingcutting,
sanding,grindingandpolishing.Theshieldcanbequickly adjustedintoposition,provideseasy access
totheacces
InstallationInstruction:
Step1.RemovethehousingcapAfromtheendofthetoolandsethousingcapaside.Theoriginal
housingcapmustbereinstalledwhenthisattach¬mentisnotused(Fig.1).
Step2.ScrewtheShieldontothetoolusingthelocknutB(Fig.2).
Step3.PositiontheShieldsuchthatitwillredirectdebris,sparks,anddustaway fromtheuserusing
thepositioningtabsC(Fig.3).
UsingTheShieldRo
Alwaysturnthetooloffbeforeadjustingposition,changingacces
Ro
Maneuverability,theShieldcanbequickly positionedandrepositionedwithaturntotherightorleft.
Toext
10

FIG.1
FIG.2
FIG.3
C
FlexibleDriverAttachment
Safety RulesforFlexibleDriver.Donot
operatetheflexibleshaftwithasharp
ormultiplebends.Ensurethatthere
arenosharpresidualbendsorkinksin
theFlexibleDriverbeforetheoperation.
Overbendingtheshaftcangenerateexcessive
heatonthejacketorhandpieceandmay
causetheFlexibleDrivertodisengagefrom
thetool.Theminimumrecommendedbendradiusis6”.Alwaysholdthehandpiecefirmly inyourhands
totwist.Notforusewithrouterbitsorotherlargediameters(1”orlarger)bits.Largediame¬terbits
cancausekickbackandlossofcontrolwhenusedwiththeFlexibleDriver.Donotremoveendferrule
whiletoolisrunning.Thecablewillbecomeloosefromthejacketandwilluncontrollably whiporlash
around.
INSTALLATION DIAGRAM OF FLEXIBLE DRIVER
1.Removetheshaftcollar.
2.Loosenthecolletnut.
3.Raisethehandleendofthe
flexibleshaft&shakegently
untiltheinnerflexibleshaft
protrudes.
5.Screwtheflexibleshaftfitting
collarontothero
tightenthecollet.
11

7.Loosenco
acces
DIRECTIONS FOR USE
1.Withsmallmillingcutters/grindingpins:Useahighspeed.
2.Withlargemillingcutters/grindingpins:Usealowspeed.
3.Precisionwork/engraving:Holdthedriveunitlikeapen.
4.Roughwork:Holdthedriveunitlikeahammer.
TIPS:
1.Ex
2.Youwillnotfinishyourworksoonerby ex
causethedriveunittoslowdownorstopandwilloverloadthemotor.
OperatingInstructions
Run-InbeforeOperation
Forop
speedonyourro
DisengagementoftheFlexibleDriver
Theflexibleshaftmay becomedisengagedifthemotorofyourro
toolisnotelevated.
HigherthantheworkingendoftheFlexibleDriver.
FlexibleShaftLubrication
TheFlexibleDrivershouldbelubricatedafterev
UnscrewtheFlexibleDriverassembly fromthemotorhousing.Pullthecenter
coreoutoftheFlexibleDriverassembly.Wipeav
bearinggreaseontothecentercoreandr
damagetotooldonotovergreaseshaft.Toomuchgreasewillcausetheunittooverheat.
ReattachtheFlexibleDrivertothero
Fig.1
12

CLEANING
1.Keepallsafety devices,airventsandthemotorhousingfreeo
Wipetheequipmentwithacleanclothorblowitwithcompressedairatlowpressure.
2.Werecommendthatyoucleanthedeviceimmediately eachtimeyouhavefinishedusingit.
3.Cleantheequipmentregularly withamoistclothandsomesoftsoap.Donotusecleaningagentsor
solvents;thesecouldattacktheplasticp
thedevice.
Readtheinstructionmanual.
ThisproductisofprotectionclassII.That meansitisequippedwithenhancedordouble
insulation.
Comply withtheEuropeansecurity c
ThisproductissubjecttotheprovisionofEuropeanDirective2012/19/EC.Thesymbol
showingawheeliebincrossedthroughindicatesthattheproductrequiresseparaterefuse
collectionintheEuropeanUnion.Thisappliestotheproductandallaccessoriesmarked
withthissymbol.Productsmarkedassuchmay notbediscardedwithnormaldomestic
waste,butmustbetakentoacollectionpointforrecyclingelectricalandelectronic
devices
EUREPUKLTD
UNIT2264,100OCKSTREET,ABINGDON
OXFORDSHIREENGLANDOX145DH
UK REP
FREEMOODLTD
Address:2HolywellLane,London,England,EC2A3ET
EUREPGmbH
Unterlettenweg1a,85051
Ingolstadt,Germany
EC REP
WAITCHX
Address:250bisboulevardSaint-Germain75007Paris
Manufacturer:ChangzhouW
Add:NiutangTown,Wujin,Jiangsu,213163
13

E-mail:[email protected]m
Table of contents
Other VEVOR Grinder manuals
Popular Grinder manuals by other brands

Würth
Würth DTS 100 Translation of the original operating instructions

Conti
Conti Grinder 400 user manual

Hitachi
Hitachi G 12SA2 Technical data and service manual

Narex
Narex EBU 150-16 Original operating manual

Chicago Electric
Chicago Electric 94071 Set up and operating instructions

Grizzly
Grizzly H8126 Parts Breakdown