VEVOR TS-103 User manual

Technical Support and E-Warranty Certificate
www.vevor.com/support
HANDHELD METAL DETECTOR
INSTRUCTIONS
MODEL: TS-103
We continue to be committed to provide you tools with competitive price.
"Save Half", "Half Price" or any other similar expressions used by us only represents an
estimate of savings you might benefit from buying certain tools with us compared to the major
top brands and does not necessarily mean to cover all categories of tools offered by us. You
are kindly reminded to verify carefully when you are placing an order with us if you are
actually saving half in comparison with the top major brands.

- 1 -
MODEL: TS-103
Have product questions? Need technical support? Please feel free to
contact us:
Technical Support and E-Warranty Certificate
www.vevor.com/support
NEED HELP? CONTACT US!
This is the original instruction, please read all manual instructions
carefully before operating. VEVOR reserves a clear interpretation of our
user manual. The appearance of the product shall be subject to the
product you received. Please forgive us that we won't inform you again if
there are any technology or software updates on our product.
Handheld metal detector
Instructions

- 2 -
Warning-To reduce the risk of injury, user must read
instructions manual carefully.
This device complies with Part 15 of the FCC Rules. Operation
is subject to the following two conditions:(1)This device may not
cause harmful interference, and (2)this device must accept any
interference received, including interference that may cause
undesired operation.
This product is subject to the provision of European Directive
2012/19/EC. The symbol showing a wheelie bin crossed
through indicates that the product requires separate refuse
collection in the European Union. This applies to the product
and all accessories marked with this symbol. Products marked
as such may not be discarded with normal domestic waste, but
must be taken to a collection point for recycling electrical and
electronic devices
FEATURES
Detect metal objects in all directions.
High precision identifying system.
Auto power off.
Low power consumption.
Shock resistance.
Small size, light weight.
Waterproof design, IP degree of IP68.
SPECIFICATIONS
Sensitivity: 40mm ( for one dollar coin )
Alarm Mode:
Mode 1: Vibration and buzzer sound alarm mode
Mode 2: Buzzer sound alarm mode
Mode 3: Vibration alarm mode

- 3 -
Operating Evnironment:
Temperature: -20C to 60C
Relative Humidity: <90%
Battery: 9V battery, 6F22 or equivalent, 1 piece
Dimensions: 250mm x 45mm x 42mm
Weight: About 250g ( including battery )
STRUCTURE
INSTALLING BATTERY
1.Remove the battery cover by turning it counterclockwise.
2. Install a new 9V battery ( 6F22 or equivalent ) intothe battery
compartment, make sure the polarityconnections are correct( see
Figure 2 ); otherwisethe metal detector may be damaged.

- 4 -
3. Reinstall the battery cover, turn it clockwise tosecure it in place.
Note:
1. Never leave an exhausted battery in the detector
2. If you do not use the detector in a long period oftime, remove the
battery from the detector to avoidcorrosion.
OPERATIONINSTRUCTION
1. Hold the detector by the handle. Make sure that the detector is far away
from any metal object, and then press the power button briefly to turn on
the detector. The green power indicator LED and the illumination lamp
light up, and the detector vibrates once and/or the buzzer sounds a beep,
indicating that the detector has been turned on.
2. The detector starts calibration automatically. Thecalibration takes about
2 to 4 secs.When thecalibration is completed, the detector vibrates
brieflytwo times and/or the buzzer sounds two beeps.
Note: lf you want to use this detector to detectmetal objects buried in
mineralized soil,salt water or wet salt sand, you must holdthe tip of the
detector to mineralized soil!salt water or wet salt sand and turn on
thedetector to let it perform auto calibrationthere.
3. Move the detecting wand smoothly along thesurface of the object to be
checked. As the detectorgets close to a metal object, it will start to
vibrateand/or the built-in buzzer will sound. The vibrationand/or the beep

- 5 -
sound will intensify as the detectorgets closer to the metal.
4. After the detector is turned on and calibrated, youcan press and hold the
power button for about 2seconds to enter the alarm-mode-switching
stateThe illumination light will flash as an indicationThe detector defaults
to enter the alarm mode withvibration and buzzer sound. Press the
power buttononce to switch to the buzzer sound alarm mode.and press it
again to switch to the vibration alarmmode. After selecting the desired
mode, press andhold the power button for about 2 seconds toconfirm
it,or wait for about 5 seconds for thedetector to automatically confirm.
Note: After the next power-up, the detector willdefault to the alarm mode
confirmed in the previoususe.
5. After finishing using the detector, press the powerbutton once to turn off
the detector; the detectorwill vibrate three times and/or the buzzer will
soundthree beeps
Note:
Before each use, verify the detector's operationby detecting a known
metal object.Do not use the detector if it operates abnormally.
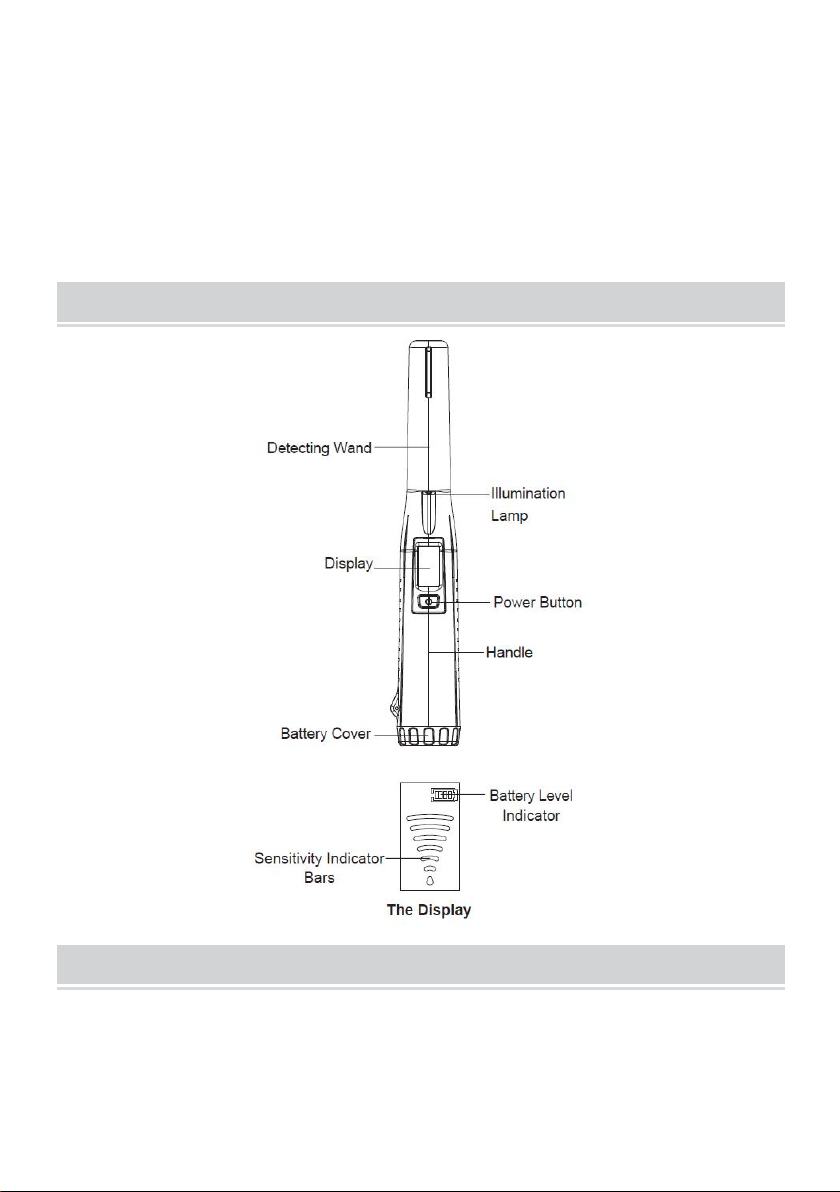
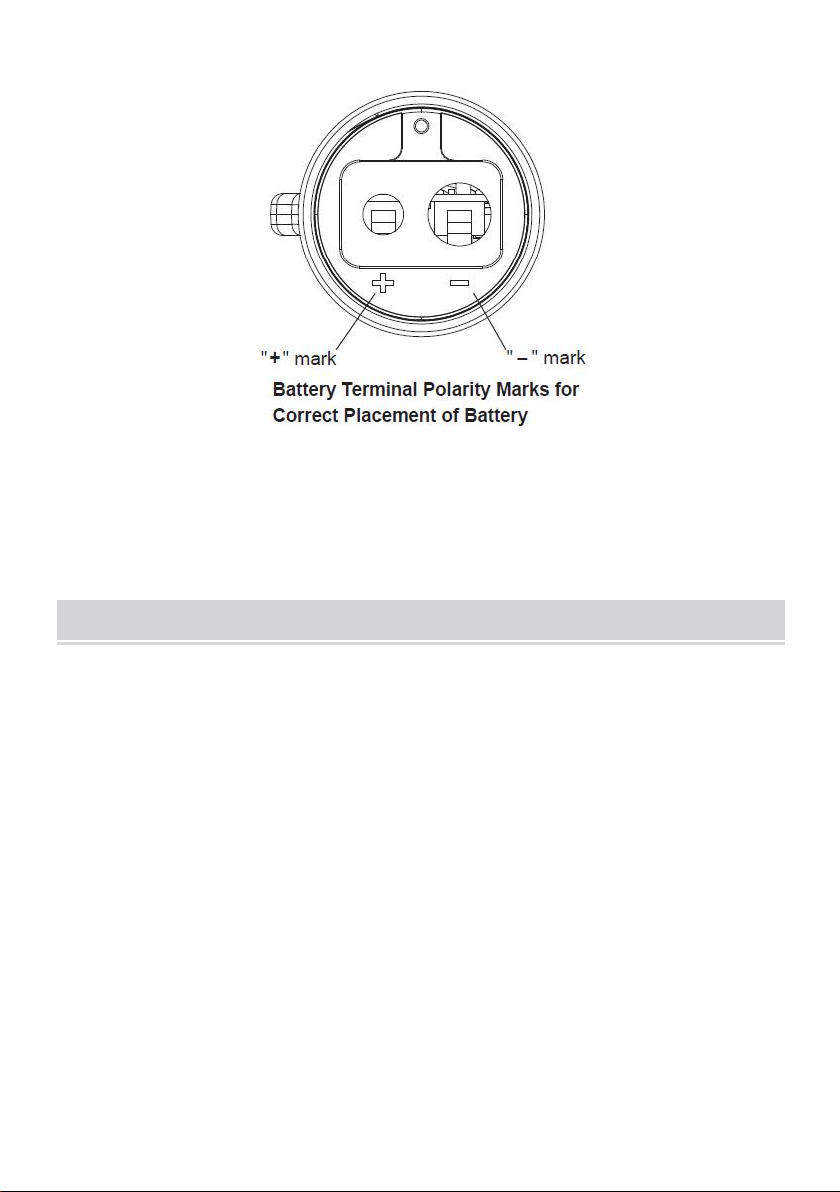
If the display shows the symbol " ", the battery is not high
enough and you must replace the battery immediately; otherwise the
detector may not operate or detect metal normally.When the battery is
too low, the detector will turnoff automatically.
When the battery is too low, the detector will turn off automatically.
To save battery charge, turn off the detector whennot in use.
AUTOMATIC POWER OFF
lf you have not pressed the power button and thedetector has not detected
any metal object for about5 minutes, the detector will start to prompt
withvibration and/or buzzer sound every 12 secs.Andafter six prompts, the
detector will turn offautomatically.
Note: If any metal object is detected or the powerbutton is pressed, the
prompt will be cancelled andthe timer will reset.

- 6 -
DECLARATION
1. This Instruction Sheet is subject to change without notice.
2. Our company will not take the other responsibilitiesfor any loss.
3. The contents of this Instruction Sheet can not beused as the reason to
use the detector for anyspecial application.
LIST OF ACCESSORIES
9V carbon tandem battery (6F22)*1
Waist hanging cover*1
Telescopic lanyard*1
Instructions*1
DISPOSAL OF THIS ARTICLE
Dear Customer,
lf you at some point intend to dispose of this article, then please
keep in mind that many of its components consist of valuable
materials,which can be recycled.
Please do not discharge it in the garbage bin, but check with
your local council for recycling facilities in your area.
Address: Baoshanqu Shuangchenglu 803long 11hao 1602A-1609shi Shanghai
Imported to AUS: SIHAO PTY LTD.1 ROKEVA STREETEASTWOOD NSW 2122
Australia
Imported to USA: Sanven Technology Ltd. Suite 250, 9166 Anaheim Place,
Rancho Cucamonga, CA 91730
REP
EC
SHUNSHUN GmbH
Römeräcker 9 Z2021, 76351
Linkenheim-Hochstetten, Germany
REP
UK
Pooledas Group Ltd
Unit 5 Albert Edward House, The
Pavilions Preston, United Kingdom
Made In China
Table of contents
Other VEVOR Metal Detector manuals