VEVOR TS26 User manual

Technical Support and E-Warranty Certificate www.vevor.com/support
METAL DETECTOR
MODEL:TS26
We continue to be committed to provide you tools with competitive price.
"Save Half", "Half Price" or any other similar expressions used by us only represents an
estimate of savings you might benefit from buying certain tools with us compared to the major
top brands and doses not necessarily mean to cover all categories of tools offered by us. You
are kindly reminded to verify carefully when you are placing an order with us if you are
actually saving half in comparison with the top major brands.


- 1 -
MODEL:TS26
Have product questions? Need technical support? Please feel free to
contact us:
CustomerService@vevor.com
NEED HELP? CONTACT US!
This is the original instruction, please read all manual instructions
carefully before operating. VEVOR reserves a clear interpretation of our
user manual. The appearance of the product shall be subject to the
product you received. Please forgive us that we won't inform you again if
there are any technology or software updates on our product.
METAL DETECTOR

- 2 -
This device complies with Part 15 of the FCC Rules. Operation is
subject to the following two conditions:(1)This device may not cause
harmful interference, and (2)this device must accept any interference
received, including interference that may cause undesired operation.
This product is subject to the provision of European Directive
2012/19/EC. The symbol showing a wheelie bin crossed through
indicates that the product requires separate refuse collection in the
European Union. This applies to the product and all accessories
marked with this symbol. Products marked as such may not be
discarded with normal domestic waste, but must be taken to a
collection point for recycling electrical and electronic devices
INTRODUCTION
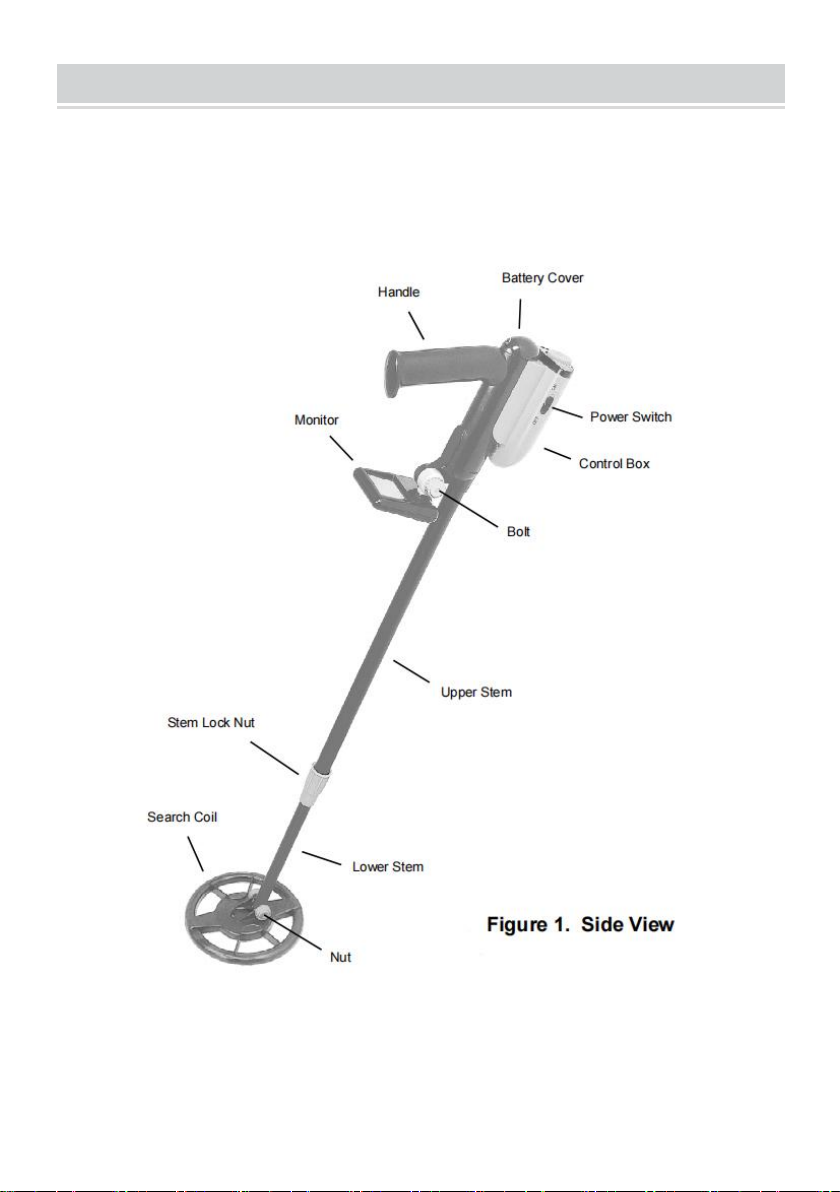
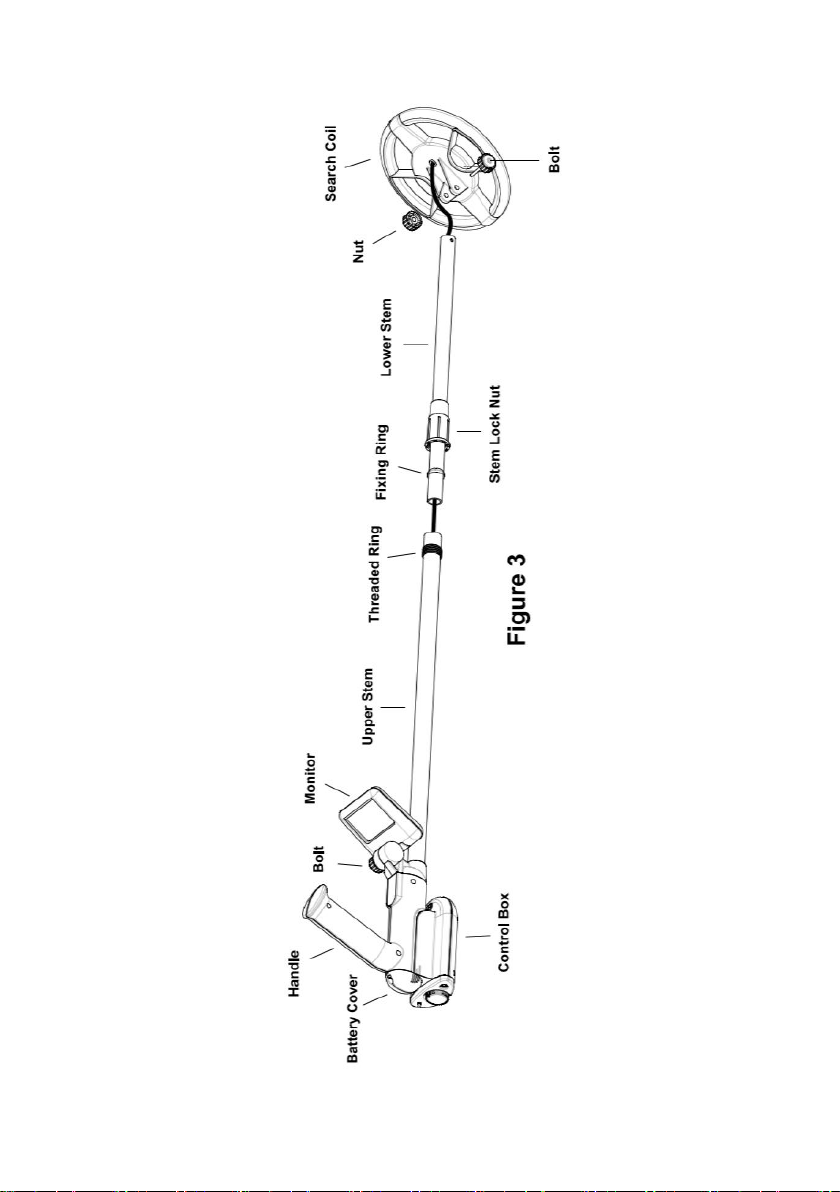
This metal detector is designed using the latest technology. It features lightweight
and easy to operate. It has two detection modes, which are ALL METALS mode
and DISCRIMINATION mode, and you can select a desired mode between them.
Features:
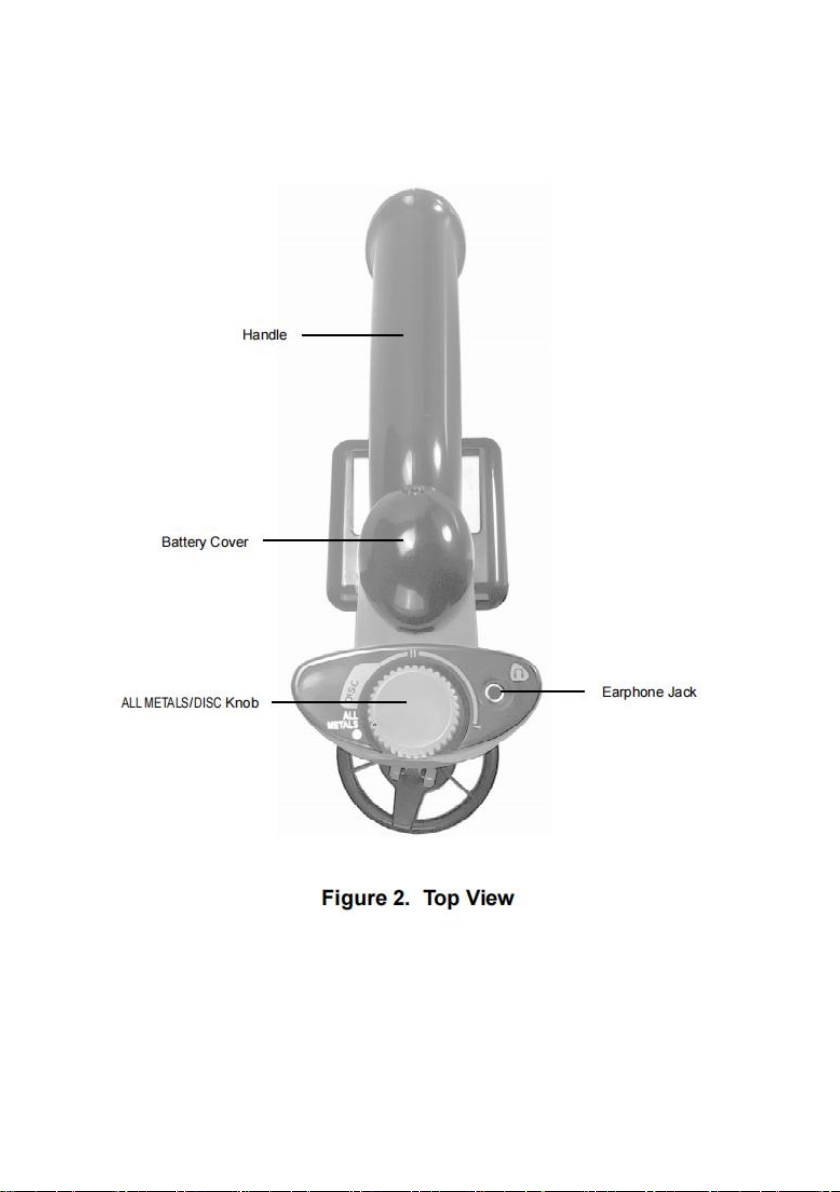
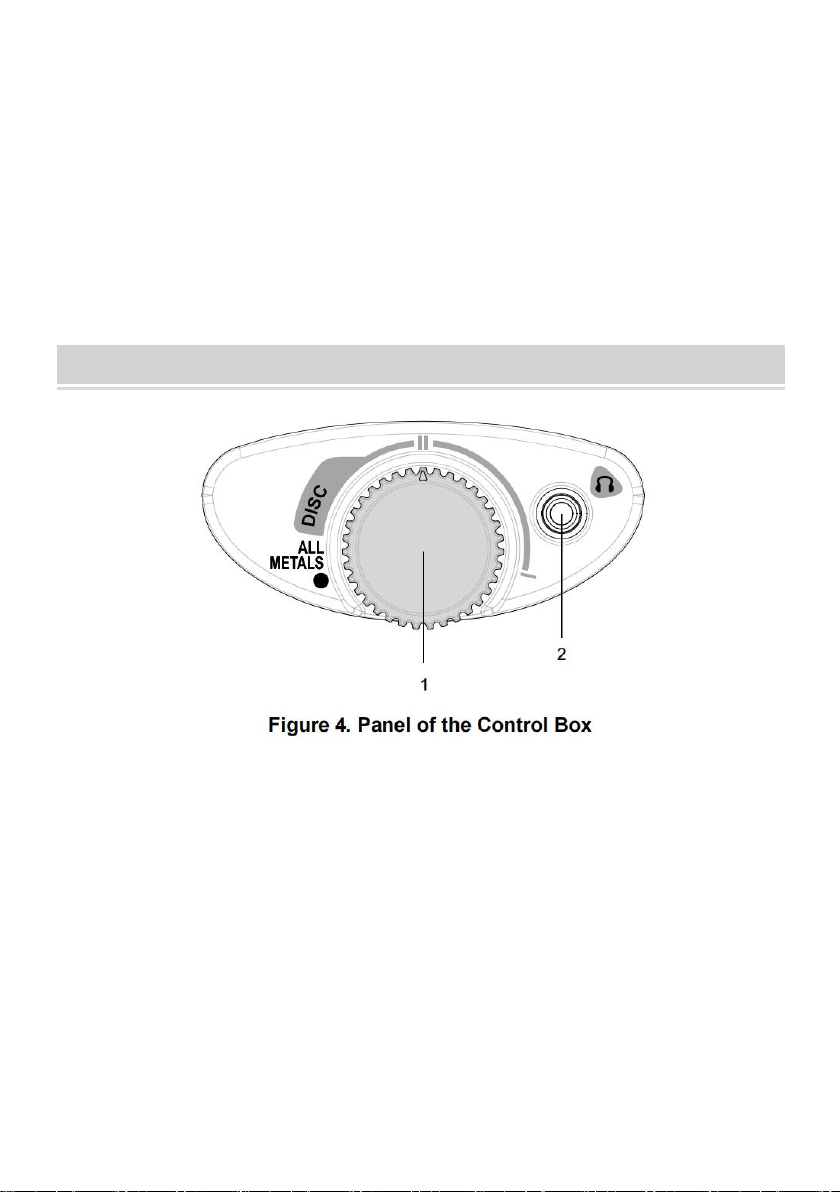
•Two detection modes - ALL METALS mode and DISCRIMINATION mode
•Adjustable discrimination type
•Auto ground balance
•Detection level indication
•Audio alarm
•9V battery power supply
•Low battery indication
•3.5mm earphone jack

- 3 -
STRUCTURE / ASSEMBLY INSTRUCTION

- 4 -

- 5 -
Assembly Drawing

- 6 -
Note:
1. See the above figure, the fixing ring is placed around the lower stem,
and its flat side faces the upper stem.
2. The two protrusions on the inner surface of the threaded ring must fit into
the two holes near the lower end of the upper stem.
3. To avoid damage, do not pull the detector's cable with force.
PANEL OF THE CONTROL BOX
1. ALL METALS/DISC knob
Counterclockwise turn this ALL METALS/DISC knob to the "ALL METALS" position.
The knob clicks and the detector stays in the ALL METALS mode.
When this knob is in the "ALL METALS" position, clockwise turn it and, after it
clicks, the detector is in the DISCRIMINATION ( DISC ) mode.
2. Earphone Jack

- 7 -
DISPLAY INSTRUCTION
OPERATING INSTRUCTION
Preparation prior to metal detection
Before beginning an outside search, test the detector with the following metal
samples:
•An iron nail
•A five-cent coin ( nickel )
•A one-cent penny ( zinc coin, after 1982 )
•A 25-cent silver quarter

- 8 -
Place the metal detector on a wooden or plastic table with the search coil roughly
perpendicular to the table surface ( see Figure 6 ). Make sure the table is far away
from TVs, computers, or any device that can cause electromagnetic interference.
Note: To avoid interference, remove any watches, rings, or other metal objects on
your fingers and hands.
To turn on the detector, slide the power switch on the left side of the control
box to ON position. The leftmost detection level indicator bar and the
rightmost detection level indicator bar appear on the display and then flash
synchronously indicating that the detector is on and that the detector is in
stand-by state.

- 9 -
Testing the detector in the All METALS mode
Counterclockwise turn the ALL METALS/DISC knob until it clicks. Now the detector
is in the ALL METALS mode. Refer to Figure 6, respectively pass the metal
samples ( the iron nail and 3 coins ) across the search coil at a distance of 5cm to
8cm. When any of the metal samples passes across the search coil, the detector
should beep and the monitor screen should show the display shown in Figure 8.
When the detector stops sounding, the monitor screen should show the stand-by
display quickly ( see Figure 7 ).
The ALL METALS mode allows the detector to achieve the maximum detection
depth possible.
Note:
During test, the metal sample which you are using must be in motion; otherwise
the detector will not respond to this metal sample.

- 10 -
Testing the detector in the DISCRIMINATION mode
Make sure that the ALL METALS/DISC knob is in the "ALL METALS" position, then
turn the knob clockwise until it clicks. Now the detector is already in the
DISCRIMINATION mode. In this mode, you can use the ALL METALS/DISC knob
to search for specific metals by having it ignore other kinds of metals. At the
present knob position, where the knob just clicked, the detector will respond to
ANY metal object and the monitor screen will show the display shown in Figure 8
when the detector beeps.
Note:
The Figure 9 on the right
shows the knob positions
for some often encountered
metals. If the ALL METALS/DISC
knob is in one of these
positions, the corresponding
metal will be ignored during
scanning. The specifications
or descriptions on the figure
are not accurate and are for
non-critical reference only.

- 11 -
1. To prevent the detector from detecting iron metals, set the ALL METALS/DISC
knob to about " 12 o'clock ". See Figure 10.
2. As a test, sweep the iron nail sample across the search coil at a distance of
about 5cm to 7.5cm, the detector will not beep and the stand-by display ( see
Figure 7 ) will remain on the monitor screen, but the other metal samples ( the
three coins ) will cause the detector to beep and the monitor screen to show the
display shown in Figure 8 when they are respectively swept across the search coil.
3. To have the metal detector ignore nickel metals, set the ALL METALS/DISC
knob to about " 3 o'clock " ( see Figure 11 ). Sweep the nickel across the search
coil at a distance of about 5cm to 7.5cm; the metal detector will not respond to the
nickel or the iron nail. But it will respond to the other samples.

- 12 -
4. To prevent the zinc penny from being detected, set the
ALL METALS/DISC knob to about " 5 o'clock " ( see Figure 12 ). By now,
only the 25-cent silver quarter should be detected.
Note: The discrimination position of aluminum is similar to that of silver. So both
metals will be detected at the same time. The discrimination position of gold is
similar to the nickel setting.
Through the above tests, you can quickly know the performance of the detector
and know how to use the detector.
Tip: During test, the metal sample which you are using must be in motion.

- 13 -
DETECTING METALLIC OBJECT WITH THE DETECTOR
After you finish all the tests mentioned above, you can start to detect metallic
objects.
Turn on the detector, and set it in the ALL METALS mode. And be far away from
any external interference source.
During detection, keep the search coil height approximately 3cm to 5cm above the
ground and parallel to the ground at all times for best detection results, walk slowly
as you scan the search coil slowly in a straight line from side to side.
When you detect a metallic object, you can use the DISCRIMINATION mode to try
further identification or discrimination, if necessary.
Metal detection is a careful, difficult job. Because there may be iron nails, metallic
oxides, and metal scraps in soil, it may be necessary to perform detection many
times in the same location to get an accurate result, especially in an area where
the soil contains complex mineral substance constituents.

- 14 -
Note:
1. Because many factors ( degree of oxidation of metallic object, metal impurities
in soil, soil moisture content, etc. ) can affect metal detection/identification in
DISCRIMINATION mode, the results of metal identification/discrimination are not
guaranteed to be correct.
2. During detection, the search coil must be in motion. If the search coil is still, the
detector can not detect metal normally.
3. The detector can work with the earphone ( optional ). To use the earphone, just
insert the plug of the earphone into the earphone jack on the control box, the
loudspeaker in the control box will be disabled automatically.
Note:
For safety, do not use earphones near traffic.
To avoid hearing loss, do not use earphones if using them makes you feel
uncomfortable.
BATTERY REPLACEMENT
When the low battery indicator " " appears on display, the battery is not high
enough and must be replaced immediately.
To replace the battery, set the power switch to OFF position to turn off the detector
first. Then use a suitable screwdriver to unscrew the screw on the battery cover
( see Figures 1 and 2 ), and then remove the battery cover. According to the
polarity indication on the inner wall of the battery compartment, replace the old
battery with a new one of the same type, making sure that the polarity connections
are correct ( refer to Figure 14 ). Reinstall the battery cover and the screw.

- 15 -
NOTE
1. To preserve battery life, set the power switch to OFF position to turn off the
detector when the detector is not in use.
2. If the detector can not operate normally, a possible cause is that the battery is
exhausted.
3. Protect the plug of the search coil cable from damp; otherwise the detector may
lose its detecting ability. Dry the plug as needed.
4. The control box is not waterproof. Protect the control box from water, and do not
use the detector in rain.
5. Do not place the detector in any high temperature environment.
6. Do not tamper with the circuit of the detector.
7. Do not pull the search coil cable with force.
8. Handle the detector gently. Do not bump, drop or abuse the detector.
9. When you turn the knob, do not apply excessive force.

- 16 -
WARNING
Any metal detector may discover underground power lines, explosives or other
items which when struck could cause personal injury. When searching for metals,
observe these precautions:
1. Do not search in an area where you believe there may be shallowly buried
underground electric lines or pipes.
2. Avoid striking any line known to be or suspected to be carrying electrical power.
3. Do not disturb any pipeline, particularly if it could be carrying flammable gas or
liquid.
4. Use reasonable caution when digging toward any target, particularly in areas
where you are uncertain of underground conditions.
5. Observe all national, state and local laws while detecting.
TECHNICAL SPECIFICATION
Operating Current: About 300mA
Battery: 9V battery, 6F22 or equivalent, 1 piece
ACCESSORIES
Manual: 1 piece
Handbag: 1 piece
Digging shovel: 1 piece
Rake: 1 piece
Battery: 1 piece
DECLARATION
1. This manual is subject to change without notice.
2. Our company will not take the other responsibilities for any loss.
3. The contents of this manual can not be used as the reason to use the detector
for any special application.

- 17 -
Address:Baoshanqu Shuangchenglu 803long 11hao 1602A-1609shi
Shanghai
Imported to USA: VEVOR STORE INC, 9448 RINCHMOND PL #E
RANCHO CUCAMONGA, California, 91730 United States of America
REP
EC
SHUNSHUN GmbH
Römeräcker 9 Z2021, 76351
Linkenheim-Hochstetten, Germany
Made In China
Table of contents
Other VEVOR Metal Detector manuals