Viatek LL03-RG-MOV-R User manual

LL03-RG-MOV-R (Red/Green Moving Laser)

IMPORTANT SAFEGUARDS
To reduce the risk of re, electric shock, or injury when using any electric appliance,
precautions should be made. These precautions include but are not limited to:
Read all instructions.
CAUTION! — Use only as directed. Improper use may result in damage to the eyes due to
direct exposure to laser radiation.
This product has a polarized plug to reduce the risk of electric shock. It will therefore only
t into a polarized outlet one way. If the plug does not t, reverse the plug. If it still does not
t, contact a qualied electrician. Do not use with an extension cord unless the plug can be
fully inserted. Do not alter the plug.
This unit is certied as a Class IIIa laser product by the US Federal Laser Product
Performance Standard (FLPPS) according to regulations in 21 CFR Subchapter J. Class IIIa
laser products can be hazardous when directly viewed.
Avoid looking directly into Class IIIa lasers. This product, as well as other demonstration
laser products like some laser pointers, are classied as Class IIIa laser energy levels. This
product uses diractive optics to scatter the beam of energy. This scattering eect causes
the energy concentration to drop below the exposure limits for momentary or accidental
viewing at a relatively short distance from the laser aperture. As with all bright light sources,
when you operate this device in public areas it is recommended that up-close access to
the light be restricted.
While the Class IIIa laser in this device may be hazardous on its own, it is encased in a
protective housing and uses diractive holographic optics, therefore users are not directly
exposed to laser radiation during operation or maintenance. Each individual laser beam is
less than 5mW, which is about the same as an average laser pointer.
DO NOT attempt to open the protective housing or operate the device if the aperture
windows are damaged. If the unit requires service that involves removing the protective
housing, contact the manufacturer. Opening the protective housing voids the warranty.
Use only three-wire outdoor extension cords that have three-prong grounding plugs,
plugged into grounded outlets. Acceptable extension cord types:
SW, SW-A, SOW, SOW-A, STW, STW-A, STOW, STOW-A, SJW, SJW-A, SJOW,
SJOW-A, SJTW, SJTW-A, SJTOW, SJTOW-A
Ground Fault Circuit Interrupter (GFCI) protection is to be provided on the circuit(s) or
outlet(s) to be used while operating portable laser light in a wet location. Receptacles with
built-in GFCI protection are available for this purpose.
SAVE THESE INSTRUCTIONS
Ground Stake
Light Projector
Remote
COLOR
FLASH
2H
8H6H
4H
RESET
2-Prong
Adapter Weather-Resistant Cap
Pivot Clamp
Screw

Activating Remote
Pull the strip from the battery compartment on the back of the remote. To
test the remote’s battery connection, press any button and the LED will
illuminate for 1 second. If the LED does not illuminate, open the battery
compartment to make sure battery is properly installed.
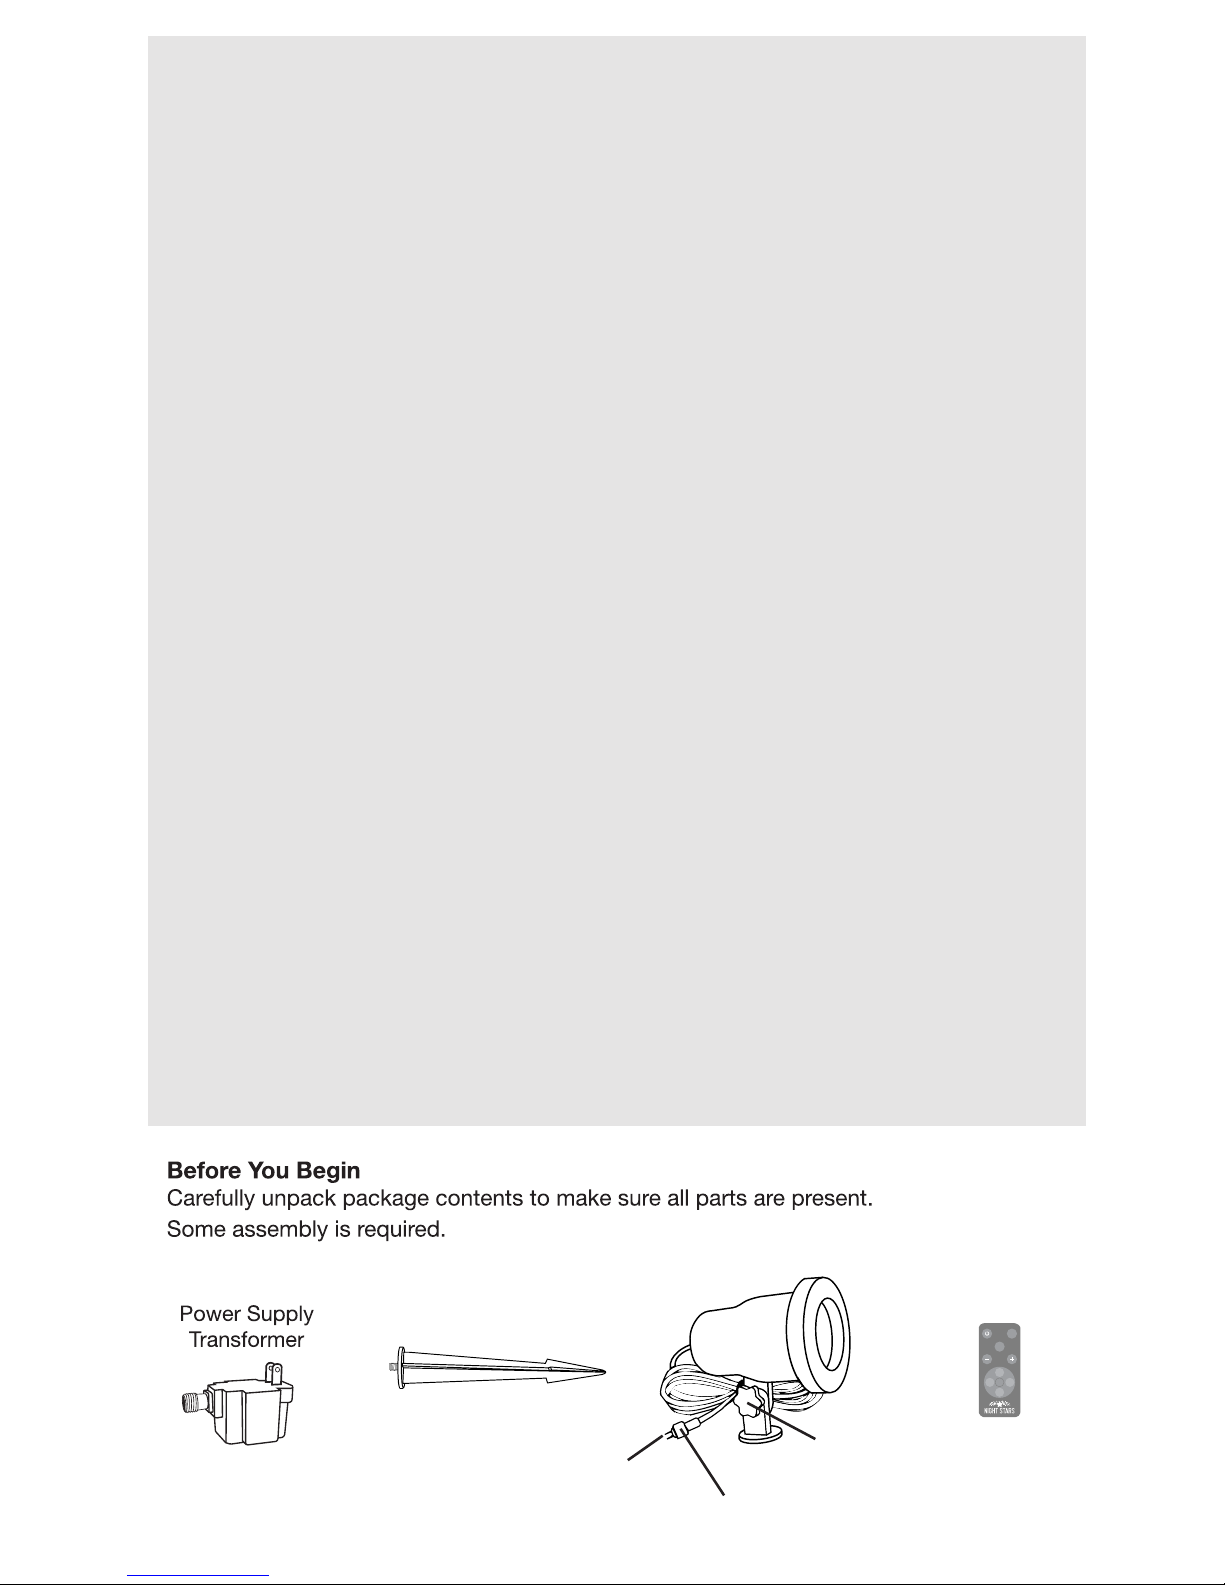
Assembly
Screw the stake into the bottom of the light projector clockwise until tight
(g. 1). To adjust the angle of the light projector, loosen the pivot clamp
screw by turning it counterclockwise. Once the angle adjustment is made,
twist the pivot clamp screw clockwise until
tight to secure (g. 2).
Plug the 2-prong adapter into the power
supply transformer. Screw on the weather-
resistant cap tightly to help protect the
connection from weather.
IMPORTANT: Point Night Stars directly at
your home and never point Night Stars directly into the sky. Do not
project Night Stars at or within the ight path of an aircraft within 10
nautical miles of an airport. If the surface at which you intend to point
the Night Stars laser is within 10 nautical miles of an airport, lower
the angle so that it does not point into the sky. Do not point laser light
toward oncoming pedestrians, vehicles, or trafc routes on land, sea, or air.
Operation
Press the button on the back of the laser unit to set motion speed or
turn o. Settings are fast, medium, slow, still, and o. Pressing this button also clears ash settings.
See the below chart for remote operations. The remote can be used hand-held or mounted to a
surface.
COLOR
FLASH
2H
8H6H
4H
RESET
Motion Speed
4 settings: still, slow, medium, fast
Change Light Color
Choose red, green, or dual-colored light
(Clears ash setting)
Reset
Cancels timer settings
6-Hour Timer
Sets the unit on a 6-hour on,
18-hour o daily cycle
8-Hour Timer
Sets the unit on an 8-hour on,
16-hour o daily cycle
2-Hour Timer
Sets the unit on a 2-hour on,
22-hour o daily cycle
4-Hour Timer
Sets the unit on a 4-hour on,
20-hour o daily cycle
Light On/O
Press On/O while unit is plugged in and
remote will connect to unit within 5 seconds
Flash Setting
Toggle between ashing
or steady light
Fig. 1
Fig. 2
IF REMOTE IS NOT CONTROLLING THE LASER while you are within remote control range,
and if the remote LED comes on when you press the buttons, your remote may not be synced with the laser
light. In this case, follow these syncing instructions:
Syncing the Remote:
Be sure you are within 5 ft. of laser to sync. Do not use an extension cord during syncing process.
1. Remove the battery from the remote, then reinstall battery. This resets the remote.
2. Unplug the laser from the power source and wait 1 minute. This resets the laser.
3. With remote in hand, plug laser into wall outlet. QUICKLY, BEFORE 3 SECONDS PASS, press the
ON/OFF button on remote AFTER plugging the laser in. DO NOT press the ON/OFF button at the same
time you plug in, it must be done within 3 seconds AFTER plugging in. DO NOT hold the button down.
Do not use an extension cord during syncing process. Once the laser is synced, it may be unplugged
and used with an extension cord. Occasionally, re-syncing the remote with the laser may be necessary. In
this case, repeat the steps above. To sync two or more lights to the same remote, unplug them all, then
plug them back in at the same time. AFTER plugging them in, press the ON/OFF button within 3 seconds.
Remove remote battery before long-term storage.
Range: Up to 11 yards

Read Instructions
Before Operating MADE IN
CHINA
© 2016 VIATEK CONSUMER PRODUCTS GROUP, INC. All specifications are subject to change without notice. All rights reserved.
For customer service call 888.7.VIATEK (+1.423.402.9010 for outside the United States) or visit us online at viatekproducts.com
Pour le service a la clientele appelez le 888.7.VIATEK (+1.423.402.9010 a l'extérieur des États-Unis) ou visitez viatekproducts.com
Para servicio al consumidor llame al 888.7.VIATEK (fuera de Estados Unidos marque +1.423.402.9010) o visite viatekproducts.com
PATENT PENDING
REV-Model No.
DO NOT DISPOSE OF BATTERIES IN FIRE. ALWAYS DISPOSE OF BATTERIES PER LOCAL & FEDERAL GUIDELINES
Follow Us
Like Us
Viatek Site
Viatek Consumer Products Group, Inc. 6011 Century Oaks Dr. Chattanooga, TN 37416
011116LL03-RG-MOV-R
Product Specications
Laser Classication
Maximum Laser Power
Laser Wavelength
Laser MTBF
Power Consumption
Power Input
Operation
Operating Temperature
Maintenance
Remote Battery
Warranty
Class IIIa
(Single beam) Less than 5mW
Green: 532nm / Red: 660nm
More than 5000 hours
Up to 5 watts
120VAC (when used with supplied transformer)
Indoor / Outdoor
-4˚F to 86˚F
Maintenance free — no user serviceable parts
23A (L1028), included
Limited 1-year warranty
Notes:
� Only use supplied transformer connected to a properly grounded outdoor
outlet.
� Do not use with dimmers.
� Operate in temperatures of -4˚F to 86˚F. There may be a slight delay if operating
below 55˚F. Please allow up to 10 minutes for light to warm up and reach its full
projection. Green laser startup time may take up to 30 minutes in temperatures
below 14˚F.
� When hanging the laser light, for safety purposes it is recommended to mount
using a sturdy hanging clamp and safety cable.
Table of contents
Other Viatek Lighting Equipment manuals
Popular Lighting Equipment manuals by other brands

Clas Ohlson
Clas Ohlson MJG5C7010-310L instruction manual

Federal Signal Corporation
Federal Signal Corporation SIGNALMASTER SML6-2SML1F instruction sheet

Chauvet
Chauvet DMX-100 user guide

SONNEMAN
SONNEMAN E Series Assembly instructions

IXL
IXL Eco Tastic 1341 user guide

MIIDEX LIGHTING
MIIDEX LIGHTING Vision-EL ELV773725-10 instructions

iGuzzini
iGuzzini AGORA SLIM manual

Konig & Meyer
Konig & Meyer Double4 LED FlexLight manual

Aputure
Aputure amaran T4c product manual

HanleyLED
HanleyLED Concorde Cabinet System installation guide

Trox Technik
Trox Technik DID301 Installation, operation and maintenance manual

Energizer
Energizer 54845 Installation