Viatek LL03-RGTIPS User manual
Celebration Series
Interchangeable Pattern Tips
Instructions
LL03-RGTIPS

IMPORTANT SAFEGUARDS
To reduce the risk of re, electric shock, or injury when using any electric
appliance, precautions should be made. These precautions include but are not
limited to:
Read all instructions.
CAUTION! — Use only as directed. Improper use may result in damage to the
eyes due to direct exposure to laser radiation.
This product has a polarized plug to reduce the risk of electric shock. It will
therefore only t into a polarized outlet one way. If the plug does not t, reverse
the plug. If it still does not t, contact a qualied electrician. Do not use with an
extension cord unless the plug can be fully inserted. Do not alter the plug.
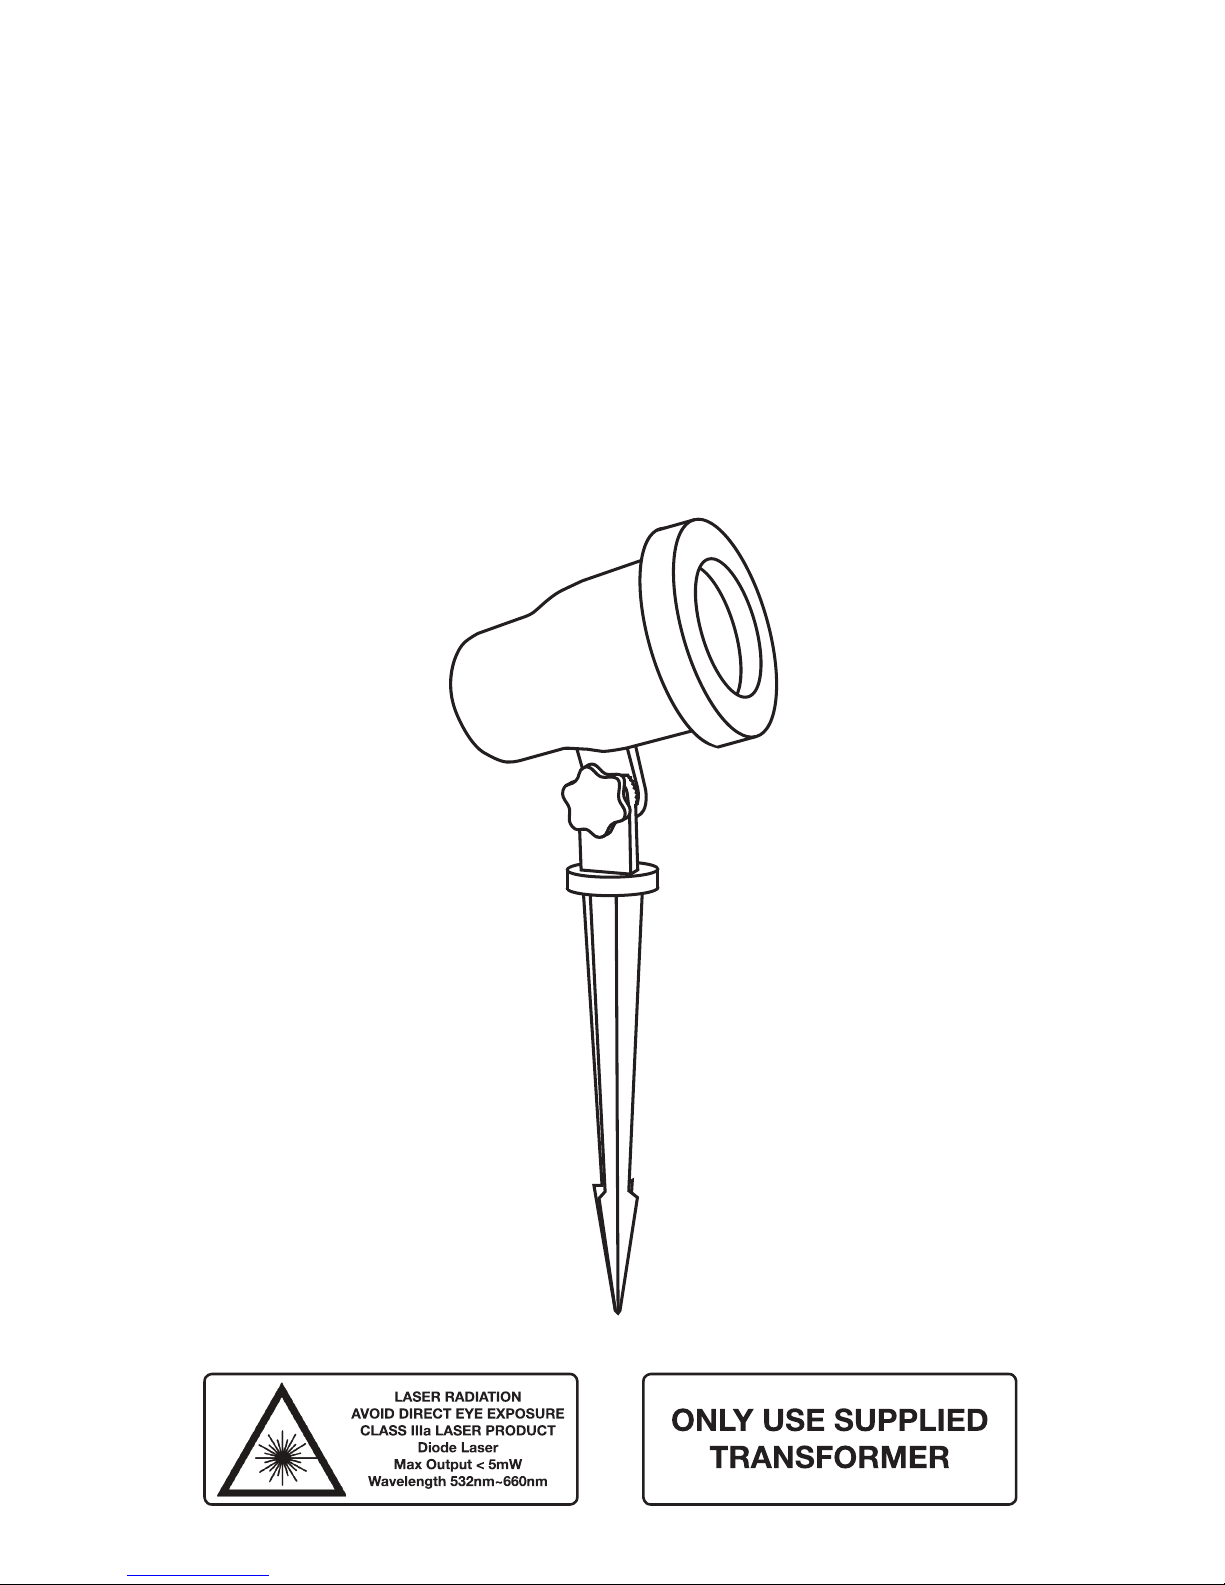
This unit is certied as a Class IIIa laser product by the US Federal Laser
Product Performance Standard (FLPPS) according to regulations in 21 CFR
Subchapter J. Class IIIa laser products can be hazardous when directly viewed.
Avoid looking directly into Class IIIa lasers. This product, as well as other
demonstration laser products like some laser pointers, are classied as Class
IIIa laser energy levels. This product uses diractive optics to scatter the beam
of energy. This scattering eect causes the energy concentration to drop
below the exposure limits for momentary or accidental viewing at a relatively
short distance for the laser aperture. As with all bright light sources, when you
operate this device in public areas it is recommended that up-close access to
the light be restricted.
While the Class IIIa laser in this device may be hazardous on its own, it is
encased in a protective housing and uses diractive holographic optics,
therefore the laser radiation is not directly exposed to during operation or
maintenance. Each individual laser beam is less than 5mW, which is about the
same as an average laser pointer.
DO NOT attempt to open the protective housing or operate the device if
the aperture windows are damaged. If the unit requires service that involves
removing the protective housing, contact the manufacturer. Opening the
protective housing voids the warranty.
Use only three-wire outdoor extension cords that have three-prong grounding
plugs, plugged into grounded outlets. Acceptable extension cord types:
SW, SW-A, SOW, SOW-A, STW, STW-A, STOW, STOW-A, SJW,
SJW-A, SJOW, SJOW-A, SJTW, SJTW-A, SJTOW, SJTOW-A
Ground Fault Circuit Interrupter (GFCI) protection is to be provided on the
circuit(s) or outlet(s) to be used while operating portable laser light in a wet
location. Receptacles with built-in GFCI protection are available for this
purpose.
SAVE THESE INSTRUCTIONS
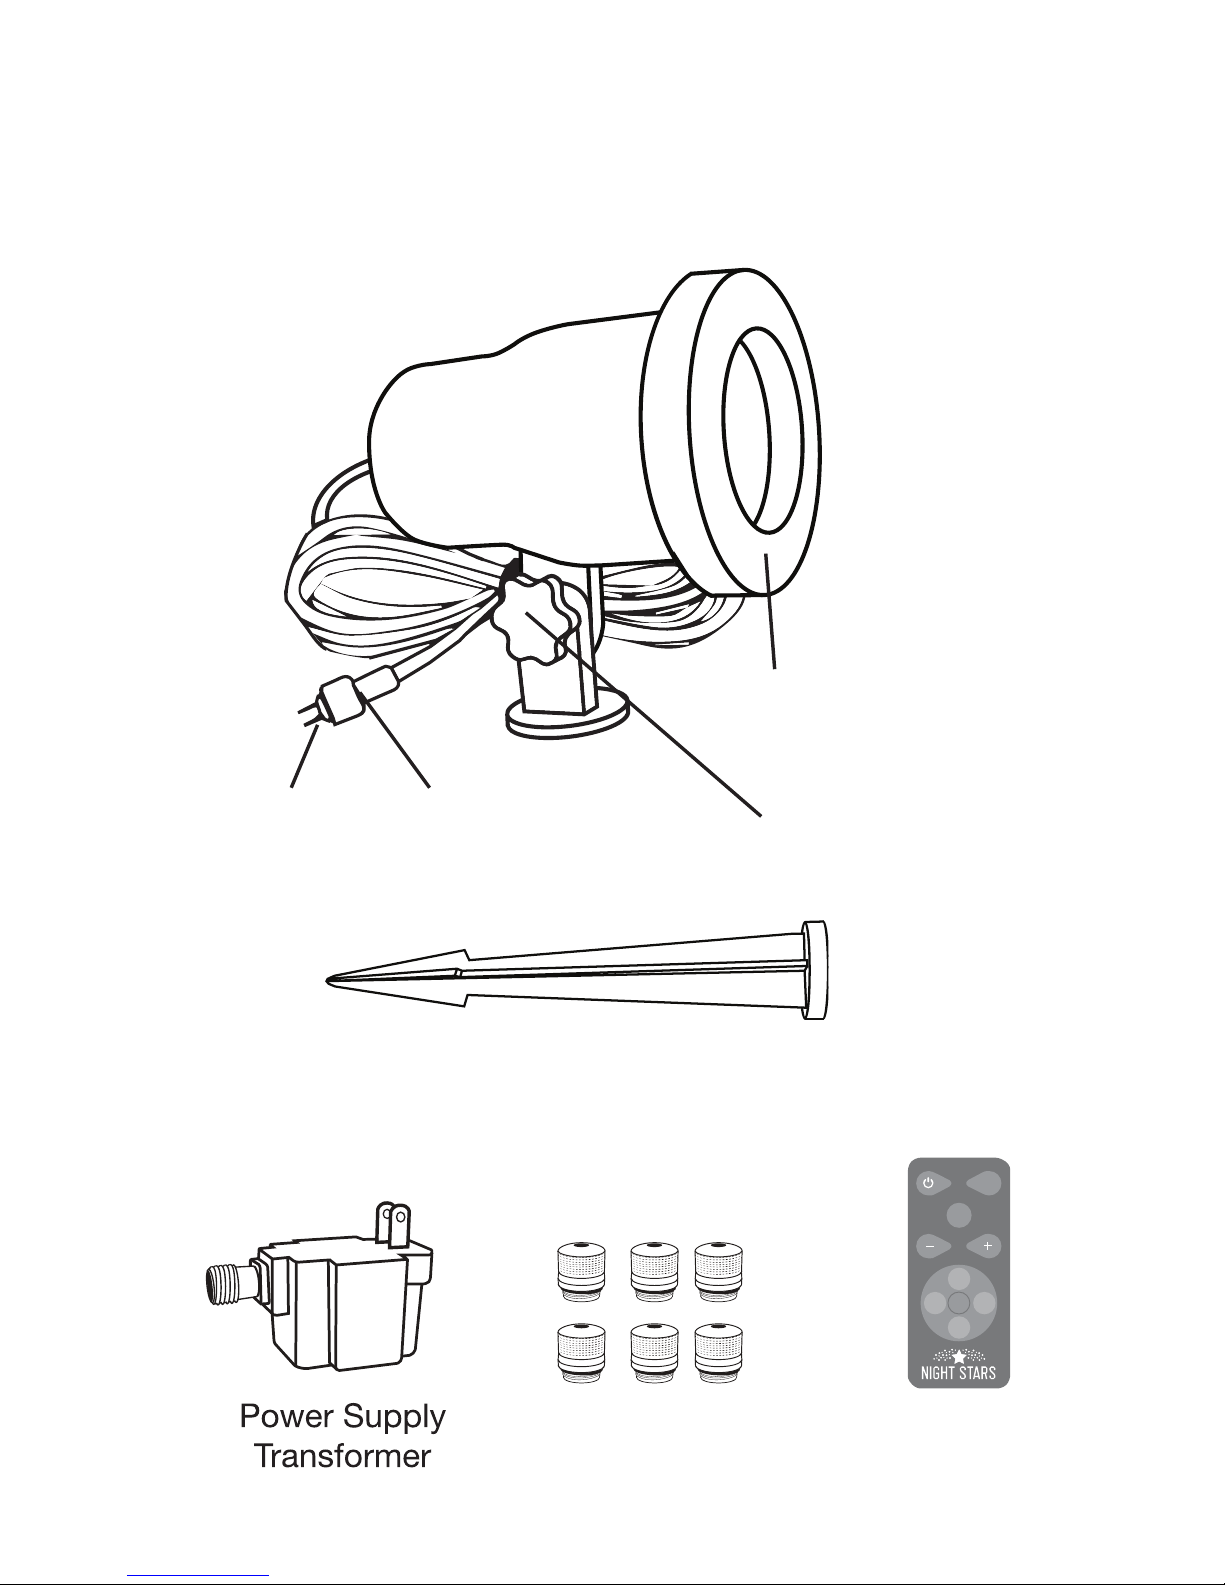
Ground Stake
2-Prong
Adapter
Pattern Tips
Before You Begin
Carefully unpack package contents to make sure all parts are present. Some
assembly is required.
Light Projector
Weather-Resistant
Cover
Weather-Resistant
Cap Screw
COLOR
FLASH
2H
8H6H
4H
RESET
Remote

Assembly
Screw the stake into the bottom of the light
projector clockwise until tight (g. 1). Plug
the 2-prong adapter into the power supply
transformer. Screw on the weather-resistant
cap tightly to help protect the connection from
weather.
Installing Pattern Tips
Remove the weather-resistant cover from the
laser light by twisting it o counterclockwise
(g. 2). If there are tips already installed, remove
them by unscrewing counterclockwise. Be
sure to grip the bottom portion of the tip to
screw and unscrew, as the top portion turns
independently of the bottom portion (g. 3).
To install the tips, screw clockwise into the light
projector (g. 4).
NEVER look directly into the lasers. It can be useful to
adjust the tips with the laser light powered on. If you
choose to do this, take caution not to point the light at
yourself or others.
To turn on the laser, plug into a wall outlet and
choose laser color either by using the remote
(see Remote) or by pressing the button on
the back of the light projector. Adjust the
laser pattern by twisting the top portion of the
pattern tip (g. 3). This has the most dramatic
eect on the dots pattern, which can range
from a pattern of diamond-shaped clusters to a
starry sky pattern.
Replace the weather-resistant cover by twisting
it on clockwise.
Positioning Light
Insert stake into the ground, about 10 feet from
the projection surface (see g. 5). After the
laser light is turned on, you may nd that the
distance needs to be adjusted.
Position the projection light by loosening the
adjustment screw, adjusting the angle, and
tightening the screw (g. 1).
Do not point laser light toward oncoming pedestrians,
vehicles, or trafc routes on land, sea, or air.
10 ft
15 ft
Fig. 2
Fig. 3
Twists to
adjust
pattern
Screws
into light
projector
Fig. 4
Fig. 5
Fig. 1

Remote Control
Use hand-held or mounted to a surface. The remote can control the light from up to 11
yards away. Pull the strip from the battery compartment on the back of the remote. To
test the remote’s battery connection, press any button and the LED will illuminate for
1 second. If the LED does not illuminate, open the battery compartment to make sure
battery is properly installed.
COLOR
FLASH
2H
8H6H
4H
RESET
Flash Speed
Change Light Color
Choose red, green, or dual-colored light
Reset
Cancels timer settings
6-Hour Timer
Sets the unit on a 6-hour on,
18-hour o daily cycle
8-Hour Timer
Sets the unit on a 8-hour on,
16-hour o daily cycle
2-Hour Timer
Sets the unit on a 2-hour on,
22-hour o daily cycle
4-Hour Timer
Sets the unit on a 4-hour on,
20-hour o daily cycle
Light On/O
Press On/O while unit is plugged in and
remote will connect to unit in 5 seconds Flash Setting
Toggle between ashing
or steady light
IF REMOTE IS NOT CONTROLLING THE NIGHT STARS LASER while you are
within remote control range of the laser, and the remote LED comes on when you
press the buttons, your remote may not be synced with the laser light. In this case,
follow these syncing instructions:
Syncing the Remote: Remove the battery from the remote, then reinstall battery. This
resets the remote. Unplug the laser unit from the power source for 1 minute. With your
remote ready (battery installed) and making sure you are within range of the laser, plug
in laser power supply adapter to power source. Within 5 seconds AFTER plugging
the laser in, press the ON/OFF button on your remote to sync it with the laser. DO
NOT press the ON/OFF button at the same time you plug in, it must be done within 5
seconds AFTER plugging in. Occasionally, re-syncing the remote with the laser may
be necessary. In this case, repeat the steps above. To sync two or more lights to the
same remote, unplug them all, then plug them back in at the same time, and AFTER
plugging them in press the ON/OFF button within 5 seconds. Remove remote battery
before long-term storage.
Selection Button
Use the button on the back of the light projector to toggle between red light, green light,
combo light, or o settings.

Product Specifications
Laser Classication
Maximum Laser Power
Laser Wavelength
Laser MTBF
Power Consumption
Power Input
Operation
Operating Temperature
Projection Coverage
Maintenance
Remote Battery
Warranty
Class IIIa
(Single beam) Less than 5mW
Green: 532nm / Red: 660nm
More than 5000 hours
Up to 5 watts
120VAC (when used with supplied transformer)
Indoor / Outdoor
-4˚F to 86˚F
25 ft. x 25 ft.
Maintenance free — no user serviceable parts
23A (L1028), included
Limited 1-year warranty
Notes
� Only use supplied transformer connected to a properly grounded outdoor outlet.
� Do not use with dimmers.
� Operate in temperatures of -4˚F to 86˚F. There may be a slight delay if operating
below 55˚F. Please allow up to 10 minutes for light to warm up and reach its full
projection. Green laser startup time may take up to 30 minutes in temperatures
below 14˚F.
� When hanging the laser light, for safety purposes it is recommended to mount
using a sturdy hanging clamp and safety cable.

Follow Us
Like Us
Viatek Site
Read Instructions
Before Operating MADE IN
CHINA
© 2015 VIATEK CONSUMER PRODUCTS GROUP, INC. All specifications are subject to change without notice.All rights reserved.
For customer service call 888.7.VIATEK (+1.423.402.9010 for outside the United States) or visit us online at viatekproducts.com
Pour le service a la clientele appelez le 888.7.VIATEK (+1.423.402.9010 a l'extérieur des États-Unis) ou visitez viatekproducts.com
Para servicio al consumidor llame al 888.7.VIATEK (fuera de Estados Unidos marque +1.423.402.9010) o visite viatekproducts.com
Protect your product for 1 year beyond our standard warranty with the Viatek No Question
Protection Extended Warranty Plan. With the Extended Warranty there are no return
shipping charges, the product will be replaced or reimbursed with no deductible, and the
product is protected 100% from any mechanical or electrical failures caused by power
surges or manufacturer’s defects. Order online at viatekproducts.com today.
PATENT PENDING
REV-Model No.
DO NOT DISPOSE OF BATTERIES IN FIRE. ALWAYS DISPOSE OF BATTERIES PER LOCAL & FEDERAL GUIDELINES
Follow Us
Like Us
Viatek Site
Viatek Consumer Products Group Inc. 6011 Century Oaks Dr. Chattanooga, TN 37416
090815LL03-RGTIPS
Table of contents
Other Viatek Lighting Equipment manuals


