manuals.online logo
Brands
  1. Home
  2. •
  3. Brands
  4. •
  5. Viega
  6. •
  7. Temperature Controllers
  8. •
  9. Viega Basic Digital Setpoint Control II Instruction sheet

Viega Basic Digital Setpoint Control II Instruction sheet

PI-PR-560400 0412 (Basic Digital Setpoint Control II) 1 of 4
Viega... The global leader in plumbing, heating and pipe joining systems
301 N. Main, 9th Floor • Wichita, KS 67202 • Ph: 800-976-9819 • Fax: 316-425-7618 • www.viega.com
©2012, ProPress®, FostaPEX®, GeoFusion®, Seapress®MegaPress®, MegaPressG®, and Viega®are registered trademarks of Viega GmbH & Co. PureFlow®, Smart Connect®, Climate Panel®, Climate Mat®, Climate
Trak®, MANABLOC®, Radiant Wizard®, S-no-Ice®, Snap Panel®, XL®and XL-C®are registered trademarks of Viega LLC. MiniBloc™, Rapid Grid™, ProRadiant™, PolyAlloy™, SmartLoop™and Zero Lead™are trademarks
of Viega LLC; ProPressG™and ViegaPEX™are trademarks of Viega GmbH & Co. KG. RIDGID®is a registered trademark of RIDGID, Inc.
Product
Instructions
Applications
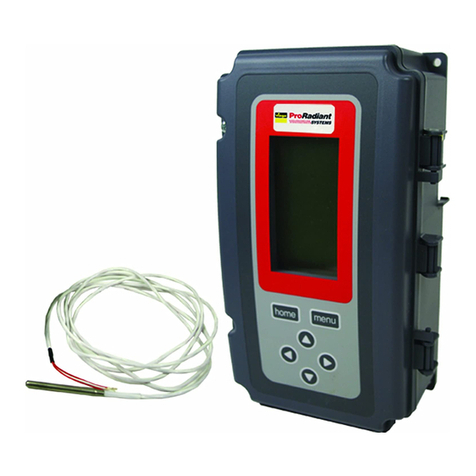
The Viega Basic Digital Setpoint Control II is a
general purpose temperature control with a wide
range of applications in the HVAC industry. This
control provides two isolated SPDT relay contacts.
The two relays are controlled by a watertight sensor,
included with the Basic Digital Setpoint Control.
This control is commonly used as basic heating
and/ or cooling system control for commercial
and residential slab applications.
Features
• Setpoint Control for Heating and Cooling
• Simple installation and programming
• Large digital LCD display
• Reliable, economical
• Two relay outputs with individual
Setpoint capability
• Watertight Sensor included
Specications
Digital Setpoint Control II (17029)
Watertight Sensor (17031)
Digital Setpoint Control II
Input: 24V, 120V, 240V
Output: 2 SPDT dry contacts,
1/2 hp @ 120 VAC
9.8 FLA, 58.8 LRA
Sensor: 6' Resistor, extendable up 100'
Setpoint: -40 - 248°F range
Differential: 1 - 150°F range
Accuracy: +/- 1°F
Environment: -40 - 140°F, 5 - 95% rH,
non-condensing
Power draw: 8 VA
Dimensions: 4.91 x 8.16 x 2.37 in.
Digital Setpoint Control II
Basic Digital Setpoint Control II
PI-PR-560400 0412 (Basic Digital Setpoint Control II) 2 of 4
Viega... The global leader in plumbing, heating and pipe joining systems
301 N. Main, 9th Floor • Wichita, KS 67202 • Ph: 800-976-9819 • Fax: 316-425-7618 • www.viega.com
©2012, ProPress®, FostaPEX®, GeoFusion®, Seapress®MegaPress®, MegaPressG®, and Viega®are registered trademarks of Viega GmbH & Co. PureFlow®, Smart Connect®, Climate Panel®, Climate Mat®, Climate
Trak®, MANABLOC®, Radiant Wizard®, S-no-Ice®, Snap Panel®, XL®and XL-C®are registered trademarks of Viega LLC. MiniBloc™, Rapid Grid™, ProRadiant™, PolyAlloy™, SmartLoop™and Zero Lead™are trademarks
of Viega LLC; ProPressG™and ViegaPEX™are trademarks of Viega GmbH & Co. KG. RIDGID®is a registered trademark of RIDGID, Inc.
Product
Instructions
Installation
Digital Setpoint Control II (17029)
Watertight Sensor (17031)
For proper control, the sensor for
the setpoint control must be located
within the heating and or cooling slab.
The sensor should be placed midway
between rows of tubing, and should be
placed in conduit which is cast into the
slab, so that replacement is possible.
SENSOR B
SENSOR A
SENSOR B
24VAC
SUPPLY
120V, 240V
SUPPLY
RELAY 1 RELAY 2
Digital Input
LOAD 2
LOAD 1
Wiring
Sensor A is triggering the two relays,
Relay 1 being boiler circulator pump,
and Relay 2 being system circulator
pump. In heating mode, when the
sensor detects temperature lower than
the selected setpoint minus the selected
differential both relays will be energized.
When the temperature reaches the
setpoint the relays will de-energize.
Note:
If using 24V to power the controller,
the 24V supply must be connected to
terminals that are marked +, C on the
left side of the control.
If using 120 or 240V to power the
controller the 120 or 240V supply must
be connect to corresponding terminals
clearly marked on the right side of the
control. When connecting the sensor
connect both red wires to one terminal
and the white wire to the other terminal.
Terminals for sensor marked "T".
120 V
COM
PI-PR-560400 0412 (Basic Digital Setpoint Control II) 3 of 4
Viega... The global leader in plumbing, heating and pipe joining systems
301 N. Main, 9th Floor • Wichita, KS 67202 • Ph: 800-976-9819 • Fax: 316-425-7618 • www.viega.com
©2012, ProPress®, FostaPEX®, GeoFusion®, Seapress®MegaPress®, MegaPressG®, and Viega®are registered trademarks of Viega GmbH & Co. PureFlow®, Smart Connect®, Climate Panel®, Climate Mat®, Climate
Trak®, MANABLOC®, Radiant Wizard®, S-no-Ice®, Snap Panel®, XL®and XL-C®are registered trademarks of Viega LLC. MiniBloc™, Rapid Grid™, ProRadiant™, PolyAlloy™, SmartLoop™and Zero Lead™are trademarks
of Viega LLC; ProPressG™and ViegaPEX™are trademarks of Viega GmbH & Co. KG. RIDGID®is a registered trademark of RIDGID, Inc.
Product
Instructions
Programming
Once the control is powered on press "MENU" button on
the control keypad to adjust settings:
At any point during the programming you may press the
"HOME" button to return back to the sensor viewing.
1. Press "MENU", then press the right arrow button when
the "Program Screen" appears
2. When the "Relay Screen" appears, press right arrow
to select Relay 1
3. Scroll up or down to select "Setpoint 1" then press the
right arrow button
4. Using the up and down arrows to adjust the Setpoint 1
desired setpoint -40 - 248 °F (this is the maximum slab
temperature setting of the heating and or cooling system)
5. Once the setpoint has been adjusted press the right
arrow button to accept and to display the "Relay 1" menu
6. Select "Diffrntl" by pressing the right arrow button
7. Using the up and down arrows, adjust the differential,
the range is 1 - 150°F, once selected press the right
arrow to accept and return to "Relay 1" menu
8. Select "Sensor A or Sensor B" for "Relay 1" using the up
and down arrows, then press right arrow button to accept
9. Select "Heat / Cool" option for "Relay 1" then press
right arrow button
10. Once you have completed all of the steps either press
the "HOME" key or scroll down using the down arrow
to "EXIT" and then press the right arrow button
11. Repeat all steps to congure "Relay 2"
Once all programming is complete the conguration can
be locked to prevent any unauthorized changes.
To Lock or Unlock the keypad simply press and hold
the "MENU" and "HOME" buttons simultaneously for
ve seconds.
Operation
Heating Mode
In heating mode once the slab temperature reaches
the selected setpoint temperature the relay will be de-
energized. As the slab temperature decreases below the
selected differential the relay will energize.
Example: Slab setpoint is set to 85 °F differential is set to
5, once the slab temperature is below
80 °F the relay will be energized.
Cooling Mode
In cooling mode, the differential is above the setpoint. So
as the temperature rises higher than the selected setpoint
plus the differential the relay is energized.
Example: Slab temperature is set to 66 °F with a
differential of 2. When the slab temperature reaches 68 °F
the relay will be energized.
PI-PR-560400 0412 (Basic Digital Setpoint Control II) 4 of 4
Viega... The global leader in plumbing, heating and pipe joining systems
301 N. Main, 9th Floor • Wichita, KS 67202 • Ph: 800-976-9819 • Fax: 316-425-7618 • www.viega.com
©2012, ProPress®, FostaPEX®, GeoFusion®, Seapress®MegaPress®, MegaPressG®, and Viega®are registered trademarks of Viega GmbH & Co. PureFlow®, Smart Connect®, Climate Panel®, Climate Mat®, Climate
Trak®, MANABLOC®, Radiant Wizard®, S-no-Ice®, Snap Panel®, XL®and XL-C®are registered trademarks of Viega LLC. MiniBloc™, Rapid Grid™, ProRadiant™, PolyAlloy™, SmartLoop™and Zero Lead™are trademarks
of Viega LLC; ProPressG™and ViegaPEX™are trademarks of Viega GmbH & Co. KG. RIDGID®is a registered trademark of RIDGID, Inc.
Product
Instructions
Troubleshooting
If the system is not operating correctly, rst check that all
electrical connections have been made properly. Check
for power to all components (120 V and 24 V).
If the setpoint conguration is correct disconnect the
sensor and check its resistance. Replace the sensor if its
resistance value does not match the temperature in the
accompanying chart to the right.
Temp °F Temp °C Resistance
Ohms
-40 -40.0 851
-30 -34.4 872
-20 -28.8 893
-10 -23.3 914
0 -17.7 935
10 -12.2 956
20 -6.6 977
30 -1.1 998
40 4.4 1019
50 10.0 1040
60 15.5 1061
70 21.1 1082
80 26.6 1103
90 32.2 1124
100 37.7 1145
110 43.3 1166
120 48.8 1187
130 54.4 1208
140 60.0 1229
150 65.5 1250
160 71.1 1271
170 76.6 1292
180 82.2 1313
190 87.7 1334
200 93.3 1355
210 98.8 1376
220 104.4 1397
230 110.0 1418
240 115.5 1439
250 121.1 1460

This manual suits for next models

2

Other Viega Temperature Controllers manuals

Viega ProRadiant SYSTEMS Basic Digital Setpoint Control... Instruction sheet

Viega

Viega ProRadiant SYSTEMS Basic Digital Setpoint Control... Instruction sheet

Popular Temperature Controllers manuals by other brands

Nibe HPAC 40 Installer manual

Nibe

Nibe HPAC 40 Installer manual

Automationdirect.com Solo user manual

Automationdirect.com

Automationdirect.com Solo user manual

ENDA EDT1411P manual

ENDA

ENDA EDT1411P manual

Tempatron PID500 operating instructions

Tempatron

Tempatron PID500 operating instructions

Heatcraft Refrigeration Products Masterlog 4 User handbook

Heatcraft Refrigeration Products

Heatcraft Refrigeration Products Masterlog 4 User handbook

Siemens RDH10RF user guide

Siemens

Siemens RDH10RF user guide

Franke ZAQUA017 Installation and operating instructions

Franke

Franke ZAQUA017 Installation and operating instructions

La Crosse Technology LTV-TH2 manual

La Crosse Technology

La Crosse Technology LTV-TH2 manual

VDH MC3-TM manual

VDH

VDH MC3-TM manual

KELD KLTH43 Specification and operating instructions

KELD

KELD KLTH43 Specification and operating instructions

Elgato eve thermo Get started

Elgato

Elgato eve thermo Get started

alre RTBSB-001 Series manual

alre

alre RTBSB-001 Series manual

Autonics TH4M Series product manual

Autonics

Autonics TH4M Series product manual

Omron E5AN-H manual

Omron

Omron E5AN-H manual

Auber Instruments SYL-2362A2 instruction manual

Auber Instruments

Auber Instruments SYL-2362A2 instruction manual

Hobo HOBOnet RXW-TMB Series manual

Hobo

Hobo HOBOnet RXW-TMB Series manual

Siemens REA23.03RF user manual

Siemens

Siemens REA23.03RF user manual

CommScope FDH 3000 user manual

CommScope

CommScope FDH 3000 user manual

manuals.online logo
manuals.online logoBrands
  • About & Mission
  • Contact us
  • Privacy Policy
  • Terms and Conditions

Copyright 2025 Manuals.Online. All Rights Reserved.