manuals.online logo
Brands
  1. Home
  2. •
  3. Brands
  4. •
  5. Viessmann
  6. •
  7. Toy
  8. •
  9. Viessmann 4264 User manual

Viessmann 4264 User manual

Bedienungsanleitung
Operating Manual
4264
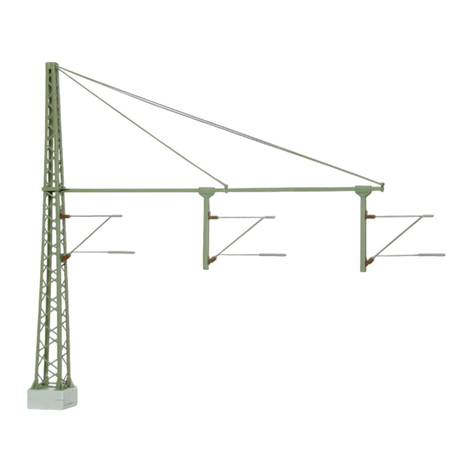
TT Radspannwerk komplett
mit Abspannmast
4264
TT Complete catenary tensioning mast
1. Wichtige Hinweise ...................................... 2
2. Montage ..................................................... 2-4
1. Important information................................. 2
2. Mounting..................................................... 2-4
2
D EN
1. Important information!
Read the operating instructions carefully before
using the product for the rst time or installing it.
Using the product for its correct
purpose
This tensioning assembly is intended
• for installation into a model railway
catenary system,
• for use in dry rooms only.
Using the product for any other purpose is
not approved and is considered incorrect.
The manufacturer cannot be held respon-
sible for any damage resulting from the im-
proper use of this product. Liability in such
a case rests with the user.
2. Mounting
Please mount the tensioning assem-
bly like this:
Pull down the mast from the ground-
socket carefully. Please touch only
the plastic-plate, not the mast.
Set the groundsocket on its place on
your railway. You can nd the correct
distance to the middle of the track by
using the mastposition gauge item-
No. 4297.
Mark the position of the screw with
a pencil. Then remove the ground-
socket and drill the determined posi-
tion with a ca. Ø1 mm drill.
Set the groundsocket on your model
railway again and x it with the en-
closed screw and a screwdriver
e.g. item-No. 4199.
1. Wichtige Hinweise!
Lesen Sie vor der ersten Anwendung des Pro-
duktes bzw. dessen Einbau diese Bedienungs-
anleitung aufmerksam durch.
Das Produkt richtig verwenden
Dieses Radspannwerk ist bestimmt
• zum Einbau in mit Oberleitung be-
stückte Modelleisenbahnanlagen,
• zum Betrieb in trockenen Räumen.
Jeder darüber hinausgehende Gebrauch
gilt als nicht bestimmungsgemäß. Für
hieraus resultierende Schäden haftet der
Hersteller nicht. Das Risiko hierfür trägt
allein der Benutzer.
2. Montage
Bitte montieren Sie das Radspann-
werk wie folgt:
Schieben Sie den Mast vorsichtig
vom Grundträger herunter. Fassen
Sie ihn dazu bitte am Kunststoff-
sockel und nicht am Mast an.
Positionieren Sie den Grundträger
an der gewünschten Stelle auf Ihrer
Anlage. Der richtige Abstand zur
Gleismitte kann mit Hilfe der Mast-
positionslehre Art.-Nr. 4297 bestimmt
werden.
Markieren Sie mit Hilfe eines Stiftes
die Schraubenposition. Anschlie-
ßend entfernen Sie den Grundträger
und bohren mit einem ca. Ø1 mm
Bohrer die ermittelte Position vor.
Positionieren Sie nun den Grundträ-
ger erneut und befestigen diesen mit
der beiliegenden Senkkopfschraube
und einem Kreuzschlitz-Schrauben-
dreher z. B. Art.-Nr. 4199 auf Ihrer
Anlage.
3
Schieben Sie den Mast mit der T-
Nut wieder auf den Grundträger auf.
Fassen Sie ihn bitte auch hierbei nur
am Kunststoffsockel und nicht am
Mast an.
Kürzen Sie den abzuspannenden Fahrdraht so
weit, dass er ca. 2-2,5 cm vor den Rädern des
Radspannwerkes endet.
Schieben Sie die Isolatoren auf die
gekürzten Fahrdrahtenden auf.
Stecken Sie die gekürzten Fahr-
drahtenden wie rechts dargestellt in
die Befestigungshülsen des Spann-
werkes ein. Bei Bedarf können Sie
die Verbindung mit einem Tropfen
Sekundenkleber xieren.
Hängen Sie den gerade verlaufenden Fahrdraht
am Ausleger des Spannwerkes ein.
Put the mast with the t-groove back
to the groundsocket. Please touch
only the plastic-plate, not the mast.
Cut the catenary wire that way, that it ends 2-2,5
cm in front of the wheels of the tensioning
assembly.
Put the insulators onto the ends of
the cut catenary wire.
Put the cut ends of the catenary wire
into the xing-holder of the tension-
ing assembly. You can use a little bit
adhesive to x it.
Put the catenary wire, which goes straight, on the
bracket of the tensioning assembly.
Dekoartikel, kein Spielzeug! Nicht geeignet für Kinder unter 14
Jahren! Maßstabsgetreues Modell zur Dekoration einer Modell-
Landschaft. Produkt kann Spitzen, Kanten und abbruchgefährdete
Teile aufweisen. Verletzungsgefahr! Die Anschlussdrähte niemals in
eine Steckdose einführen! Anleitung aufbewahren!
Decoration item, this is not a toy! Not suitable for children under
the age of 14 years! True to scale model for the decoration of a model
landscape. This product can have peaks, edges and breakable parts.
Risk of injury! Never put the connecting wires into a power socket!
Please keep these instructions!
Ce produit n’est pas un jouet. C’est un produit décor! Ne
convient pas aux enfants de moins de 14 ans ! Modèle réduit dèle
à l’échelle pour la décoration d’un réseau. Le produit peut présen-
ter des pointes, des arêtes et des pièces détachables. Risque de
blessure! Ne jamais introduire les ls d’alimentation dans une prise!
Conservez ce mode d’emploi!
Decoratie artikel, geen speelgoed! Niet geschikt voor kinderen onder 14
jaar! Schaalmodel, bedoeld als decoratie model in een modellandschap.
Kunnen er onderdelen met scherpe punten, zijkanten en ook breekbare
onderdelen aanwezig zijn. Risico op verwonding! De aansluitdraden nooit
in een wandcontactdoos steken! Gebruiksaanwijzing bewaren!
Articolo decorativo, non è un giocattolo! Non adatto a bambini al di
sotto dei 14 anni! Modello in scala per la decorazione di un paesaggio
per modellismo. Il prodotto può presentare punte, spigoli e parti che
potrebbero staccarsi. Pericolo di lesion! Non inserire mai i fili di col-
legamento in una presa! Conservare instruzioni per l’uso!
Artículo para decoración ¡No es un juguete! No recomendado para
menores de 14 años! Este producto es un modelo en miniatura para
decorar un paisaje en una maqueta. Los modelos pueden tener partes
puntiagudas, cantos y piezas filigranas. Riesgo a lesionarse. ¡No intro-
ducir nunca los hilos de conexiones en un enchufe de la red eléctrica!
Conserva las instrucciones de servicio!
Modellspielwaren GmbH
4
Vorsicht ! / Caution !
falsch / wrong richtig / right
92064
If you want to use the tension-
ing assembly as shown in Fig.
2, you have to change the
position of the bracket.
Für den Einsatz gemäß Abb.
2 müssen Sie die Position des
Auslegers ändern.
Schieben Sie den Ausleger leicht nach
oben.
Ziehen Sie den Ausleger vorsichtig aus
dem Mast heraus.
Drehen Sie den Mast um 180 Grad.
Stecken Sie die Befestigungsstege in
die dafür vorgesehenen Öffnungen des
Mastes.
Ziehen Sie den Ausleger vorsichtig nach
unten. Fassen Sie ihn dazu an den Kunst-
stoffteilen an.
Pull up the bracket carefully.
Pull the bracket carefully out of the mast.
Turn the mast through 180 degree.
Put the brackets into the xingholes of
the mast.
Pull down the bracket carefully. Please
only touch the plastic parts.
Die jeweils aktuellste Version der Anleitung n-
den Sie auf der Viessmann-Homepage unter der
Artikel-Nr.
The latest version of the manual can be looked up
at the Viessmann homepage using the item-No.
92361
Stand 02/sw
04/2014
Ho/Me

Other Viessmann Toy manuals

Viessmann 5046 User manual

Viessmann

Viessmann 5046 User manual

Viessmann 5242 User manual

Viessmann

Viessmann 5242 User manual

Viessmann kibri N Windmill with motor functional kit User guide

Viessmann

Viessmann kibri N Windmill with motor functional kit User guide

Viessmann 5048 User manual

Viessmann

Viessmann 5048 User manual

Viessmann 1383 User manual

Viessmann

Viessmann 1383 User manual

Viessmann H0 4720 User manual

Viessmann

Viessmann H0 4720 User manual

Viessmann 4610 User manual

Viessmann

Viessmann 4610 User manual

Viessmann 26110 User manual

Viessmann

Viessmann 26110 User manual

Viessmann 26254 User manual

Viessmann

Viessmann 26254 User manual

Viessmann 4162 User manual

Viessmann

Viessmann 4162 User manual

Viessmann Vollmer 47709 User guide

Viessmann

Viessmann Vollmer 47709 User guide

Viessmann 5228 User manual

Viessmann

Viessmann 5228 User manual

Viessmann 4197 H0 User manual

Viessmann

Viessmann 4197 H0 User manual

Viessmann kibri 15010 User guide

Viessmann

Viessmann kibri 15010 User guide

Viessmann 4570 User manual

Viessmann

Viessmann 4570 User manual

Viessmann 5079 User manual

Viessmann

Viessmann 5079 User manual

Viessmann 4515 User manual

Viessmann

Viessmann 4515 User manual

Viessmann 1500 User manual

Viessmann

Viessmann 1500 User manual

Viessmann 5547 User manual

Viessmann

Viessmann 5547 User manual

Viessmann 6728 User manual

Viessmann

Viessmann 6728 User manual

Viessmann 4751 User manual

Viessmann

Viessmann 4751 User manual

Viessmann VOLLMER 45147 User guide

Viessmann

Viessmann VOLLMER 45147 User guide

Viessmann 4600 User manual

Viessmann

Viessmann 4600 User manual

Viessmann kibri 38144 User manual

Viessmann

Viessmann kibri 38144 User manual

Popular Toy manuals by other brands

MGA Entertainment LOL SURPRISE LOVES MINI BITES quick start guide

MGA Entertainment

MGA Entertainment LOL SURPRISE LOVES MINI BITES quick start guide

Carson X16 Mini Desert Warrior instruction manual

Carson

Carson X16 Mini Desert Warrior instruction manual

Mattel Barbie ON THE GO FHV93 instructions

Mattel

Mattel Barbie ON THE GO FHV93 instructions

Minicraft Models Piper Cherokee 11677 Assembly instructions

Minicraft Models

Minicraft Models Piper Cherokee 11677 Assembly instructions

Jabiru j160 Technical manual

Jabiru

Jabiru j160 Technical manual

QABA 350-153V00 manual

QABA

QABA 350-153V00 manual

WEEEMAKE WeeeBot Jeep manual

WEEEMAKE

WEEEMAKE WeeeBot Jeep manual

Mega Bloks Call of Duty Jungle Rangers manual

Mega Bloks

Mega Bloks Call of Duty Jungle Rangers manual

PLAYMOBIL 9487 instructions

PLAYMOBIL

PLAYMOBIL 9487 instructions

REVELL Enzo Ferrari Assembly instructions

REVELL

REVELL Enzo Ferrari Assembly instructions

Fisher-Price BUBBLE MOWER H8910 instructions

Fisher-Price

Fisher-Price BUBBLE MOWER H8910 instructions

marklin 36871 Start-up

marklin

marklin 36871 Start-up

Eclipse 650 quick start guide

Eclipse

Eclipse 650 quick start guide

Hasbro GIJoe Cobra Mamba instructions

Hasbro

Hasbro GIJoe Cobra Mamba instructions

Hangar 9 CAP 232G ARF Assembly manual

Hangar 9

Hangar 9 CAP 232G ARF Assembly manual

OYO Sports FOOTBALL HELMET CART manual

OYO Sports

OYO Sports FOOTBALL HELMET CART manual

Faller HUNTERS HOUSE AND MOUNTAIN INN manual

Faller

Faller HUNTERS HOUSE AND MOUNTAIN INN manual

GAUGEMASTER Structures Fordhampton Bridge Assembly instructions

GAUGEMASTER

GAUGEMASTER Structures Fordhampton Bridge Assembly instructions

manuals.online logo
manuals.online logoBrands
  • About & Mission
  • Contact us
  • Privacy Policy
  • Terms and Conditions

Copyright 2025 Manuals.Online. All Rights Reserved.