Dekoartikel, kein Spielzeug! Nicht geeignet für Kinder unter 14
Jahren! Maßstabsgetreues Modell zur Dekoration einer Modell-
Landschaft. Produkt kann Spitzen, Kanten und abbruchgefährdete
Teile aufweisen. Verletzungsgefahr! Die Anschlussdrähte niemals in
eine Steckdose einführen! Anleitung aufbewahren!
Decoration item, not a toy! Not suitable for children under the
age of 14 years! True to scale model for the decoration of a model
landscape. This product can have peaks, edges and breakable parts.
Risk of injury! Never put the connecting wires into a power socket!
Keep these instructions!
Ce produit n’est pas un jouet. C’est un produit décor! Ne
convient pas aux enfants de moins de 14 ans ! Modèle réduit dèle
à l’échelle pour la décoration d’un réseau. Le produit peut présen-
ter des pointes, des arêtes et des pièces détachables. Risque de
blessure! Ne jamais introduire les ls d’alimentation dans une prise!
Conservez ce mode d’emploi!
Decoratie artikel, geen speelgoed! Niet geschikt voor kinderen onder 14
jaar! Schaalmodel, bedoeld als decoratie model in een modellandschap.
Kunnen er onderdelen met scherpe punten, zijkanten en ook breekbare
onderdelen aanwezig zijn. Risico op verwonding! De aansluitdraden nooit
in een wandcontactdoos steken! Gebruiksaanwijzing bewaren!
Articolo decorativo, non è un giocattolo! Non adatto a bambini al di
sotto dei 14 anni! Modello in scala per la decorazione di un paesaggio
per modellismo. Il prodotto può presentare punte, spigoli e parti che
potrebbero staccarsi. Pericolo di lesion! Non inserire mai i fili di col-
legamento in una presa! Conservare instruzioni per l’uso!
Artículo para decoración ¡No es un juguete! No recomendado para
menores de 14 años! Este producto es un modelo en miniatura para
decorar un paisaje en una maqueta. Los modelos pueden tener partes
puntiagudas, cantos y piezas filigranas. Riesgo a lesionarse. ¡No intro-
ducir nunca los hilos de conexiones en un enchufe de la red eléctrica!
Conserva las instrucciones de servicio!
Modellspielwaren GmbH
4
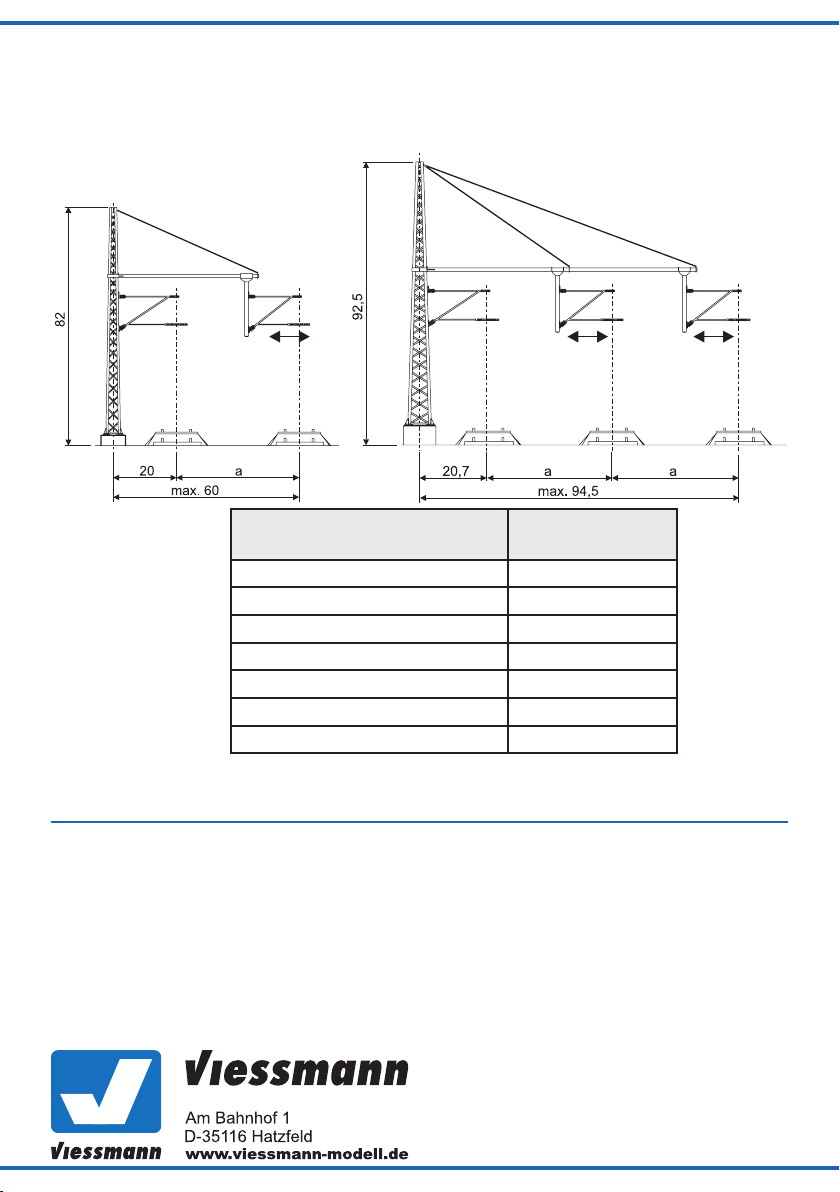
Gleissystem
Track system
Gleisabstand a
Track distance a
Arnold 30,0 mm
Fleischmann Bettungsgleis 33,6 mm
Fleischmann-Gleis ohne Bettung 33,6 mm
Kato 33,0 mm
Roco 33,6 mm
Minitrix 33,6 mm
Peco 26,5 mm
4. Einstellung
Durch die freie Verschiebbarkeit jedes Hänge-
jochs auf dem Hauptträger lässt sich der Rohraus-
leger universell für jedes Gleissystem bzw. für je-
den Gleisabstand einstellen.
4. Adjustment
By moving the yoke on the main girder, you can
adjust the tabular outrigger for every track system
resp. every track distance.
92149
Stand 02/sw
04/2014
Ho/Eg
Die jeweils aktuellste Version der Anleitung nden
Sie auf der Viessmann-Homepage unter der
Artikel-Nr.
The latest version of the manual can be looked up
at the Viessmann homepage using the item-No.