manuals.online logo
Brands
  1. Home
  2. •
  3. Brands
  4. •
  5. Viessmann
  6. •
  7. Toy
  8. •
  9. Viessmann Kibri Polyplate Lina User manual

Viessmann Kibri Polyplate Lina User manual

38339
H0 Kubushaus Lina mit Terrasse - Polyplate Bausatz
H0 Cube house Lina with terrace - Polyplate kit
80877
Stand 01/sw
06/2023
Ho/Kf 1
DE EN
1. Inhalt .................................................1
4. Montage............................................5
1. Contents.............................................1
4. Mounting .............................................5
Made in Europe
Schwierigkeitsgrad
der Bausätze:
Level of difficulty:
Einsteiger
Learners
Fortgeschrittene
Profis
Professionals
Advanced learners
Bitte legen Sie die Einzelteile nach
Baugruppen zusammen und beginnen Sie
dann mit entsprechend der Zeichnungen
dem Zusammenbau.
Dieser Bausatz besteht aus nachhaltigem
Polyplate Verbundwerkstoff.
Für den Zusammenbau dieses hoch-
wertigen Polyplate-Bausatzes empfehlen
wir unseren kibri Polyplate Kleber,
Art. 39997.
Arrange the individual parts by assembly
groups, and then begin assembling in
accordance with the drawings.
This kit consists of sustainable Polyplate
composite material.
For the assembly of this high-quality
Polyplate kit, we recommend our kibri
Polyplate glue, item 39997.
Änderungen vorbehalten. Keine Haftung für
Druckfehler und Irrtümer.
Die aktuelle Version der Anleitung finden Sie auf
der Homepage unter der Artikelnummer.
Subject to change without prior notice. No liability for
mistakes and printing errors.
You will find the latest version of the manual on the
website using the item number.
Montageanleitung
Mounting instructions Baugruppe Teile-Nr. Stück
Assembly group Part No. Pieces
1. Inhalt / Contents
A 0 1
1 1
2 1
3 1
4 1
5 1
6 1
7 1
8 1
9 1
10 1
B 1 1
2 1
3 1
4 1
5 1
6 1
7 1
8 1
9 1
10 1
11 1
12 1
D 1 1
2 1
3 1
4 1
5 1
6 1
7 1
FR 1 1
2 1
G 1 1
2 1
EL 1 1
2 1
3 1
Schablone
Eingang
Template
Entrance 1 1
1 mm Klemmen
1 mm clamps 2 1
2 mm Klemmen
2 mm clamps 3 1
Baugruppe Teile-Nr. Stück
Assembly group Part No. Pieces
15,2 cm
12,0 cm
Baugruppe A / Assembly group A
2
A0 A1 A2 A3 A4
A5 A6-A8 A9 A10
B1 B2 B3 B4 B5 B6 B7 B8
B9 B10
B11 B12
Baugruppe B / Assembly group B
Baugruppe D / Assembly group D
3
D1 D2 D3 D4 D5
D6
D7
Fr1 Fr2 G1 G2
Baugruppe F / Assembly group F Baugruppe G / Assembly group G
EL- 21 3
EL 1-3
An den Bauteilen der Innenwände befinden sich kleine Ausschnitte
in die die Montageklemmen eingesteckt werden.
On the components of the interior walls, there are small cutouts where
the mounting clamps are inserted.
4
2. Montagehinweise / Mounting hints
2mm 2mm 2mm 2mm
2mm 2mm 2mm 2mm
2.1 Montage Klemmen / Clamp mounting
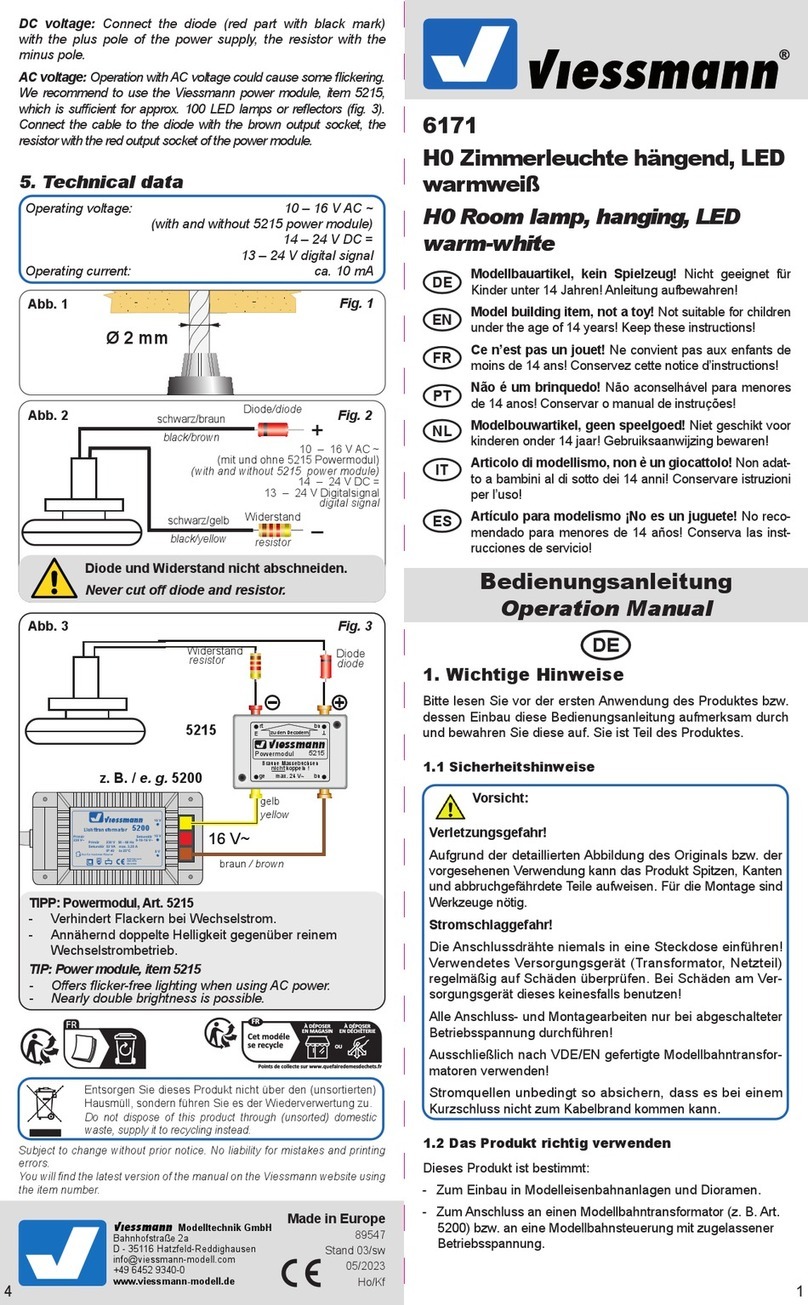
Die Klemmen werden nicht geklebt!
Stecken Sie diese zunächst auf der einen Seite in den Ausschnitt und
dann mit einer leichten Drehung nach unten in den zweiten Ausschnitt.
The clamps are not glued!
First, insert them on one side into the cutout, and then with a gentle twist,
secure them downward into the second cutout.
Montagestelle Klemme
Mounting place clamps
Abb.2
Kernbauteil (A..)
Core component (A...)
Fassadenbauteil (B..)
Facade component (B...)
Aussparungen und Löcher auf Abschnitte überprüfen, diese ggf. entfernen!
Die Klemmen dienen zur korrekten Positionierung der Fassadenbauteile auf den Kernbauteilen.
Verwenden Sie möglichst wenig Klebstoff, entfernen Sie möglicherweise ausdringenden Klebstoff umgehend.
Inspect recesses and holes for cut-offs, remove them if necessary!
The clamps are used to ensure proper positioning of the facade components on the core components.
Minimize the use of adhesive and promptly remove any excessive adhesive that may penetrate.
Schutzfolie abziehen.
Kleben Sie den Rahmen in den vorgesehenen Wandausschnitt.
Danach das Glas auf die Klebeseite aufdrücken.
Remove protection foil.
Glue the frame into the the wall cut-out provided.
Then press the glass onto the adhesive side.
Klebstofffilm
Adhesive film
2.2 Fenstermontage / Mounting of the windows
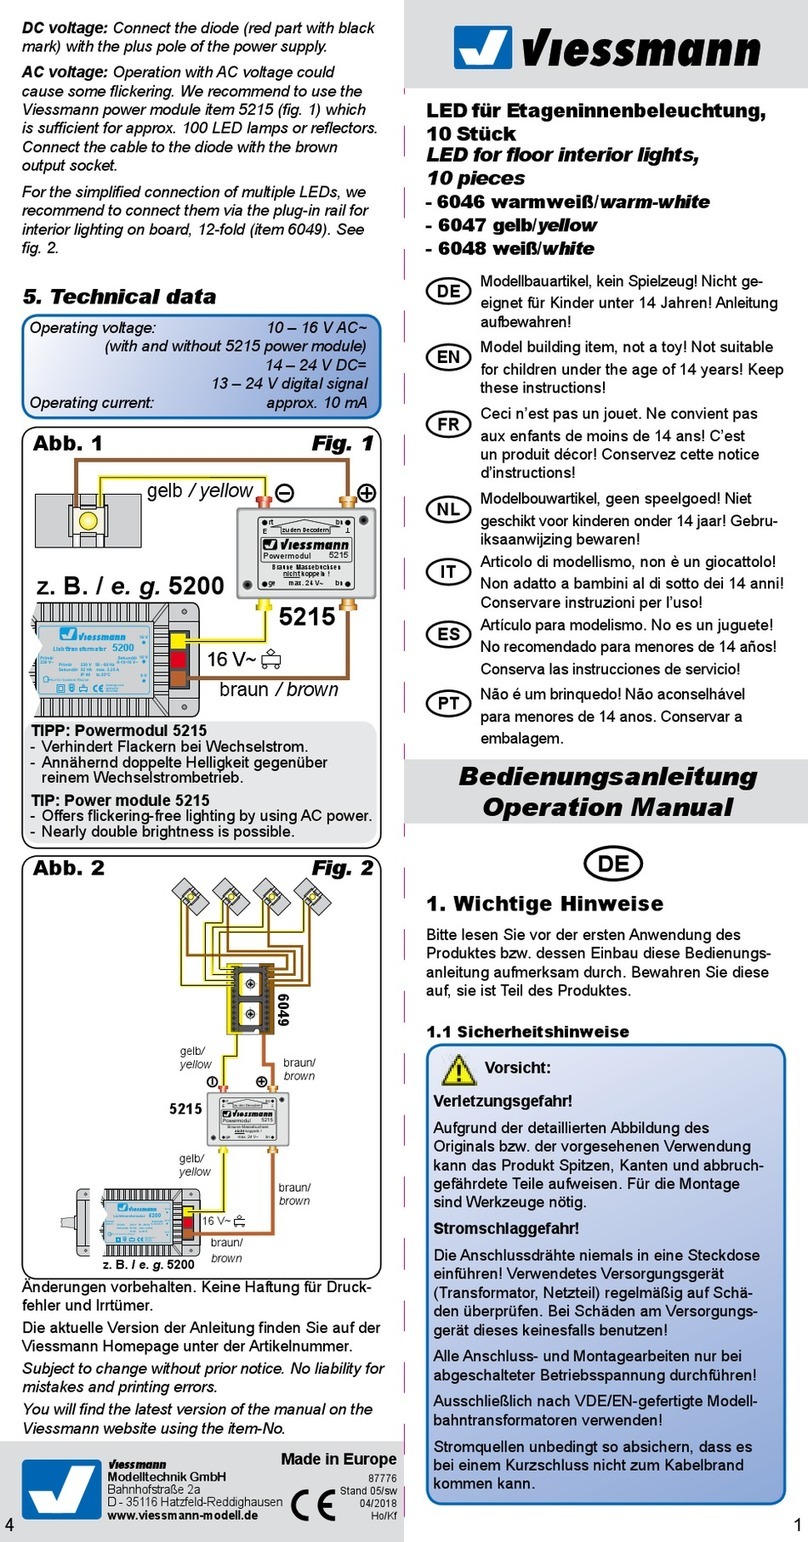
Die Klemme mit der Aufschrift 2 mm
wird für die dickeren Wände (A1 – A4)
verwendet.
The clamp labeled 2 mm is used for the
thicker walls (A1 – A4).
1
5
3. Montage / Mounting
A1
B1
A 10/A
2
A2
B2
Der Stecker muss gut mit Sekundenkleber in den
Bauteilen EL 1 und EL 2 verklebt und eingepresst werden.
Achtung! Der dünne Kontakt ist leicht zerbrechlich.
The plug must be securely glued and pressed into components
EL 1 and EL 2 with super glue.
Caution! The thin contact is easily breakable.
Verwendung von
Viessmann Art. 6002
Use of Viessmann item 6002
EL- 21 3
+-
1
3
B3
A3
4
B4
A4
A11/A
A 10/B A11/B
6
5
B5
B5
A5
A0
A9 wird mit einer leichten Drehung
angebracht und spannt dadurch die
erste Ecke des Gebäudes.
A9 is installed with a slight twist,
thereby tensioning the first corner
of the building.
Achten Sie auf die Abstände der Bodenzapfen.
Sie sind so gesetzt, dass Sie selbst die Seite
der Tür und die Öffnungsseite wählen können.
Die Türen des Erdgeschosses und Obergeschosses
werden diagonal zueinander platziert.
Please pay attention to the distances of the floor pegs.
They are positioned in such a way that you can choose both
the side of the door and the opening side yourself.
The doors on the ground floor and upper floor are placed
diagonally to each otherr.
6
A6
7
B7
A7
B8
A8
Wand 5
Wall 5
Wand 2
Wall 2 Wand 1
Wall 1
Die Klemme mit der Aufschrift 1 mm
wird für die dünneren Wände (A7, A8)
verwendet.
The clamp labeled 1 mm is used for the
thinner walls (A7, A8).
8
7
1.
2.
B6
1.
3.
4.
2.
910
Wand 7
Wall 7
Wand 8
Wall 8
Wand 3
Wall 3
Wand 4
Wall 4
11
A12
Die Schablone hilft dabei den Eingangsbereich sauber und rechtwinklig zu verkleben.
The template assists in cleanly and perpendicularly adhering the entrance area.
D1
D3
D2
Wand 5 aus Bauschritt 5
Wall 5 from step 5
12 Bei Verwendung von Viessmann Art. 6002 lösen Sie die Durchlässe
an Bauteil D1 zum Einsetzen der Beleuchtungselemente aus.
When using Viessmann item 6002, you will detach the passages on
component D1 for installing the lighting elements.
8
13
Zwischendecke einsetzen
Insert false ceiling
D5
D4
14
Bei Verwendung von Viessmann Art. 6002 lösen Sie die Durchlässe
an Bauteil D4 zum Einsetzen der Beleuchtungselemente aus.
When using Viessmann item 6002, you will detach the passages on
component D4 for installing the lighting elements.
EL- 21 3
D 6
D4
D6 2.
D6 1.
D6 3.
D6 4.
15
B10
B9
Das Dach ist abnehmbar. Beginnen Sie
beim Abheben des Daches immer
in der Ecke mit dem Stecker EL.
Beim Aufsetzen des Daches gehen
Sie in umgekehrter Reihenfolge vor.
Arbeiten Sie dabei sehr vorsichtig, da die Kontakte der Verbindung leicht abbrechen können.
The roof is removable. When removing the roof, always start with the corner containing the plug EL.
When putting the roof back on, follow the reverse order.
Be very careful during this process as the contacts of the connection can easily break.

This manual suits for next models

1

Other Viessmann Toy manuals

Viessmann 9010 User manual

Viessmann

Viessmann 9010 User manual

Viessmann 5107 User manual

Viessmann

Viessmann 5107 User manual

Viessmann Vollmer 42513 User guide

Viessmann

Viessmann Vollmer 42513 User guide

Viessmann 5100 User manual

Viessmann

Viessmann 5100 User manual

Viessmann 4176 User manual

Viessmann

Viessmann 4176 User manual

Viessmann 4551 User manual

Viessmann

Viessmann 4551 User manual

Viessmann 4502 User manual

Viessmann

Viessmann 4502 User manual

Viessmann kibri 38144 User manual

Viessmann

Viessmann kibri 38144 User manual

Viessmann 9500 User manual

Viessmann

Viessmann 9500 User manual

Viessmann 5040 H0 User manual

Viessmann

Viessmann 5040 H0 User manual

Viessmann 5065 User manual

Viessmann

Viessmann 5065 User manual

Viessmann 6442 User manual

Viessmann

Viessmann 6442 User manual

Viessmann Vollmer 43545 User guide

Viessmann

Viessmann Vollmer 43545 User guide

Viessmann 4751 User manual

Viessmann

Viessmann 4751 User manual

Viessmann 9500 User manual

Viessmann

Viessmann 9500 User manual

Viessmann 4129 User manual

Viessmann

Viessmann 4129 User manual

Viessmann 5068 User manual

Viessmann

Viessmann 5068 User manual

Viessmann 4021 User manual

Viessmann

Viessmann 4021 User manual

Viessmann 2680 User manual

Viessmann

Viessmann 2680 User manual

Viessmann 6170 User manual

Viessmann

Viessmann 6170 User manual

Viessmann Vollmer 45754 User guide

Viessmann

Viessmann Vollmer 45754 User guide

Viessmann Curved pull-of 4122 User manual

Viessmann

Viessmann Curved pull-of 4122 User manual

Viessmann 26091 User manual

Viessmann

Viessmann 26091 User manual

Viessmann kibri 36606 User guide

Viessmann

Viessmann kibri 36606 User guide

Popular Toy manuals by other brands

Fisher-Price V44377 instructions

Fisher-Price

Fisher-Price V44377 instructions

LeapFrog Level Up & Learn Controller Parents' guide

LeapFrog

LeapFrog Level Up & Learn Controller Parents' guide

VQ Models CESSNA 188 AGWAGON instruction manual

VQ Models

VQ Models CESSNA 188 AGWAGON instruction manual

TILLIG BAHN 16807 manual

TILLIG BAHN

TILLIG BAHN 16807 manual

Chicco VEHICLES quick guide

Chicco

Chicco VEHICLES quick guide

Mattel HotWheels DROP FORCE instructions

Mattel

Mattel HotWheels DROP FORCE instructions

ESM F8F Bearcat instruction manual

ESM

ESM F8F Bearcat instruction manual

LEGO 31034 CREATOR Building instructions

LEGO

LEGO 31034 CREATOR Building instructions

Mega Bloks HALO 97105 manual

Mega Bloks

Mega Bloks HALO 97105 manual

Value Hobby AVIATOR 25 ARF instruction manual

Value Hobby

Value Hobby AVIATOR 25 ARF instruction manual

E-FLITE UMX BEAST 3D instruction manual

E-FLITE

E-FLITE UMX BEAST 3D instruction manual

LEXIBOOK ELECTRONIC BABY PUZZLE manual

LEXIBOOK

LEXIBOOK ELECTRONIC BABY PUZZLE manual

Fisher-Price DFP07 manual

Fisher-Price

Fisher-Price DFP07 manual

Eduard F-117 interior S.A. manual

Eduard

Eduard F-117 interior S.A. manual

Eduard F-4 Phantom II Placards Assembly instructions

Eduard

Eduard F-4 Phantom II Placards Assembly instructions

REVELL Avro RJ 85 Assembly manual

REVELL

REVELL Avro RJ 85 Assembly manual

Real Good Toys QuickBuild Firehouse instructions

Real Good Toys

Real Good Toys QuickBuild Firehouse instructions

REVELL Grumman F-14A Black Tomcat Assembly instructions

REVELL

REVELL Grumman F-14A Black Tomcat Assembly instructions

manuals.online logo
manuals.online logoBrands
  • About & Mission
  • Contact us
  • Privacy Policy
  • Terms and Conditions

Copyright 2025 Manuals.Online. All Rights Reserved.