manuals.online logo
Brands
  1. Home
  2. •
  3. Brands
  4. •
  5. Viessmann
  6. •
  7. Toy
  8. •
  9. Viessmann 5103 User manual

Viessmann 5103 User manual

Made in Europe
Viessmann Modelltechnik GmbH
Bahnhofstraße 2a
D - 35116 Hatzfeld-Reddighausen
[email protected]
+49 6452 9340-0
www.viessmann-modell.de
4
5103
H0 Verlängerungssatz für
Bahnschranke, Art. 5100
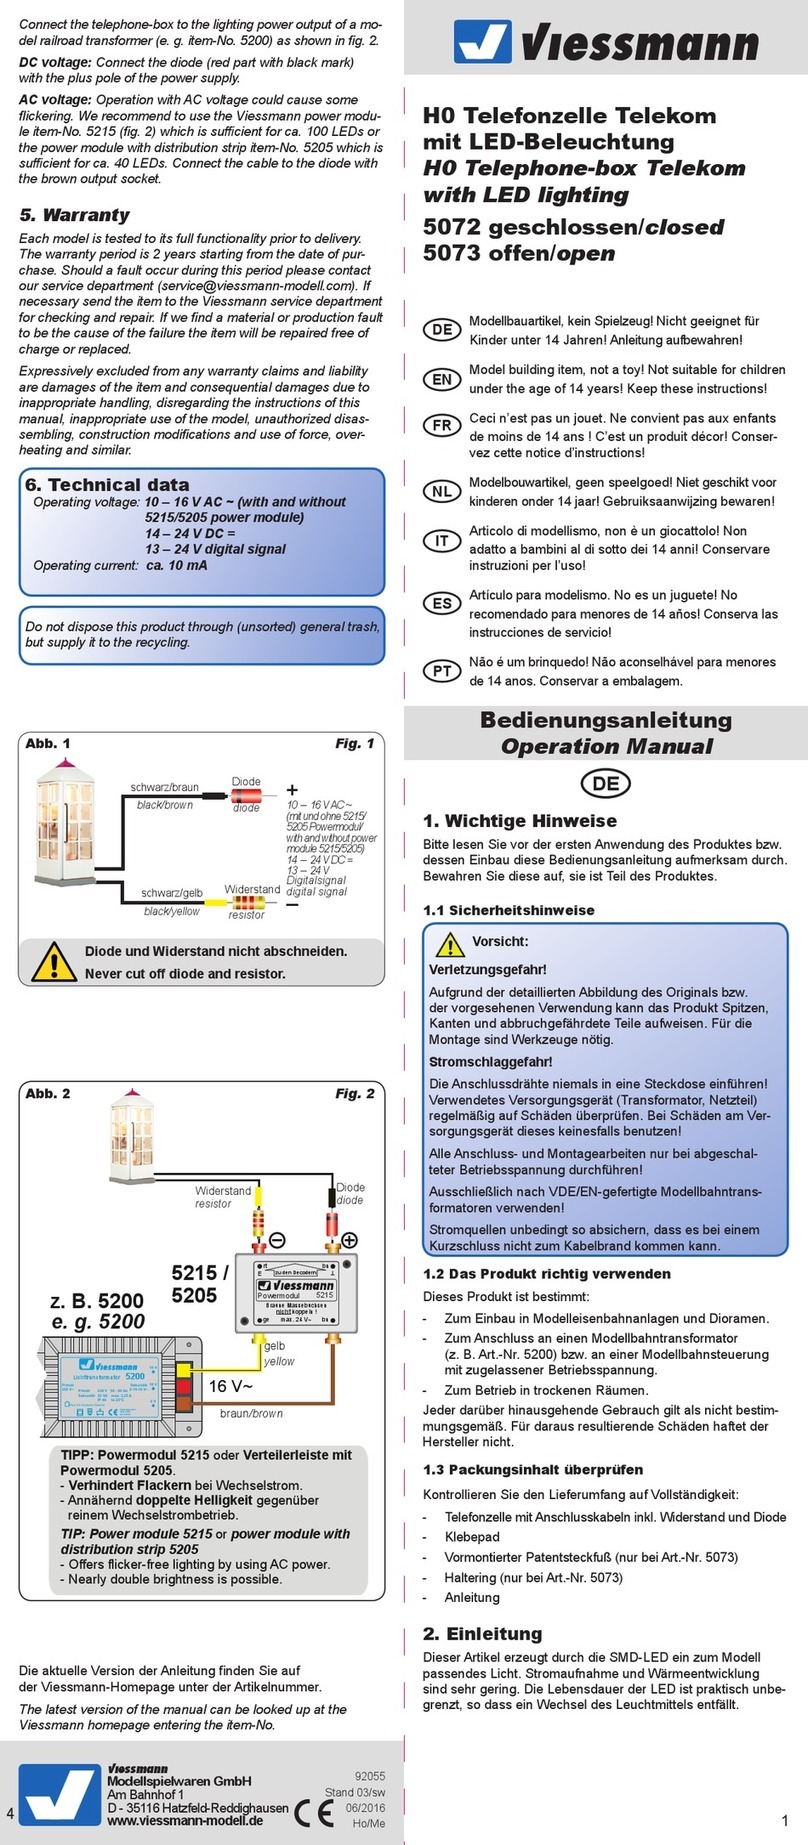
H0 Extension set for level
crossing, item 5100
Bedienungsanleitung
Operation Manual
DE
1. Wichtige Hinweise
Bitte lesen Sie vor der ersten Anwendung des Produktes bzw.
dessen Einbau diese Bedienungsanleitung aufmerksam durch.
Bewahren Sie diese auf, sie ist Teil des Produktes.
1.1 Sicherheitshinweise
Vorsicht:
Verletzungsgefahr!
Aufgrund der detaillierten Abbildung des Originals bzw. der
vorgesehenen Verwendung kann das Produkt Spitzen, Kan-
ten und abbruchgefährdete Teile aufweisen. Für die Montage
sind Werkzeuge nötig.
Stromschlaggefahr!
Die Anschlussdrähte niemals in eine Steckdose einführen!
Verwendetes Versorgungsgerät (Transformator, Netzteil)
regelmäßig auf Schäden überprüfen. Bei Schäden am Ver
-
sorgungsgerät dieses keinesfalls benutzen!
Alle Anschluss- und Montagearbeiten nur bei abgeschalteter
Betriebsspannung durchführen! Ausschließlich nach VDE/EN
gefertigte Modellbahntransformatoren verwenden! Stromquel-
len unbedingt so absichern, dass es bei einem Kurzschluss
nicht zum Kabelbrand kommen kann.
1.2 Das Produkt richtig verwenden
Dieses Produkt ist bestimmt:
- Zum Verlängern der Schrankenbäume von Art. 5100.
- Zum Betrieb in trockenen Räumen.
Jeder darüber hinausgehende Gebrauch gilt als nicht bestim-
mungsgemäß. Für daraus resultierende Schäden haftet der
Hersteller nicht.
1.3 Packungsinhalt überprüfen
Kontrollieren Sie den Lieferumfang auf Vollständigkeit:
- 6 Schrankenbaumelemente weiß
- 6 Schrankenbaumelemente rot
- 2 Ausgleichsfedern
- Gleiszwischenstück
- Gleiszwischenstück mit Kabel
- 2 Rampen
- 4 Rampenfüße
- Anleitung
98467
Stand 03/sw
03/2022
Ho/Kf
Änderungen vorbehalten. Keine Haftung für Druckfehler und Irrtümer.
Die aktuelle Version der Anleitung finden Sie auf der Viessmann Homepage
unter der Artikelnummer.
Subject to change without prior notice. No liability for mistakes and printing
errors.
You will find the latest version of the manual on the Viessmann website using
the item number.
Entsorgen Sie dieses Produkt nicht über den (unsortierten) Haus-
müll, sondern führen Sie es der Wiederverwertung zu.
Do not dispose of this product through (unsorted) domestic
waste, supply it to recycling instead.
Modellbauartikel, kein Spielzeug! Nicht geeignet für
Kinder unter 14 Jahren! Anleitung aufbewahren!
Model building item, not a toy! Not suitable for chil-
dren under the age of 14 years! Keep these instructions!
Ceci n’est pas un jouet. Ne convient pas aux
enfants de moins de 14 ans! Conservez cette notice
d’instructions!
Modelbouwartikel, geen speelgoed! Niet geschikt voor
kinderen onder 14 jaar! Gebruiksaanwijzing bewaren!
Articolo di modellismo, non è un giocattolo! Non
adatto a bambini al di sotto dei 14 anni! Conservare
istruzioni per l’uso!
Artículo para modelismo.No es un juguete! No
recomendado para menores de 14 años! Conserva las
instrucciones de servicio!
Não é um brinquedo! Não aconselhável para meno-
res de 14 anos. Conservar o manual de instruções.
DE
EN
FR
NL
IT
ES
PT
Abb. 5
Abb. 6
Abb. 7
Abb. 8
Fig. 5
Fig. 6
Fig. 7
Fig. 8
ENDE
2. Einbau
2.1 Bahndamm erzeugen
Je eines der abgeflachten Enden der Gleiszwischenstücke ist
mit einem Messer zu kappen. Die beiden Teile können dann
an den Schnittflächen zusammengefügt und in den Übergang
gesetzt werden.
1. Important information
Please read this manual completely and attentively before using
the product for the first time. Keep this manual. It is part of the
product.
1.1 Safety instructions
Caution:
Risk of injury!
Due to the detailed reproduction of the original and the in-
tended use, this product can have peaks, edges and break-
able parts. For installation tools are required.
Electrical hazard!
Never put the connecting wires into a power socket! Reg-
ularly examine the transformer for damage. In case of any
damage, do not use the transformer!
Make sure that the power supply is switched off when you
mount the device and connect the cables! Only use VDE/EN
tested special model train transformers for the power supply!
The power sources must be protected to prevent the risk of
burning cables.
1.2 Using the product for its correct purpose
This product is intended:
- To extend barrier arms of item 5100.
- For operation in dry rooms only.
Using the product for any other purpose is not approved and is
considered inappropriate. The manufacturer is not responsible
for any damage resulting from the improper use of this product
1.3 Checking the package contents
Check the contents of the package for completeness:
- 6 extensions white
- 6 extensions red
- 2 balance springs
- 2R connector
- 3R connector
- 2 ramps
- 4 ramp feets
- Manual
2. Mounting
2.1 Create a level crossing
Clip off one of the flattened ends each of the connectors with a
knife. Both parts can then be joined together at their cut surfac-
es and positioned in the level crossing.
2.2 Extension of the barrier boom
You have to plug two extensions from the individual parts of
the extension set together. Make sure to always begin with a
red extension.
You can pull off the boom from the barrier behind the first white
element.
Then you first have to plug the extension set followed by the
original boom onto the barrier.
2.3 Mounting the spring
In order to be able to mount the compensation spring, the actu-
ating wire and the barrier must first be disconnected.
Use a pair of tweezers to carefully lift the barrier out of the drive.
To do this, the tweezers need to be applied at the horizontal
connection element.
The actuating wire has to be fixated by a pair of tweezers. Sub-
sequently, the spring has to be screwed onto the actuating wire
sleeve.
Under no circumstances pull off the actuating wire sleeve
and simply slide on the spring!
Finally, use a pair of tweezers to put first the left and then the
right barrier foot onto the drive and click the actuating wire
sleeve back into the barrier.
32
Abb. 1 Fig. 1
2.2 Verlängerung des Schrankenbaums
Aus den einzelnen Teilen des Verlängerungssatzes sind zwei
Verlängerungsstücke zusammenzustecken. Hierbei ist jeweils
mit einem roten Element zu beginnen.
Abb. 2
Abb. 3
Abb. 4
Fig. 2
Fig. 3
Fig. 4
Der Schrankenbaum ist hinter dem ersten weißen Element von
der Schranke abzuziehen.
Anschließend ist zunächst der Verlängerungssatz und dann
der ursprüngliche Schrankenbaum wieder auf die Schranke
aufzustecken.
2.3 Federmontage
Um die Ausgleichsfeder montieren zu können, muss zunächst
die Verbindung zwischen dem Stelldraht des Antriebes und der
Schranke gelöst werden.
Die Schranke ist mit Hilfe einer Pinzette vorsichtig aus dem An-
trieb herauszuheben. Hierzu ist die Pinzette am waagerechten
Verbindungselement anzusetzen.
Der Stelldraht ist mit Hilfe einer Pinzette zu fixieren. Anschlie-
ßend muss die Feder auf die Stelldrahtmuffe aufgeschraubt
werden.
Bitte auf keinen Fall die Stelldrahtmuffe abziehen und die
Feder einfach aufschieben!
Nun ist mit Hilfe einer Pinzette zunächst der linke und dann der
rechte Schrankenfuß wieder auf den Antrieb aufzusetzen und die
Stelldrahtmuffe wieder in die Schranke einzuklicken.
Other Viessmann Toy manuals

Viessmann 4518 User manual

Viessmann

Viessmann 4518 User manual

Viessmann Vollmer 45131 User guide

Viessmann

Viessmann Vollmer 45131 User guide

Viessmann 2624 User manual

Viessmann

Viessmann 2624 User manual

Viessmann 6046 User manual

Viessmann

Viessmann 6046 User manual

Viessmann 6045 User manual

Viessmann

Viessmann 6045 User manual

Viessmann 3043 User manual

Viessmann

Viessmann 3043 User manual

Viessmann 5108 User manual

Viessmann

Viessmann 5108 User manual

Viessmann 4176 User manual

Viessmann

Viessmann 4176 User manual

Viessmann 4172 User manual

Viessmann

Viessmann 4172 User manual

Viessmann 5022 User manual

Viessmann

Viessmann 5022 User manual

Viessmann 4174 User manual

Viessmann

Viessmann 4174 User manual

Viessmann 5057 User manual

Viessmann

Viessmann 5057 User manual

Viessmann 4750 User manual

Viessmann

Viessmann 4750 User manual

Viessmann 1843 User manual

Viessmann

Viessmann 1843 User manual

Viessmann Vollmer 45754 User guide

Viessmann

Viessmann Vollmer 45754 User guide

Viessmann eMotion Series User manual

Viessmann

Viessmann eMotion Series User manual

Viessmann Vollmer 47749 User guide

Viessmann

Viessmann Vollmer 47749 User guide

Viessmann 2618 User manual

Viessmann

Viessmann 2618 User manual

Viessmann eMotion 1542 User manual

Viessmann

Viessmann eMotion 1542 User manual

Viessmann 5079 User manual

Viessmann

Viessmann 5079 User manual

Viessmann 4160 User manual

Viessmann

Viessmann 4160 User manual

Viessmann 26110 User manual

Viessmann

Viessmann 26110 User manual

Viessmann 2680 User manual

Viessmann

Viessmann 2680 User manual

Viessmann 1513 User manual

Viessmann

Viessmann 1513 User manual

Popular Toy manuals by other brands

SG Models Radial Rocket TD 10cc Assembly manual

SG Models

SG Models Radial Rocket TD 10cc Assembly manual

GREAT PLANES Spirit 100 Instruction book

GREAT PLANES

GREAT PLANES Spirit 100 Instruction book

Eduard 49 1006 quick start guide

Eduard

Eduard 49 1006 quick start guide

Hornby Railroad Compound Class Operating and maintenance instructions

Hornby

Hornby Railroad Compound Class Operating and maintenance instructions

Skyrocket Pomsies quick start guide

Skyrocket

Skyrocket Pomsies quick start guide

Eduard USS Nimitz CVN-68 1/700 quick start guide

Eduard

Eduard USS Nimitz CVN-68 1/700 quick start guide

JMB-Jets PC 21 manual

JMB-Jets

JMB-Jets PC 21 manual

Trix 66718 manual

Trix

Trix 66718 manual

marklin 37074 user manual

marklin

marklin 37074 user manual

Eduard A6M2-K S.A. manual

Eduard

Eduard A6M2-K S.A. manual

GREAT PLANES Yard Stik instruction manual

GREAT PLANES

GREAT PLANES Yard Stik instruction manual

Eduard F/A-18F interior manual

Eduard

Eduard F/A-18F interior manual

MTHTrains Premier GP60M Diesel Engine Operator's manual

MTHTrains

MTHTrains Premier GP60M Diesel Engine Operator's manual

Enabling Devices 3112 user guide

Enabling Devices

Enabling Devices 3112 user guide

SPAD Debut Building instructions

SPAD

SPAD Debut Building instructions

HQ Kites & Design Constellation owner's manual

HQ Kites & Design

HQ Kites & Design Constellation owner's manual

Mega Bloks Kapow! Blok Bots Fighting League PYRO 94203 instructions

Mega Bloks

Mega Bloks Kapow! Blok Bots Fighting League PYRO 94203 instructions

H-KING FLYCAT manual

H-KING

H-KING FLYCAT manual

manuals.online logo
manuals.online logoBrands
  • About & Mission
  • Contact us
  • Privacy Policy
  • Terms and Conditions

Copyright 2025 Manuals.Online. All Rights Reserved.