ViewPlus InkConnect User manual

ViewPlus InkConnect
for VP Elite and Premier Embossers
Revision: 20160630

1
Table of Contents
I. Introduction ............................................................................................................................................... 2
A. Preface ................................................................................................................................................ 2
B. FCC Compliance Statement................................................................................................................. 2
C. Safety Instructions .............................................................................................................................. 3
D. Specifications ...................................................................................................................................... 4
II. Installation ................................................................................................................................................ 5
A. Items in the Box .................................................................................................................................. 5
B. Unpacking............................................................................................................................................ 5
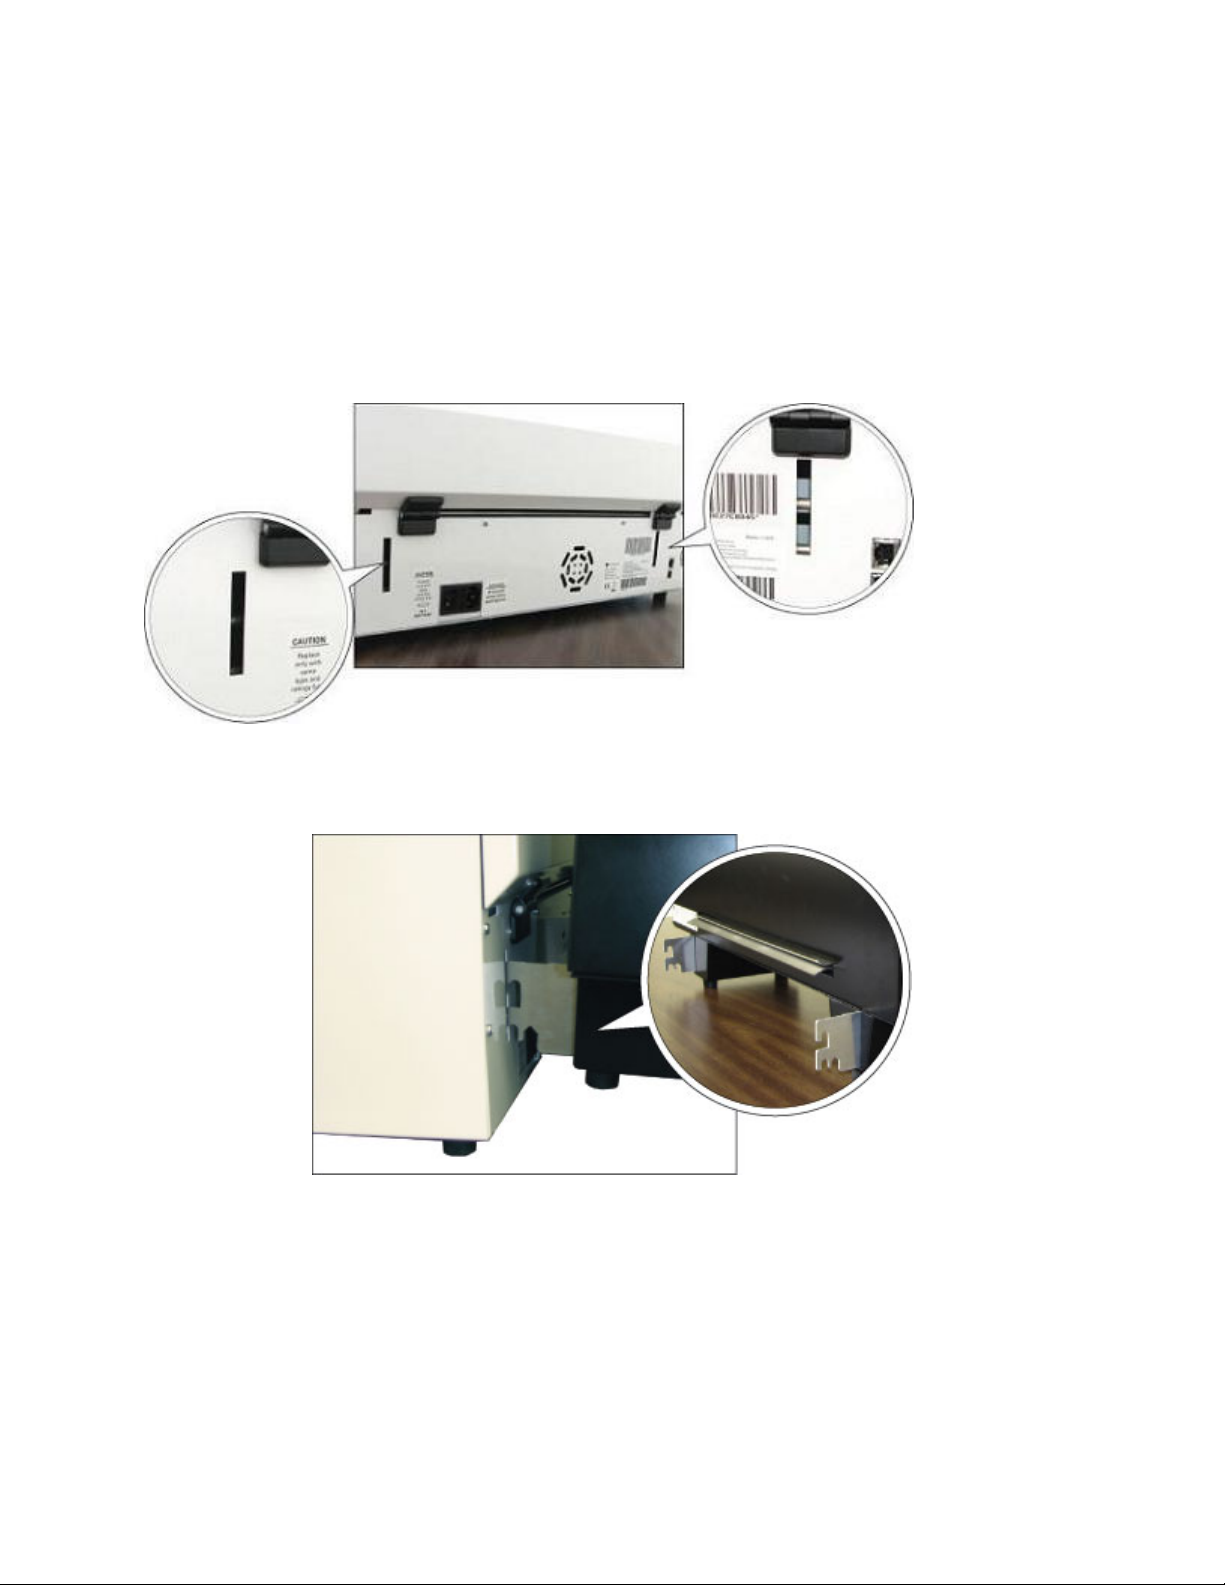
C. Hardware Attachment ........................................................................................................................ 6
D. Software Installation........................................................................................................................... 7
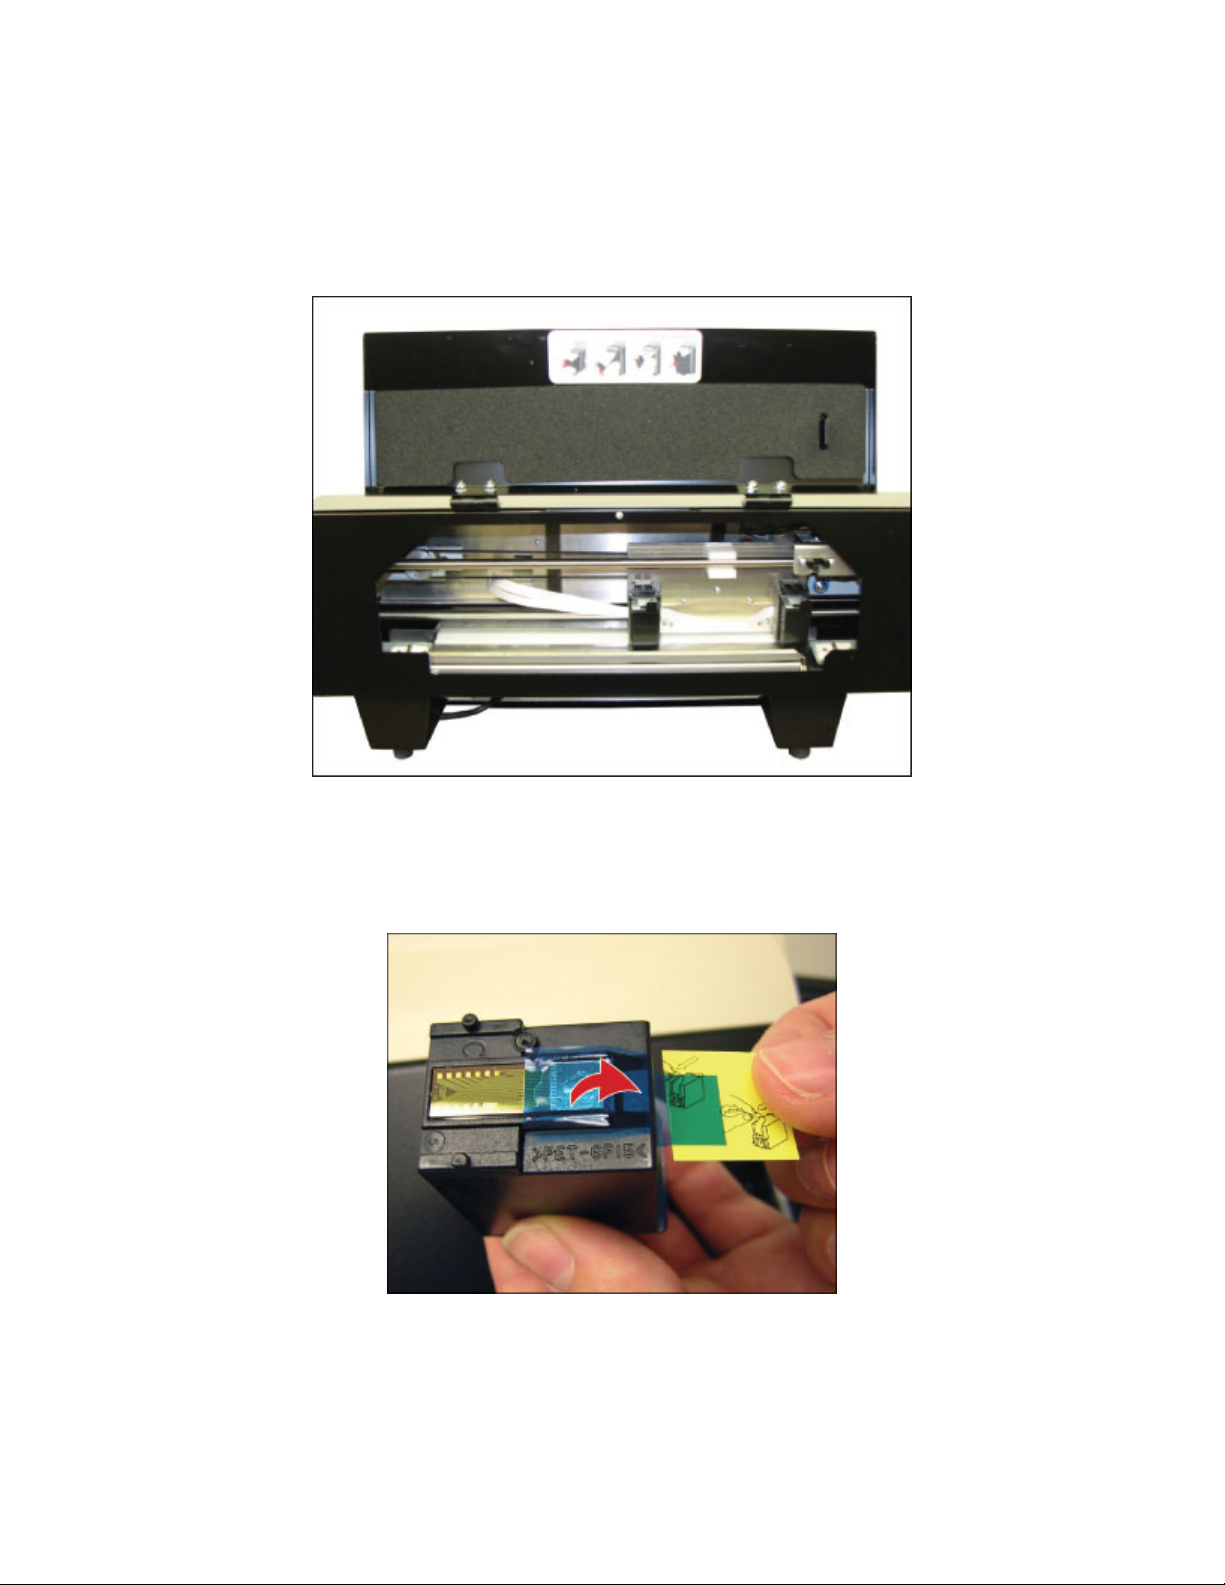
E. Ink Cartridge Installation ..................................................................................................................... 8
III. Set Defaults for the Printer ...................................................................................................................... 9
A. Windows Printer Defaults................................................................................................................... 9
B. Legacy Printer Defaults ..................................................................................................................... 12
C. Service Settings ................................................................................................................................. 13
IV. Braille, Translation and Printing ............................................................................................................ 15
A. ViewPlus Tiger Software Suite .......................................................................................................... 15
B. Fonts.................................................................................................................................................. 15
C. Math and Braille................................................................................................................................ 15
D. Printing.............................................................................................................................................. 16
V. Support, Maintenance and Warranty..................................................................................................... 16
A. Training and Support Packages......................................................................................................... 16
B. Maintenance ..................................................................................................................................... 16
C. Warranty ........................................................................................................................................... 17

2
I. Introduction
A. Preface
ViewPlus InkConnect
For your Elite or Premier embosser
User's Manual
Congratulations on owning a ViewPlus InkConnect!
This HP Inkjet attachment for your Elite or Premier embosser allows you to easily add ink to all
your tactile documents. This manual will introduce you to the basic information regarding your
new ink attachment. The ViewPlus web site is another resource for information on your
ViewPlus product including examples, tutorials and other useful downloads.
Visit the website at: http://www.viewplus.com
Model Number VPT9034-00
B. FCC Compliance Statement
Compliance Statement (USA)
This equipment has been tested and found to comply with the limits for a Class A digital device, pursuant
to Part 15 of the FCC Rules. Operation is subject to the following two conditions: (1) this device may not
cause harmful interference, and (2) this device must accept any interference received, including
interference that may cause undesired operation. If this equipment does cause harmful interference to
radio or television reception, which can be determined by turning the equipment off and on, the user is
encouraged to try to correct the interference by one or more of the following measures:
•Reorient or relocate the receiving antenna.
•Increase the separation between the equipment and receiver.
•Connect the equipment to an outlet on a circuit different from that to which the receiver is
connected.
•Consult the dealer or an experienced radio/TV technician for help.
•FCC Warning: Changes or modifications not expressly approved by the party responsible for
compliance could void the user's authority to operate the equipment.
Compliance Statement (Canada)
This digital apparatus is in conformity with standard NMB-003 of Canada.
Cet appareil numérique est conforme à la norme NMB-003 du Canada.

3
Compliance Statement (Germany)
Bescheinigung des Herstellers/Importeurs:
Hiermit wird bescheinigt, dass der Drucker der Maschinenlärminformationsverordnung 3. GSGV,
18.01.1991 entspricht: Der höchste Schalldruckpegel beträgt 70 dB(A) oder weniger gemäß EN27779-
1991.
Compliance Statement (Europe)
Warning: This product meets the interference requirements of EN55022. In a domestic environment, this
product may cause radio interference in which case, the user may be required to take adequate measures.
Compliance Statement (Korea)
This apparatus complies with CISPR22 requirements.
International Compliance
EN55022:2006 Emissions series
EN55024:1998 Immunity characteristics
EN61000-3-2:2006 Power line harmonics
EN61000-3-3:1995 Power line flicker
EN55024:1998 Electrostatic discharge
EN55024:1998 Radiated susceptibility
EN55024:1998 Electrical fast transient/burst
EN55024:1998 Surge
EN55024:1998 Conducted immunity
EN55024:1998 Input voltage interruptions/DIPS
Waste Electrical and Electronic Equipment (WEEE) Compliance
ViewPlus BV complies with EU Directive 2002/96 regarding WEEE recycling; upon the conclusion of the
product lifecycle, please contact ViewPlus BV concerning proper disposal.
C. Safety Instructions
Read all the following safety instructions before using the ViewPlus InkConnect for your Tiger Elite or
Premier embosser. In addition, always follow all warnings and instructions marked on the printer itself.
All safety instructions listed in your Tiger Elite and Premier series embosser manual continue to apply.
•Do not place printer with ink attachment on an unstable surface.
•Do not place printer with ink attachment near a radiator or heat source.

4
•Do not block or cover slots and openings in the printer's cabinet; do not insert objects through
slots.
•Use only the type of power source indicated on printer's label.
•Connect all equipment to properly grounded electrical outlets.
•Do not connect the ink attachment to any external power supply.
•Do not use frayed or damaged power cord.
•The use of an extension cord with the printer is not recommended.
•Detach printer from power during the ink attachment installation or removal process.
•Unplug printer before cleaning it; always clean it with a piece of damp cloth only.
•Do not spill liquid into printer or the ink attachment.
•Only adjust those controls that are covered by the operating instructions.
•Except as specifically explained in the user's manual, do not attempt to service the printer by
yourself.
•Detach the printer from power source and refer to qualified service personnel under the following
conditions:
oIf the power cord or plug is damaged.
oIf liquid has entered the printer or the ink attachment.
oIf printer or ink attachment have been dropped or the cabinet is damaged.
oIf the printer or ink attachment do not operate properly or exhibit a distinct change in
performance.
D. Specifications
ViewPlus InkConnect for Tiger Elite and Premier Embossers
Character Sets
Use any font at any size
Print Resolution
100 dots per inch
Print Speed
up to 110 combined print and braille characters per second in draft mode
(actual speed depends on embosser model)
Print Mechanism
Uses two HP C6602A cartridges, capacity: 15mg of ink, equals approx. 7
million characters
Paper Feed Method
Tractor feed only
Paper Size
Any tractor-fed braille or office paper 4-12 inches wide
Paper Weight
Any weight from thin computer paper (starting at 75 g/m2) to thick card
stock, photo paper or braille paper (up to 230 g/m
2
)
Dimensions
Length
Width
Height
Weight
8.2 inches (20.9 cm)
22.3 inches (56.7 cm)
10.0 inches (25.4 cm)
14 pounds (6.35 kg)
Connectivity
USB or LAN connection through Tiger Elite or Premier embosser
Power Consumption
Standby < 0.5 W
Average Print 90 mA @ 5 V, 300 mA @ 42 V

5
Computer Requirements
Operating System
Memory
Windows XP or later
256 MB or more
Embosser Requirements
Embosser type
Firmware
ViewPlus Elite or Premier embosser (if your embosser serial number is lower
than CEL2000100 for Elite 200, CEL1500100 for Elite 150, CPM1000100 for
Premier 100 or CPM0800100 for Premier 80, please contact ViewPlus
Technologies for information on upgrading your hardware)
Version 1.6.0 or later (if your embosser serial number is lower than
CEL2000100 for Elite 200, CEL1500100 for Elite 150, CPM1000100 for
Premier 100 or CPM0800100 for Premier 80, please contact ViewPlus
Technologies for a free firmware upgrade)
II. Installation
A. Items in the Box
•1 ViewPlus InkConnect for Tiger Elite and Premier embossers (embosser not included)
•1 installation CD with user's manual in html
•2 ink cartridges
•1 serial cable
B. Unpacking
•Remove the InkConnect and all its accessories from its packaging.
•Inspect the unit and its packaging for any damage.
•Save the packing material and box. If any damage occurred during shipping, most shipping
companies require the box and the packing material in order to settle the insurance claim. The
packing material must also be used to ship the InkConnect for warranty maintenance service.
•Follow the ViewPlus InkConnect Setup Instructions included with your other materials.

6
C. Hardware Attachment
Before attaching the InkConnect, make sure that your Elite or Premier embosser is turned off.
To attach the InkConnect to the embosser, line up the hooks on the InkConnect with the pegs in the back
of the embosser. Insert the InkConnect hooks straight into the embosser and lower the InkConnect onto
the embosser pegs.
Shows the locations of the pegs in the back of the embosser
Shows the hooks on the InkConnect
Connect the InkConnect's serial port to the embosser's serial port with the provided serial cable.

7
Shows the locations of the serial port connectors on the embosser and ink attachment
D. Software Installation
Please follow the easy steps that are part of your Setup Instructions to install your InkConnect driver. They
can also be found on your installation CD.

8
E. Ink Cartridge Installation
To install ink cartridges, rotate the back lid of the InkConnect up.
Shows the InkConnect with the back lid open
The ink cartridge carriage will be accessible through the opening. Unpack the two ink cartridges included
with the InkConnect. Carefully remove the plastic tape covering the ink cartridge nozzles without touching
the nozzles.
Shows the plastic tape covering the ink cartridge nozzles
Hold a cartridge with the nozzles pointing down (the label will be up). The flat plastic tab should be toward
you so that the writing on the label is upside down. Insert the cartridge into one of the ink cartridge

9
holders by placing the nozzle end in first and then pressing the side with the tab forward into the
InkConnect until the cartridge snaps into the holder.
Shows how to insert an ink cartridge
Install the second cartridge the same way, then close the lid.
The next time a print job is sent to the printer, a dialog will appear for each cartridge stating that a
cartridge change was detected. Choose the 'Yes' button on each cartridge's dialog to confirm that a new
cartridge was installed. This will ensure that the ink fill status of the cartridge is set at 100% when the
cartridge is full.
If an ink cartridge change dialog does not appear for one or both cartridges, or if you would like to reset
the ink fill status immediately without printing, the ink fill status can be set manually instead. To do this,
refer to the instructions for checking the ink fill status in Chapter III, Section C of this manual.
III. Set Defaults for the Printer
A. Windows Printer Defaults
After installation and setup are completed, changing your default settings to settings that will be used the
most often will save time in the future.
To set the default settings on your printer, enter the printer properties page for your Elite or Premier
embosser with InkConnect through Start>Printers and Faxes on Windows XP or Start>Control Panel>
Printers on Windows Vista, right click on your Elite or Premier and choose 'Printer Properties'.
To select the paper size you will most commonly use, click the 'Printing Preferences...' button on the
General tab. On the Layout tab of the Printing Preferences page, click the 'Advanced...' button. You will
now be able to select the paper size you will usually use from a drop down list. Please note that if you
later wish to use a paper size larger than what you have chosen on this page, you will need to adjust this
setting before printing.

10
Now you need to set your Tiger printing preferences. Please read the descriptions below to help you make
your selections. The default settings on the Tiger tab will be appropriate for most users most of the time.
When you are finished making your selections, be sure to click the OK button to save your settings.
Shows Tiger Tab
•Duplex - From this drop down you may choose to print single-sided or double-sided (interpoint).
•Insert an empty page to the front/back of a graphics page - If this option is checked, a blank
page will be inserted so that graphics print on a separate page. This prevents graphics within a
text document from having braille or other graphics printed on the back side, potentially
distorting the image.
•Inverse Landscape - If inverse landscape is checked, multiple pages of a spreadsheet will be
printed so the information is continuous.
•Emboss - When this option is checked, the printer will create embossed output.
•Ink - When this options is checked, the printer will create inked output.
Note: When both Emboss and Ink are checked (default), the printer will create both embossed
and inked output.

11
•2 in 1 - When this option is checked, the printer will generate embossed output from every odd
page and inked output from every even page of the document. This is useful if editing is done on
either the embossed page or the printed page.
•One Pass Print Ink and Two Pass Print Ink - When the duplex option is set to double-sided
(interpoint) and the ink option is checked, the one pass print ink and two pass print ink options
become available. Selecting one pass print ink will print the ink corresponding to both the front
and back sides of each page on the front of the page, and the braille and all the ink will be printed
in one pass of the paper through the printer. Selecting two pass print ink will print the braille for
both sides and the ink for the front sides of the pages in one pass, then require the paper to be
flipped over and reinserted into the printer to print the ink on the back sides of the pages. An
extra sheet of blank paper at the end of the embossed pages is required when using the two pass
print ink option.
•Ink Quality - From this drop down you may select draft, normal or best ink quality. Draft print
quality uses half the amount of ink as normal print quality, while best print quality uses twice as
much ink as normal print quality.
•Braille Dot Quality - From this drop down you may select standard, better or best braille dot
quality. The standard setting will print standard Tiger braille dots, the better setting will print
more rounded braille dots and the best setting will print more conventionally sized and rounded
braille dots.
•Braille Dot Height - This combo box allows you to choose high, normal or low braille dots. This
can be useful if you are having difficulty reading the dots due to them being too high or too low.
•Media Type - This allows you to select the type of media you are printing on to load pre-set punch
force values that optimize printing on that media. You may view the values for pre-set media
types, or you can add your own if you are printing on a special type of media.
•Invert Colors - This might be used for special effects for images that would emboss better with
the light colors embossed as dark and the dark colors embossed as light colors.
•Contrast - The default setting is 0. The range is from -100 to 100. Increasing the contrast increases
the dot height difference of two colors that have intensities that are nearly the same. By
increasing the contrast, light colors get lighter and dark colors get darker.
•Brightness - The default setting is 0. The range is from -100 to 100. Increasing the brightness
would be useful if you want to increase the intensity of all the colors. This would be useful if the
lines in the drawing are thin and light.
•Apply Chessboard Pattern - If this option is checked, solid color areas of graphics will be printed
with every other dot removed, creating a chessboard pattern. This option is often helpful for large,
dark graphics where the embossing might be likely to wrinkle the paper.
•Thin Line Intensity - If lines on the graphics are too thin to emboss correctly, slide the indicator
to the right.
•Collate - When the collate box is checked and multiple copies of a document are desired, one
complete document will be embossed at a time. If the collate box is left unchecked multiple copies
of each page will be embossed.
•Preview - If this option is checked, a preview of the document will be shown in Tiger Viewer or
Tiger Designer instead of printing.
•Reset to Default - This button restores all options on the Tiger tab to the factory default values
The Tiger tab also displays important information about your printer. On the Tiger tab you can find the
printer driver version number. If you are locally connected to your printer and it is turned on, you can also

12
find the serial number for your Elite or Premier and its firmware version number, as well as the serial
number and firmware version number for your InkConnect.
B. Legacy Printer Defaults
Now that you have set your Windows printer defaults, you should also set your legacy printer defaults.
These are adjustable from the Legacy Settings tab of the printer properties window. Below is a description
of the options on the Legacy Settings tab.
Shows Legacy Settings Tab

13
•Paper size - Standard page sizes or custom page sizes may be selected.
•Margins - Set the margins to 0 if you are using a program which sets its own margins.
•Line Settings
oAutomatic text wrapping - When this option is checked, the text is wrapped to the next
line. If it is not checked, it is possible if the line is too long to lose characters.
Extra space between lines - The default spacing is 0.05 inches with 0.00 extra
space between lines. It increases in 0.05 increments up to 0.25 inches.
•Media Type - This allows you to select the type of media you are printing on to load pre-set punch
force values that optimize printing on that media. You may view the values for pre-set media
types, or you can add your own if you are printing on a special type of media.
•Media Source - This allows you to select the source of the media. The default is 'Tractor'.
•Text/graphics mode - Choose either text or graphics.
•Dots per character - Choose between 6 or 8.
•Download custom braille table - A user defined braille character set from ASCII value 32 to 127
can be downloaded to the ViewPlus Elite or Premier. The braille character sets are typically stored
in braille conversion table files (*.BCT). This file format is editable in Notepad and allows the user
to create user definable conversion tables. Go to the ViewPlus Support Page for additional
information about this mode.
•Braille dot height - This combo box allows you to choose high, normal or low braille dots. This
can be useful if you are having difficulty reading the dots due to them being too high or too low.
•Duplex mode - When this option is checked, documents will be printed double-sided (interpoint).
C. Service Settings
The service tab provides several servicing functions for your ViewPlus Tiger Elite or Premier embosser and
InkConnect. Most users will not need to use anything but the ink servicing functions (accessed through
the Ink Skew Alignment, Ink-Emboss Alignment, Cartridge Spacing Calibration and Check Ink Cartridge
Level buttons) on this tab. Please do not adjust any other settings on this page unless directed to do so
by ViewPlus Support. Adjusting embosser settings without the assistance of a trained ViewPlus technician
may result in permanent damage to the embosser.
•Print Head Alignment - This prints the alignment page for the embossing head. Select which
embossing head to align by choosing the button under the "Top" or "Bottom" section. The "Top"
settings are used for the front of the page, which is the top side of the paper as it comes out of
the embosser. The "Bottom" settings are used for the back side of the page, which is the bottom
side of the paper as it comes out of the embosser. In order to produce perfect dots on the special
Tiger platen, the embossing head needs to be aligned with the grooves. This procedure prints out
a 20 by 24 pattern of dots of which one dot looks perfectly aligned. After the test page has been
printed, select the best aligned row and column and enter their values in the "Vertical" and
"Horizontal" boxes, respectively. The columns and rows are numbered from the left to right and
top to bottom, respectively, starting with 1.
•Emboss Skew Calibration - This prints the skew calibration pattern. Select which embossing
head to set the print skew for by choosing the button under the "Top" or "Bottom" section. The
"Top" settings are used for the front of the page, which is the top side of the paper as it comes

14
out of the embosser. The "Bottom" settings are used for the back side of the page, which is the
bottom side of the paper as it comes out of the embosser. The pattern is 40 dots of which one is
perfectly aligned with the dots above and below it in line. Count the number of dots from top to
bottom starting with 1. Enter the best dot number.
•Interpoint Calibration - This button allows the user to adjust the horizontal placement of
interpoint (the placement of dots horizontally on the back side of the page with respect to the
placement of dots on the front of the page). The calibration pattern is 11 cells of four dots on the
front side and 11 cells of one dot on the back side. The dots on the back side have varying
horizontal alignment with respect to the dots on the front. With the four-dot cells facing up, find
the cell with the best interpoint alignment and count the cells, from left to right starting with 1,
to determine its number. Enter this number in the Figure box.
•Ink Skew Alignment - This prints the ink skew alignment pattern, which allows the user to line
up the ink printing from one pass of the print head to the next. The pattern is a numbered set of
vertical ink lines, one of which is a perfectly straight line. Enter the number of the perfectly straight
line into the Ink Skew field.
•Ink-Emboss Alignment - This prints the ink/emboss alignment page, which allows the user to
change the horizontal and vertical placement of the ink with respect to the embossing. The
pattern is two numbered sets of 11 embossed rectangles with 11 ink rectangles overlapping them;
one set of rectangles is for the horizontal placement and the other is for vertical placement. To
set the horizontal placement, locate the embossed rectangle in the "Horizontal" set that is
perfectly horizontally aligned with the corresponding ink rectangle and enter its number into the
Horizontal field. To set the vertical placement, locate the embossed rectangle in the "Vertical" set
that is perfectly vertically aligned with the corresponding ink rectangle and enter its number into
the Vertical field.
•Cartridge Spacing Calibration - This prints the ink cartridge spacing calibration pattern, which
allows the user to line up the printing from the two ink cartridges so that there is no overlap or
empty space between them in the center of the page. The pattern is two columns of inked
rectangles and a column of numbers from -10 to 10. Select the number of the row in the pattern
in which the ink rectangles neither overlap nor have white space between them and enter it into
the Cartridge Spacing field.
•Ethernet - This button opens a new dialog displaying the Ethernet information being used for the
printer, including its IP address.
•Print Test Page - This button will print a test page from the printer.
•Check Ink Cartridge Level - This button will display the current estimated fill status of the ink
cartridges in the InkConnect. NOTE: The next time a print job is sent after changing one or both
ink cartridges, a dialog or dialogs will appear asking if cartridge 1 and/or 2 has been replaced.
Make sure to confirm that the cartridge(s) were replaced or the ink cartridge fill status will not be
reset. If no print jobs will be sent right away but it is desired to reset the ink fill status immediately,
check the ink cartridge level to receive the dialog(s) asking if the cartridge(s) have been changed.
•Check Emboss Usage - This button displays how much of the total printing done by the printer
has been done on each print carriage and allows the user to change which carriage is the primary
carriage (which carriage prints single-sided print jobs and graphics). Users who frequently print
single-sided documents and graphics can extend the life of their printers by changing the primary
carriage periodically, which helps even out the wear on the carriages. NOTE: When ink print from
an InkConnect is desired on a document, Carriage 1 must be designated as the primary carriage
for correct print results. Carriage 2 may still be used as the primary carriage when printing
emboss-only documents with an InkConnect attached.

15
•Printer Status - At the bottom of the Service tab is a printer status box, which gives information
about what the printer is currently doing. If you are receiving an error tone from the printer, check
the printer status box for more information about the error.
IV. Braille, Translation and Printing
A. ViewPlus Tiger Software Suite
Most braille should be produced using the Tiger Software Suite. The Tiger Software Suite is part of your
embosser package. Instructions for installation and use come with the software package.
B. Fonts
Tiger screen fonts are alternative braille fonts installed during the installation of the ViewPlus embosser
driver. They can be chosen as output options in Tiger Software Suite (TSS) and other software programs,
like MathType. Tiger screen fonts appear as standard text characters on the screen and print as braille dot
patterns.
It is very important to use the default font size and spacing for braille fonts. If the font size or spacing is
changed, the braille will not be printed with the correct standards. For Tiger fonts, a point size of 36 is
suggested. Most other braille fonts will use a point size of 29.
Characters or text not translated to braille will print as graphic images of the visual character. This enables
embossing of visual print characters. More information about the fonts included can be found on your
installation CD in the Tiger/Docs folder.
C. Math and Braille
Create braille math documents using the Tiger Software Suite 4.0 and MathType 5.0 or higher from Design
Science. Insert text, graphics and math equations directly into a Microsoft Word document and translate
to braille in one easy step. Equations will appear in both braille and ink allowing sighted readers to follow
along. More information about braille math can be found on the ViewPlus website.

16
D. Printing
Now the installation is complete, you should be set to print a document. These are the steps that you
should follow to print:
•Open the document to be printed.
•Open the program's File menu and choose Print.
•On the Print dialog, make sure a ViewPlus embosser is selected. Click on the printer properties
button and ensure that the correct paper size and Tiger printing options are selected. Click OK on
the printer properties dialog when you are finished. Then click OK on the Print dialog to start the
print job.
•When the printer is finished, press the up arrow button to advance the paper enough so you can
detach it. Press the down arrow button after you have detached the paper to move the paper to
the ready position.
•There are example documents and tips for using various Windows applications
at: https://viewplus.com/viewplus-support/downloads
V. Support, Maintenance and Warranty
A. Training and Support Packages
Tutorials and other support materials are available on the ViewPlus website. For these resources and
other support inquiries, please visit https://viewplus.com/viewplus-support/ .
Additional training and support is available for purchase through your authorized ViewPlus distributor or
from ViewPlus Technologies.
B. Maintenance
It is important to choose a suitable location for the Tiger Elite or Premier with InkConnect. The cable length
between the printer and the host computer should not exceed ten feet (three meters). The location should
be sturdy and flat. The printer should not be exposed to direct sunlight, extreme heat, cold, dust or
humidity. The AC power outlet must be compatible with the plug of the printer's power cord. Dot quality
should be monitored; poor alignment can cause permanent damage to the platen of the Tiger embosser.
Software updates can be downloaded from the ViewPlus Technologies web site. You should occasionally
check the web site for the latest developments.

17
C. Warranty
ViewPlus Technologies has a 1 year full parts and service warranty for the ViewPlus InkConnect.
The full warranty information was shipped with your InkConnect. In order to get service and technical
support, it is necessary to completely fill out and return the warranty form. You will be asked for the serial
number of your InkConenct when you call for support or request online support. There are several ways
to register the warranty:
•To register by mail, complete the warranty form, cut it out, and mail it to ViewPlus Technologies.
•To register by fax, complete the form and fax it to ViewPlus Technologies at (541) 738-6505.
•To register online, access our website at
https://viewplus.com/viewplus-support/warranty-details/.
This manual suits for next models
1
Table of contents
Other ViewPlus Printer Accessories manuals