ViewPlus Tiger Box User manual

ViewPlus Tiger Box
User Manual
Revision: 20210618
This user manual applies to ViewPlus Tiger Box, as well as APH PIXie, and Irie-AT GoBraille devices.

1
Table of Contents
I. Introduction ............................................................................................................................................... 2
I.A. Preface ................................................................................................................................................ 2
I.B. Specifications ...................................................................................................................................... 3
II. VP Tiger Box Setup .................................................................................................................................... 3
II.A. Hardware Setup ................................................................................................................................. 3
Multiple Tiger Boxes in the same area? ................................................................................................ 3
II.B. Software Setup .................................................................................................................................. 3
II.B.1. iOS Mobile Devices ..................................................................................................................... 3
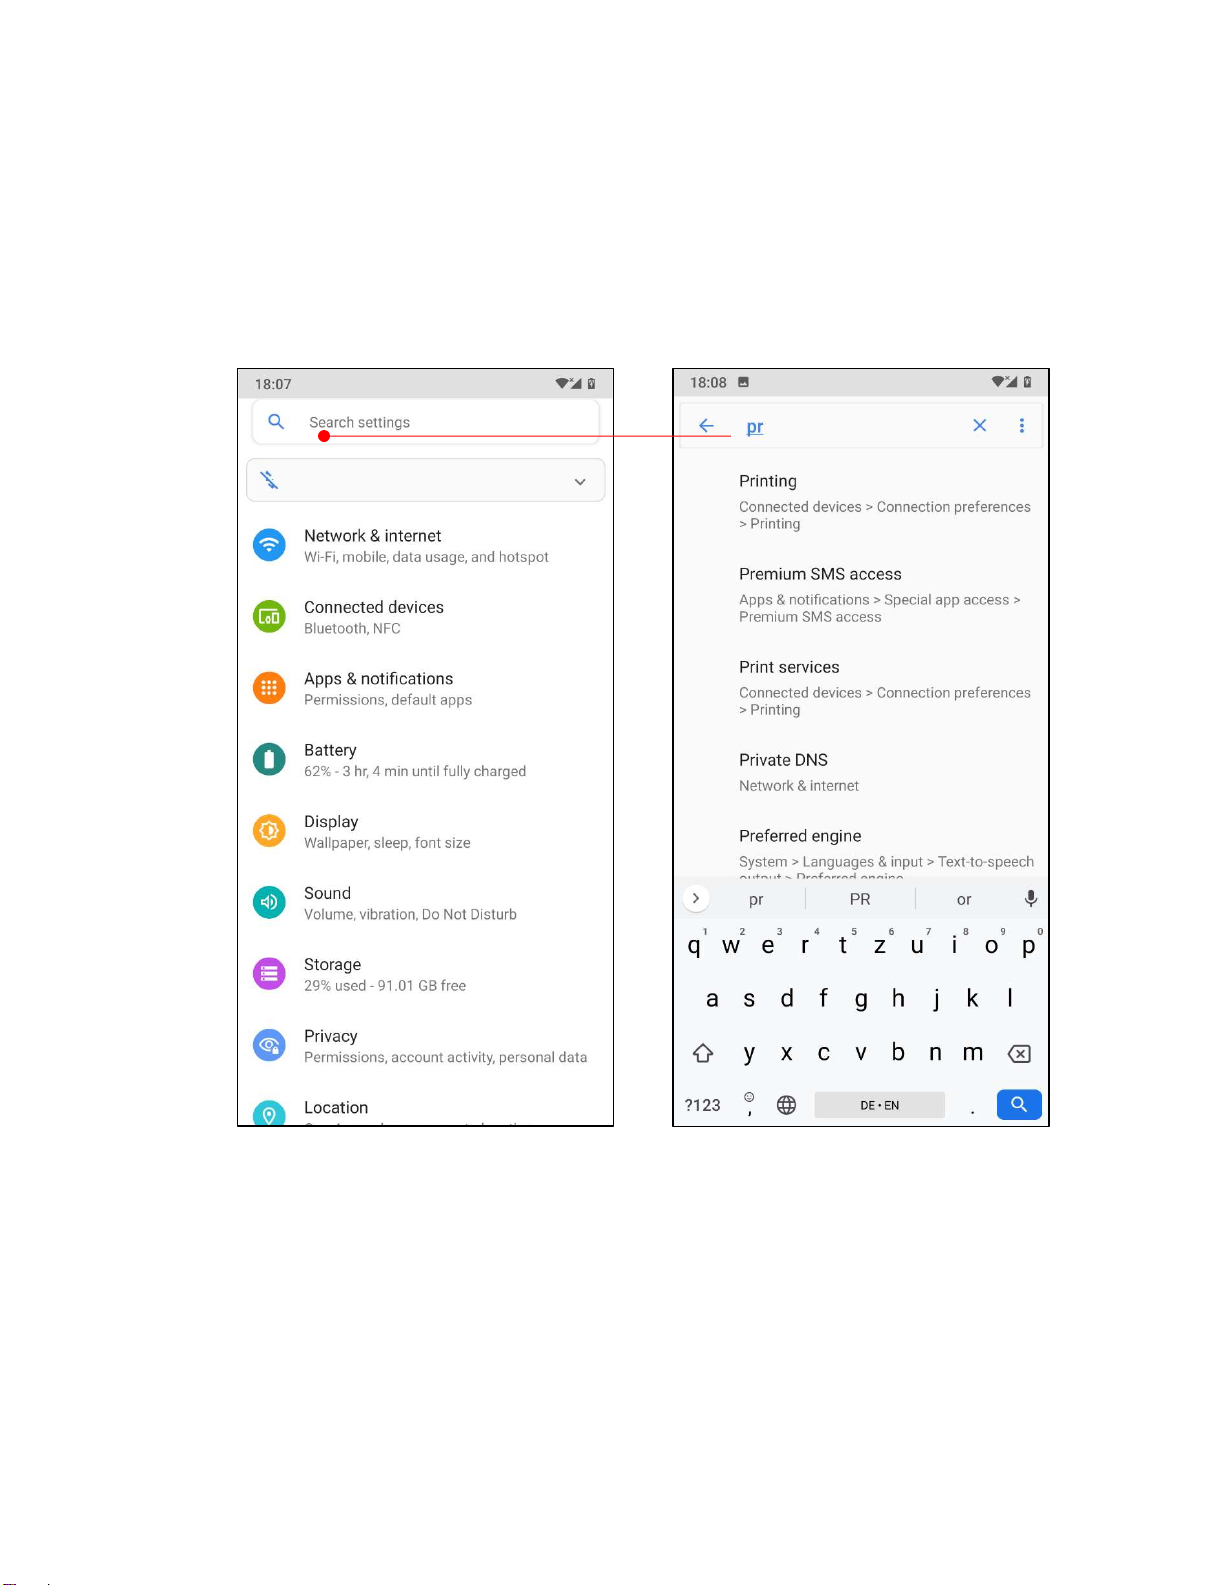
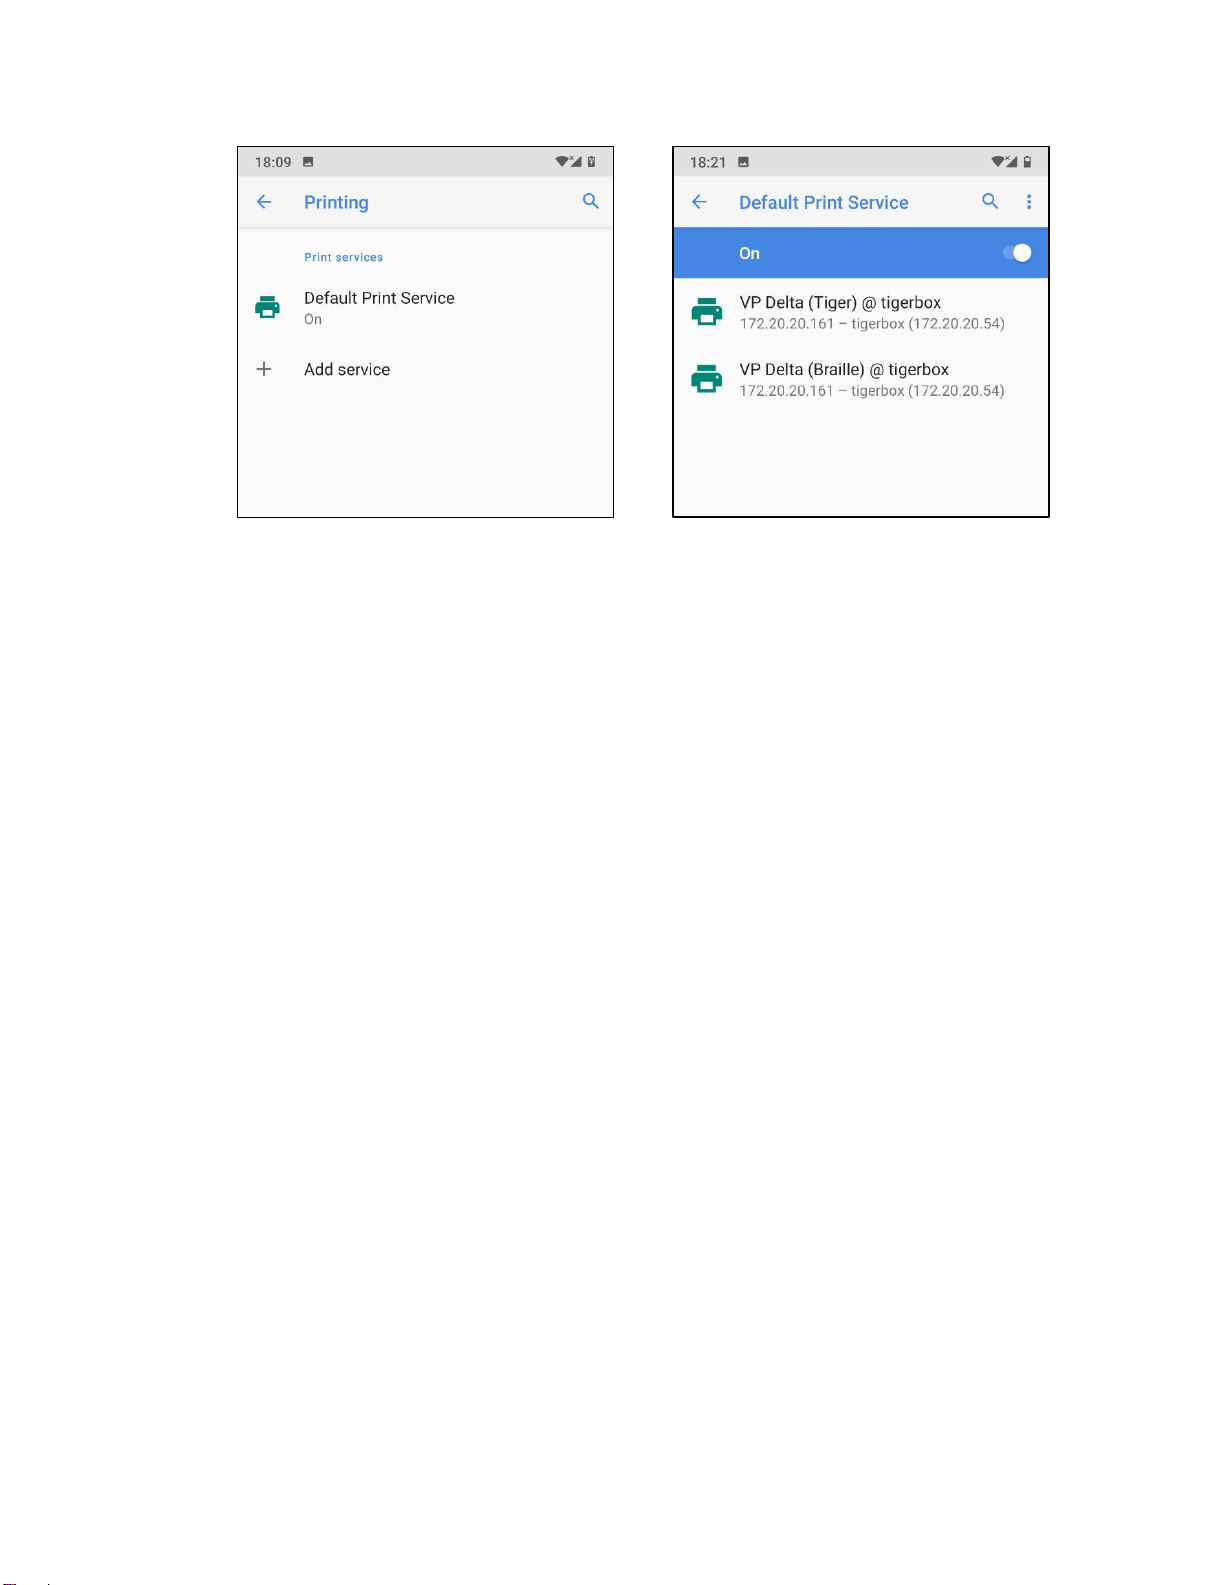
II.B.2. Android Mobile Devices .............................................................................................................. 4
III.B.3. All Devices .................................................................................................................................. 5
II.C. Network configurations of Tiger Box ................................................................................................. 5
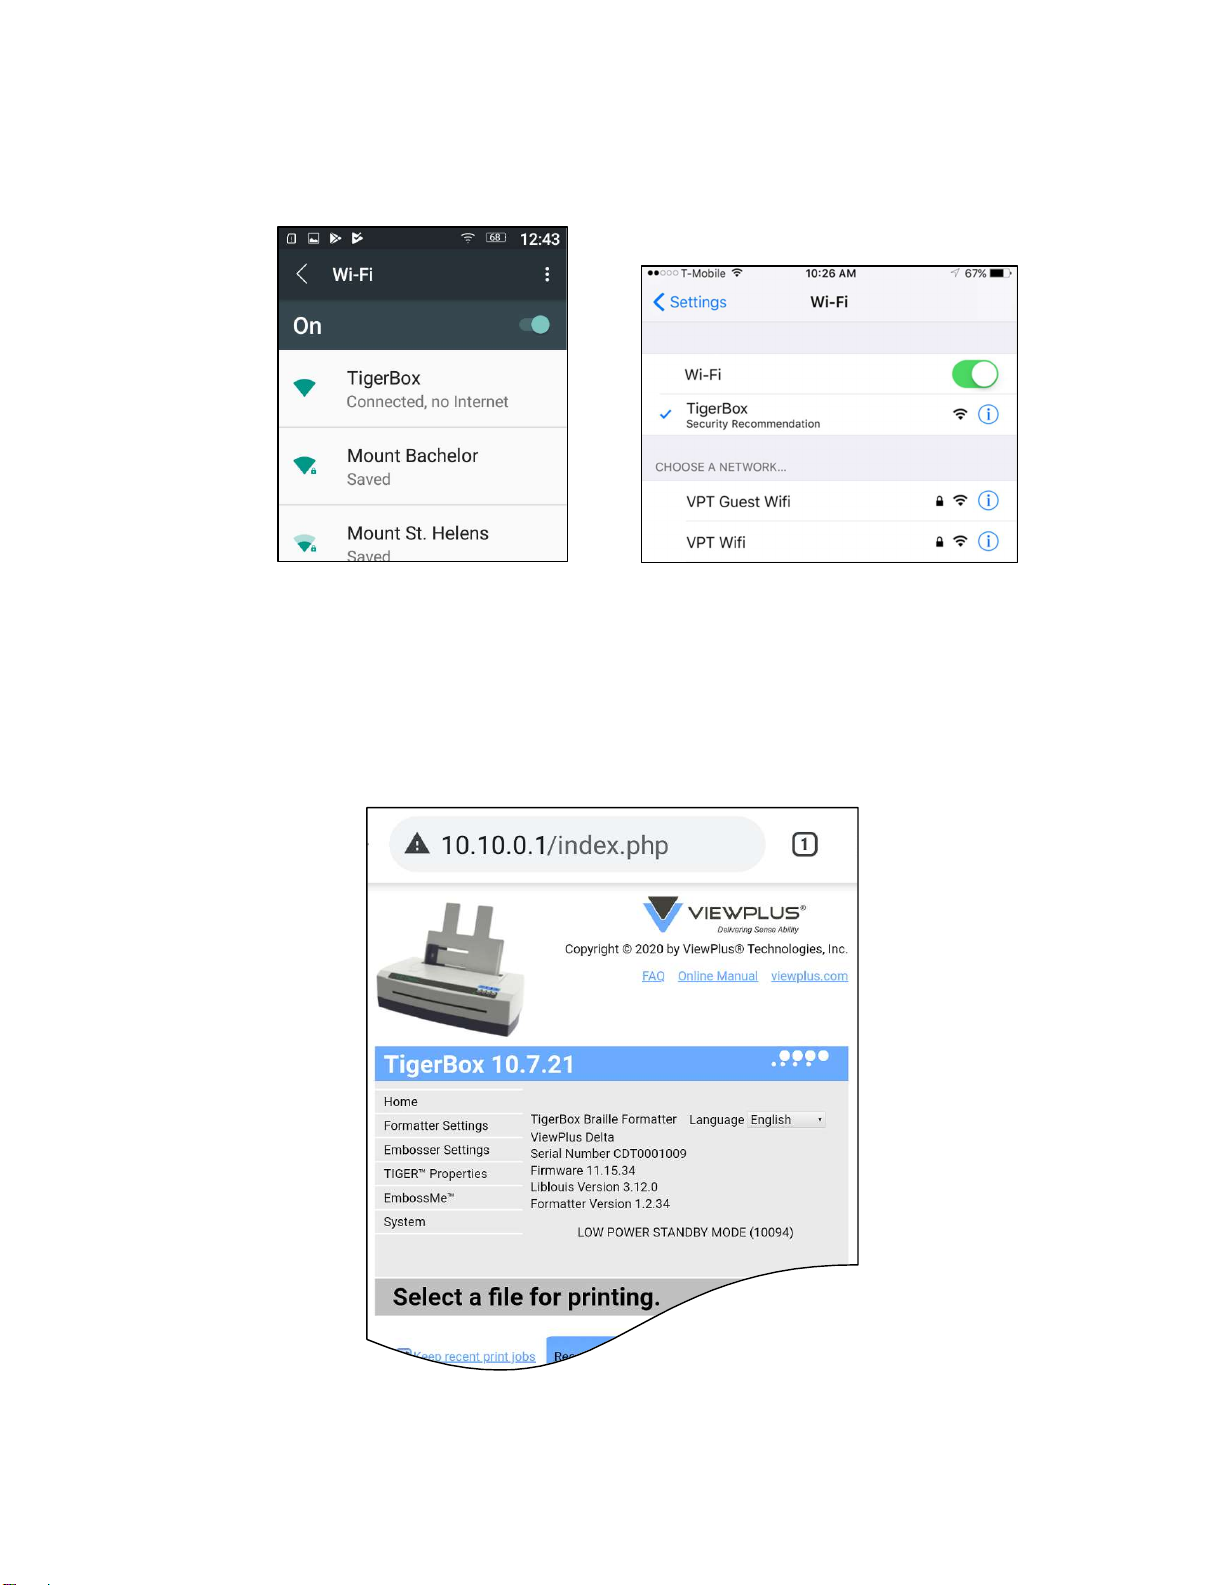
II.C.1. Connecting to Tiger Box Direct Wi-Fi and accessing user interface ........................................... 5
II.C.2. Switching between Wi-Fi Direct and Wi-Fi Network Client mode .............................................. 9
II.C.3. Adding Tiger Box to wired local area network via Ethernet cable ............................................ 11
II.C.4. Accessing Tiger Box user interface when connected to another network ............................... 11
II.D. Hardware Reset to Wi-Fi Direct Mode ............................................................................................ 13
III. Printing to ViewPlus embosser @ tigerbox ........................................................................................... 13
III.A. Settings for printing Text documents ............................................................................................. 13
III.A.1. Formatter Settings ................................................................................................................... 13
III.A.2. Embosser Settings .................................................................................................................... 16
III.B. Settings for printing documents with Graphics .............................................................................. 18
III.B.1. TigerTM Properties .................................................................................................................... 18
III.C. Availability of VP embosser @ tigerbox for printing ...................................................................... 19
III.C.1. Availability of VP embosser @ tigerbox on mobile devices and MacBook ............................. 20
III.C.2. Availability of VP embosser @ tigerbox on Windows PC ........................................................ 20
III.D. Printing through Tiger Box .............................................................................................................. 26
III.D.1. When to choose VP embosser (Braille)? .................................................................................. 26
III.D.2. When to choose VP embosser (Tiger)? .................................................................................... 26
III.D.3. Examples .................................................................................................................................. 27
III.E. Tiger Box user interface print options ............................................................................................ 31
III.E.1. Option to print Braille ready files through home page ............................................................ 31
III.E.2. Using a USB flash drive file repository - EmbossMeTM feature ................................................ 32
III.E.3. Creating PRN files using virtual printer driver - EmbossMeTM feature .................................... 37
IV. ViewPlus Help and Support ................................................................................................................... 39

2
I. Introduction
I.A. Preface
Welcome to ViewPlus Tiger Box, an AirPrint compatible wireless print server for current VP embosser
models, including VP EmBraille, VP Cub, VP Max, VP SpotDot, VP Columbia, VP Delta, VP Premier, and VP
Elite.
Connect your embosser to Tiger Box to send text from mobile devices for text to Braille translation and
embossing. It will work with mobile devices running iOS, or Android operating system, utilizing Airprint
protocol. It is recommended to use Android version 6 or higher when printing through Tiger Box.
Tiger Box will produce translation of standard text to Braille on the fly according to user preference
settings for language, Braille type, and page layout. Only true text information will be translated to Braille.
Tiger Box will also enable to emboss tactile graphics.
Wi-Fi Direct mode
Wi-Fi Direct provides a direct wireless connection to your ViewPlus supported embossers that allows you
to print without joining a local network or connecting to the Internet. When you activate Wi-Fi Direct on
your embosser, you can securely print documents from most Wi-Fi-capable computers and mobile
devices. The technology is similar to Bluetooth, but uses Wi-Fi to work at greater distances and faster
speeds.
Wi-Fi Network mode
Tiger Box can also be configured to work in Wi-Fi Network mode where it can be configured as a client to
another accessible wireless network. The advantage of Network mode is, that you can print content
directly from the internet if the host network allows internet access. And, the embosser connected to
Tiger Box will also be accessible for Braille printing from any PC or other device connected to the same
host network.
Keep up to date by checking the ViewPlus Technologies, Inc. web site at:
www.ViewPlus.com

3
I.B. Specifications
Operating System
s
Android 6+, iOS,
Windows 7, 8,
8.1
or 10
Network
10/100 MBps Ethernet, 802.11n Wireless Lan,
Bluetooth 4.0
Connections
Ethernet, WiFi Direct, WiFi Network
Security
WPA2
II. VP Tiger Box Setup
II.A. Hardware Setup
The hardware for your Tiger Box is easily setup with these simple steps:
1. Insert the micro USB plug of provided power cable to Tiger Box, and plug in the power plug to a
power wall outlet (or extended wall outlet).
2. If you are planning to setup Tiger Box in Network Client mode to an existing local area network,
connect it to the corresponding router using ethernet cable.
3. Connect your ViewPlus embosser to Tiger Box using a standard USB device cable. Please note that
only one of the four accessible USB ports will be active, but it is your choice which one you occupy.
Tiger Box will boot upon power connection. The red LED light should turn on steady. The green light should
be blinking, indicating proper Wi-Fi function.
NOTE: The USB stick included in delivery, serves as reset dongle. Please keep it safe and don't use it for
any other purpose. See section II.D for further instructions on using the USB dongle.
Multiple Tiger Boxes in the same area?
If you are planning to run multiple Tiger Boxes within the same local area, please make sure to power on
any next Tiger Box only after changing network configuration of the previous one. If leaving in Wi-Fi Direct
mode, set a unique SSID for each Tiger Box to identify itself. When running in Network Client mode, set a
unique hostname for each Tiger Box. Please see section II.C. below for further information.
II.B. Software Setup
II.B.1. iOS Mobile Devices
No specific software setup is needed on iOS mobile devices to be able to print wireless to your ViewPlus
embosser @ tigerbox.

4
II.B.2. Android Mobile Devices
On Android devices, it might be necessary to explicitly switch printing services ON. Therefore follow
instructions below.
1. Go to device settings and start typing "print" in search bar. From search results, select item 'Print
services'.
Looking for print service within Android settings
2. The next screen will show 'Default Print Service' turned On, or Off. It needs to be 'On'. To turn it
on, select it to get to the next screen.
3. On the next screen for 'Default Print Service', you will find a toggle switch for turning the service
On, or Off. It needs to be turned 'On'.
Also within this screen you should see a list of available printers. If you just turned the service on,
it might take a minute for available printers to show. This list should include two instances of your
ViewPlus embosser @ tigerbox. The purpose of these two instances, which we refer to as 'Tiger'
instance, and 'Braille' instance of the ViewPlus printer is explained further in section III.D below.

5
Default print service in Android settings
III.B.3. All Devices
Depending on your network configuration, a network discovery app (e.g. Fing) might be convenient for
the purposes of finding Tiger Box IP address when configured in Network Client mode. This user manual
will point out situations where this could be useful.
Please also note, that the capability to print through Tiger Box from your mobile device depends on
printing capabilities of the application from where you would like to print.
II.C. Network configurations of Tiger Box
After initial hardware setup, Tiger Box provides its own direct Wi-Fi network. See section II.C.1 below to
learn how to access Tiger Box user inface in this case.
The configuration can be changed within Tiger Box user interface to setup Tiger Box as a client to an
existing wireless local area network. See section II.C.2 below to learn how to perform this switch.
Additionally, Tiger Box can be connected via ethernet cable to an existing network structure. This wired
connection performs parallel to wireless connection whichever wireless configuration you choose. See
section II.C.3 for more information about this.
II.C.1. Connecting to Tiger Box Direct Wi-Fi and accessing user interface
Tiger Box is hosting direct Wi-Fi named 'TigerBox' by factory default. As long as Tiger Box is configured to
Wi-Fi Direct mode, you will need to connect your mobile device, or PC, to this Wi-Fi in order to access user
settings and configurations for wireless printing, and to print to the connected embosser.
Interface screens of different devices may vary from screen shots below, but in general these are the steps
to take for connecting to Tiger Box Direct Wi-Fi, and to access network configuration settings.

6
1. Open settings on your mobile device and select Wi-Fi. A list of known networks should appear.
2. Select 'TigerBox' network and connect.
Screenshots of connecting to TigerBox Wi-Fi
3. Your device will notice that 'TigerBox' has no internet access and might try to connect to a different
Wi-Fi network instead. You may need to acknowledge that you want to stay connected, and
possibly also need to select 'forget other networks' and turn off mobile data.
4. When successfully connected to 'TigerBox' Wi-Fi network, open your preferred web browser
application and enter "http://10.10.0.1" for Tiger Box dedicated IP address, or URL
"http://tigerbox" within the address line. A page as shown in following picture will open.
Tiger Box user interface Home page

7
5. This is the 'Home' page of the Tiger Box user interface application within your web browser.
Depending on the ViewPlus embosser model that you have currently connected to your Tiger Box,
printer specific information will be displayed. Without any embosser connected to Tiger Box, it will
show embosser information to not be available.
Within the header section of Tiger Box user interface application you find links to the FAQ section
of ViewPlus online knowledge base, and to the online version of this user manual, as well as a link
to the general ViewPlus company web page.
Language: Within center section to the right you find the 'Language' selection. This is referring to
the display language within this user interface. Choose your preferred language from the drop-
down list box.
Menu items: On the left you find menu items that will bring you to different settings pages of the
Tiger Box user interface. Following items are available: 'Home', 'Formatter Settings', 'Embosser
Settings', 'TIGERTM Properties', and 'System'.
If you are using an additional USB flash drive as file repository as explained in section III.E.2. and
III.E.3. below, you will find additional item 'EmbossMeTM' between ' TIGERTM Properties' and
'System'.
Go to 'System' for Wi-Fi Direct, or Wi-Fi Network Client configuration settings.
6. The System page offers options to change wireless configuration between Wi-Fi Direct and Wi-Fi
Network Client operating mode.
Additionally, the system page offers options to change wired LAN configuration when connecting
to a router via Ethernet cable. See more information in section II.C.3. below.
At the bottom of the system page you also find a 'Refresh' button to refresh display of values after
any change, as well as a button to check for updates on Tiger Box.
Please note, that internet connection is required when performing 'Check for Update'.

8
Tiger Box user interface System page
This is the section of the System page,
where wireless configuration can be
changed between Wi-Fi Direct and Wi-Fi
Network operating mode.
This section is used for wired LAN
configuration when connecting to your
router via Ethernet cable.

9
Tiger Box main settings in WiFi-Direct mode
7. In Wireless LAN Configurations, Tiger Box will initially provide Wi-Fi direct network with SSID
'TigerBox' and no password. If you like, you can secure TigerBox direct Wi-Fi by entering a
passphrase (password).
8. You may also change SSID, for example to differentiate between multiple Tiger Box devices in
Wi-Fi Direct mode.
9. Select 'Apply' to save any changes made within main settings.
10. Make sure to remember SSID and passphrase to be able to connect to Tiger Box again at any later
time.
II.C.2. Switching between Wi-Fi Direct and Wi-Fi Network Client mode
You may switch configurations to run Tiger Box in Network Client mode. The advantage of the network
client mode is that you have access to all data provided through the host network (internet), and at the
same time you can use all wireless printing features through Tiger Box. Alternatively to using Wi-Fi
network client mode is to connect Tiger Box to another network via Ethernet cable. See section II.C.3
below for further information on this option.
Follow the steps below to connect Tiger Box in Wi-Fi network client mode to another network.
1. Select radio button 'Connect to another Network' within Main Settings of System page.

10
Tiger Box main settings in Wi-Fi network client mode
2. A selection box will appear to choose one of the available networks to serve as host for Tiger Box
in Network Client mode. Select your preferred local network from the list.
3. SSID of the selected network will show in edit fields below. Enter the passphrase (password) for
access to the selected network.
4. You may also change hostname of your Tiger Box, for example to differentiate between multiple
Tiger Box devices connected to the same network.
5. Upon selecting 'Apply' Tiger Box will switch to Wi-Fi network client mode.
Note: Current webpage user interface will not respond anymore as soon as Tiger Box is switched
to network client mode.
Be aware that from now on you will need to connect to the just selected host network and know its
passphrase to be able to access Tiger Box user interface again, or to print through Tiger Box. (See section
II.C.4. below.)
Connection to the host network might happen automatically, because your device remembers that
network, but still a restart of the browser window might be necessary, or even a power cycle of Tiger Box.
Tiger Box user interface needs to be called by given Tiger Box hostname, or its IP address (see section
II.C.4. below).
If you are planning any changes to the host network (SSID, passphrase), or are planning to move Tiger Box
out of reach of current host network, please reset Tiger Box to Wi-Fi Direct mode first, and afterwards re-
configure to Network Client mode with new properties. Otherwise Tiger Box will not be able to connect
to the network anymore, and consequently it will not be accessible anymore for printing.
If for whatever reason, access to Tiger Box is not possible anymore through any device connected to the
same host network, a hardware reset will be required as described in section II.D below.

11
II.C.3. Adding Tiger Box to wired local area network via Ethernet cable
Tiger Box can be connected to an existing local area network via ethernet cable between Tiger Box and
network router.
From the DHCP server an IP address is assigned to Tiger Box. This IP address will change periodically. To
know current IP address of Tiger Box in wired LAN connection, you have the following options.
1. The network administrator will be able to access current IP address from the server settings.
2. Use a network discovery app, for example 'Fing'.
3. Connect an active speaker to Tiger Box audio connector, make sure speaker volume is turned on,
and power cycle the Tiger Box (unplug power cable, plug back in). The Tiger Box will give an audio
message upon start-up including IP addresses for both, wireless as well as wired LAN connection.
You can switch from DHCP to static IP address within Tiger Box user interface 'System' page if desired.
The wired LAN connection will always add Tiger Box in network client mode to the existing LAN structure.
If you can dial in to this local area network with your mobile device, you will see the embosser @ tigerbox
in list of available printers, thus wireless printing is possible.
The Tiger Box wireless configuration is independent of the configuration for wired connection, so at the
same time, where Tiger Box is visible within network provided by the local router, it can still provide its
own Tiger Box Wi-Fi Direct host network.
II.C.4. Accessing Tiger Box user interface when connected to another network
After Tiger Box was switched to Wi-Fi Network Client mode by choosing to connect to another Network
in Main Settings under System section of Tiger Box user interface, you will need to connect to the specified
network to gain access to Tiger Box again.
1. Open settings on your mobile device and select Wi-Fi. A list of known networks should appear.
2. Select the network that you specified in 'Connect to another Network' in Tiger Box settings.
3. To access Tiger Box user interface, you need to know the Tiger Box hostname, or its IP address.
The hostname is 'tigerbox' by default, but you might have changed it as described in point 4 of
section II.C.2. above. Enter "http://<hostname>" ("http://tigerbox" by default) in your web
browser address line to access Tiger Box user interface.
Depending on router capabilities it might not work to accomplish connection trying to call through
hostname. In this case you will need to enter the IP address of Tiger Box in your web browser
address line, like "http://<ipadress>" (for example "http://172.20.21.128").
When using iOS, or newer Android mobile devices, the IP address can easily be found by going to
the print option of some app and looking up the list of available printers. Along with the name of
the Tiger Box printer, the IP address will be given.

12
iOS available Tiger Box printers with IP address information
A free network discovery app (e.g. Fing) can also be used to find current IP client address of Tiger
Box. This app will find all devices connected to the network that your mobile device is connected
to currently. Find Tiger Box, or whatever the given hostname for Tiger Box is, in the list of Devices
and see corresponding IP address paired with this name.
4. If you are getting a warning message when accessing Tiger Box user interface through IP address
for the first time, please select to trust the host.
5. The Tiger Box user interface still looks the same as in Wi-Fi Direct mode.
Tiger Box user interface Home page this time with Emprint SpotDot connected
Please find description of all items that are relevant in conjunction with printing through Tiger Box
explained in chapter III. below.

13
If for whatever reason, access to Tiger Box is not possible anymore from any device connected to the same
network, a hardware reset will be required as described in section II.D below.
II.D. Hardware Reset to Wi-Fi Direct Mode
You might run into situations where Tiger Box is configured to Wi-Fi Network Client mode, but connection
to the previous host network is not possible anymore. Without the connection to the host network, it will
not be possible to access Tiger Box user interface to change any configuration settings.
In this case follow these easy steps to perform a hardware reset of your Tiger Box which will result in
Wi-Fi Direct operation and thus provide direct access to Tiger Box Wi-Fi again.
1. Make sure to power Tiger Box OFF.
2. Plug in the USB dongle which was delivered with your Tiger Box.
3. Power Tiger Box ON.
4. Wait a minute.
5. Power Tiger Box OFF again.
6. Take out USB dongle.
7. Power Tiger Box ON again and check if it is running in Wi-Fi Direct mode again by trying to connect
to it via mobile device.
8. If Tiger Box is not available for Wi-Fi Direct connection, repeat steps 1 through 7 and wait a little
longer in step 4.
9. When connecting successfully to Tiger Box direct Wi-Fi, browse to the user interface home page
to change to desired configurations again as explained in document sections above.
III. Printing to ViewPlus embosser @ tigerbox
III.A. Settings for printing Text documents
If you want to print text that still needs to be translated to Braille when printing through Tiger Box, your
choices from 'Formatter Settings' and 'Embosser Settings' of Tiger Box user interface will be taken into
account. Please find all items from these user interface sections explained below.
III.A.1. Formatter Settings
At the top within Formatter Settings you will find TigerBox License, and Hardware ID. This is
manufacturer's serial number information and has nothing to do with text to Braille translation results,
but might be needed in rare occasion when contacting ViewPlus support in regard to a technical problem
with your Tiger Box.

14
Tiger Box user interface Formatter Settings
Braille Language: The Braille table of the language defined in this field will be applied to translate text to
braille with embosser output.
Link 'Braille Table and Screen Font': This Link will bring up controls to install Braille table of selected Braille
Language on connected embosser, or to download and install corresponding screen fonts to the
computing device you are currently using.
If you are planning to send Word files for printing that have been translated through Tiger Software Suite
previously, the installation of corresponding screen font is necessary to receive correct Braille dot
placement on output. These files would be send for printing through Tiger instance of VP embosser (see
section III.D).
Besides providing these controls, the Braille table of currently selected Braille Language is also being
displayed on screen.
Next below this link you find a radio control with two options:
- Pass Text through (No formatting): In this case text characters are converted to corresponding
Braille code of their ASCII value, applying the Braille table chosen with 'Braille Language' setting.
No further formatting of the document will occur, but Embosser Settings will apply for actual
Braille output.
OR
- Convert Text to Braille Ready Format (BRF) according to settings below: In this case the whole
document will be formatted according to settings below, also applying the Braille table chosen
with 'Braille Language' setting for text to Braille translation.

15
Braille Grade: Depending on availability for language selected in 'Braille Language' above, a grade of
contraction for the resulting Braille code can be chosen here.
Paper Size: The paper size of print media, which is currently loaded to the embosser should be defined.
Selecting the name of current paper size setting here will bring you directly to paper size selection under
Embosser Settings.
Chars per Line: Depending on paper size, and left and right margin settings from Embosser Settings page,
the maximum possible number of Braille characters per line will be given to the right. When choosing any
number less than the maximum, extra blank space will be created at right margin of embosser output.
Link 'Margins' to the right will bring you directly to margin settings under Embosser Settings.
Lines per Page: Depending on paper size, and top and bottom margin settings from Embosser Settings
page, the maximum possible lines per page will be given to the right. If choosing any number less than the
maximum, extra blank space will be created at bottom margin of embosser output.
Interpoint: You have the choice to
- Never emboss a document double sided.
OR
- Let App decide and emboss whatever is send from the App, double or single sided document.
OR
- Always emboss double sided.
Page Numbering: You have the choice of
- None, which will not include any page numbering in embossed document.
OR
- Insert braille page numbers, which will include Braille page numbers at the bottom right of each
page of the embossed document.
OR
- Insert braille and print page numbers, which will add printed numbers to Braille page numbering
depending on VP printer model capabilities.
Interline Text: Black print text can be added depending on VP printer model capabilities. You have the
choice between
- None, which will not include any print text along with Braille.
OR
- Above, which will include black print text accompanying Braille in position above each Braille line.
OR
- On Top, which will include black text overprinted over embossed dots in each Braille line.
OR
- Below, which will include black print text accompanying Braille in position underneath each Braille
line.
Font: Choose the type of font for black print text, either Aerial, Al Arabiya, Tymes, or Veranda. (Font names
are based on Windows font names, but due to registered trademarks you see different spelling here.)

16
Size: Enter a number for desired font size of black print text. Font types differ slightly in size, but for your
orientation, print text in size 10 usually fits well in between Braille lines with not extra line spacing, and
size 30 is about the height of 6 dot Braille cells.
Color: Select the color field and you will get a pop-up showing all colors available. Pick a color and select
'Set' to confirm your choice.
Apply: Use this button to confirm any change in the settings above. This is essential for changed settings
to be applied to any next Braille output.
III.A.2. Embosser Settings
Tiger Box user interface Embosser Settings
Embosser settings are passed on to the embosser and saved to the device to be applied to any following
output of embossed Braille on paper.

17
Paper Size, or Paper Width and Length: You can choose either a predefined paper format from the drop
down list, or enter specific paper width and paper length for custom paper size. Please note, that the
setting here should conform with physical size of paper loaded to the embosser.
Top Margin, Left and Right Margin: You can enter customized margin settings in inch dimension.
Extra Line Space: The spacing defined here in inches, is being added in between lines, additionally to
whatever line spacing the source data will include.
The maximum number of 'Chars per Line' and 'Lines per Page' in Formatter Settings is given in
dependence to the dimensional page formatting constraints set by these Embosser Settings above.
Graphics Mode: You have the choice of
- Text, which will ensure Braille text output with specified line spacing.
OR
- Graphics, which will yield to line spacing being eliminated between lines of Braille code, producing
tactile Braille graphics.
Text Wrapping: Turn text wrapping
- On, which will make any Braille character exceeding the constraints of printable line width move
to the next line.
OR
- Off, which will have any Braille character discarded when exceeding the printable line width.
Braille Quality: Depending on availability on connected embosser, the Braille quality can be set to Draft,
Standard, or Best. Please refer to the embosser user manual for more information about these Braille
quality modes.
Braille Dot Height: Select Low, Normal, or High to control how tall Braille dots will emboss.
Media Type: Depending on availability for the connected embosser, there will be a choice of media types
to choose from. Choose the media type by name that would best match the characteristics of paper
material currently loaded to the embosser.
Dots Per Character: Select 6 or 8 dot Braille to be produced.
Braille Spacing: Depending on availability for the connected embosser, you will have a choice of different
Braille dot spacings to select by internationally known names.
Apply: Use this button to confirm any change in the settings above. The embosser should confirm saving
of these settings with one beep.

18
III.B. Settings for printing documents with Graphics
If you want to print graphical content from any file type, or files that have previously been translated to
Braille using Tiger Software Suite, the following settings from TigerTM Properties section of Tiger Box user
interface will be taken into account.
Note: The actual selection of settings and options in TigerTM Properties depends on the availability for the
currently connected ViewPlus embosser, and not all that are described below are shown in screen shot
image.
III.B.1. TigerTM Properties
Tiger Box user interface TigerTM Properties
Paper Source: Possible options are Tractor, Manual, or ASF. Tractor is the feeder for continuous paper,
manual means feeding one sheet after the other during printing through single sheet feeder input tray,
and ASF stands for "Automatic Sheet Feeder" like VP Emprint SpotDot, or VP Delta provide.
Duplex mode: Possible options are Open to Left, Open to Top, or None. Depending on capability of the
connected embosser you can choose an option here for double sided embossing. Please note, that tactile
graphics will not emboss double sided due to dot density.

19
Output Face: Select Up, or Down here. For embossers models that are capably of double sided embosser,
this will specify the direction in which dots will protrude from paper on odd pages when exiting the
embosser.
Page Size: All available paper sizes for the connected embosser will show. The paper size you choose
should match the size of paper physically loaded to the embosser.
Inverse Landscape: Select Yes, or No. Inverted Landscape will enable banner printing in one piece on
endless tractor feed paper.
Media Type: Depending on availability for the connected embosser, there will be a choice of media types
to choose from. Choose the media type by name that would best match the characteristics of print media
currently loaded to the embosser.
Braille Force: Select Heavy, Normal, or Light for the strength of embossed Braille text dots.
Print Mode: Possible options are Ink and Emboss, Emboss Only, Ink Only, and 2 in 1. Options for VP
SpotDot, or InkConnect. Please refer to the device user manual for further explanation about these print
modes.
Emboss Standard Texts: Select Yes, or No. If chosen yes, this option will cause standard text, that is not
translated to Braille, to emboss like a tactile image of the characters.
Braille Quality: This settings effects quality of embossed Braille dots. Since dot quality is influenced by
speed and direction of print head movement, a higher Braille Quality setting will cause the print out to
take more time. You have the choice between Standard, Normal, and Best Braille quality.
Graphics Quality: This setting effects quality of and density of tactile graphics output. Choose between
Draft, Standard, Best, Tiger17, and Tiger20 Graphics quality setting. It might be best to try different
settings for certain graphic prints to gain some experience which setting is best for which purpose. As with
Braille quality setting, this Graphics quality setting will also influence printing speed.
Ink Quality: Possible options are Draft, Normal, or Best. An adjustment for quality of ink output on VP
InkConnect, or VP Emprint SpotDot.
Dry Time: Lists numbers which will refer to drying time in seconds on VP Emprint SpotDot.
Thin Line Intensity: Choose between 1 and 6. With higher setting, lines with be more enhanced on tactile
output.
III.C. Availability of VP embosser @ tigerbox for printing
Printing functionality and procedures in general work the same from Android, or iOS mobile device, and
from MacBook, or Windows PC if this is connected to the same network as Tiger Box.
Table of contents
Other ViewPlus Printer Accessories manuals