ViewPlus Emprint VPT1300-00 User manual


!"
# "
$ %"&
&'"
(
# &""
$ &)
# *"+,
$ -.!/!
0'
) #"-
&
% +!,
( #,
0
# %"
$ )'
1!,

# /!,
$ 2
$
# %
$ ,&&
,!
# !"
$ ,
/,"'
) &"
,%)"
# ,
$
3 #""!&"+,
# #""
$ 0-&"+,
,!&"+,
3 "!4'
# "
$ 4'
.!!4'!"

!"
# "
"(-"!$,5!',
06
Congratulations on purchasing a ViewPlus Emprint haptic color printer Powered by Tiger! Share
documents with virtually anyone using color and tactile printouts. The ViewPlus Emprint combines reliable
Tiger Technology with HP uality color ink resolution. The ViewPlus Emprint Powered by Tiger is the first
full-color ink Braille and tactile graphics printer.
The ViewPlus Emprint Powered by Tiger adds color ink print to a tactile output using a user-friendly USB
interface. Print on many different types of media, from lightweight copy paper to heavy cardstock, up to 9
inches wide.
Patented roller-die technology means ViewPlus embossers print at a 20 dots-per-inch graphic resolution
and automatically convert colors and gray scale into variable dot heights. The sound-absorbing roller die
makes Powered by Tiger embossers much uieter than other Braille printers.
ViewPlus embossers use the standard Windows printer driver to mix text and graphics in mainstream
Windows software like Word and Excel. Use the computer to adjust settings and preferences. Print
documents exactly how they appear on the screen.
Use the Tiger Software Suite to take braille translation and tactile graphics to a new level. The Tiger
Formatter is a Microsoft add-in that gives you advanced tools for translation and embossing. Tiger
Designer enables basic editing of documents for uick drawing and braille needs. Translator serves as a
basic translation tool for almost any Windows software- including PowerPoint and Corel Draw.
Keep up to date by checking the ViewPlus Technologies, Inc. Internet site at:
http://www.ViewPlus.com
ViewPlus Emprint Model Number:
VPT1300-00
USER'S Manual
$ %"&
%"&7*
This e uipment has been tested and found to comply with the limits for a Class B digital device, pursuant
to Part 15 of the FCC Rules. Operation is subject to the following two conditions: (1) this device may not
cause harmful interference, and (2) this device must accept any interference received, including
interference that may cause undesired operation. If this e uipment does cause harmful interference to
radio or television reception, which can be determined by turning the e uipment off and on, the user is
encouraged to try to correct the interference by one or more of the following measures:

Reorient or relocate the receiving antenna.
Increase the separation between the e uipment and receiver.
Connect the e uipment to an outlet on a circuit different from that to which the receiver is
connected.
Consult the dealer or an experienced radio/TV technician for help.
FCC Warning: Changes or modifications not expressly approved by the party responsible for compliance
could void the user's authority to operate the e uipment.
Note the following:
The use of a non-shielded interface cable with the referenced device is prohibited.
The length of the power cord must be 3 meters (10 feet) or less.
"&7!8
This digital apparatus is in conformity with standard NMB-003 of Canada.
Cet appareil num?ri ue est conforme à la norme NMB-003 du Canada.
"&7('8
Bescheinigung des Herstellers/Importeurs:
Hiermit wird bescheinigt, dass der Drucker der Maschinenlärminformationsverordnung 3. GSGV,
18.01.1991 entspricht: Der höchste Schalldruckpegel beträgt 70 dB(A) oder weniger gemä?? EN27779-
1991.
"&78
Warning: This product meets the interference re uirements of EN55022. In a domestic environment, this
product may cause radio interference in which case, the user may be re uired to take ade uate
measures.
"&798
This apparatus complies with CISPR22 re uirements.
"
EN55022 ClassB:1998 Emissions series
EN55024:1998 Immunity characteristics
EN61000- -2:2000 Power line harmonics
EN61000- - :2001 Power line flicker
EN61000-4-2:2001-04 Electrostatic discharge
EN61000-4- :2002-09 Radiated susceptibility
EN61000-4-4:2004 Electrical fast transient/burst

EN61000-4-5:2005-11 Surge
EN61000-4-6:2004-11 Conducted immunity
EN61000-4-8:2001-0 Magnetic Field Immunity
EN61000-4-11:2004 Input voltage interruptions/DIPS
&'"
Read all of these safety instructions before using the embossing printer. In addition, follow all warnings
and instructions marked on the embossing printer itself.
Do not place embossing printer on an unstable surface.
Do not place embossing printer near a radiator or heat source.
Do not block or cover slots and openings in the embossing printer's cabinet; do not insert objects
through slots.
Use only the type of power source indicated on embossing printer's label.
Connect all e uipment to properly grounded electrical outlets.
Do not use frayed or damaged power cord.
The use of an extension cord with the embossing printer is not recommended.
Unplug embossing printer before cleaning it; always clean it with a piece of damp cloth only.
Do not spill li uid into embossing printer.
Except as specifically explained in the user's manual, do not attempt to service the embossing
printer by yourself.
Detach the embossing printer from power source and refer to ualified service personnel under
the following conditions:
oIf the power cord or plug is damaged.
oIf li uid has entered the embossing printer.
oIf the embossing printer has been dropped or the cabinet is damaged.
oIf the embossing printer does not operate properly or exhibits a distinct change in
performance.
Only adjust those controls that are covered by the operating instructions.

(
# &""
ViewPlus Emprint
Character Sets DotsPlus
Braille - free programmable character sets
Paper Feed Method single sheet
150 sheet input tray (copy paper) or 60 sheet for braille
paper or card stock or up to 20 envelopes, labels or
banners.
Paper Size A4, US Letter (8.5 x 11in.), Legal (8.5 x 14in.),
envelopes
Paper Weight Letter 20-28 lb (75 to 105 g/m2)
Envelopes 20 to 24 lb (75 to 90 g/m2)
Banner 15 to 24 lb (60 to 90 g/m2)
Card Stock up to 110 lbs (200 g/m2)
Photo paper up to 1 0 lbs (2 0 g/m2)
Power Supply
100 - 240 VAC (? 10%)
Frequency: 50/60 (? %)
Power Consumption Standby 21 W
Average Ink Print 26 W
Average Emboss Print 64 W
Heavy Embossing 110 W
Embosser Dimensions
Width
Depth
Height
Weight
2 .5 in. (597 mm)
16.8 in. (427 mm) - incl. Extension and Input tray
6.7 in. (170 mm)
24.4 lbs. (11 kg)
Connectivity
1 USB (1.1, 2.0)
Operating Conditions
Operating Temperature
Storage Temperature
Relative Humidity
59 to 95 ?F (15 to 5 ?C)
-4 to 158 ?F (-40 to 70 ?C)
20 to 80% RH (non condensing)
Duty Cycle up to 000 pages per month

Lifetime 15,000 hours at 15% duty cycle
$ &)
Tiger drivers for Windows 2000/XP (Home, Professionsl, Tablet) and Windows 2003 Server are included
with your printer. Follow the instructions from the installation program.
# *"+,
Remove the embossing printer and all its accessories from its packaging.
Inspect the ViewPlus embossing printer and its packaging for any damage.
&-"+,!. If any damage occurred during shipping, most shipping
companies re uire the box and the packing material in order to settle the insurance claim. The
packing material must also be used to ship the ViewPlus embosser for warranty maintenance
service.
Follow the ViewPlus Emprint Setup Instructions included with your other materials.
$ -.!/!
An HP duplexer (rear paper path extension) is mounted in the back of the ViewPlus Emprint. It is
mounted with snap locks which can be released by pressing the two buttons on either side of the
extension. Make sure the duplexer is firmly attached before operating the embossing printer.
The lid on top of the embossing printer lifts up and can easily be taken off without any hooks or
snaps. During operation of the ViewPlus Emprint make sure the lid is in place and is closed.

0'
The paper output tray has been removed prior to shipment in order to prevent damage. The tray has a
pull out extension which is lighter grey colored. The extension slides out and then the upper portion folds
out to extend the tray to its full length. There are metal brackets with pins on either side of the front
opening of the case above the paper input tray. Line up the slots on the side of the tray over the pins and
slide the tray in until it drops into place. For convenience the output tray can be removed to load new
media on the input tray. An optional stack paper tray is available for larger stacks of paper. This can be
purchased separately.
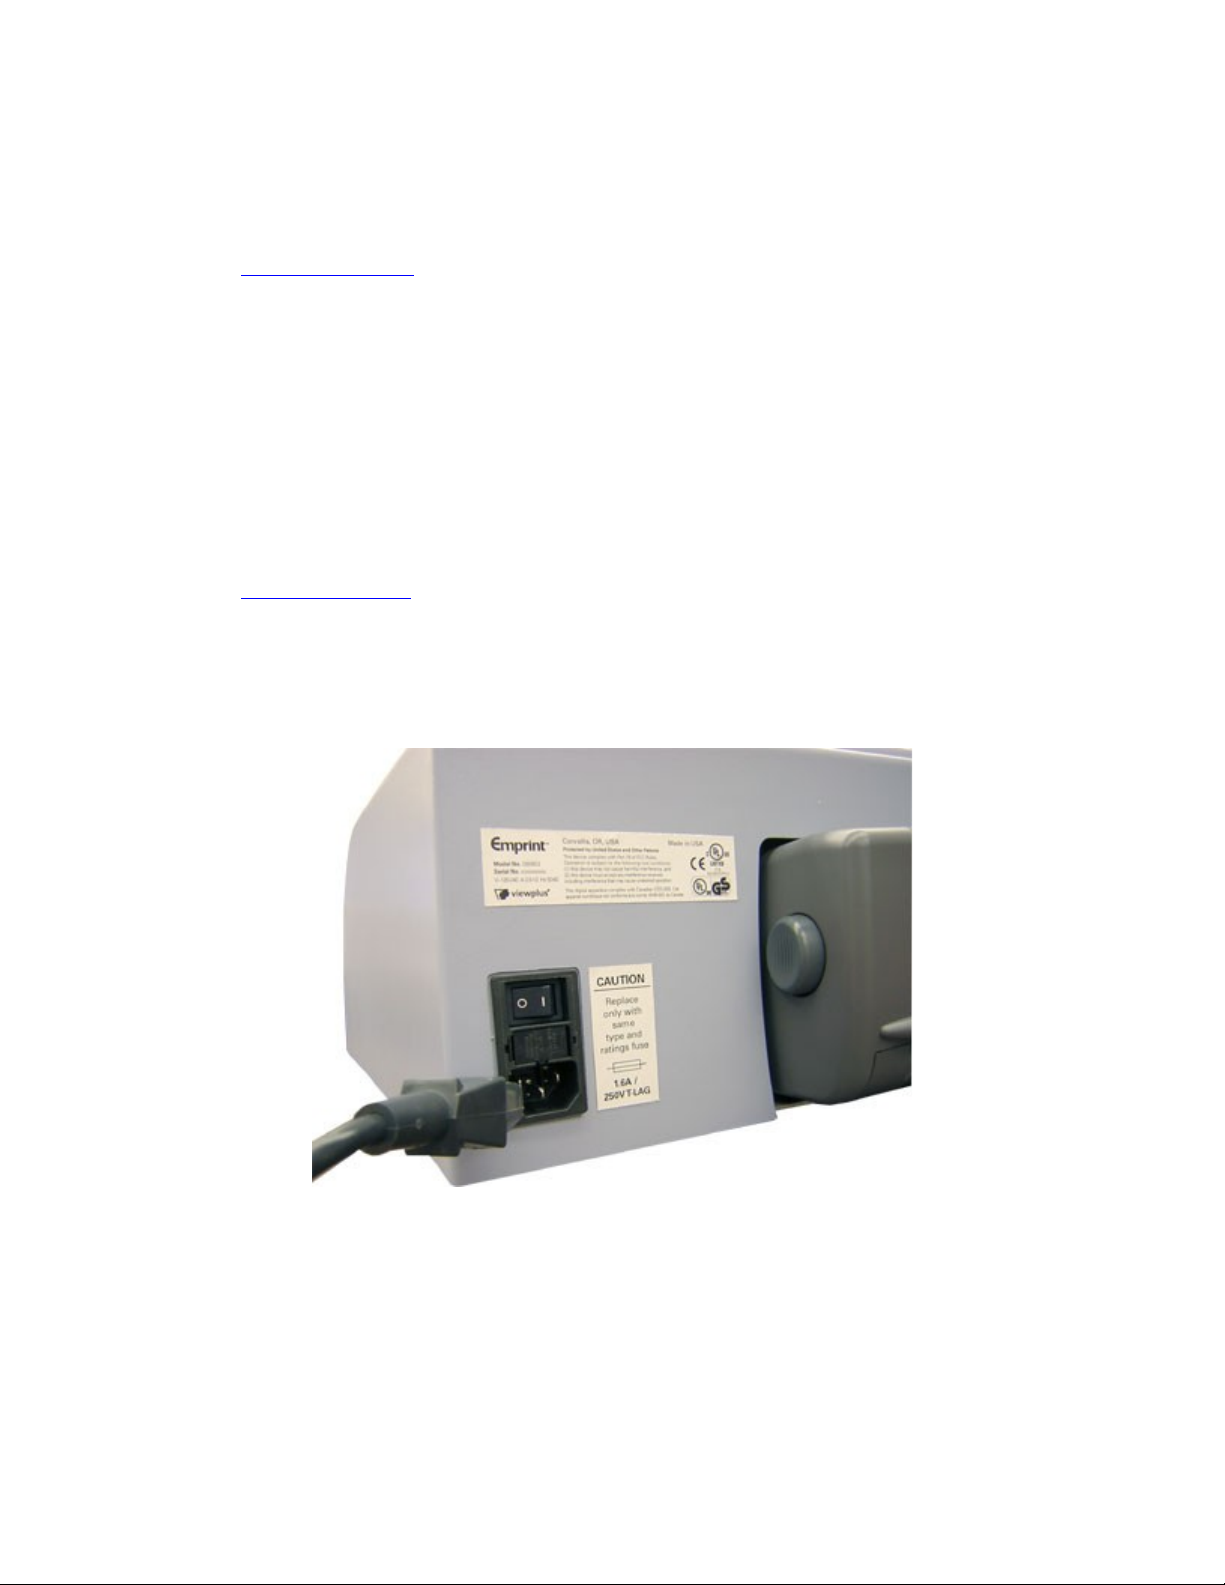
) #"-
The ViewPlus Emprint has a power module with a power socket, on/off switch, and a
compartment holding two fuses on the back side. A sticker next to the power module indicates
what specific fuses are re uired for the embossing printer. If the embossing printer will not power
on, it might be necessary to replace the fuses.
Shows the power module in the back of the embossing printer
Insert the power cable plug into the Emprint power connector and the other end of the power
cable into a grounded outlet or ViewPlus recommends connecting to a surge protector.
Turn the embosser on by pressing the power switch to the On or "I" position. The part of the
switch towards the center of the embossing printer should be pressed down.

Shows the power switch in the back of the embossing printer
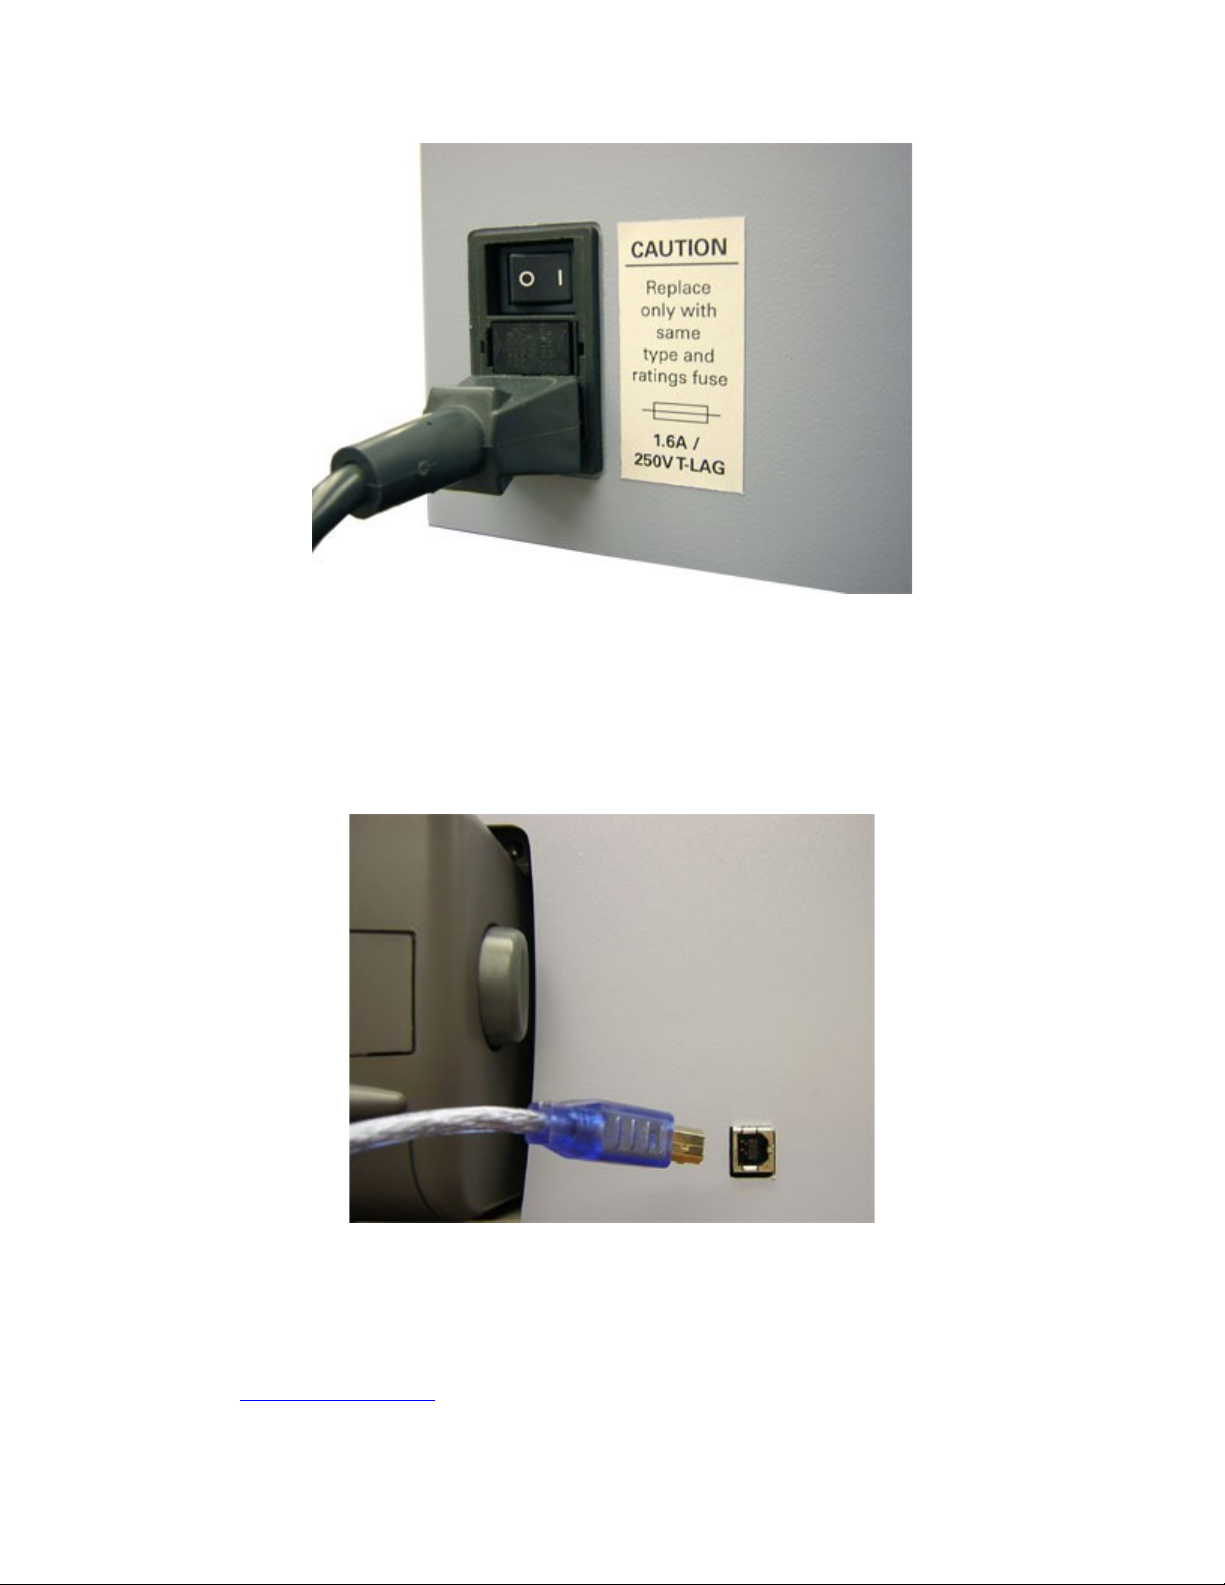
Attach data cable.
oA USB printer cable was included in your box.
oAttach the flat end of the USB data cable to the USB port of the host computer, and then
attach the other end to the embossing printer. The USB connection is located on the back
side of the embossing printer.
Shows the USB connector in the back of the embossing printer
&

Please follow the easy steps to install your Tiger driver. They can also be found on your installation CD
(:DocsSetup(language code)index.html)
% +!,
Included with your Emprint are starter cartridges. HP27 - black and HP28-tri color. Your embossing
printer should be turned on so that the cartridge holder will move to the correct position for the installation
of the cartridges. The standard replacement cartridges are VPT9014 (or HP56) for black and VPT9015
(or HP57) for Tri Color.
( #,
The ViewPlus Emprint automatically checks alignment for the tactile dots at the beginning of each print
job. If the embossed output of your Emprint seems to be incorrectly aligned, please ensure that the
embossing printer is on a flat, even surface. It is possible to bend the body of the embossing printer and
cause the ViewPlus embosser to be out of alignment. After a paper jam, it is also possible for the
embosser to be incorrectly aligned if you simply continue to print. Start a new print job, allow the
ViewPlus Emprint to automatically align, and check the new document to see if the alignment is good.
If the embossed dots do not seem to be aligned, or there is a problem with the alignment of the embossed
image with respect to the printed image refer to service section of the manual.
0
# %"
(The buttons are described from left to right order.)
" - Pressing this button during printing will stop the print job or clear error status.
:*-;"Pressing this button during the embossing phase of a
print job will interrupt the embossing. Press resume again to continue the print job, or cancel to
abort the print job.
0 - The button within the big dark area of the panel (indentation at lower left) is the optional
resume button. It has the same function as the other resume button.Holding down this button on
power up will initiate the printing and embossing of a system information page. It will load paper,
print and emboss information such as the serial number, the firmware version plus some

adjustment values for the embossing and ink modes. If this function completes without error, the
embossing printer is functioning properly.
$ )'
(,--!+0- This light is on when the embossing printer is
powered and ready to receive data. It is blinking if the embossing printer is busy receiving data or
servicing the ink cartridges.
)-!,-7,8- This light is blinking if the embossing printer has no ink cartridges
installed, or if the housing lid is open.
#-!,-78- This light is blinking when an error occurred during
printing. The specific errors are: out of paper, paper jam, embosser head position error, or if the
print job data is corrupted. To clear the error status warning light, press the cancel button.
/,-"'"-,--,-- During start up the embossing printer automatically checks
the three lights by cycling through them once. If an unidentified error occurs during operation, the
embossing printer indicates this by cycling through the three lights continuously. If this happens,
please contact ViewPlus support.
&<".!-!,-5.-!,-- If this blinking se uence occurs the
embossing printer is detecting a non volatile ram error. If this happens, please contact ViewPlus
support.
Error Alerts
During printing the printer driver is monitoring the status of the print job .If problems occur during printing
the embossing printer will inform the user of the error by showing a dialog box on the screen. This will
only
happen if the embossing printer is connected locally to the computer via the USB interface. This will not
happen with network or BlueTooth connections.
0 - (High-Low) Load new print media to the input tray and press the cancel button to
clear the error status warning. Now any print job which was sent but not printed before the error
occurred should be resent.
2:(High-Low-High) Remove the jammed paper and press cancel to clear the error
status warning. Now any print job which was not printed before the error occurred should be
resent.

#,=-!!:(High-High_Low) Press cancel to clear the error
status warning. Try printing again. If the problem persists contact ViewPlus support.
!:(Low-High) Press cancel to clear the error status warning.
+,!:(High-Low-Very Low) A paper jam might cause the ink carriage to stall.
Please clear the paper from the paper path and free up the ink carriage inside of the embossing
printer. See B in the Paper Handling section also.
-.- The rear paper path extension of the embossing printer is not
properly installed. Please firmly attach the rear paper path extension to fix the problem.
>+"!,:(High-High-High) Open the lid of the embossing printer and insert at least
one ink cartridge (see the installation instructions supplied with your ink cartridges). Your Emprint
uses HP 56 - Black and HP 57 - Tri-color ink cartridges. The embossing printer will not emboss if
there are no ink cartridges installed because the HP system will not load paper. Close lid and
continue operation.
1,:(Low) Close the lid of the embossing printer and continue operation. If error
status warning does not clear that make sure the lid is not crooked and verify that the black
plastic lever to the right of the ink cartridges is being hit by the pin protruding from the inside of
the lid. An error message will be displayed if you try to print with the lid open.
1!,
# /!,
The ViewPlus Emprint takes stacks of single sheet print media. Insert the paper from the front into the
input tray.

Shows the input tray in the front of the embossing printer
$ 2
Paper jams can occur in the main body of the embossing printer or in the rear paper path extender. To
check and clear paper jams please follow the steps below.
> Always pull the paper from the center of the visible side or with one hand on each edge of the
paper so the pulling force is distributed. This way it is less likely that the sheet will be torn into pieces
which might be harder to remove.
If the embossing printer is indicating a paper jam, turn the embossing printer off.
Open the housing lid and check for paper inside. If there is paper present, in most cases it can
be removed from the area where the ink cartridges would move over the paper. (If the ink
cartridges are stuck on jammed paper, move them manually over to the right side).
oFirst try to free the paper from underneath the flat metal part towards the front of the
embossing printer by pulling the paper towards the back of the embossing printer.
oThen try to free the paper from underneath the small metal rollers towards the back of the
embossing printer by pulling the paper towards the front of the embossing printer.
If you cannot remove the paper using the methods described in the previous steps or if the area
underneath the lid is free of paper, check for paper within the rear paper path extender.
To remove the rear paper path extender press the buttons on the left and right sides of the
accessory and pull it away from the embossing printer. Remove any paper jam inside the
embossing printer.

To check the inside of the rear paper path extender, press the button on top of the accessory and
lower the access door. Remove any paper jam from inside the rear paper path extender and
close the door again.
Reinsert the rear paper path extender into the embossing printer until both sides snap into place.
Turn on the embossing printer, then reprint the document.
$
# %
During installation of the Tiger printer driver, a number of Tiger screen fonts are installed into the
Windows font folder. These are standard true-type (.ttf) Windows fonts. It is very important for users to
choose the screen font and point size that is converted properly to the desired braille or other tactile
representation.
Each Tiger screen font appears as standard Roman characters on the screen and prints with the
ViewPlus embosser as braille dot patterns (DotsPlus). More will be described below.
If the point size is not set correctly, text may be incorrectly positioned or overlap other text or graphics.
Most Tiger fonts should be used at a point size of 36. This gives a vertical spacing on one-half inch. Any
fonts intended for use with other spacing have the point size given explicitly in its name. For example, the
ViewPlus Translator uses Braille29Tgr font and sets the point size at 29 to ensure the correct vertical
spacing.
Characters in fonts that are not recognized by the Tiger printer driver will be printed as graphic images of
the visual character. In this way, tactile images of Roman characters and symbols can be produced.
The point size of the font may have to be increased. If you wish to emboss DotsPlus Braille, you must
simply change the font to one of the ViewPlus Tiger fonts, and it is not necessary to use the ViewPlus
Translator.
More information about the fonts included can be found on your installation CD in the Tiger/Docs folder.
$ ,&&
The Tiger Software Suite is part of your embossing printer package. Instructions for installation and use
come with the software package.

,!
# !"
The Tiger printer driver provides user access to setting options on the ViewPlus embosser from a local or
networked computer. Open the Tiger printer driver properties by going to Start/Settings/Printer and
Faxes. The Legacy mode property tab is only accessible if the embossing printer is connected locally via
the USB port.
$ ,
Illustration of Tiger tab
1
oBy checking , the Viewplus Emprint will create embossed output.
oBy checking +, the Viewplus Emprint will create inked output.

Note: By checking both and + (default), the embossing printer will create both embossed and
inked output.
oIn mode, the embossing printer will generate embossed output from every odd
page and inked output from every even page of the document. This is useful if editing is
done on either the embossed page or the printed page. There would be two pages in the
document.
o&!!. if checked standard text fonts will be printed in ink and
embossed as text. The default is for this to be unchecked. The standard text fonts will
be printed in ink only.
o This checkbox (default is unchecked) toggles the embossing printer
preview option. If printer preview is selected the printer driver will provide the user with a
previewing dialog prior to the execution of the print job.
, - Contrast and brightness settings for embossed output.
o: The default setting is 0. The range is from -100 to 100. Increasing the
contrast increases the dot height difference of two colors that have intensities that are
nearly the same. Increasing the contrast makes the light colors lighter and makes the
dark colors darker.
o$,-: The default setting is 0. The range is from -100 to 100. Increasing the
brightness is useful if you want to increase the intensity of all the colors. This is useful if
the lines in the drawing are thin and light.
!-"+- Select the type of paper you want to use. The choices are:
o$7)8- This is the default setting.
o/,-$7)8
o'7)?8
o!&"+7)@8
o"&-7)A8
o'7)B8
o"'7)8
o- Custom types may be added (use the Add button). Assign a name and set the
low punch force (1-20); default is 11, and the high punch force (7-30); default is 25.
Custom pages may be removed. Or you can "View" the punch forces for the selected
media. You can view a default media, but you cannot change the name, the high dot
value or low dot value.
Illustration of edia Type Punch Forces

!'- Print to see the effect of the punch forces. This button accessed
by using either Add or View.
!&"
oPlain paper
oPhoto paper, glossy
oOther Photo paper
oPremium plus Inkjet transparancy film
oOther transparency film
oBrochure & flyer, glossy
oBrochure & flyer, matte finish
$!-,-- High, medium or low may be selected. The best way to judge the desired
height is to print a document and adjust the braille height. The default is normal.
-/'- Enhances thin lines with darker colors against lighter backgrounds. The
slider bar can be adjusted between 1 and 6. The higher the intensity factor, the sharper the thin
line.
)' - This option sets the time that the embossing printer allows the ink to dry. This slider
bar can be adjusted between 1 and 16 seconds.
If any changes are made in the Tiger printer driver settings, you must click on the apply button. If the
embossing printer acknowledges the changes, it will beep once.
/,"'

Illustration of Legacy Setting Tab
This mode allows access to the legacy braille embosser emulator settings.
C- Standard pages sizes or custom page sizes may be selected.
,:Set the margins to 0 if you are using a program which sets its own margins.
.":The default spacing is .05 inches. It increases in .05 increments up
to .25 inches.
-" - When margins or page size is changed, this number also changes.
/, - When margins or page size is changed, this number also changes.
.=,-"!- You can choose either text or graphics.
)"-"- Choose between 6 or 8.
#".,- When checked the text is wrapped to the next line. If it is not
checked, it is possible to lose characters from long lines.
)!"- The ViewPlus Emprint can hold up to 8 custom defined braille
tables. Clicking on this button opens a Load Table window and a user-defined braille character
set from ASCII value 0 to 255 can be downloaded to the ViewPlus Emprint. The braille character
sets are typically stored in braille conversion table files (*.BCT). This file format is editable in
Notepad and allows the user to create user definable conversion tables. Go to
http:// www.viewplus.com/support/ for additional information about this mode.

Illustration of Load Braille Table Tab
) &"
The service tab provides several servicing functions for your Emprint.
- Performs a calibration of the black and color ink cartridge. This procedure
needs at least two sheets of plain paper in the input tray.
, - Prints a test page to exercise the embossing printers ink and embossing
mechanism. This procedure needs at least one sheet of plain paper in the input tray.
+=#, - The function should be used if the ink image does not line
up with the emboss output. After the test page has been printed, an input dialog box opens. The
print out shows an array of boxes marked with numbers. Please enter the number of the box that
best matches the ink and emboss output.
1!- This prints the alignment page for the embossing head. In order to
produce perfect dots on the special Tiger platen, the embossing head needs to be aligned with
the grooves. This procedure prints out a 10 by 10 pattern of dots of which one dot looks perfectly
aligned. After the test page has been printed, an input dialog box opens. The user is prompted to
enter the number of the best vertical line and horizontal line of the dot. The rows and columns are
numbered from the left to right and top to bottom, respectively, starting with 1.
&+ - This prints the skew calibration pattern. The pattern is 10 vertical
lines of which one is a perfect aligned line. Please count the number of lines from left to right
starting with 1. The user is prompted to enter the best line number.
+!,/- This dialog box shows the status of the ink cartridges. It shows how much
of ink is left in the cartridges (in percent).
,%)"
# ,
Table of contents
Other ViewPlus Printer manuals
Popular Printer manuals by other brands

Canon
Canon iP6700D - PIXMA Color Inkjet Printer Specifications

Ricoh
Ricoh Aficio AP400 operating instructions

Seiko I Infotech
Seiko I Infotech IP-5620 user guide

Samsung
Samsung CLP 610ND - Color Laser Printer Service manual

DEK
DEK 265 horizon Engineering specification

NSR Marine
NSR Marine NPT-100 user manual