manuals.online logo
Brands
  1. Home
  2. •
  3. Brands
  4. •
  5. Vigier
  6. •
  7. Musical Instrument
  8. •
  9. Vigier Excalibur User manual

Vigier Excalibur User manual

Manual
Manuel d’utilisation
You are now the lucky owner of a Vigier instrument. An instrument whose qualities will become more and more obvious
to you everyday and provide you with years of satisfaction. Once you’ve mastered it you will find it will adapt perfectly to
your playing style. To help you get started we put together this manual. Should you require further information, please feel
free to contact us. We would be delighted to hear from you.
Vous êtes désormais l’heureux possesseur d’un fabuleux instrument, une VIGIER, instrument dont les qualités
exceptionnelles vous apparaîtront au fil des jours. Lorsque vous en aurez acquis la maîtrise, vous vous apercevrez que,
quelque soit votre style de jeu, il s’y adaptera parfaitement.Afin de vous aider à mieux vous familiariser avec votre VIGIER,
nous avons rédigé ce manuel.
This guitar is set with 9-46 guitar strings.
Cette guitare est réglée avec des cordes 9-46.
Thank you for choosing VIGIER THE WORLD’S MOST ADVANCED GUITARS
Merci d’avoir choisi VIGIER THE WORLD’S MOST ADVANCED GUITARS.
LIMITED WARRANTY
This warranty is issued by Vigier Guitars.
WHO BENEFITS FROM THIS WARRANTY?
Vigier warrants the original retail purchaser for two (2) years from the date of purchase.
WHAT IS NOT COVERED BY THE WARRANTY?
Damages or malfunctions not resulting from defects in material and workmanship and damages or malfunctions from other
than normal use, including repair by unauthorized parties, tampering, modification or accident.
WHAT TO DO WHEN SERVICE IS NEEDED?
Package the product carefully using ample material to prevent damage in transit and return it to Vigier or an authorized
Vigier dealer transportation costs and insurance prepaid.
When returning items for service your package should include the following:
1) Evidence of date and place of purchase
2) A detailed description of the problem
Should you have any questions about the use or performance of your instrument, please write or call:
VIGIER Guitars, 10-12 rue de l’abbé Grégoire, 91350 Grigny.
Web: www.vigierguitars.com
GARANTIE
Cette garantie est délivrée par VIGIER/HIGH TECH DISTRIBUTION
QUI BENEFICIE DE CETTE GARANTIE?
Le premier propriétaire de l’instrument.
DUREE DE LA GARANTIE
Tous les produits VIGIER sont garantis deux ans à compter de leur date d’achat.
CAS EXCLUS DE LA GARANTIE
Incidents dûs à de mauvaises conditions de transport, dommages ou malfonctions n’étant pas dûs à un défaut de
fabrication ou à un défaut des matériaux utilisés, utilisations anormales, réparations et modifications effectuées sans
l’accord écrit de HIGH TECH DISTRIBUTION, incidents dûs à de brusques écarts thermiques, usure des barrettes, usure
et oxydation des parties métalliques et/ou des chromes, les réglages et les cordes.
APPLICATION DE LA GARANTIE
Il est IMPERATIF de contacter notre service commercial afin de déterminer si votre demande entre dans le cadre de la
garantie. Lorsque l’accord de notre service commercial est obtenu, procéder de la façon suivante:
1) Nous retourner l’instrument suffisamment bien emballé pour qu’il ne subisse aucun dommage pendant le transport.
2) Prendre le port et l’assurance à votre charge.
3) Joindre la facture d’achat de l’instrument ainsi qu’un descriptif détaillé du problème rencontré.
Si vous avez la moindre question concernant l’utilisation ou les caractéristiques de votre VIGIER , si vous rencontrez le
moindre problème de service après-vente, ou si des questions concernant nos produits étaient restées sans réponse,
veuillez contacter :
HIGH TECH DISTRIBUTION, 10-12 rue de l’abbé Grégoire, 91350 Grigny.
Web : www.HTD.fr et www.vigier.fr
MAN-VE6U-AP.QXP-06/2014
Ultra AP
ELECTRONIC CONTROLS / CONTROLE ELECTRONIQUE
“V” Volume
“T” Tone / Tonalité
Pickup switch “SW”
Switch micros “SW”
Position 1 = Pickup/micro “A”
Position 2 = Pickup/micro “A” & “B”
Position 3 = Pickup/micro “A” & “C”
Position 4 = Pickup/micro “B” & “C”
Position 5 = Pickup/micro “C”
“P” active/passive switch
“P” Switch actif/passif
PREAMP SETTING / REGLAGE DU PREAMPLI
- You can adjust, with a screwdriver, the volume of the
preamp by turning gently the potentiometer located on
back of the guitar.
- Vous pouvez, à l'aide d'un tournevis, ajuster le niveau du
préamplificateur en tournant avec précaution le
potentiomètre situé à l'arrière de la guitare.
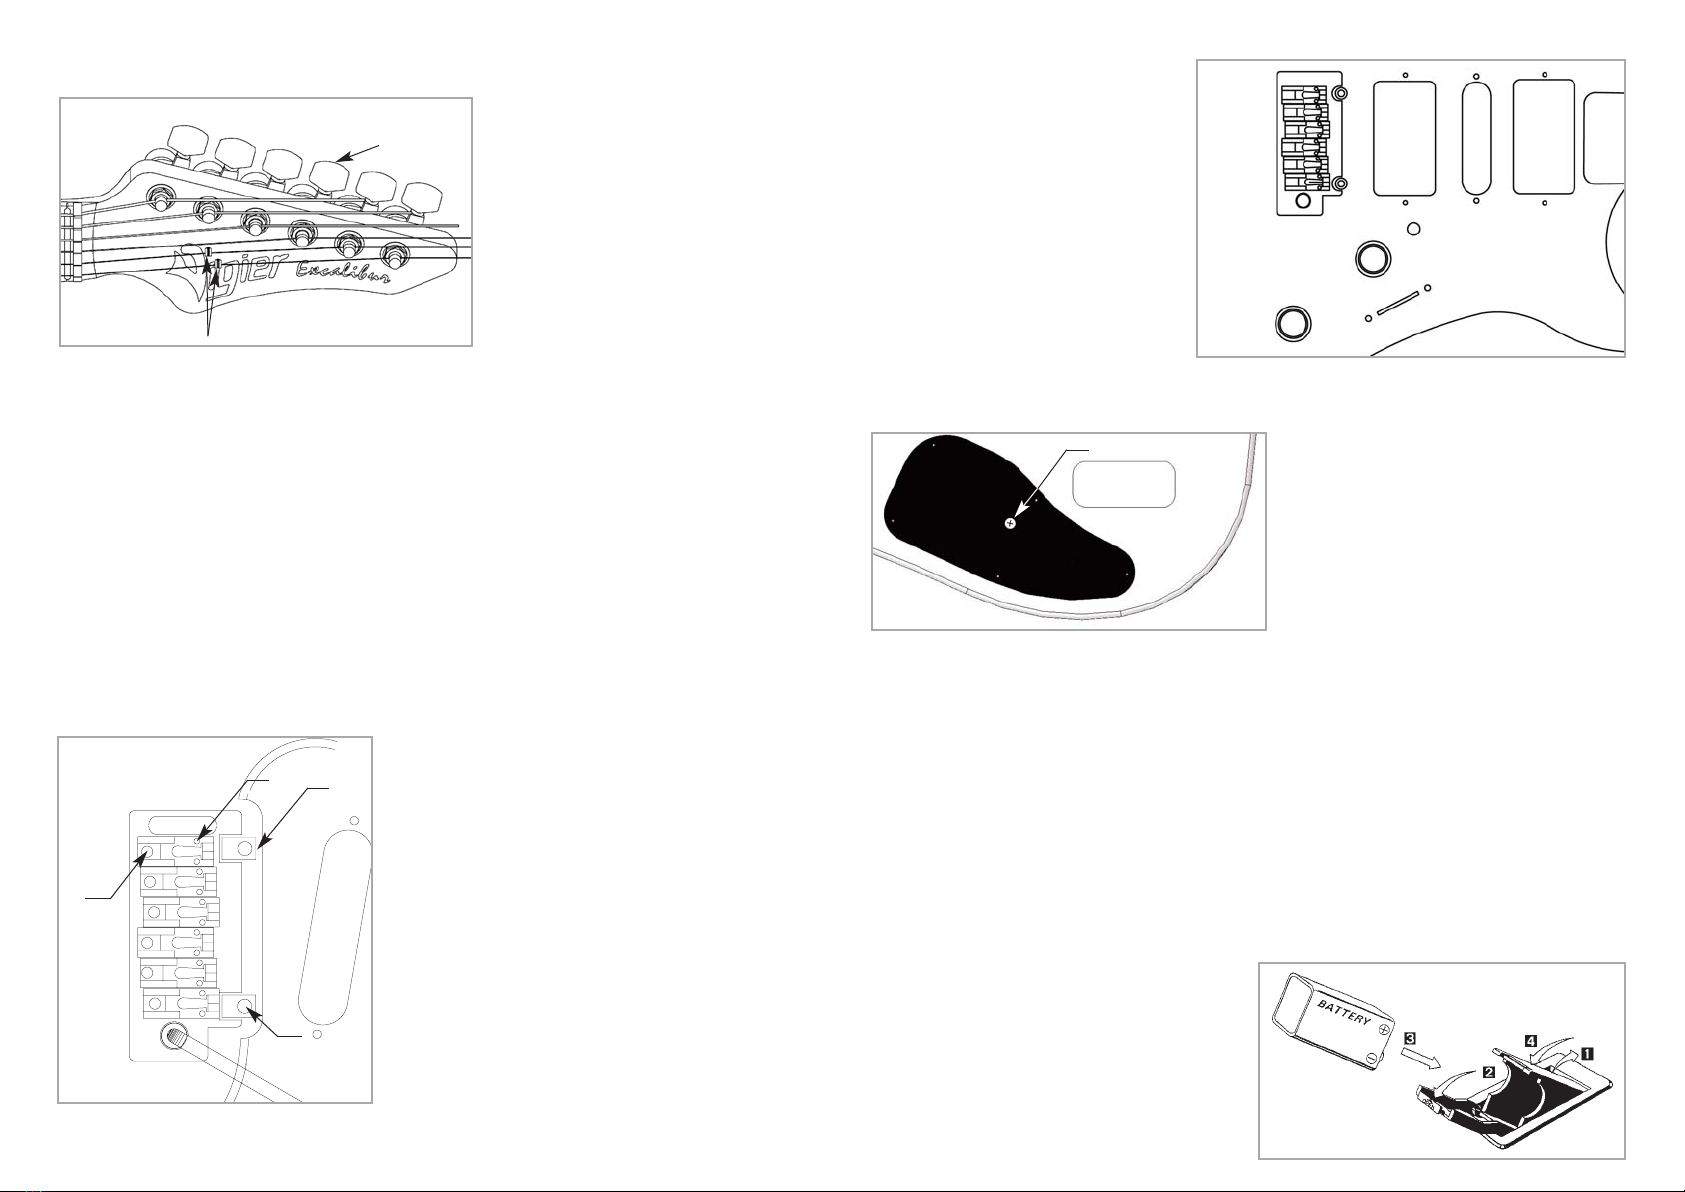
BATTERY CHANGING / CHANGEMENT DE LA PILE
The preamplifier is powered by a single 9V battery (6F22/PP3) placed on the rear of the guitar in its own compartment. To
change the battery simply open the lid, you’ll see the battery and replace it with a new one.
Don’t forget! Always remove your cable from the guitar once you’ve finished playing, it will disconnect the battery from the
circuit and preserve battery power.
Elle est située à l’arrière de la guitare. L’ouverture du boîtier s’effectue en deux temps :
1) Soulever le couvercle, le boîtier de la pile apparaît.
2) Libérer la pile en soulevant le couvercle du boîtier.
3) Insérer une pile 9 volts format 6F22.
4) Refermer le couvercle.
N'oubliez pas de débrancher votre jack, ceci déconnecte la
pile et évite donc qu'elle ne s'use prématurément.
STRING CHANGING / CHANGEMENT DES CORDES
In order to avoid excessive winding & tuning problems, it is important to carefully follow the procedures below.
1) Start by loosening the wheel located behind the
machineheads. Remove your old set of strings from
the rear side of the guitar.
1) Détendre les cordes et desserrer les molettes
situées au dos des mécaniques, sortir les cordes du
chevalet par l’arrière de la guitare.
2) Insert the new string from the rear side of the guitar
through the bridge.
Insert E & B string in the Flexretainer / string retainers
“A”.
Align the hole of each machinehead as shown in the
drawing. Pull the string & lock at the same time by
tightening the wheel and tune your guitar.
2) Insérer de nouvelles cordes dans le chevalet.
Aligner le trou des mécaniques comme sur le dessin ci-dessus.
Mettre les cordes MI et SI dans les Flexretainer / cavaliers “A”.
Introduire les cordes dans les mécaniques et tirer sur chacune d’entre-elles tout en les bloquant avec la molette. Accorder
l’instrument. Le but de cette opération est d’avoir le moins de tours de corde possible autour de l’axe de la mécanique,
afin d’éviter le désaccordage.
* If you decided to change string gauges the tremolo will no longer be in its original position. To reset it the way you like,
remove the back plate and tighten or loosen the springs.
* Si vous avez changé de tirant de corde, il se peut que le trémolo se soulève ou revienne en arrière. Il vous faut alors
enlever la plaque située à l’arrière de la guitare et retendre (ou détendre) les ressorts selon le réglage souhaité.
Note: If while using the tremolo the guitar goes out of tune tighten “E” (as shown in the diagram above) of each appropriate
machinehead.
Note : Si, en utilisant le trémolo, la guitare se désaccorde anormalement, resserrer la vis “E” de la corde concernée.
Important: The Flexretainer must be perpendicular to the string (not exaggeratedly bended forward or backward).
Important : Le Flexretainer doit être perpendiculaire à la corde (ne pas être courbé exagérément vers l'avant ou vers
l'arrière).
ADJUSTMENTS / REGLAGE DE HAUTEUR ET JUSTESSE
1) Screw "F" adjusts the overall height of the bridge. Before using it,
make sure to loosen by 1/10 of turn screw "I".
1) La vis “F” permet le réglage global de la hauteur. Avant de l’utiliser,
débloquer de 1/10e de tour la vis “I”.
2) Screw “G” adjusts only the height of the bridge saddle.
2) Le réglage de la hauteur se fait avec les vis “G”.
3) Intonation can be adjusted by loosening screw “H”. If the note
played on the twelfth fret is higher than the harmonic tone move the
saddle backward. If the note played on the 12th fret is lower than the
harmonic tone move the saddle forward. As soon as the intonation is
adjusted, go back to screw “H” and tighten it.
3) Le réglage de justesse se fait en desserrant la vis “H”. Si la note
jouée à la 12ème case est plus haute que l’harmonique, reculer le
pontet.A l’inverse, si la note jouée à la 12ème case est plus basse que
l’harmonique, avancer le pontet. Une fois la justesse réglée, rebloquer
“H”.
1
2
3
4
5
ACB
V
T
SW
H
G
F
E
A
I
Preamp setting
P
Active
Passive

Other Vigier Musical Instrument manuals

Vigier Excalibur Supra User manual

Vigier

Vigier Excalibur Supra User manual

Vigier Passion 4 User manual

Vigier

Vigier Passion 4 User manual

Vigier Passion Series Bass 4 User manual

Vigier

Vigier Passion Series Bass 4 User manual

Vigier Kaos Series User manual

Vigier

Vigier Kaos Series User manual

Vigier Excalibur User manual

Vigier

Vigier Excalibur User manual

Vigier Arpege Series User manual

Vigier

Vigier Arpege Series User manual

Vigier EXCESS User manual

Vigier

Vigier EXCESS User manual

Vigier ArpEge 5 Strings Series User manual

Vigier

Vigier ArpEge 5 Strings Series User manual

Vigier Excalibur User manual

Vigier

Vigier Excalibur User manual

Vigier Marilyn Series User manual

Vigier

Vigier Marilyn Series User manual

Popular Musical Instrument manuals by other brands

Yamaha Electone MC-600 manual

Yamaha

Yamaha Electone MC-600 manual

Yamaha Portatone PSR-282 owner's manual

Yamaha

Yamaha Portatone PSR-282 owner's manual

Gewa PP-3 manual

Gewa

Gewa PP-3 manual

Yamaha Electone 305D user guide

Yamaha

Yamaha Electone 305D user guide

Johannus REMBRANDT 275 user manual

Johannus

Johannus REMBRANDT 275 user manual

Yamaha TP-6220 owner's manual

Yamaha

Yamaha TP-6220 owner's manual

Kurzweil KA-90 owner's manual

Kurzweil

Kurzweil KA-90 owner's manual

Pearl MIDTOWN instruction manual

Pearl

Pearl MIDTOWN instruction manual

Vox V301H troubleshooting guide

Vox

Vox V301H troubleshooting guide

FAME SP-15 user manual

FAME

FAME SP-15 user manual

Korg The iS40 user guide

Korg

Korg The iS40 user guide

Viscount LEGEND user manual

Viscount

Viscount LEGEND user manual

Yamaha psr-F51 owner's manual

Yamaha

Yamaha psr-F51 owner's manual

KEY POWER KP100 user manual

KEY POWER

KEY POWER KP100 user manual

Rockler 39496 manual

Rockler

Rockler 39496 manual

Yamaha YC-10 owner's manual

Yamaha

Yamaha YC-10 owner's manual

Yamaha Clavinova CLP-810S owner's manual

Yamaha

Yamaha Clavinova CLP-810S owner's manual

Max Music KB1 instruction manual

Max Music

Max Music KB1 instruction manual

manuals.online logo
manuals.online logoBrands
  • About & Mission
  • Contact us
  • Privacy Policy
  • Terms and Conditions

Copyright 2025 Manuals.Online. All Rights Reserved.