manuals.online logo
Brands
  1. Home
  2. •
  3. Brands
  4. •
  5. Viking
  6. •
  7. Enclosure
  8. •
  9. Viking VE-9x12 Instructions for use

Viking VE-9x12 Instructions for use

VE-9x12(R/Y/B)-2
- E-10
- E-1600-20A
- E-30
- W-1000
- W-3000
VE-9x20(R/Y/B)
- K-1500-7
- K-1900-7
- K-1900-8
R = Red
Y = Yellow
B = Black
VE-9x12(R/Y/B)-1
- E-1600A
- E-1600-03B
- E-1600-45A
- E-20A
- K-1500P-W
- K-1900W-2
- W-2000A
Added Protection for Your
Viking Phone or Doorbox
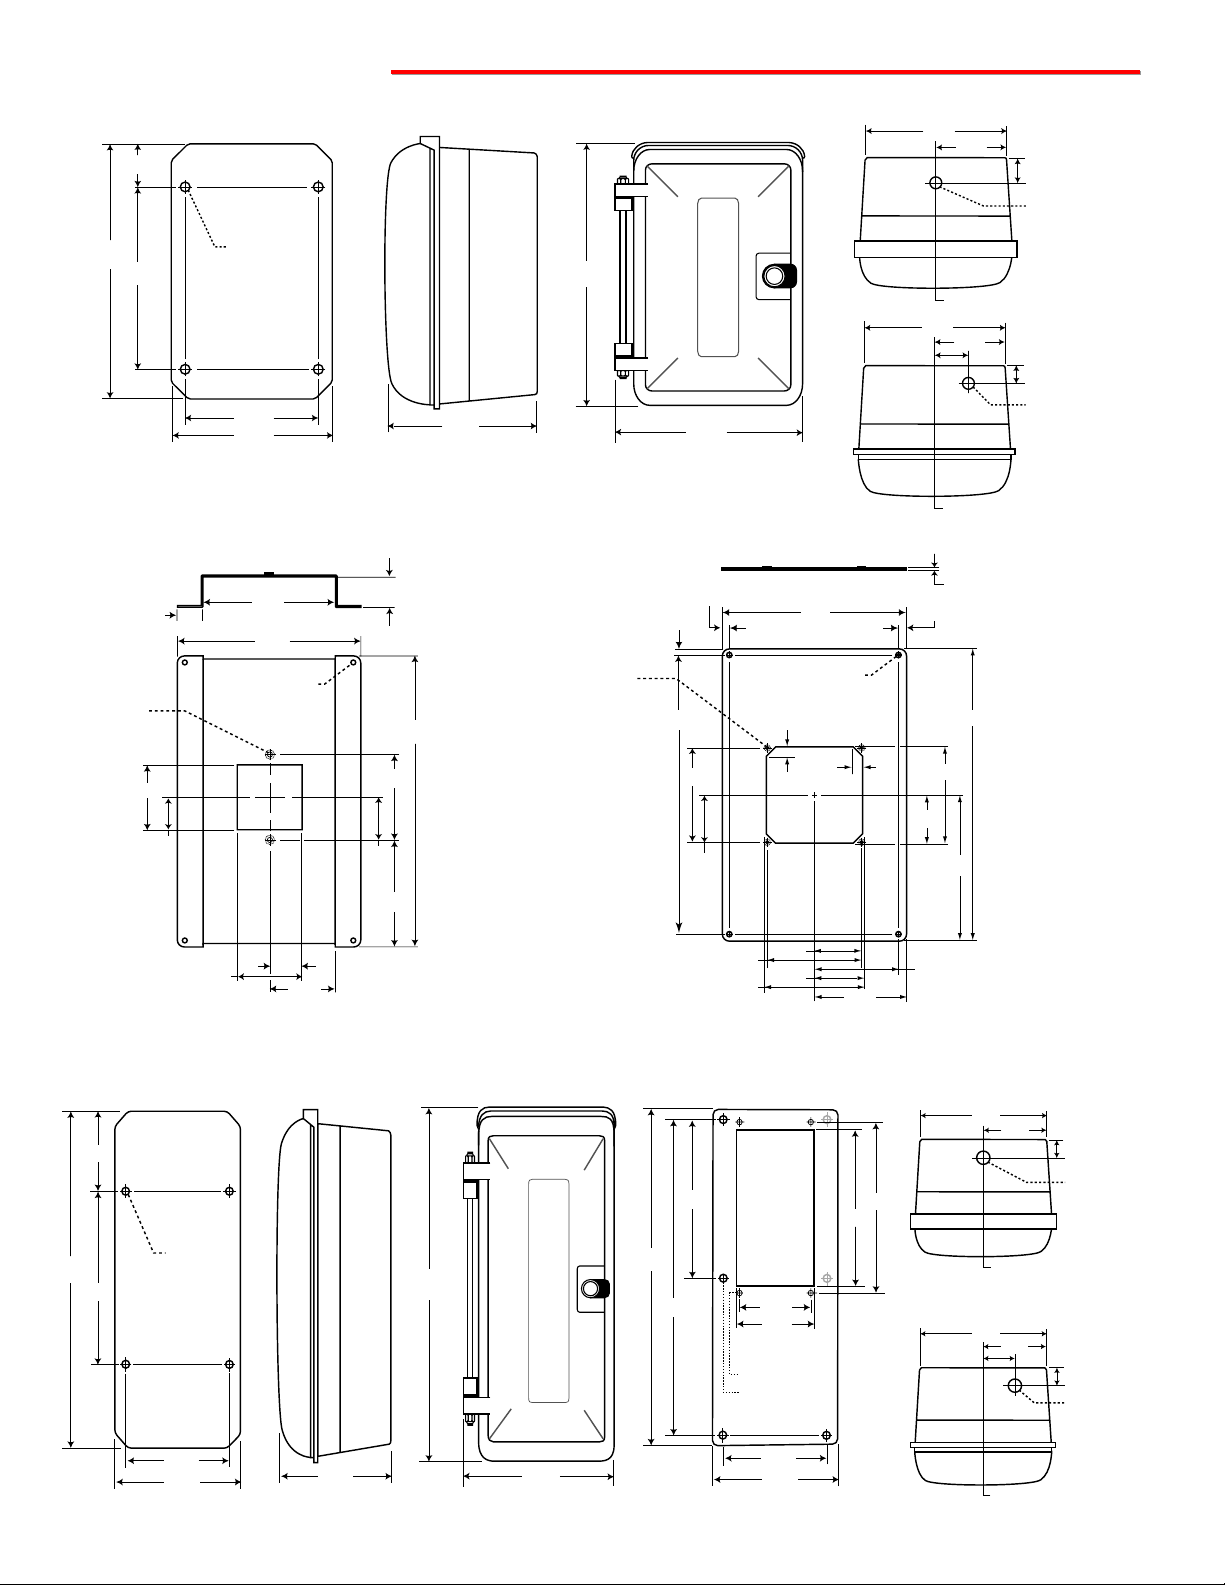
Dimensions: See “Specifications,” page 2
Shipping Weight: VE-9x12 - 5.4 kg (12 lbs), VE-9x20 - 7.3 kg
(16 lbs)
Colors: Red with white lettering, yellow with red lettering or
black with white lettering
Conduit Opening: ¾” NPT with plug, top and bottom
P
Pr
ra
ac
ct
ti
ic
ce
e
T
TE
EL
LE
EC
CO
OM
MS
SO
OL
LU
UT
TI
IO
ON
NS
SF
FO
OR
RT
TH
HE
E2
21
1S
ST
TC
CE
EN
NT
TU
UR
RY
Y
TECHNICAL
TECHNICAL
S
Sp
pe
ec
ci
if
fi
ic
ca
at
ti
io
on
ns
s
h
ht
tt
tp
p:
:/
//
/w
ww
ww
w.
.v
vi
ik
ki
in
ng
ge
el
le
ec
ct
tr
ro
on
ni
ic
cs
s.
.c
co
om
m
P
Ph
ho
on
ne
e.
..
..
.7
71
15
5.
.3
38
86
6.
.8
88
86
61
1
i
in
nf
fo
o@
@v
vi
ik
ki
in
ng
ge
el
le
ec
ct
tr
ro
on
ni
ic
cs
s.
.c
co
om
m
A
Ap
pp
pl
li
ic
ca
at
ti
io
on
ns
s
F
Fe
ea
at
tu
ur
re
es
s
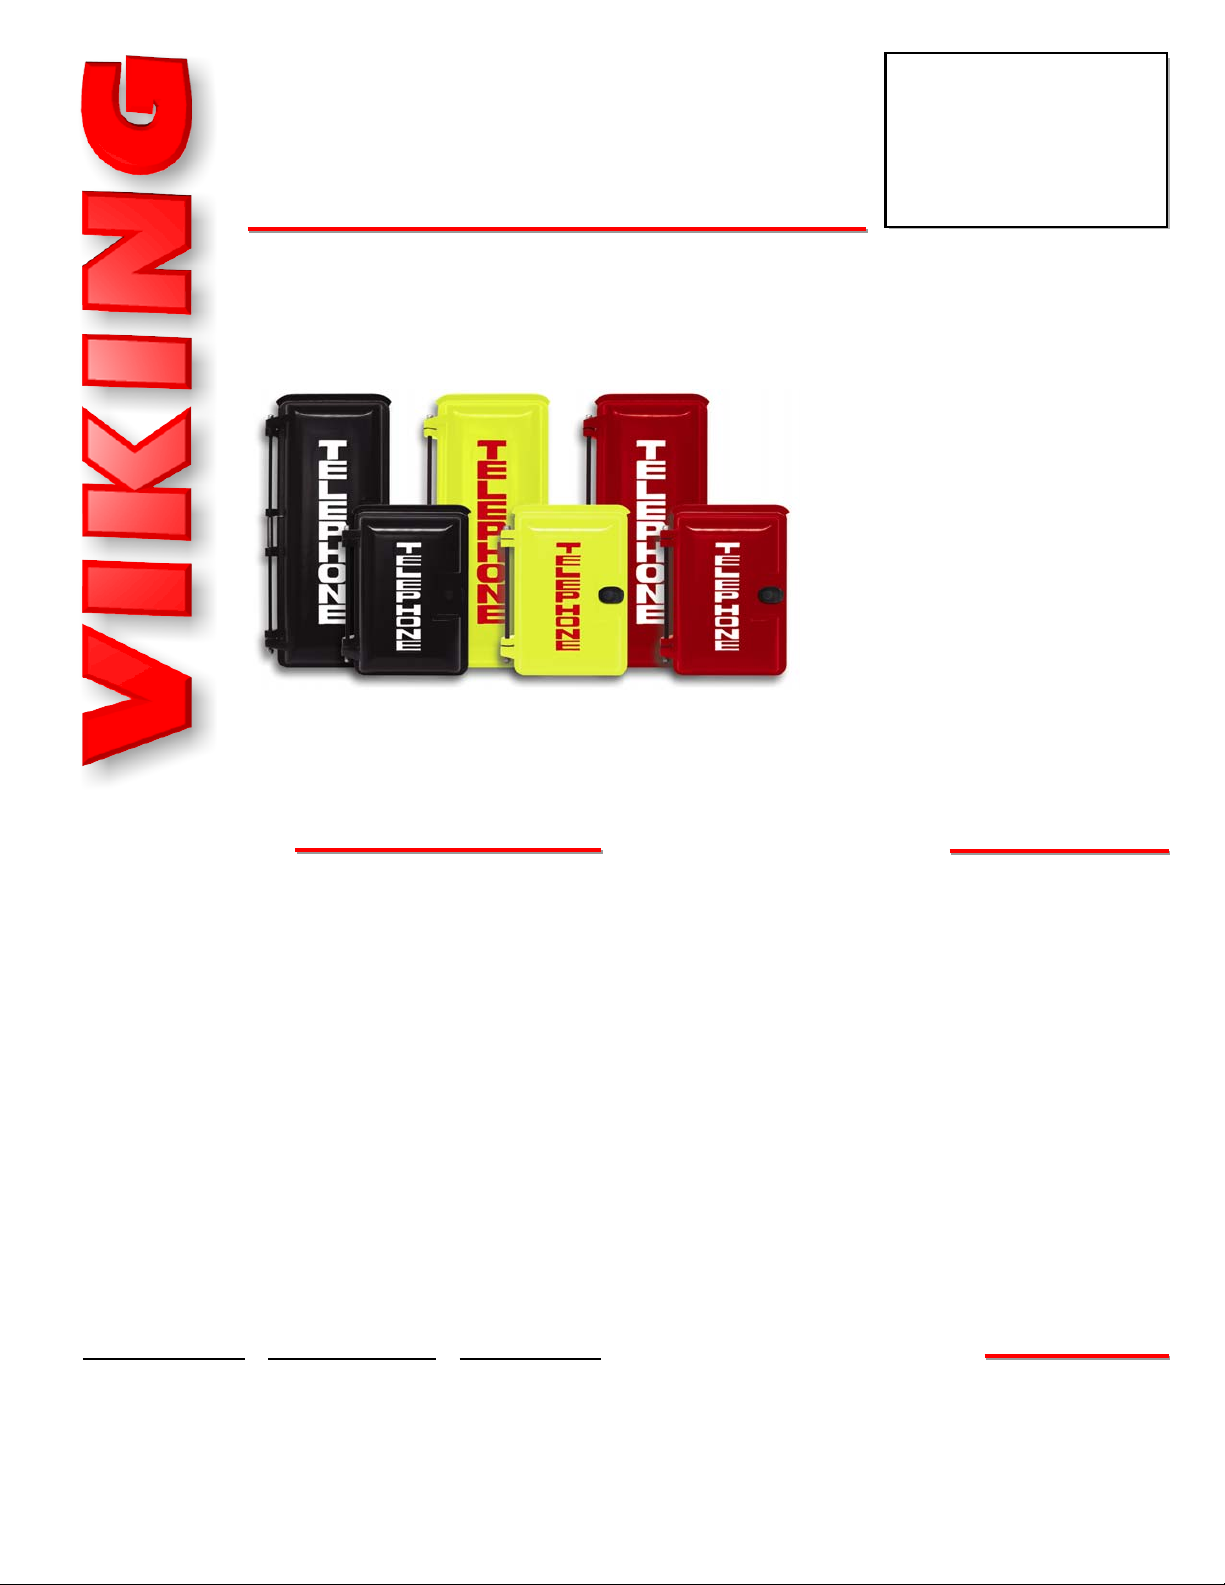
The VE-9x12 and VE-9x20 provide
the ultimate in weather protection for
your Viking product!
These enclosures are constructed of
cast aluminum and are made for
years of outdoor service. The heavy-
duty aluminum doors are labeled
“Telephone” and have a gasket seal
to keep out even the harshest
weather. The VE-9x12 allows you to
choose from two panels that allow
mounting many different Viking
products.
Both the VE-9x12 and VE-9x20 are available in three high visibility colors: emergency red with
white lettering, safety yellow with red lettering, or black with white lettering.
• Heavy-duty cast aluminum construction
• Gasket sealed door
• Drip guard
• Universal mounting adapter panel
• 3/4” NPT conduit openings on top and bottom
• Available in three colors: emergency red,
safety yellow, or black
• Mounting holes for a standard RJ11 wall plate
(VE-9x12 with adapter panel 1)
• Hardware included
• Available with two adapter panels (VE-9x12)
• Optional VE-PBL lock and key set available
• Compatible with these Viking products:
• Parking lots
• Maintenance areas
• Building exteriors
• Swimming pools
• Play grounds
• Roadside help areas
VE-9x12/VE-9x20
VE-9x12/VE-9x20
Outdoor
Enclosures
July 18, 2007
VE-9x20(B) VE-9x20(Y) VE-9x20(R)
VE-9x12(B) VE-9x12(Y) VE-9x12(R)
7.08 0.29
0.29
10.725 11.23
3.70
1.810
3.625
5.615
1.85
0.36 Typ.
3.25
3.625
3.54
3.70
1.81
0.36
1.85
0.25
(4) 6-32
Clinch Nuts
0.08
0.203 Dia.
4 Places
S
Sp
pe
ec
ci
if
fi
ic
ca
at
ti
io
on
ns
s
8.0
5.87
7.10
1.60
11.25 (4) .43 Dia.
T
E
L
E
P
H
O
N
E
9.375
12.6
7.45
7.10
3.55
1.25
7.10
1.625
0.875
3.55
Center Line
Center Line
3/4" Conduit
Knockout
3/4" Conduit
Knockout
7.08
5.48
11.23
3.30
2.50
4.40
1.65
1.25
1.25
2.74
2.50 1.25
0.80
Typ.
(2) 8-32
Clinch Nuts
0.203 Dia.
4 Places
A. VE-9x12 Box
Rear View
Side View Front View
1. Adapter Panel 1 2. Adapter Panel 2
B. VE-9x12 Adapter Panels
8.0
5.88
5.0
19.0
(4) .43 Dia.
T
E
L
E
P
H
O
N
E
9.25
20.25
7.25
7.19
6.49
9.14
18.76
(4) Tapped 6−32
(6) 0.218 Diameter
7.02
18.28
9.50
9.00
4.50
4.60
7.02
3.51
0.75
Center Line
3/4" Conduit
Knockout
7.02
1.75 3.51
Center Line
3/4" Conduit
Knockout
0.75
C. VE-9x20 Box
Rear View
Side View Front View Adapter Panel
Minimum Internal Clearance: 5.75” x 10.0” x 6.75”
(12 gauge Aluminum Black Powder Paint)
Minimum Internal Clearance: 5.75” x 10.0” x 5.25” (12 gauge Aluminum Black Powder Paint)
Minimum Internal Clearance: 5.75” x 10.0” x 4.0”
Minimum Internal Clearance: 5.75” x 17.25” x 6.75” (14 gauge Stainless Steel)
Minimum Internal Clearance: 5.75” x 17.25” x 4.0”
Top View
Bottom View
Top View
Bottom View
I
In
ns
st
ta
al
ll
la
at
ti
io
on
n
K-1900W-2 or K-1500P-W
(not included)
RJ-11 Wall Plate
(not included)
Adapter Panel #1
(included)
VE-9x12 Box
(included)
A. Using the VE-9x12 to mount the K-1900W-2 or K-1500P-W
1. Mount the VE-9x12 to the wall, or surface desired, using the (4) corner mounting holes.
2. Run the conduit and wiring as appropriate.
3. Attach adapter panel #1 using the (4) included 8-32 x 3/8 black cap screws.
4. Attach a standard RJ11 wall plate (Radio Shack part # 279-451 or equivalent).
5. Attach the K-1900W-2 or K-1500P-W to the RJ11 wall plate.
B. Using the VE-9x12 to mount the E-1600A, E-1600-03B, E-1600-45A, W-2000A or E-20A
1. Mount the VE-9x12 to the wall, or surface
desired, using the (4) corner mounting holes.
2. Run the conduit and wiring as appropriate.
3. Attach adapter panel #1 using the (4) includ-
ed 8-32 x 3/8 black cap screws.
4. Attach the Viking product directly to the
adapter using the installation instructions pro-
vided in the product’s Technical Practice.
E-1600A Shown
(not included)
Adapter Panel #1
(included)
VE-9x12 Box
(included)
C. Using the VE-9x12 to mount the E-10, E-1600-20A, E-30, W-1000 or W-3000
1. Mount the VE-9x12 to the wall, or surface
desired, using the (4) corner mounting holes.
2. Run the conduit and wiring as appropriate.
3. Attach adapter panel #2 using the (4) includ-
ed 8-32 x 3/8 black cap screws..
4. Attach the Viking product directly to the
adapter using the installation instructions
provided in the product’s Technical Practice.
W-3000 Shown
(not included)
Adapter Panel #2
(included)
VE-9x12 Box
(included)
(4) 8-32 x 3/8 black cap
screws (included)
(4) 8-32 x 3/8 black cap
screws (included)
(4) 8-32 x 3/8 black cap
screws (included)
Due to the dynamic nature of the product design, the information contained in this document is subject to change without notice. Viking Electronics, and its affiliates and/or subsidiaries
assume no responsibility for errors and omissions contained in this information. Revisions of this document or new editions of it may be issued to incorporate such changes.
Fax Back Doc 413 ZF301480 Rev CPrinted in the U.S.A.
P
Pr
ro
od
du
uc
ct
tS
Su
up
pp
po
or
rt
tL
Li
in
ne
e.
..
..
.7
71
15
5.
.3
38
86
6.
.8
86
66
66
6F
Fa
ax
xB
Ba
ac
ck
kL
Li
in
ne
e.
..
..
.7
71
15
5.
.3
38
86
6.
.4
43
34
45
5
E-10
E-1600A
E-1600-03B
E-1600-45A
E-20A
E-30
K-1500P-W
K-1500-7
K-1900W-2
K-1900-7
K-1900-8
W-1000
W-2000A
W-3000
Box
VE-9x12
VE-9x12
VE-9x12
VE-9x12
VE-9x12
VE-9x12
VE-9x12
VE-9x20
VE-9x12
VE-9x20
VE-9x20
VE-9x12
VE-9x12
VE-9x12
Color
R/Y/B
R/Y/B
R/Y/B
R/Y/B
R/Y/B
R/Y/B
R/Y/B
R/Y/B
R/Y/B
R/Y/B
R/Y/B
R/Y/B
R/Y/B
R/Y/B
Panel
2
1
1
1
1
2
1
1
2
1
2
Enclosure Part Number
Product
C
Co
om
mp
pa
at
ti
ib
bl
le
eP
Pr
ro
od
du
uc
ct
ts
sa
an
nd
dA
Ad
da
ap
pt
te
er
rP
Pa
an
ne
el
ls
s
210
215
215
215
210
212
355
352
360
360
362
170
170
180
Emergency speaker phone with call button, flush mount.
ADA compliant handsfree emergency phone.
ADA compliant handsfree emergency phone, yellow.
Emergency speaker phone with push button, surface mount.
Stainless steel handsfree phone with dialer, flush mount.
Wall phone with ringer and network.
Vandal resistant stainless steel panel phone.
Hot-line wall phone with non-volatile memory.
Hot-line vandal resistant stainless steel panel phone.
Hot-line, stainless steel panel phone with keypad and armored cable.
Weather resistant handsfree doorbox, flush mount.
Weather resistant handsfree doorbox, surface mount.
Stainless steel handsfree doorbox, flush mount.
Fax
Back # Description
2. Brass Collar - Loosen set
screw, using 3/32 hex key
(included)
1. 6-32 Nut-
Loosen
3. Pull cable to
desired length
(6) 8-32 x 3/8 stainless
steel cap screws (included)
Panel Phone
(not included)
Adapter Panel
(included)
VE-9x20 Box
(included)
D. Using the VE-9x20 to mount the K-1500-7, K-1900-7 or K-1900-8
1. Remove adapter panel from the VE-9x20 using
the included hex key.
2. Mount the VE-9x20 to the wall, or surface
desired, using the (4) corner mounting holes.
3. Run the conduit and wiring as appropriate.
4. Attach adapter panel.
5. Attach the Viking product directly to the adapter
panel using the installation instructions provid-
ed in the product’s Technical Practice.
Note: If you wish to shorten the armored cable of
the panel phones, you may do so by loosening the
6-32 nut and brass collar located on the back of the
stainless steel panel and pulling the cable through
to its desired length, then retightening the nut and
brass collar (see diagram right).
E. Optional VE-PBL Push Button Lock
An optional VE-PBL lock and key set is available if you choose
to keep your VE-Series phone box locked. Please contact your
distributor or Viking Electronics “Spare Parts” website for pric-
ing and availability. Important: The lock and key set uses 9
different key combinations. If you wish to have multiple VE-
PBL’s keyed alike, a special order is required.
T
E
L
E
P
H
O
N
E
VE-PBL Lock
Caution: When warm air comes in contact with cold surfaces, such as outside walls and conduits, it causes conden-
sation. To prevent condensation and moisture from accumulating inside the VE-9x12 or VE-9x20 always bring conduit
into the bottom of the unit.

This manual suits for next models

1

Other Viking Enclosure manuals

Viking W-1000 User manual

Viking

Viking W-1000 User manual

Viking VE-9x12 Instructions for use

Viking

Viking VE-9x12 Instructions for use

Viking E-10 Instructions for use

Viking

Viking E-10 Instructions for use

Viking W-3000 Instructions for use

Viking

Viking W-3000 Instructions for use

Viking BLK-3-EWP Installation and operating instructions

Viking

Viking BLK-3-EWP Installation and operating instructions

Viking VE-9x12 Instructions for use

Viking

Viking VE-9x12 Instructions for use

Viking ONYX Series User manual

Viking

Viking ONYX Series User manual

Popular Enclosure manuals by other brands

StorCase Technology Data Express DE100i-SW user guide

StorCase Technology

StorCase Technology Data Express DE100i-SW user guide

BE QUIET! PURE BASE 600 user manual

BE QUIET!

BE QUIET! PURE BASE 600 user manual

Genesis Titan 550 PLUS Quick installation guide

Genesis

Genesis Titan 550 PLUS Quick installation guide

Thermaltake VN10006W2N user manual

Thermaltake

Thermaltake VN10006W2N user manual

Bartec DE8-BC Series user manual

Bartec

Bartec DE8-BC Series user manual

Sonnet FUSION R400Q user guide

Sonnet

Sonnet FUSION R400Q user guide

CommScope NovuX Fiber Optic System installation instructions

CommScope

CommScope NovuX Fiber Optic System installation instructions

DX Engineering DXE-UE-2P instructions

DX Engineering

DX Engineering DXE-UE-2P instructions

Fender LTB-12 Reference owner's manual

Fender

Fender LTB-12 Reference owner's manual

ENERMAX MarbleShell MS21 Series manual

ENERMAX

ENERMAX MarbleShell MS21 Series manual

Moog RM7C2N Installation and operation instructions

Moog

Moog RM7C2N Installation and operation instructions

Protective Enclosures Company The TV Shield owner's manual

Protective Enclosures Company

Protective Enclosures Company The TV Shield owner's manual

Memphis MME10TSP quick start guide

Memphis

Memphis MME10TSP quick start guide

Peavey PBK12FM operating manual

Peavey

Peavey PBK12FM operating manual

EMC CX200-Series Hardware reference

EMC

EMC CX200-Series Hardware reference

Montech Air X Series manual

Montech

Montech Air X Series manual

Vention KPK user manual

Vention

Vention KPK user manual

Peavey 210 HP user guide

Peavey

Peavey 210 HP user guide

manuals.online logo
manuals.online logoBrands
  • About & Mission
  • Contact us
  • Privacy Policy
  • Terms and Conditions

Copyright 2025 Manuals.Online. All Rights Reserved.