Villaware FPVLFPSL01 User manual

model • modèle • modelo
modell • модель • modell
FPVLFPSL01
Instruction Manual
food processor
Read All Instructions Before Use
Mode d’Emploi
robot culinaire
LireToutes les Instructions Avant Utilisation
FR
Manual de Instrucciones
procesador de
alimentos
¡Lea las instrucciones antes de usarlo!
ES
Инструкция для Пользователя
кухонный комбайн
Перед использованием прочитайте
всю инструкцию
RU
Instruktion Bok
matberedare
Läs igenom alla instruktioner
innan användning
SV
Bedienungsanleitung
Küchenmaschine
Bitte lesen Sie vor dem Gebrauch
erst alle Anleitungen sorgfältig durch
DE

1
important safeguards
When using electrical appliances, basic safety precautions should always be followed
including the following:
•Readallinstructionsbeforeusingyourfoodprocessor “ ”.
•Alwaysmakesurethefoodprocessoriscompletelyassembledbeforeoperating.Theunit
will not turn on unless properly assembled.
•Becertainbowlcoverissecurelylockedinplacewhileoperatingappliance.
•Toreducetheriskofinjury,neverplacecuttingbladeonmotorbase
without first putting container properly in place.
•Bladeandprocessingdiscsaresharp.Handlecarefullytoavoidinjury.
•Neverfeedfoodintothefoodchutebyhand;alwaysusethefoodpusher.
•Donotoperatethisappliancecontinuouslyformorethan3minutes.
•Alwaysusethefoodprocessoronadry,levelsurface.
•Toavoidproductdamage,donotliftthefoodprocessorbythehandle.
•Donotuseyourfoodprocessorifanypartisbroken.
•Ifunitisoperatedinanymannerotherthanindicatedinthismanual,itmaycausematerial
damagesorpersonalinjuries.
•Theuseofattachmentsnotrecommendedorsoldbythemanufacturermaycausere,
electricshockorinjury.
•Avoidcontactwithmovingparts.Keephandsandutensilsawayfrommovingbladesor
discswhileprocessingfoodtoreducetheriskofsevereinjurytopersonsordamage
to the food processor.
A scraper may be used but must be used only when the food
processor is not running.
•Unplugfromoutletwhennotinuse,beforecleaningandbeforeassemblingorremoving
parts.
•Switchofftheapplianceandunplugitfromtheelectricaloutletbeforechanging
accessories or approaching parts that move.
•Toprotectagainstriskofelectricalshock,donotimmersepowercord,plugormotor
base in water or other liquid.
•Donotoperateanyappliancewithadamagedcordorplugoraftertheappliance
malfunctions, or is dropped or damaged in any manner. Return appliance to the nearest
AuthorisedServiceCentreforexamination,repairorelectricalormechanicaladjustment.
•Donotletcordhangoveredgeoftableorcounter,ortouchhotsurfaces,includingthe
stove.
•Donotplacethisapplianceonornearahotgasorelectricburner,orwhereitcould
touch a heated oven.
•Themotorcontainsaresettablefusetoprotectagainstoverheatingaftercontinuedheavy
use. If the motor shuts off, turn food processor off “ ” and unplug it from the electrical
outlet.
After the food processor has cooled, plug it into the electrical outlet and resume
normal use.

2
•Alwaysturnthefoodprocessoroff“”rstbeforeunpluggingitfromtheoutlet.
•Besuretoturnswitchtooffposition“”aftereachuseofyourfoodprocessor.
•Donotuseapplianceforotherthanintendeduse.
•Donotuseoutdoors.
•Closesupervisionisnecessarywhenanyapplianceisusedbyornearchildrentoensure
they do not play with the appliance.
•Thisapplianceisnotintendedforusebypersons(includingchildren)withreduced
physical, sensory or mental capabilities, or lack of experience and knowledge, unless they
have been given supervision or instruction concerning use of the appliance by a person
responsible for their safety.
THIS APPLIANCE IS FOR HOUSEHOLD USE ONLY.
SAVETHESE INSTRUCTIONS
power cord instructions
Please follow the instructions below to ensure the safe use of the power cord.
•Donotuseanextensioncordwiththisproduct.
•Donotpull,twistorotherwiseabusethepowercord.
If power cord is damaged, the manufacturer, an Authorised Service Centre or similarly
qualified persons must replace it in order to avoid a hazard.
important product markings
“Read Instructions” located on cover next to Food Chute
“On”
“Off”
“Pulse”
“Lock”
“Unlock”
“Alignment Arrow”
“Food Chute Lid Release”

3
for u.k. and ireland only
If the plug is not suitable for the socket outlets in your home, it can be removed and
replaced by a plug of the correct type. Please refer to “Installation of a plug” below.
Installation of a plug applicable to U.K. and Ireland.
WARNING -THIS APPLIANCE MUST BE EARTHED
NOTE: If the terminals in the plug are not marked or if you are unsure or in doubt about
the installation of the plug, please contact a qualified electrician. If a 13A3-pinplugistted,
it must be an ASTA approved plug, conforming to BS1363standard.
Replacement 5A fuses must be BS1or ASTA BS1362approved.
The wires in the mains lead are coloured as such:
GREENANDYELLOW-EARTH
BROWN-LIVE
BLUE-NEUTRAL
Please note that the colour of these mains wires may not correspond with the colour
markings that identify the terminals in your plug.
Please proceed as follows:
ThewirewhichiscolouredGREENANDYELLOWmustbeconnectedtotheterminal
whichismarkedwiththeletter“E”orbytheearthsymbol“”orcolouredGREENAND
YELLOW.
TheBROWNcolouredwiremustbeconnectedtotheterminal,whichismarkedwiththe
letter“L”oriscolouredRED.
The BLUE coloured wire must be connected to the terminal, which is marked with the
letter“N”oriscolouredBLACK.
5 amp
5 amp

4
1
2
4
6
5
10
8
7
12
11
39
13
14
16
15
17
description of the appliance
1. Food Pusher
2.FoodChuteLid
3.ExtraWideFoodChute
4. Motor Base
5. OnIndicatorLight(Amber)
6.On“”/Off“”
Switch Control
7. () Pulse function
8.StorageDrawer
9. Cover
10. “Read Instructions” Symbol
11. 3-LitreBowl
12.DriveShaft
13.ChoppingBlade
14.2mm/4mmSlicingDisc
15. Spatula
16.AttachmentRod
17.Grating/ShreddingDisc

5
instructions for use
BEFOREUSINGYOURFOODPROCESSOR
Follow the assembling instructions listed below before using your Villaware™Food Processor:
BE SURETHATTHE ELECTRIC CORD IS UNPLUGGED.
THE BLADES AND DISCS ARE EXTREMELY SHARP. USE CAUTION WHEN
HANDLINGTHEM.
•Beforeassemblingyour
food processor
, make
sure it is unplugged and
placed on a dry, level
surface. Place the bowl,
without the cover, over
the drive shaft on the
motorbase.(Figure1)
•Ifyouaregoingtouse
one of the discs, place
the attachment rod over
thedriveshaft(gure
4a).Thenplacethedisc
on top of the attachment
rod with the desired
sidefacingup(slicing,
shreddingorgrating)
(gure4b).
•Attachthecoveronto
the bowl so that the
food chute is in front
of the bowl above the
switchcontrol(Figure5).
Turn counter clockwise
until the arrow on the
cover is aligned with the
locked symbol on the lid
“ ”.
•Rotatethebowluntilit
fits evenly on the base.
Holdhandleandturnthe
bowl counter clockwise
until it locks firmly into
place(Figure2).The
handle will be facing
forward and aligned with
the switch control. Make
sure the arrow on the
base is aligned with the
locked symbol “ ”.
•
If you are going to use
thechoppingblade;place
it over the drive shaft,
rotating it slightly until it
dropsintoplace(Figure3).
THE BLADES AND
DISCS ARE SHARP.
USE CAUTIONWHEN
HANDLINGTHEM.
Figure 4a
Figure 1Figure 2 Figure 3
Figure 5 Figure 6
•Pushdownonfood
pusher lid until it clicks,
indicating that the cover
is locked into place.
Figure 4b
NOTE:Eachtimeyoure-assembleyourfoodprocessor,besuretoattachthebowlrst
and lock it into position.Then attach the cover.

6
operating instructions
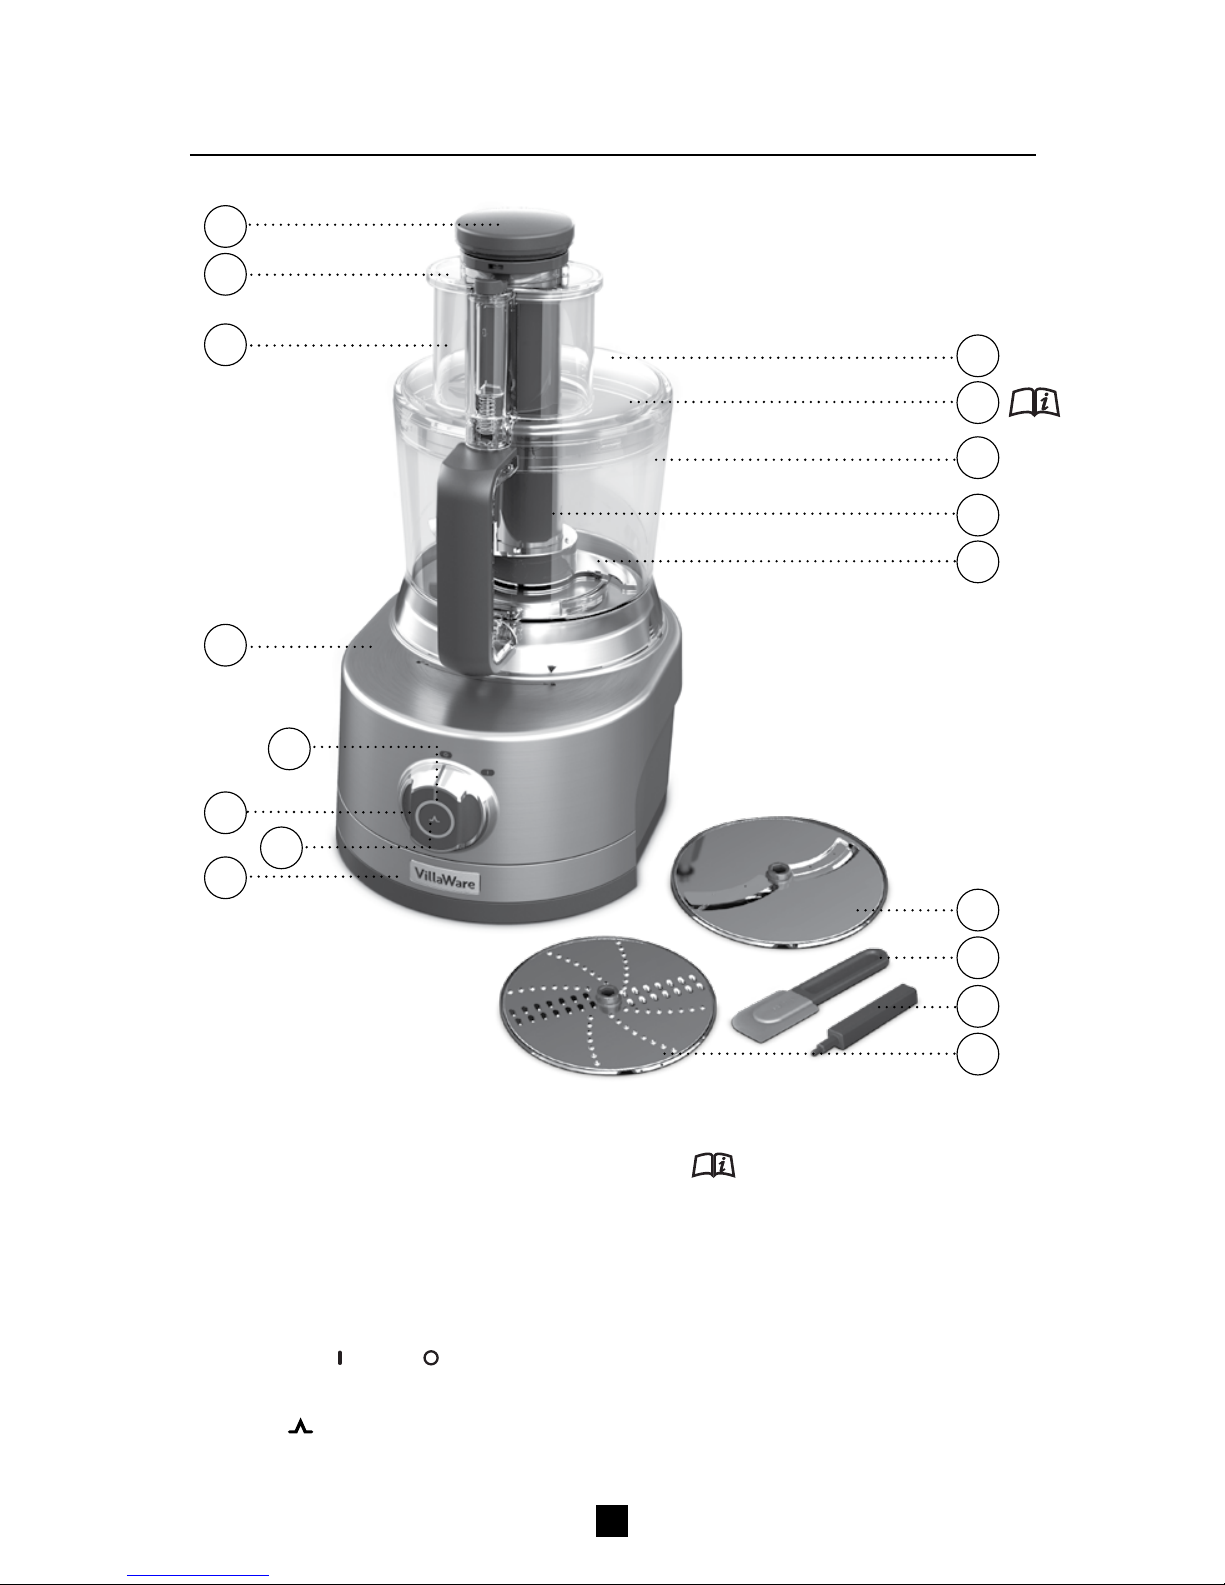
1.Yourfoodprocessorfeaturesanextrawidechutesomostvegetablessuchassmaller
onions and potatoes will not need to be cut into smaller pieces since they fit in the chute.
2.Prepareyourvegetablesbywashingthemthoroughlyandpeelingthosethatneedthe
skin removed.
3.Ensurethefoodprocessoranditsaccessoriesarecleanbyfollowingthe“cleaning”and
“maintenance” sections of this manual.
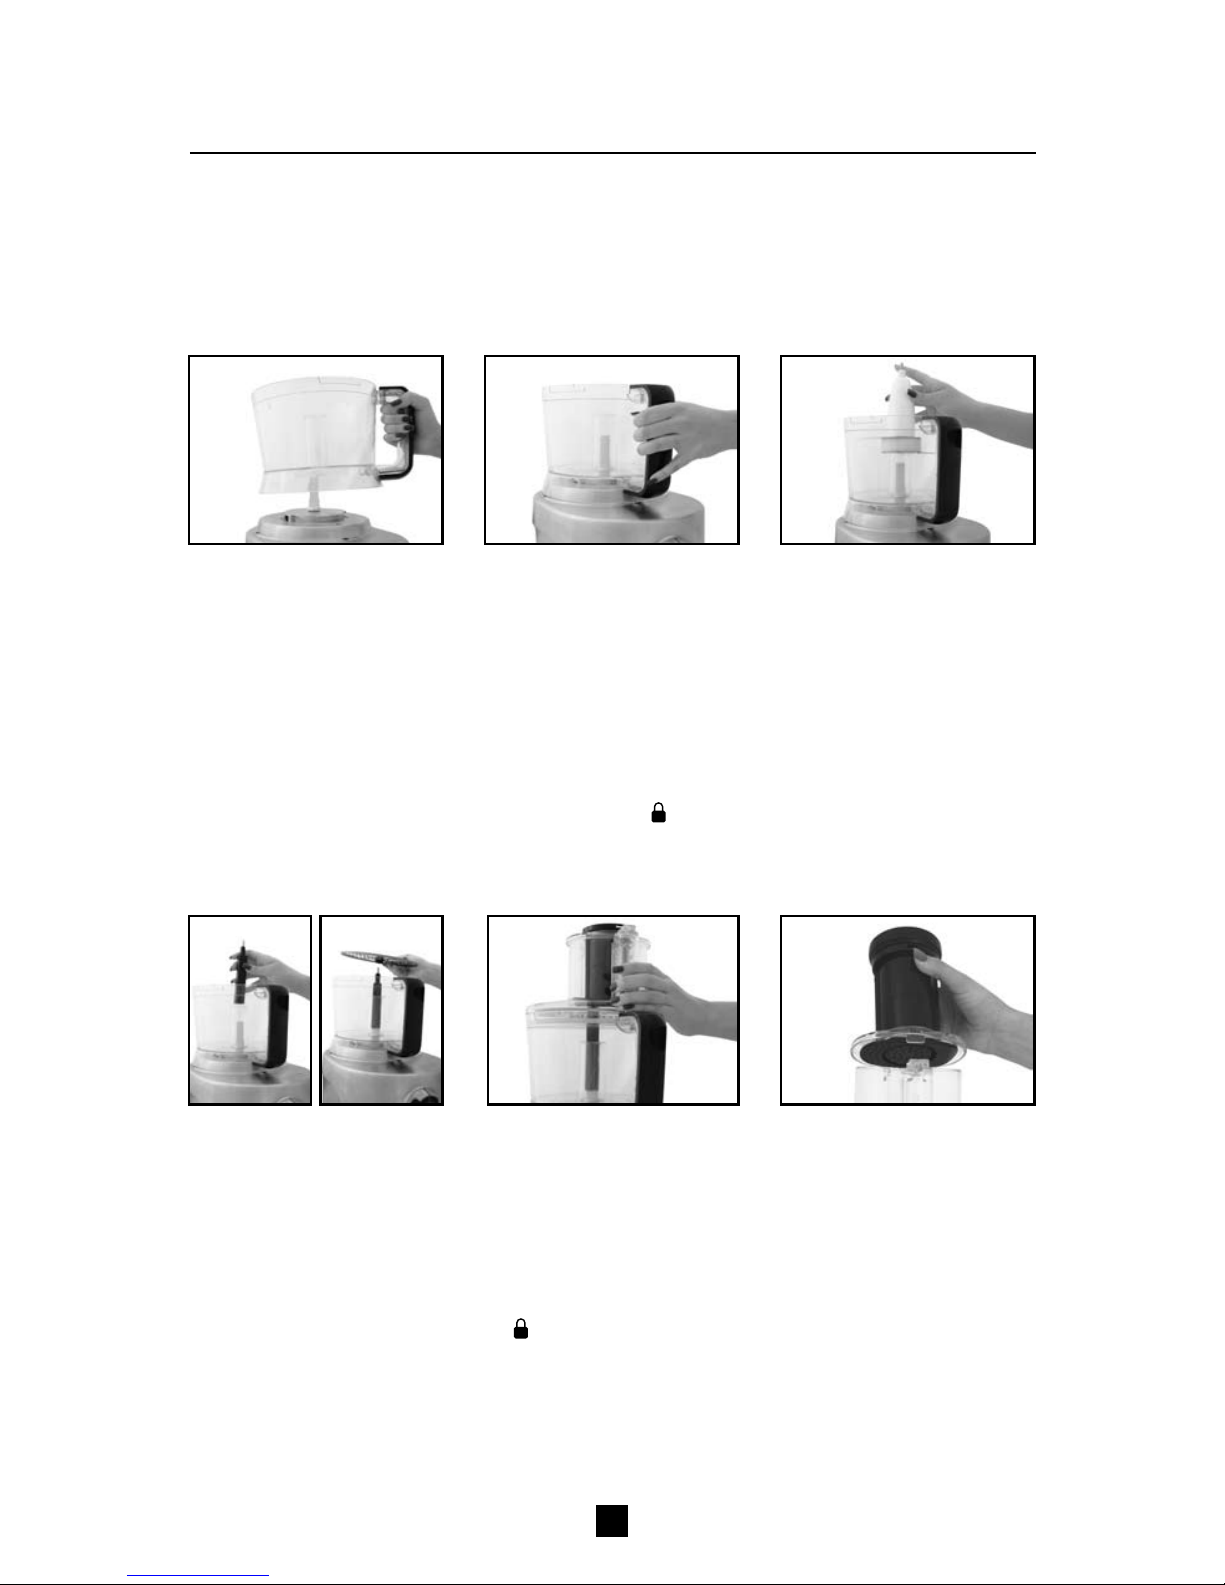
4. Make sure your food processor is properly assembled. Please follow the instructions from
thesection“BEFOREUSINGYOURFOODPROCESSOR.”Beforeclosingthefoodchute
lid, food can be placed in the food chute area if a disc is being used.
5. Plug the power cord into an electrical outlet and turn the power on selecting “ ” or Pulse
“ ”. The food chute lid must be locked in place for the unit to run.
6.Oncethefoodprocessorison,placethevegetablesinthefoodchuteandusethefood
pusher to slowly drive them down.
7. By twisting the food pusher, it can be locked into the food chute so the pieces act as one
to push food down the food chute. If separate, the food pusher can be removed while
the unit is running to add liquids or smaller foods.
WARNING: NEVERUSEHANDSORFINGERSTOPUSHFOODDOWNTHEFOODCHUTE
ORTOCLEARTHEFOODCHUTE.ALWAYSUSETHEFOODPUSHERPROVIDED.
THE BLADES AND DISCS ARE EXTREMELY SHARP. USE CAUTIONWHEN
HANDLINGTHEM.
CAUTION: Maximum running time for product is 3 continuous minutes.
USING CHOPPING BLADE:
1. Place the chopping blade over the drive shaft, rotating it slightly until it drops into place.
2.Attachthecoverontothebowlsothatthefoodchuteisinthefrontofthebowl(above
theswitchcontrol).Turncounterclockwiseuntilthecovertsintoplace.Thefoodchute
will be directly above and in line with the handle. Push down on the food pusher lid until
you hear it click, indicating that the cover is locked into place.
3.Plugthepowercordintoanelectricaloutlet.
4. Start processing by selecting “ ”orPULSE( ).
USINGTHE SLICING/SHREDDING /GRATING DISCS:
1. Place the attachment rod over the drive shaft rotating it slightly until it drops into place.
2.Selectwhichdisctouseaccordingtorecipeortaste.
3.Insertdiscontotheattachmentrodwiththebladeofyourchoicefacingupsincethediscsare
reversible.
4. Attach the cover onto the bowl so that the food chute is facing to left side of the bowl.
5. Turn counter clockwise until the cover locks into place.
6.Loadthefoodchutewithingredientsbeforeturningthefoodprocessoron.Alwaysusethe
food pusher to yield more evenly sliced or shredded foods.
7.Restthefoodpusherinthefoodchute.Switchuniton“”.Holdingthefoodpusherwithone
hand, and food chute in the other, push gently down on the food pusher. When finished, press
control button to the off “ ” position before removing cover.

7
after using your food processor
Before cleaning and storing your food processor, follow the instructions below to
disassemble the unit:
•Turnfoodprocessoroff“”andunplugitfromtheelectricaloutlet.
•Releasefoodchutelidbypressingoutwardonthelatch.
•Turnclockwisetoremovethecover.
•Removeprocessingaccessoryyouwereusingholdingitbytheshaft.Donottouchblades
or sharp edges when emptying the bowl or removing accessories.
•Rotatethebowltothelefttoreleaseandthenliftuptoremoveitfromthebase.
cleaning
THE BLADES AND DISCS ARE EXTREMELY SHARP. USE CAUTION
WHEN HANDLINGTHEM DURING CLEANING.
•Turnfoodprocessoroff“”andunplugitfromtheelectricaloutlet.
•Disassembleallremovablepartsofthefoodprocessor.Thechoppingblade,discsand
attachmentrodaredishwashersafe;selecttheminimumtemperatureandplaceonthe
top shelf. Wash the other pieces by hand with warm, soapy water. If the residues dry
out in the chopping blade, discs, bowl or the cover, let it soak in warm, soapy water for
approximately 10 minutes before washing it.
•Wipethemotorbase,includingthedriveshaft,withadampordrycloth.
•Donotimmersethemotorbaseinwateroranyotherliquid.
•Useapieceofkitchenpaperwithalittlevegetableoiltoremovesomeofthestaining
resulting from certain foodstuffs, such as carrots.
•Cleaningtheinternalshaftofyourchoppingbladeismostimportant.Wesuggesttheuse
of a small baby bottle brush to remove any food particles, then wash and dry the shaft
thoroughly.
•Whenhandwashing,avoidsoakingpartsindetergentfortoolong.
•Readthroughthemanufacturer’sinstructionstoverifythatdishwashingdetergentsare
suitable for cleaning plastic items.
RESET FUNCTION:
1.The motor contains a resettable fuse to protect against overheating.
2.Iftheunitstopsaftercontinuoususetheturnthefoodprocessoroff“ ” and unplug it from
the electrical outlet.
3.Waitfor5-10 minutes for the food processor to cool down.
4. Plug the food processor into the electrical outlet and resume normal use.
5. If the food processor does not operate after instructions 1-4,repeattheabovestepsandwait
a further 10 minutes before using again.

8
maintenance
•Somepartsmightstainwhenincontactwithcertainvegetables.Inordertoavoidthis,all
parts should be washed immediately after each use.
problems and solutions
PROBLEM SOLUTION
Food processor will not work
after switching on
Food Processor makes loud
noise or starts vibrating
Performance of disc is reduced
Motor stops after continued
heavy use
•Bowlmaynotbelockedinproperposition.
•FoodChuteLid/Covermightnotbelocked
into position.
•Turnoffandunplugunitandensureallparts
are assembled properly.
•Turnoffandunplugunitandcheckifthereare
any residues blocking the unit.
•Themotorcontainsaresettablefusetoprotect
against overheating. Turn the food processor off
“ ” and unplug it from the electrical outlet.
After the food processor has cooled, plug the
food processor into the electrical outlet and
resume normal use.
•If the holes are blocked, use a brush and clean
the disc in hot water or wash the disc in the
dishwasher.
•Turnoffandunplugunitandensureallparts
are assembled properly.
storing
•Storethechoppingbladeintheclearbowl.
•Discsandotheraccessoriesshouldbestoredinthestoragedrawerofthefoodprocessor.

9
tips and suggestions
PULSINGTECHNIQUES
Thefoodprocessorprocessesfoodveryquickly;inmostcases,inseconds!Therefore,foods
caneasilybecomeoverprocessedifyoudon’twatchcarefully.Wesuggestthatwhenusing
the chopping blade in the bowl, you process foods no more than a few seconds at a time.
Pulsing ensures excellent results every time.
NOTE: Please be sure that the chopping blade has stopped spinning completely before
removing the cover.
PLACING FOOD INTO BOWL
For the best results, process pieces of food that are about equal in size. Results will be more
uniform.Youwillgetfaster,moreconsistentprocessingresultsifyoudonotoverloadthe
bowl.Whenusingthechoppingbladebesuretollthebowltoonly3/4ofitsmaximum
capacity.
NOTE: When processing a heavy load, check to be sure the food processor is sitting firmly
on the counter or tabletop.
CHOPPING MEATS
Pre-cutmeatintopiecesabout3/4inchsquare.Placethepiecesinthebowl;replacethe
coverandprocessusingthepulsetechniquefor5to7seconds.Neverprocessmorethan2
cups of meat cubes at one time.
CHOPPINGVEGETABLES
When processing vegetables such as onions, turn the food processor on and off 1to2
timestocoarselychop,3to4moretimestonelychop.Scrapesidesofbowlonceor
twice during processing, if necessary.
ADDING LIQUID INGREDIENTS
Liquid ingredients may be added while the processor is operating by pouring them through
the food chute.
USE CAUTIONWHEN ADDING HOT LIQUIDS ASTHEY MAY SPLASH
CAUSING INJURY.
NOTE: Whenprocessingsaucesorsemi-liquidingredients,stopthefoodprocessorand
scrape down the sides of the bowl and cover.
DO NOT WALK AWAY FROMTHE FOOD PROCESSORWHILE PROCESSING.
consumer affairs
HolmesProducts(Europe)Ltd.
1Francis Grove
London SW194DT
England
Fax:+44(0)2089478272
Email:enquir[email protected]
UK-FreephoneCustomerServiceHelpline–08000523615

10
TurkeyVegetable Flan
450 g turkey sausage
3-4zucchinis
1bunch spring onions
Olive oil
450 g frozen egg substitute, defrosted
235mlspicytomatojuicedrinkmix
14 g cornstarch
Pre-heatovento175° C.
Grate460gofzucchiniusingthegrating
disc on your food processor.
Mince 115 g of green onions using the
chopping blade of your food processor.
Sauté turkey sausage, grated zucchini and
mincedonionsovermediumheatfor5-7
minutes or until the turkey sausage is no
longerpinkandvegetablesaretender.Drain.
Place 115 g of the mixture into a 170 g
custard cup or ramequin which has been
coated with olive oil. Pour 58 g of egg
substitute over turkey mixture. Should fill
8 cups.
Placecupsina38cmx28cmx5cmpan.
Pourhotwateraroundcupsreaching2.5
cm in depth. Place pan on oven rack and
bake at 175°Cfor25-35minutesoruntil
a knife inserted into centre of each cup
comes out clean. Remove and unmould.
In500mlglasscup,blendtomatojuice
drink with cornstarch. Microwave on high
for2minutes,whiskingmixtureafter1
minute. Continue microwaving until sauce
is thickened.
Spoon sauce over turkey moulds and serve.
English Mint Sauce
1bunch fresh mint leaves
235mlmaltvinegar
28gwhitesugar
Glassjarswithscrewtoporcorklid
Rinse mint leaves and strip from stems.
Chop mint leaves in your food processor
using the chopping blade.
Using a small saucepan, bring vinegar to a
simmer. Add sugar and chopped mint leaves.
Simmerforaround20minutes.Additional
water or sugar can be added for taste.
Washjarsthenimmerseinhotwaterand
simmer for 10 minutes to sterilize. Remove and
inverttodrainexcesswater.Whilejarsarestill
warm, fill with mint sauce and seal tightly.
Cranberry Sauce
235mlwater
230gsugar
340gfreshcranberries
1orange, peeled
1apple, peeled, cored and diced
1pear, peeled, cored and diced
230gchoppeddriedmixedfruit
2gsalt
2ggroundcinnamon
1g ground nutmeg
Boil water and sugar in a medium saucepan
until sugar dissolves. Reduce to simmer and
add all other ingredients.
Cover and simmer, stirring occasionally until
cranberries burst. Remove from heat and
let cool.
recipes

11
Cranberry Glaze
230gcranberrysauce
1large shallot
1redjalapenopepper,stemmedand
partly seeded
14gfreshlemonjuice
60mlfruityredwine
9 g ginger preserves
21g minced fresh rosemary
14 g olive oil
Hotpeppersaucetotaste
In your food processor, chop the shallot
with the chopping blade.
Using your food processor, puree all
ingredients in order mentioned. Pour into
amicrowave-safebowl.Microwaveon
high for 5 minutes. Glaze should be thick
and syrupy. If desire a thicker glaze, use
1minute increments in the microwave. If
desire a thinner glaze, more wine can be
added. Serve warm.
Honey, Lime and Ginger Glaze
5 cm piece fresh ginger root
85 g honey
28gdrysherry
1lime,coarselygratedzestandjuice
Salt
Ground black pepper
Cut ginger in two. Using your food
processor, finely grate one piece. Collect
gratingsandsqueezeoutjuiceintoabowl.
Cut the other half of the ginger into small
stripsandmixintogingerjuicealongwithall
of the other ingredients.
Place mixture in small pan and simmer
for3minutesuntilhalfofthemixturehas
evaporated. Let cool until mixture becomes
thick and syrupy. Brush over meat about 10
minutes before meat finishes cooking.
Prince of Wales Ketchup
½ litre elderberries
Vinegar
5 salt anchovies
45 ml shallots
5 ml cloves
5 ml ground mace
5 ml ground ginger
5 ml grated nutmeg
Place elderberries in dish and cover with
vinegar. Cook at 150° C until berries burst,
about 1½ hours. Let stand overnight, then
strainthroughajellybag.
Using your food processor, thinly slice
the shallots. Mix with elderberry vinegar
and add the remaining ingredients. Bring
to a boil. Reduce heat and simmer until
anchoviesbreakapart,around20minutes.
Let cool, strain and bottle with a tight cork.
Refrigeratefor2weeksbeforeopening.
Spinach Sauce
230gspinach
28goliveoil
115 g plain yogurt
Crushed garlic
Driedbasil
1handful of fresh parsley
1lemon
28gfetacheese
Using the chopping blade of your food
processor, chop the spinach and the parsley.
Juice the lemon.
Whirl spinach, olive oil, yogurt, garlic, basil,
parsley and lemon until desired consistency.
Water can be added to thin sauce if desired.
Pour over pasta and mix well. Crumble feta
cheese over dish and mix again.
recipes (continued)

12
Mornay Sauce
21g butter
21g flour
177 ml milk
85 g gruyere cheese
28gparmesancheese
.5 g grated nutmeg
1g cayenne pepper
1g salt
Usingtheprocessor’sgratingdisc,gratethe
gruyere and parmesan cheese and set aside.
Over low heat, melt butter then add flour
and cook 1to2minutes.Heatmilkand
add to flour mixture. Cook over medium
heat until thick. Mix in cheese, nutmeg,
pepper and salt.
Asian Marinade
120mlpeanutoil
60mlwhitewinevinegar
60mlsoysauce
60mllemonjuice
4 garlic cloves
8 cilantro sprigs
1red chilli pepper
Ginger
Using your food processor, mince the garlic
cloves. Then chop the ginger to obtain 9 g.
Add all ingredients and blend until well mixed.
Water can be added to thin the marinade, if
desired. Marinate meat overnight.
Roasted Eggplant Soup
1large eggplant
2redbellpeppers
2largetomatoes
43goliveoil
1onion
8 garlic cloves
5 g cumin
950 ml chicken stock
120 ml heavy cream
60gfreshbasil
Roast eggplant, peppers and tomatoes over
open flame until blackened. Remove skins.
From the peppers and tomatoes, remove
the seeds. Using your food processor, chop
eggplant, peppers and tomatoes. Set aside.
Using the food processor, chop the onion.
Set aside. Mince the garlic. Set aside. Thinly
slice the basil. Set aside.
In medium saucepan, heat oil on medium
then add onions and sauté until tender. Mix
in eggplant, tomatoes and peppers. Then
add the garlic, cumin and chicken stock.
Simmer for 45 minutes then stir in cream.
Pour mixture into your food processor and
puree until smooth. Season with salt and
garnish with the basil.
Fig and Honey Spread
700 g dried figs
300ghoney
3naveloranges,nelychoppedorground
360mlsweetredwine
3cinnamonstick
Finely chop the dried figs in the food
processor and add 130ghoney.Mixupto
15 seconds max.
Pour mixture into a saucepan and add
the remaining ingredients. Simmer, stirring
occasionally until the sauce becomes thick,
appearinglikejam.Coolandstoreina
refrigerator until needed.
Spread on bread, particularly challah or
toasted bagels.
recipes (continued)

13
europe guarantee
Please keep your receipt, as this will be required for any claims under this guarantee.
Thisapplianceisguaranteedfor3yearsafteryourpurchaseasdescribedinthisdocument.
The induction motor is guaranteed for 10 years after your purchase as described in this
document.
Duringthisguaranteedperiod,ifintheunlikelyeventtheappliancenolongerfunctionsdue
to a design or manufacturing fault, please take it back to the place of purchase, with your till
receipt and a copy of this guarantee.
The rights and benefits under this guarantee are additional to your statutory rights, which
arenotaffectedbythisguarantee.OnlyHolmesProducts(Europe)Ltd.(“Holmes”)hasthe
right to change these terms.
Holmesundertakeswithintheguaranteeperiodtorepairorreplacetheappliance,orany
part of appliance found to be not working properly free of charge provided that:
•YoupromptlynotifytheplaceofpurchaseorHolmesoftheproblem;and
•Theappliancehasnotbeenalteredinanywayorsubjectedtodamage,misuse,abuse,
repairoralterationbyapersonotherthanapersonauthorisedbyHolmes.
Faults that occur through, improper use, damage, abuse, use with incorrect voltage, acts of
nature,eventsbeyondthecontrolofHolmes,repairoralterationbyapersonotherthan
apersonauthorisedbyHolmesorfailuretofollowinstructionsforusearenotcovered
by this guarantee. Additionally, normal wear and tear, including, but not limited to, minor
discoloration and scratches are not covered by this guarantee.
The rights under this guarantee shall only apply to the original purchaser and shall not
extend to commercial or communal use.
Ifyourapplianceincludesacountry-specicguaranteeorwarrantyinsertpleaserefertothe
terms and conditions of such guarantee or warranty in place of this guarantee or contact
your local authorised dealer for more information.
WasteelectricalproductsshouldnotbedisposedofwithHouseholdwaste.Pleaserecycle
wherefacilitiesexist.E-mailusatenquir[email protected]forfurtherrecyclingand
WEEE information.
HolmesProducts(Europe)Limited
1Francis Grove
London
SW 194DT
UK

14
importantes mesures de précaution
Aumomentd’utiliserdesappareilsélectriques,ilestrecommandédeprendrecertaines
précautionsd’emploi,enparticulier:
•Liretouteslesinstructionsavantd’utiliservotrerobotculinaire“ ”.
•Vousassurerquelerobotculinaireestcomplètementassembléavantdel’utiliser.
L’appareilnesemettrapasenroutes’iln’estpascorrectementassemblé.
•Assurer-vousquelecouvercledubolestbienenplacependantusage.
•Pourévitertoutrisquedeblessure,nejamaismettrelalamecouteausurleblocmoteur
sansd’abordavoirmislebolenplace.
•Lalamecouteauetlesdisqueséminceurssontcoupants.Manipuleravecsoinpouréviter
tout risque de blessure.
•Nejamaispousserlesalimentsdansletubed’alimentationaveclamain;toujoursutiliser
le poussoir.
•Nepasutiliserl’appareildemanièrecontinuepourplusde3minutes.
•Toujoursutiliserlerobotculinairesurunesurfacesècheetplane.
•Pouréviterd’endommagerl’appareil,nepasleleverparlapoignée.
•Nepasutiliserlerobotculinairesiunouplusieursélémentssontcassés.
•Sil’appareilestutiliséd’unefaçondifférenteàcelleindiquéedanscemoded’emploi,cela
peut entraîner des dommages et blessures.
•L’utilisationd’accessoiresnonrecommandésouvendusparlefabricantpeutentraîner
électrocution ou blessure.
•Evitertoutcontactaveclesélémentsenmouvement.Gardermainsetustensilesloindes
lamesenmouvementoudesdisquespendantusageand’évitertoutrisquedeblessure
gravesoudedommagesàl’appareil.Vouspouvezutiliserunespatulemaisseulement
lorsquelerobotculinaireestàl’arrêt.
•Débrancherl’appareillorsqu’iln’estpasenfonctionnement,avantdelenettoyeretavant
de le désassembler ou de retirer les accessoires.
•Eteindreetdébrancherl’appareilavantdechangerlesaccessoiresoudes’approcherdes
éléments en mouvement.
•Pourévitertoutrisqued’électrocution,nepasplongerlelélectriqueouleblocmoteur
dansdel’eauoutoutautreliquide.
•Nepasutiliserl’appareilsilelélectrique,lapriseoul’appareilestendommagéous’il
esttombé.Faites-levérierouréparerauCentreAgréédeServiceAprès-venteleplus
proche de chez vous.
•Nepaslaisserleld’alimentationdépasserdubordd’unetable,d’unplandetravailou
êtreencontactavecdessurfaceschaudes.
•Nepasplacercetappareilsurouàcotéd’uneplaqueàgazouélectriquechaudeou
toute surface en contact avec un four en marche.
•Lemoteurcontientunfusiblequiprotégecontrelasurchauffeaprèsunusagecontinu
prolongé.Silemoteurs’éteint,arrêterl’appareil“ ” et débrancher. Une fois le robot
culinairerefroidi,lebrancherànouveauetcontinueràutilisernormalement.

15
•Toujourséteindrelerobotculinaire“ ” avant de le débrancher.
•Assurez-vousdetournerleboutondel’appareilsurlapositionarrêt“ ” aprèschaque
utilisation.
•Nepasutiliserl’appareilpourtoutautreusagequeceluipourlequelilaétéconçu.
•Nepasutiliseràl’extérieur.
•Lesenfantsdoiventêtresurveillésanqu’ilsnepuissentpasjoueraveccetappareil.
•Cetappareiln’estpasdestinéaêtreutilisépardespersonnes(ycomprisdesenfants
dont les capacités physiques, sensorielles ou mentales sont diminuées, ou qui ne disposent
pasdesconnaissancesoudel’expériencenécessaire,àmoinsqu’ellesn’aientétéformées
etencadréespourl’utilisationdecetappareilparunepersonneresponsabledeleur
sécurité.
CET APPAREIL EST CONCU SEULEMENT POUR UN USAGE DOMESTIQUE.
CONSERVER CES INSTRUCTIONS
instructionspourleld’alimentation
Veuillez suivre les instructions suivantes pour assurer un usage en toute sécurité du fil
électrique.
•Nepasutiliserderallongeaveccetappareil.
•Nepastirersur,entortillerouabuserduld’alimentation.
Sileld’alimentationestendommagé,ildoitêtreremplacéparlefabricant,leCentreAgréé
deServiceAprès-venteoutoutepersonnequaliéepourévitertoutrisque.
symboles importants
“Lirelesinstructions”situésurouàcôtédutubed’alimentation
“Marche”
“Arrêt”
“Fonction “impulsion”
“Fermeture”
“Ouverture”
“Flèched’Alignement”
“Verrouillageducouvercledutubed’alimentation”

16
1
2
4
6
5
10
8
7
12
11
39
13
14
16
15
17
descriptiondel’appareil
1. Poussoir
2.Couvercle
3. Tubed’AlimentationUltraLarge
4. Bloc Moteur
5. VoyantdeMarche(Ambre)
6. BoutondeMarche“”/Arrêt“”
7. ()FonctionImpulsion
8. Tiroir de Rangement
9. Couvert
10. Symbole “Lire les Instructions”
11.Bolde3litres
12.Axed’Entraînement
13.LameCouteau
14. DisqueEminceur2mm/4mm
15. Spatule
16.Manche
17.DisqueRâpe/Eminceur

17
moded’emploi
AVANTD’UTILISERVOTREROBOTCULINAIRE
Suivrelesinstructionsd’assemblageci-dessousavantd’utiliservotrerobotculinaireVillaware™:
ASSUREZ-VOUS QUE LE CORDON D’ALIMENTATION EST DEBRANCHE.
LA LAME COUTEAU ET LES DISQUES SONTTRES COUPANTS. SOYEZ PRUDENT
AU MOMENT DE LES MANIPULER.
•Avantd’assembler
votre robot culinaire
assurez-vousqu’ilest
biendébranchéetqu’il
se trouve sur une surface
sècheetplane.Placer
le bol sans le couvercle
surl’axed’entraînement.
(Schéma1)
•Sivousallezutiliserl’un
desdisques,placez-le
sur le manche au dessus
del’axed’entraînement
(Schéma4a).Puisplacer
le disque sur le manche
enplaçantlecôtéque
vous avez choisi sur le
dessus(trancher,émincer
ourâper)(Schéma4b).
•Attacherlecouverclesur
leboldetellemanière
queletubed’alimentation
se trouve sur le devant du
bol, au dessus de bouton
demarche/arrêt(Schéma
5).Tournerdanslesens
inversedesaiguillesd’une
montrejusqu’àcequela
èchesurlecouverclesoit
alignée avec le symbole de
verrouillage du couvercle
“”.
•Fairetournerleboljusqu’à
cequ’ilsoitbienplacé
sur le bloc moteur. Saisir
la poignée et tourner le
bol dans le sens inverse
desaiguillesd’unemontre
jusqu’àcequ’ilverrouille
enplace(Schéma2).La
poignée se trouvera alors
faceàvousetalignéeavec
leboutondemarche/arrêt.
Assurez-vousquelaèche
sur le bloc moteur est en
alignement avec le symbole
de verrouillage “ ”.
•Sivousallezutiliserla
lame couteau, la placer
audessusdel’axe
d’entraînementettourner
légèrementjusqu’àce
qu’ellesoitenplace
(Schéma3).
LES LAMES ET LES
DISQUES SONT
COUPANTS. LES
UTILISER AVEC
PRECAUTION.
Schéma 4a
Schéma 1Schéma 2 Schéma 3
Schéma 5 Schéma 6
•Pousserlecouvercle
dupoussoirjusqu’àce
qu’ils’enclenche,cequi
indique que le couvercle
et bien verrouillé en
place.
Schéma 4b
REMARQUE: Chaquefoisquevousassemblezvotrerobotculinaire,assurez-vousde
mettre le bol en premier et de le verrouiller en place. Puis mettre le couvercle.

18
instructionsd’utilisation
1.Votrerobotculinairepossèdeuntubed’alimentationultralargecequivouspermetd’y
faire entrer la plupart des légumes tels que petits oignons et pommes de terre sans avoir
àlescouperpréalablementenmorceauxpluspetits.
2.Préparervoslégumesenleslavantd’abordsoigneusementetlespelerpourretirerla
peau si nécessaire.
3.Assurez-vousquelerobotculinaireetsesaccessoiressontpropres,suivrelesinstructions
quisetrouventauxchapitresintitulés“nettoyage”et“entretien”dumoded’emploi.
4.Assurez-vousquelerobotculinaireestcorrectementassemblé.Veuillezsuivreles
instructionsduchapitreintitulé“AVANTD’UTILISERVOTREROBOTCULINAIRE”.
Avantdefermerlecouvercledutubed’alimentation,lesalimentspeuventêtreplacésà
l’intérieurdutubesivousutilisezundisque.
5.Brancherlecordond’alimentationsurlaprisemuraleetmettrel’appareilenmarcheen
choisissant la fonction “ ”ou Impulsion “ ”Lecouvercledoitêtreverrouillépourque
l’appareilsemetteenmarche.
6.Unefoisquelerobotculinaireestenmarche,mettrelesalimentsdansletube
d’alimentationetutiliserlepoussoirpourlespousserlentementàl’intérieur.
7.Sivoustournerlepoussoir,ilpeutêtreverrouilléenpositiondetellemanièrequeles
élémentsagissentcommeuneseulepiècepourpousserlesalimentsàl’intérieur.Sile
poussoirresteséparé,ilpeutalorsêtreretirépendantquel’appareilestenmarchepour
ajouterdesliquidesoudesalimentspluspetits.
ATTENTION: NEJAMIASUTILISERLESMAINSOULESDOIGTSPOURPOUSSERLES
ALIMENTSAL’INTERIEURDUTUBED’ALIMENTATIONOUPOURLENETTOYER.TOUJOURS
UTILISERLEPOUSSOIRQUIVOUSESTFOURNI.
LES LAMES ET DISQUES SONT EXTREMEMENTTRANCHANTS, LES UTILISER
AVEC PRECAUTION.
ATTENTION: Ne pas utiliser de manière continue pendant plus de 3 minutes.
UTILISATION DE LA LAME A DECOUPER:
1.Placerlalameàdécoupersurl’axed’entraînement,lefairetournerunpeujusqu’àcequ’iltombe
en place.
2.Attacherlecouvercleduboldetellemanièrequeletubed’alimentationsetrouvesurledevant
dubol(audessusdeboutondemarche/arrêt).Tournerdanslesensinversedesaiguillesd’une
montrejusqu’àcequelecouverclesoitbienenplace.Letubed’alimentationsetrouveraalors
directementau-dessusetalignéaveclapoignée.Poussersurlecouvercledupoussoirjusqu’àce
qu’ilverrouilleenplace.
3.Brancherlecordond’alimentationsurlapriseélectrique.
4. Mettre en marche en choisissant la fonction“ ”ouIMPULSION( ).

19
UTILISATION DES DISQUES A COUPER/EMINCER/RAPER:
1.Placerlemanchesurl’axed’entraînementenlefaisanttournerlégèrementjusqu’àcequ’ilsoit
en place.
2.Choisirledisqueàutiliserenfonctiondelarecetteoudevotregoût.
3.Insérerledisquesurlemancheaveclalamedevotrechoixsurledessus,lesdisquessont
réversibles.
4.Attacherlecouverclesurleboldetellemanièrequeletubed’alimentationsetrouvesurla
gauche du bol.
5.Tournerdanslesensdesaiguillesd’unemontrejusqu’àcequelecouvercleseverrouilleen
place.
6.Placerlesalimentsdansletubed’alimentationavantdemettrelerobotenmarche.Toujours
utiliserlepoussoirpourétalerdemanièreplusuniformelesalimentsàcouperouémincer.
7.Laisserlepoussoirdansletubed’alimentationetmettreenmarche“ ”. Maintenir le poussoir
d’unemainetletubed’alimentationdel’autre,pousserdoucementlesalimentsverslebas.
Unefoisterminé,appuyersurleboutond’arrêt“ ”avantd’ouvrirlecouvercle.
FONCTION DE REMISE A JOUR:
1.Lemoteurcontientunfusiblequel’onpeutremettreàjouretquiprotégecontrela
surchauffe.
2.Sil’appareils’arrêteaprèsuneutilisationprolongée,arrêterl’appareilentournantsurlaposition
“ ” et débrancher.
3.Attendre5-10 minutes, le temps que le robot culinaire se refroidisse.
4.Brancherlerobotsurlaprisemuraleetcontinuerl’utilisationnormalement.
5.Silerobotnefonctionnetoujourspasaprèsavoirsuivilesindicationsci-dessus,répéter
l’opérationetattendreplusde10minutesavantd’utiliserl’appareilànouveau.
Table of contents
Languages:
Other Villaware Food Processor manuals