manuals.online logo
Brands
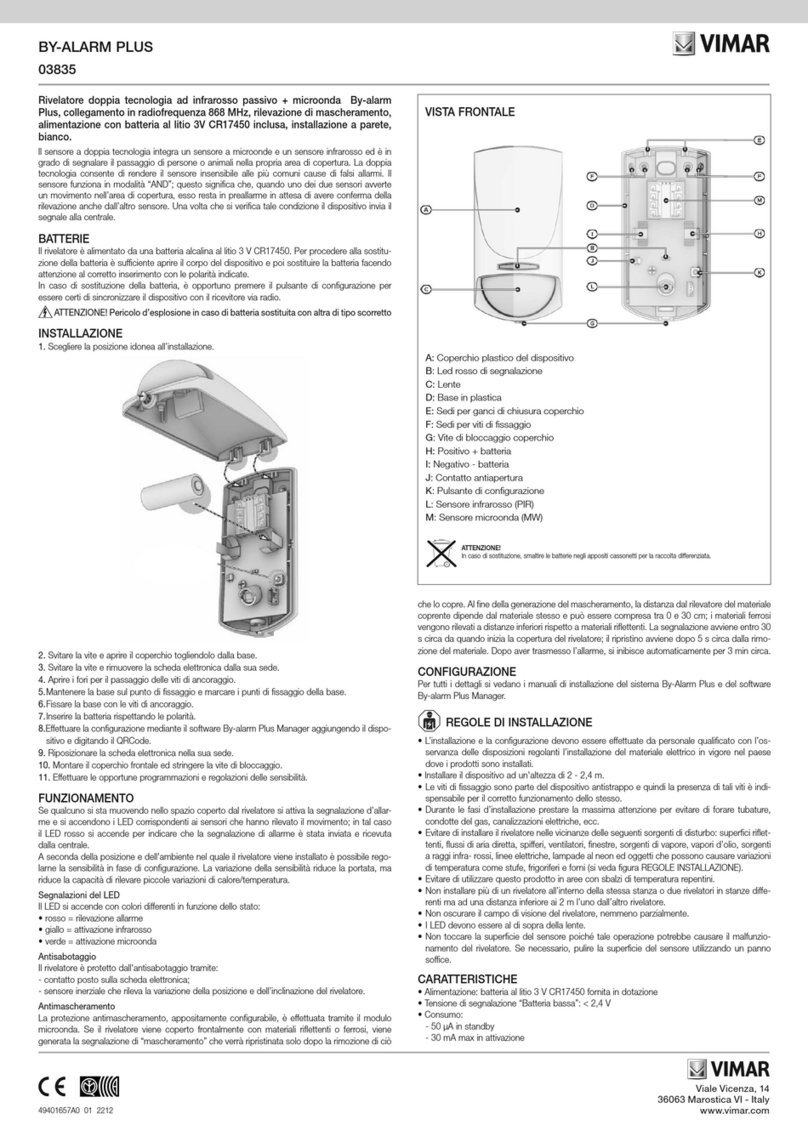
  1. Home
  2. •
  3. Brands
  4. •
  5. Vimar
  6. •
  7. Security Sensor
  8. •
  9. Vimar NEVE UP 09595.0.120 User manual

Vimar NEVE UP 09595.0.120 User manual

Viale Vicenza, 14
36063 Marostica VI - Italy
www.vimar.com
49401881A0 01 2307
NEVE UP
09595.0.120
Scarica dagli store l’app View Wireless sul tablet/smartphone che userai per la configurazione • Download the View Wireless App from the stores onto the tablet/smartphone you will
be using for configuration • Téléchargez depuis les stores l’appli View Wireless sur la tablette/le smartphone que vous utiliserez pour la configuration • Descargue la aplicación View
Wireless en la tablet o el smartphone que vaya a utilizar para la configuración • Laden Sie die App View Wireless aus den Stores auf das für die Konfiguration verwendete Tablet/
Smartphone
•
Εκτελέστε λήψη από τα store της εφαρμογής View Wireless στο tablet/smartphone που θα χρησιμοποιήσετε για τη διαμόρφωση
  /   View Wireless  
A seconda della modalità che scegli ti servirà • Depending on the mode you select, you will need • Selon le mode choisi, prévoir • Según el modo elegido, se precisa • Entsprechend des gewählten
Modus benötigen Sie • Ανάλογα με τον τρόπο λειτουργίας που θα επιλέξετε θα χρειαστείτε τα εξής •
Gateway • Gateway • Passerelle • Gateway
Gateway • Gateway •
Art.
•
Κωδ.
•
09597
Gateway Zigbee (Amazon Echo Plus, Echo Show o Echo Studio)
App Alexa
Zigbee Gateway (Amazon Echo Plus, Echo Show or Echo Studio)
Alexa App
Passerelle Zigbee (Amazon Echo Plus, Echo Show ou Echo Studio)
Appli Alexa
Gateway Zigbee (Amazon Echo Plus, Echo Show o Echo Studio)
Aplicación Alexa
ZigBee-Gateway (Amazon Echo Plus, Echo Show oder Echo Studio)
App Alexa
Gateway Zigbee (Amazon Echo Plus, Echo Show ή Echo Studio)
Εφαρμογή Alexa
Zigbee Gateway (Amazon Echo Plus, Echo Show or Echo Studio)
Alexa App
App View per la gestione da smartphone/tablet
View App for management via smartphone/tablet
App View pour la gestion via smartphone/tablette
Aplicación View para el control por smartphone/tablet
App View für die Verwaltung über Smartphone/Tablet
Εφαρμογή View για διαχείριση από smartphone/tablet
Assistenti vocali Alexa, Google Assistant, Siri, Homekit per l’eventuale comando voce
Alexa, Google Assistant, Siri and Homekit voice assistants for possible voice operation
Assistants vocaux Alexa, Google Assistant, Siri, Homekit éventuellement pour la commande vocale
Asistentes de voz Alexa, Google Assistant, Siri, Homekit para el posible comando de voz
Sprachassistenten Alexa, Google Assistant, Siri, Homekit zur Sprachsteuerung
Αφηγητές Alexa, Google Assistant, Siri, Homekit για πιθανή φωνητική εντολή
Gateway  

/  App View
    Homekit Siri Google Assistant Alexa   
DUE MODALITA’ DI FUNZIONAMENTO (ALTERNATIVE TRA LORO) • TWO OPERATING MODES (ALTERNATIVE) • DEUX MODES DE FONCTIONNEMENT
(ALTERNATIFS ENTRE EUX) • DOS MODOS DE FUNCIONAMIENTO (ALTERNATIVOS) • ZWEI (ALTERNATIVE) BETRIEBSARTEN •ΔΥΟ ΤΡΟΠΟΙ ΛΕΙΤΟΥΡΓΙΑΣ
(ΕΝΑΛΛΑΣΣΟΜΕΝΟΙ) •
oppure • or • ou •o •oder • ή•
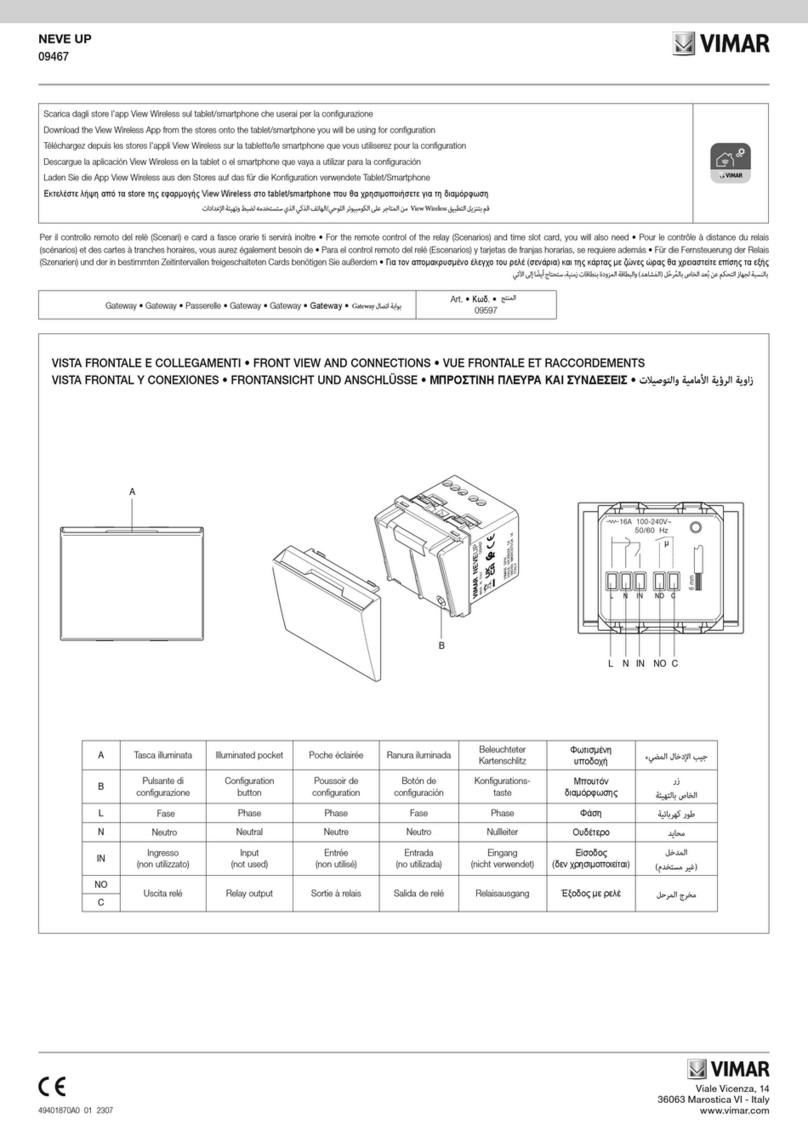
VISTA FRONTALE E POSTERIORE •FRONT AND REAR VIEW • VUES DE FACE ET ARRIÈRE • VISTA FRONTAL Y TRASERA
FRONT- UND RÜCKANSICHT • ΜΠΡΟΣΤΙΝΗ ΚΑΙ ΠΙΣΩ ΠΛΕΥΡΑ •  
A: Touche
B: LED
C: Sortie EN-BAS
: Sortie EN-HAUT
P: Input for wired push button for
scenario recalling
A: Tecla
B: LED
C: Salida BAJAR
: Salida SUBIR
P: Entrada para pulsador cableado
para activación de escenario
A: Taste
B: LED
C: Ausgang AB
: Ausgang AUF
P: Eingang für verkabelte Taste
zum Szenarienabruf
A: Πλήκτρο
B: Λυχνία LED
C: Έξοδος ΚΑΤΩ
: Έξοδος ΠΑΝΩ
P: Είσοδος για ενσύρματο πλή-
κτρο για ανάκληση σεναρίου
A: Tasto SU
B: LED
C: Tasto GIU’
: Collegamento del carico
P:Ingresso per pulsante filare per
richiamo scenario o controllo
dispositivo
A: UP Button
B: LED
C: DOWN Button
: UP output
P: Input for wired push button for
scenario recalling
 :A
LED  :B
  :C
  :
      :P


(  )  
A
B
C
N
P
L
6 mm
P N L
20-200W
120V~ 60Hz
Viale Vicenza, 14
36063 Marostica VI - Italy
www.vimar.com
49401881A0 01 2307
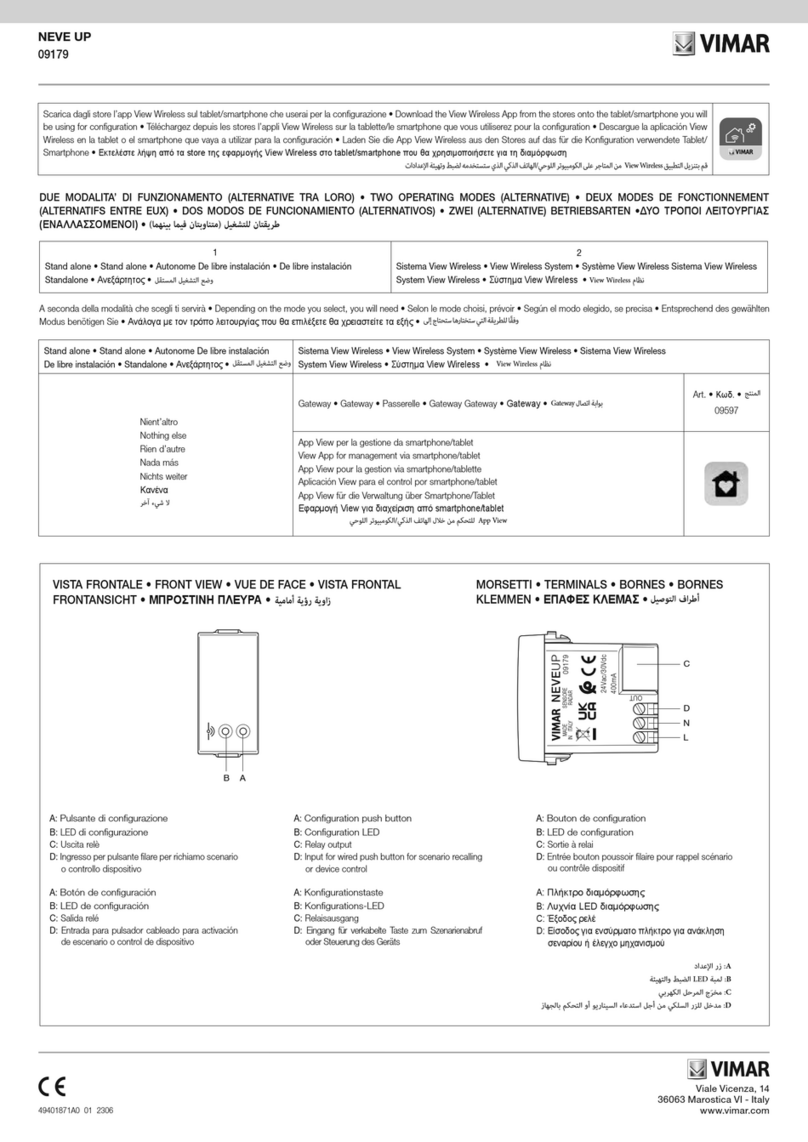
COLLEGAMENTI • CONNECTIONS •BRANCHEMENTS • CONEXIONES • ANSCHLÜSSE • ΣΥΝΔΕΣΕΙΣ •
* Non utilizzare l’unità di segnalazione 00931 •* Do not use the signalling unit 00931 •* Ne pas utiliser l’unité de signalisation 00931 •* No utilice la unidad de señalización 00931
* Signaleinheit 00931 nicht verwenden •* Μη χρησιμοποιείτε τη μονάδα σήμανσης 00931 •00931     *
Carichi comandabili • Controllable loads
Charges pilotables • Cargas controlables
Regelbare Lasten • Ελεγχόμενα φορτία LE TE
20 - 200 W 20 - 200 W
2 - 100 W
(max 10 lampade) • (max 10 lamps) • (max 10 lampes)
(máx. 10 lámparas) • (max. 10 Lampen) • (10 λαμπτήρες το μέγ.)
2 - 200 W
(max 20 lampade) • (max 20 lamps) • (max 20 lampes)
(máx. 20 lámparas) • (max. 20 Lampen) • (20 λαμπτήρες το μέγ.)
20 - 100 W
(max 3 trasformatori di tipo
L
) • (max 3
L
type transformers)
(max 3 transformateurs type
L
) • (máx. 3 transformadores de tipo
L
)
(max. 3
L
Transformatoren) • (3 μετασχηματιστές το μέγ. τύπου
L
)
20 - 200 W
(max 5 trasformatori di tipo
C
) • (Max 5 transformers type
C
)
(max 5 transformateurs type
C
) • (máx. 5 transformadores de tipo
C
)
(max. 5 Transformatoren Typ
C
) • (5 μετασχηματιστές το μέγ. τύπου
C
)
•IMPORTANTE: Le lampade comandabili da un singolo dimmer devono essere tutte uguali. Tutti i carichi comandati devono essere dichiarati DIMMERABILI dal costruttore. Verificare
sulla confezione delle lampade la tipologia di dimmeraggio compatibile: LE (Leading Edge) o TE (Trailing Edge). Nel caso in cui non sia indicato, la lampada può funzionare in entrambe
le modalità ed è a discrezione dell’installatore scegliere la tipologia di dimmerazione che garantisce il miglior funzionamento della lampada
• IMPORTANT: Lamps controllable from a single dimmer must all be the same. All controllable loads must be declared DIMMERABLE by the manufacturer. Check the type of compatible
dimmering on the lamp package: LE (Leading Edge) or TE (Trailing Edge). Where not specified, the lamp works in both modes, at the discretion of the installer; choose the type of
dimmering that ensures the best lamp
•IMPORTANT Toutes les lampes commandées par un même variateur doivent être identiques. Toutes les charges commandées doivent être certifiées À INTENSITÉ VARIABLE par le
fabricant. Vérifier le type de gradation compatible sur l’emballage des lampes: LE (Leading Edge) ou TE (Trailing Edge). Sans indication particulière, la lampe peut fonctionner dans les
deux modes de gradation et l’installateur choisit celui qui permet le meilleur fonctionnement.
•IMPORTANTE: Las lámparas gobernables por un único variador deben ser todas iguales. Todas las cargas gobernadas deben ser declaradas REGULABLES CON VARIADOR por el fabri-
cante. Comprobar el tipo de variación compatible en el envase de las lámparas: LE (leading edge) o TE (trailing edge). En el caso de que no esté indicado, la lámpara puede funcionar
en ambas modalidades y queda a discreción del instalador seleccionar el tipo de variación que garantiza el mejor funcionamiento de la lámpara
•WICHTIG: Von einem einzelnen Regler können nur gleiche Lampen geregelt werden. Alle geregelten Lampen müssen vom Hersteller als DIMMBAR gekennzeichnet sein. Auf der Packung
der Lampen die Art der kompatiblen Dimmung prüfen: LE (Leading Edge) oder TE (Trailing Edge). Wenn nichts angegeben ist, funktioniert die Lampe sowohl als Phasenanschnitt- als
auch als Phasenabschnitt-Dimmer, und es ist Aufgabe des Installationstechnikers, die Dimmerart zu wählen, die den besten Betrieb der Lampe garantiert
• ΣΗΜΑΝΤΙΚΟ: Οι ελεγχόμενοι λαμπτήρες από έναν μεμονωμένο ρυθμιστή πρέπει να είναι ίδιοι. Όλα τα ελεγχόμενα φορτία πρέπει να έχουν δυνατότητα DIMMER σύμφωνα με τις
προδιαγραφές του κατασκευαστή. Ελέγξτε στη συσκευασία των λαμπτήρων τη συμβατή τυπολογία ρύθμισης dimmer: LE (Leading Edge, ανερχόμενη παρυφή) ή TE (Trailing Edge,
κατερχόμενη παρυφή). Εάν δεν αναφέρεται, ο λαμπτήρας μπορεί να χρησιμοποιηθεί και στους δύο τρόπους λειτουργίας. Ο τεχνικός εγκατάστασης μπορεί να επιλέξει την τυπολογία της
ρύθμισης dimmer που διασφαλίζει τη βέλτιστη λειτουργία του λαμπτήρα.
N.B Il dispositivo effettua anche la dimmerazione di strisce a led a condizione che siano pilotate da alimentatori per LED, dichiarati dimmerabili e compatibili con il controllo LE/TE dal costruttore •N.B
The device also performs dimming on LED strips provided that they are operated by power supply units for LED, declared dimmable and compatible with LE/TE control by the manufacturer •N.B Le
dispositif réalise également la gradation de bandes à leds, à condition qu’elles soient pilotées par des alimentations pour LED, déclarées réglables et compatibles avec le contrôle LE/TE de la part du
fabricant •NOTA: El dispositivo realiza también la regulación por variador de tiras de LED siempre que cuenten con alimentadores para LEDs, declarados regulables y compatibles con el control LE/TE
del fabricante •ANM. Das Gerät dimmt auch LED-Streifen, vorausgesetzt, dass diese durch Netzteile für LED angesteuert werden, vom Hersteller als dimmbar angegeben und mit der Regelung LE/TE
kom
patibel sein
•
ΣΗΜ. Ο μηχανισμός πραγματοποιεί επίσης ρύθμιση dimmer για τις ταινίες led εφόσον ελέγχονται από τροφοδοτικά για λυχνίες LED, για τα οποία υπάρχει δυνατότητα dimmer
και τα οποία είναι συμβατά με έλεγχο LE/TE από τον κατασκευαστή
•
COMANDO CONNESSO
CONNECTED CONTROL
COMMANDE CONNECTÉE
MANDO CONECTADO
VERNETZTER SCHALTER
COMANDO CONNESSO
COMANDO CONNESSO
  
.LE/TE                          
   :
      .( ) TE  ( ) LE :        .              .           : •
.                  
PULSANTE* PER COMANDO SCENARIO O
CONTROLLO DISPOSITIVO
PUSH BUTTON* FOR SCENARIO CONTROL OR
DEVICE CONTROL
POUSSOIR* POUR COMMANDE SCÉNARIO OU
CONTRÔLE DISPOSITIF
PULSADOR* PARA CONTROL DE ESCENARIO O
CONTROL DE DISPOSITIVO
TASTE * FÜR SZENARIO- ODER GERÄTE-
STEUERUNG
ΠΛΗΚΤΡΟ* ΓΙΑ ΕΛΕΓΧΟ ΣΕΝΑΡΙΟΥ Ή ΕΛΕΓΧΟ
ΜΗΧΑΝΙΣΜΟΥ
      *
    
( 10  ) ( 20  )
(
L
   3  ) (
C
   5  )
09008 0959109595.0.120
6 mm
P N L
20-200W
120V~ 60Hz
L 1
PAT.PEND.
10/250~
L
N
Viale Vicenza, 14
36063 Marostica VI - Italy
www.vimar.com
49401881A0 01 2307
CARATTERISTICHE • FEATURES • CARACTÉRISTIQUES • CARACTERÍSTICAS • MERKMALE • ΧΑΡΑΚΤΗΡΙΣΤΙΚΑ • 
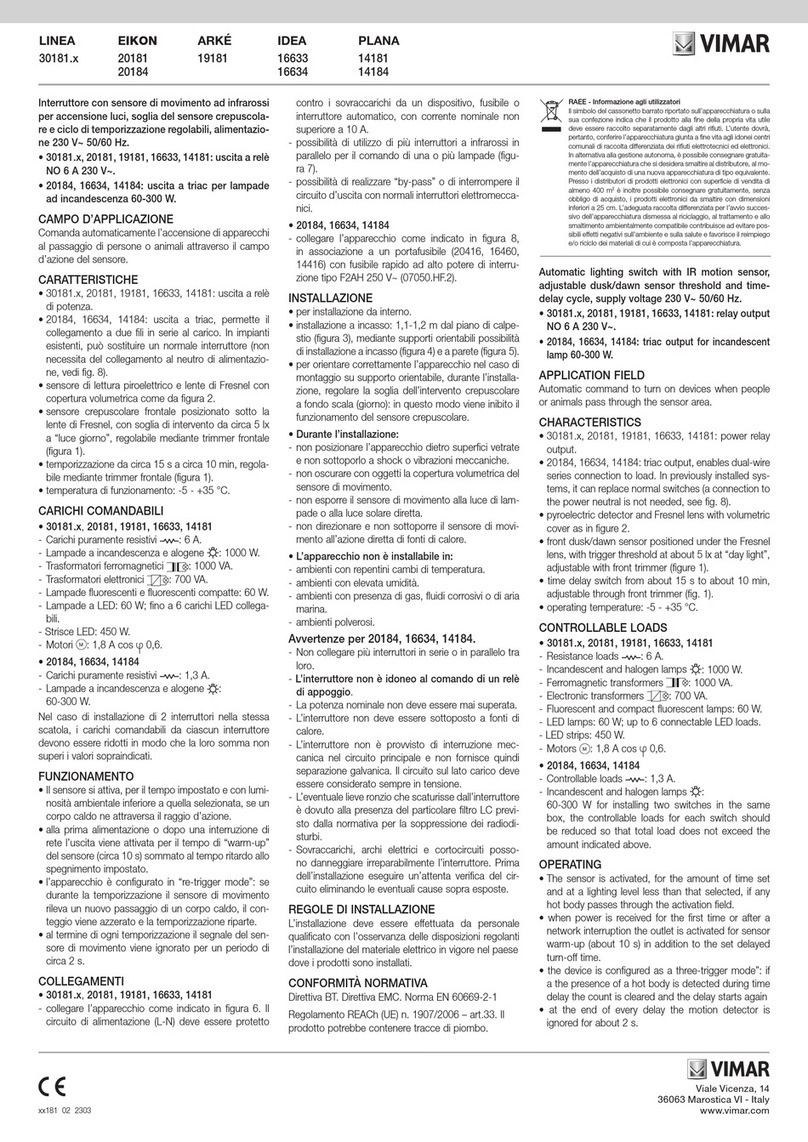
Tensione nominale di alimentazione • Rated supply voltage • Tension nominale d’alimentation • Tensión nominal de alimentación • Nennversorgungsspannung
Ονομαστική τάση τροφοδοσίας •
120 V~, 60 Hz
Potenza RF trasmessa • RF transmission power • Puissance RF transmise • Potencia RF transmitida • Übertragene Funkleistung • Μεταδιδόμενη ισχύς RF < 100mW (20dBm)
Range di frequenza • Frequency range • Gamme de fréquence • Rango de frecuencia • Frequenzbereich • Εύρος συχνότητας • 2400-2483.5 MHz
   
 60 ~ 120
(dBm 20)  100>
  2483,5-2400
   
 
MORSETTI • TERMINALS • BORNES • BORNES • KLEMMEN • ΕΠΑΦΕΣ ΚΛΕΜΑΣ •
2 (L,N) per linea e neutro • 2 (L, N) for line and neutral • 2 (L, N) de ligne et neutre • 2 (L, N) para línea y neutro • 2 (L, N) für Leitung und Nullleiter • 2 (L, N) για γραμμή και ουδέτερο
1 morsetto (P) per il collegamento al comando filare remoto (ad esempio art. 09008). La distanza max tra dispositivo IoT e pulsante è pari a 50 m con cavo di sezione minima 1,5 mm2•1 ter-
minal (P) for connection to the remote wired control (for instance art. 09008). The max distance between the IoT device and the push button is 50 m with a cable with a minimum cross-section
of 1.5 mm2• 1 borne (P) pour la connexion à la commande filaire à distance (par exemple art. 09008). La distance maximale entre un dispositif IoT et le poussoir correspond à 50 m, avec un
câble d’une section minimum de 1,5 mm2•1 borne (P) para la conexión al mando cableado remoto (por ejemplo, art. 09008). La distancia máxima entre dispositivo IoT y pulsador es de 50 m
con cable de sección mínima de 1,5 mm2•1 Klemme (P) für den Anschluss an den entfernten verkabelten Schalter (zum Beispiel Art. 09008). Der maximale Abstand zwischen IoT-Gerät und
Taste beträgt 50 m bei Kabel mit Mindestquerschnitt 1,5 mm2•1 επαφή κλέμας (P) για σύνδεση στον ενσύρματο απομακρυσμένο διακόπτη (για παράδειγμα, κωδ. 09008). Η μέγ. απόσταση μεταξύ
του μηχανισμού IoT και του πλήκτρου είναι 50 m με καλώδιο ελάχιστης διατομής 1,5 mm
2 .
1 morsetto per uscita regolata • 1 terminal for dimmed output • 1 borne pour sortie réglée • 1 borne para salida regulada • 1 Klemme für den geregelten Ausgang • 1 επαφή κλέμας για ρυθμι-
ζόμενη έξοδο •
  
   (N  L) 2
.2 1,5        50   IoT     .(09008    )       (P)   1
COLLEGAMENTI •
CONNECTIONS
•
RACCORDEMENTS
•
CONEXIONES
•
EIGENSCHAFTEN
•
ΧΑΡΑΚΤΗΡΙΣΤΙΚΑ
•
Comando e dimmerazione mediante pulsanti incorporati o da più punti con pulsanti NO in parallelo. Non utilizzare pulsanti NO con spia luminosa. ATTENZIONE: Il PULSANTE ON/OFF VA COLLE-
GATO AL CONDUTTORE DI NEUTRO •Control and dimmering with built-in button or more points with NO buttons in parallel. Do not use NO buttons with pilot light. NOTE: THE ON/OFF BUTTON
IS CONNECTED TO THE CABLE NEUTRAL •Commande et réglage par bouton intégré ou multipoints par boutons NO en parallèle. Ne pas utiliser de bouton NO à témoin lumineux. REMARQUE:
LE BOUTON ON/OFF EST RELIÉ AU NEUTRE CABLE • Mando y regulación mediante pulsador incorporado o, desde varios puntos, con pulsadores NA en paralelo. No utilizar pulsadores NA
con testigo luminoso. NOTA: EL BOTÓN ON/OFF SE CONECTA AL CABLE NEUTRO •Bedienung und Regeln über eingebaute Drucktaste oder von mehreren Stellen mit parallelgeschalteten
Schließtasten. Keine Schließtasten mit Kontrollleuchte verwenden. HINWEIS: DIE ON/OFF-TASTE WIRD AN DEN CABLE NEUTRAL VERBUNDEN • Ελεγχος μέσω ενσωματωμένων πλήκτρων
ή από πολλά σημεία με παράλληλα πλήκτρα no. μη χρησιμοποιείτε πλήκτρα no με ενδεικτική λυχνία. ΣΗΜΕΙΩΣΗ: ΤΟ ΚΟΥΜΠΙ ON / OFF ΕΧΕΙ ΣΥΝΔΕΘΕΙ ΜΕ ΤΟ ΚΑΛΩΔΙΟ NEUTRAL
    1

.   /    : .        .               
Spingere i conduttori di collegamento sul fondo della scatola onde evitare che vadano a toccare il corpo del dimmer.
Press the connection conductors to the bottom of the box to prevent them from coming into contact with the dimmer body.
Pousser les connecteurs de liaison au fond du boîtier pour qu’ils ne touchent pas le corps du variateur.
Colocar los conductores de conexión al fondo de la caja para evitar que toquen el cuerpo del regulador
Die Anschlussleiter auf den Boden des Gehäuses schieben, damit sie nicht den Reglerkörper berühren können.
Πιέστε τους αγωγούς σύνδεσης στο κάτω μέρος του κουτιού, ώστε να αποφευχθεί η επαφή των αγωγών με το σώμα του ρυθμιστή.
.         
REGOLE DI INSTALLAZIONE •INSTALLATION RULES •CONSIGNES D’INSTALLATION • NORMAS DE INSTALACIÓN
INSTALLATIONSVORSCHRIFTEN • ΚΑΝΟΝΙΣΜΟΙ ΕΓΚΑΤΑΣΤΑΣΗΣ •
• L’apparecchio deve essere completato con tasti intercambiabili ed installato in scatole da incasso o da parete con supporti e placche Neve Up. Il circuito di alimentazione dell’uscita a relè deve essere
protetto contro i sovraccarichi da un dispositivo, fusibile o interruttore automatico, con corrente nominale non superiore a 10 A. L’installazione deve essere eseguita con impianto spento. Installare i
tasti sul meccanismo deviatore prima di alimentare l’impianto. Il dimmer non è provvisto di interruzione meccanica nel circuito principale e non fornisce quindi separazione galvanica. Il circuito sul
lato carico deve essere considerato sempre in tensione. Va utilizzato in luoghi asciutti e non polverosi ad una temperatura compresa tra 0 °C e +35 °C. Nel caso di installazione di 2 regolatori nella
stessa scatola, i carichi comandabili da ciascun regolatore devono essere ridotti in modo che la loro somma non superi la potenza massima comandabile di un singolo dispositivo.
• The device must be completed with interchangeable buttons and installed in flush mounting boxes or surface mounting boxes with Neve Up mounting frames and cover plates.The relay output power
circuit must be protected against overloads by installing a device, fuse or automatic 1-way switch, with a rated current not exceeding 10 A. Installation must be carried out with the system switched
off. Install the buttons onto the switch mechanism before powering up the system. The dimmer does not have a mechanical 1-way switch in the main circuit and so is not galvanically separated.
The circuit load should be considered always powered. It should be used in dry, dust-free places at a temperature between 0 °C and +35 °C. If installing 2 dimmers in a single box, the loads that
can be controlled by each dimmer must be reduced so that their total does not exceed the maximum power that can be controlled by a single device.
• L’appareil doit être complété avec des touches interchangeables et installé dans des boîtes d’encastrement ou en saillie, avec des supports et des plaques Neve Up. Le circuit d’alimentation de la
sortie à relais doit être protégé contre les surcharges par un dispositif, fusible ou interrupteur automatique, avec courant nominal inférieur ou égal à 10 A. Procéder à l’installation après avoir mis le
circuit hors tension. Installer les touches sur le mécanisme déviateur avant de mettre le circuit sous tension. Le variateur est dépourvu de coupure mécanique sur le circuit principal et n’assure
pas l’isolation galvanique du dispositif. Le circuit côté charge doit être considéré comme étant toujours sous tension. Utiliser dans des locaux secs non poussiéreux à une température comprise entre
0° C et + 35° C. En cas d’installation de 2 variateurs dans le même boîtier, les charges commandables par chaque variateur doivent être réduites de façon à ce que leur somme ne dépasse pas
la valeur maximale commandable d’un seul dispositif.
 
NEVEUP
09613
MADE IN ITALY
Viale Vicenza, 14
36063 Marostica VI - Italy
www.vimar.com
49401881A0 01 2307
Vimar SpA dichiara che l’apparecchiatura radio è conforme alla direttiva 2014/53/UE. Il testo completo della dichiarazione di conformità UE è disponibile nella scheda di prodotto al seguente indirizzo
Internet: www.vimar.com • Vimar SpA declares that the radio equipment complies with Directive 2014/53/EU. The full text of the EU declaration of conformity is on the product sheet available on the
following website: www.vimar.com • Vimar S.p.A. déclare que l’équipement radio est conforme à la directive 2014/53/UE. Le texte complet de la déclaration de conformité UE est disponible sur la
fiche du produit à l’adresse Internet suivante : www.vimar.com • Vimar S.p.A. declara que el equipo radio es conforme a la directiva 2014/53/UE. El texto completo de la declaración de conformidad
UE está recogido en la ficha del producto en la siguiente página web: www.vimar.com • Vimar SpA erklärt, dass die Funkanlage der Richtlinie 2014/53/EU entspricht. Die vollständige Fassung der
EU-Konformitätserklärung steht im Datenblatt des Produkts unter der Internetadresse www.vimar.com zur Verfügung • Η Vimar SpA δηλώνει ότι η συσκευή ραδιοσυχνοτήτων συμμορφώνεται με την
οδηγία 2014/53/ΕΕ. Το πλήρες κείμενο της δήλωσης συμμόρφωσης ΕΕ διατίθεται στην κάρτα του προϊόντος στην παρακάτω διαδικτυακή διεύθυνση: www.vimar.com.
 .     . 10                  . Neve Up                   •
°-5             .          .             .        
.                             2    . 45°+  
Il logo Apple, iPhone e iPad sono marchi commerciali di Apple Inc., registrati negli Stati Uniti e in altri Paesi e Regioni. App Store è un marchio di servizio di Apple Inc. Google è un marchio di Google LLC. Amazon, Alexa e tutti i loghi correlati sono
marchi di Amazon.com, Inc. o delle sue affiliate. • The Apple, iPhone and iPad logos are trademarks of Apple Inc., registered in the United States and in other Countries and Regions. App Store is a service trademark of Apple Inc. Google is a trademark
of Google LLC. Amazon, Alexa and all related logos are trademarks of Amazon.com, Inc. or its affiliates.• Les logos Apple, iPhone et iPad sont des marques commerciales de Apple Inc., enregistrées aux États-Unis et dans d’autres pays et régions.
App Store est une marque de service de Apple Inc. Google est une marque de Google LLC. Amazon, Alexa et tous les logos associés sont des marques de Amazon.com, Inc. ou de ses sociétés affiliées.•El logotipo Apple, iPhone e iPad son marcas
comerciales de Apple Inc., registradas en EE. UU. y otros países y regiones. App Store es una marca de servicio de Apple Inc. Google es una marca de Google LLC. Amazon, Alexa y todos los logotipos correspondientes son marcas de Amazon.com,
Inc. o de sus afiliadas. •Die Logos Apple, iPhone und iPad sind in den USA sowie in anderen Ländern und Regionen eingetragene Handelsmarken von Apple Inc. App Store ist eine Dienstleistungsmarke von Apple Inc. Google ist ein Markenzeichen von
Google LLC. Amazon, Alexa und alle damit verbundenen Logos sind Markenzeichen von Amazon.com, Inc. oder der Tochtergesellschaften • Τα λογότυπα Apple, iPhone και iPad είναι κατοχυρωμένα εμπορικά σήματα της Apple Inc. στις Ηνωμένες Πολιτείες
και σε άλλες χώρες και περιοχές. Η ονομασία App Store είναι σήμα υπηρεσίας της Apple Inc. Η ονομασία Google είναι σήμα της Google LLC. Οι ονομασίες Amazon, Alexa και όλα τα σχετικά λογότυπα είναι σήματα της Amazon.com, Inc. ή των θυγατρικών της.
..Inc  Amazon.com        Alexa Google LLC. Amazon     Apple Inc. Google   App Store .     .Apple Inc      iPad iPhone Apple 
Regolamento REACh (UE) n. 1907/2006 – art.33. Il prodotto potrebbe contenere tracce di piombo • REACH (EU) Regulation no. 1907/2006 – Art.33. The product may contain traces of lead • Règlement REACH (EU) n° 1907/2006 –
art.33. Le produit pourrait contenir des traces de plomb • Reglamento REACH (UE) n. 1907/2006 – art.33. El producto puede contener trazas de plomo • REACH-Verordnung (EG) Nr. 1907/2006 – Art.33. Das Erzeugnis kann Spuren
von Blei enthalten • Κανονισμός REACh (ΕΕ) αρ. 1907/2006 – Άρθρο 33. Το προϊόν μπορεί να περιέχει ίχνη μολύβδου •.      .33  – 2006/1907  (REACh (UE       
.www.vimar.com :               .UE/53/2014      Vimar SpA  
• El dispositivo debe montarse completo de teclas intercambiables e instalarse en cajas de empotrar o de superficie con soportes y placas Neve Up. El circuito de alimentación de la salida de relé debe estar
protegido contra sobrecargas por un dispositivo, fusible o interruptor automático, con corriente nominal no superior a 10 A. El montaje debe realizarse con la instalación apagada. Monte las teclas en el
mecanismo conmutador antes de conectar la alimentación de la instalación. El variador no está provisto de interrupción mecánica en el circuito principal y por lo tanto no realiza la separación galvánica.
En el lado de la carga, el circuito debe considerarse siempre en tensión. Tienen que utilizarse en lugares secos y sin polvo, a una temperatura comprendida entre 0 °C y +35 °C. Si se instalan 2 reguladores
en la misma caja, las cargas que se pueden controlar desde cada regulador deben reducirse de forma que su suma no supere la potencia máxima controlable por cada dispositivo.
• Das Gerät ist mit austauschbaren Tasten zu ergänzen und in Unterputz- oder Aufputzdosen mit Halterungen und Abdeckrahmen Neve Up zu installieren. Der Versorgungskreis des Relaisausgangs
muss durch ein entsprechendes Gerät, eine Sicherung oder einen Schutzschalter mit Nennstrom nicht über 10 A gegen Überlasten geschützt werden. Die Installation hat bei ausgeschalteter Anlage
zu erfolgen. Die Tasten vor Versorgung der Anlage auf dem Wechselschalter-Mechanismus installieren. Der Dimmer verfügt nicht über eine mechanische Unterbrechung des Hauptkreises und
gewährleistet somit keine galvanische Trennung. Der Kreis auf Lastseite ist stets als spannungsführend zu betrachten. Benutzung in trockener, nicht staubiger Umgebung bei einer Temperatur
zwischen 0 °C und +35 °C. Bei Installation von 2 Reglern in ein und derselben Dose müssen die von jedem Regler geregelten Lasten so begrenzt werden, dass ihre Summe nicht die von einem
einzelnen Gerät regelbare Höchstleistung übersteigt.
• Η συσκευή πρέπει να συμπληρωθεί με ανταλλάξιμα πλήκτρα και να εγκατασταθεί σε χωνευτά ή επιτοίχια κουτιά με στηρίγματα και πλαίσια Neve Up. Το κύκλωμα τροφοδοσίας της εξόδου με
ρελέ πρέπει να προστατεύεται από την υπερφόρτωση μέσω μηχανισμού, ασφάλειας ή αυτόματου διακόπτη, με ονομαστικό ρεύμα έως 10 A. Η τοποθέτηση πρέπει να πραγματοποιείται με την
εγκατάσταση απενεργοποιημένη. Εγκαταστήστε τα πλήκτρα στον μηχανισμό εκτροπέα πριν από την τροφοδοσία της εγκατάστασης. Το dimmer δεν διαθέτει μηχανική διακοπή στο κύριο κύκλω-
μα και, κατά συνέπεια, δεν παρέχει γαλβανική μόνωση. Το κύκλωμα στην πλευρά του φορτίου πρέπει να θεωρείται πάντα υπό τάση. Πρέπει να χρησιμοποιείται σε στεγνούς χώρους, χωρίς
σκόνη, σε θερμοκρασία μεταξύ 0°C και +35°C. Στην περίπτωση εγκατάστασης 2 ρυθμιστών στο ίδιο κουτί, τα ελεγχόμενα φορτία από κάθε ρυθμιστή πρέπει να μειωθούν, ώστε το άθροισμά
τους να μην υπερβαίνει τη μέγιστη ελεγχόμενη ισχύ από έναν μεμονωμένο μηχανισμό.
DOWNLOAD DER GERÄTEDETAILS, KONFIGU-
RATION UND WEEE-INFORMATIONEN ALS PDF
VOM PRODUKTDATENBLATT AUF www.vimar.com
VERFÜGBAR
ΛΕΠΤΟΜΕΡΕΙΕΣ ΣΧΕΤΙΚΑ ΜΕ ΤΟΝ ΜΗΧΑΝΙΣΜΟ,
ΔΙΑΜΟΡΦΩΣΗ ΚΑΙ ΠΛΗΡΟΦΟΡΙΕΣ ΑΗΗΕ ΕΙΝΑΙ
ΔΙΑΘΕΣΙΜΕΣ ΓΙΑ ΛΗΨΗ ΣΕ PDF ΑΠΟ ΤΟ ΔΕΛΤΙΟ
ΠΡΟΪΟΝΤΟΣ ΣΤΗ ΔΙΕΥΘΥΝΣΗ www.vimar.com
         
           
www.vimar.com  
DEVICE DETAILS, CONFIGURATION AND WEEE IN-
FORMATION CAN BE DOWNLOADED IN PDF FOR-
MAT FROM THE PRODUCT DATA SHEET ON www.
vimar.com
DÉTAILS DU DISPOSITIF, CONFIGURATION ET IN-
FORMATIONS DEEE À TÉLÉCHARGER AU FORMAT
PDF À PARTIR DE LA FICHE PRODUIT SUR www.
vimar.com
DETALLES DISPOSITIVO, CONFIGURACIÓN E IN-
FORMACIÓNRAEEDESCARGABLESENPDFDESDE
LA FICHA DEL PRODUCTO EN www.vimar.com
Other Vimar Security Sensor manuals

Vimar EIKON 20184 User manual

Vimar

Vimar EIKON 20184 User manual

Vimar BY-ALARM PLUS 03835 User manual

Vimar

Vimar BY-ALARM PLUS 03835 User manual

Vimar BY-ALARM PLUS User manual

Vimar

Vimar BY-ALARM PLUS User manual

Vimar 01527 User guide

Vimar

Vimar 01527 User guide

Vimar NEVE UP 09462 User manual

Vimar

Vimar NEVE UP 09462 User manual

Vimar LINEA 30181 Series User manual

Vimar

Vimar LINEA 30181 Series User manual

Vimar BY-ALARM PLUS User manual

Vimar

Vimar BY-ALARM PLUS User manual

Vimar By-alarm 01722 User manual

Vimar

Vimar By-alarm 01722 User manual

Vimar By-alarm 01727.1 User manual

Vimar

Vimar By-alarm 01727.1 User manual

Vimar NEVE UP 09467 User manual

Vimar

Vimar NEVE UP 09467 User manual

Vimar Eikon 20181 User manual

Vimar

Vimar Eikon 20181 User manual

Vimar By-alarm 01728 User manual

Vimar

Vimar By-alarm 01728 User manual

Vimar NEVE UP 09179 User manual

Vimar

Vimar NEVE UP 09179 User manual

Vimar 01739 User guide

Vimar

Vimar 01739 User guide

Vimar By-alarm 01731 User manual

Vimar

Vimar By-alarm 01731 User manual

Vimar By-alarm 01723 User manual

Vimar

Vimar By-alarm 01723 User manual

Vimar NEVE UP 09591.0 User manual

Vimar

Vimar NEVE UP 09591.0 User manual

Vimar 01740 User guide

Vimar

Vimar 01740 User guide

Vimar NEVE UP 09467 User manual

Vimar

Vimar NEVE UP 09467 User manual

Vimar By-alarm 01721 User manual

Vimar

Vimar By-alarm 01721 User manual

Vimar By-alarm 01720 User manual

Vimar

Vimar By-alarm 01720 User manual

Vimar By-alarm 01726 User manual

Vimar

Vimar By-alarm 01726 User manual

Popular Security Sensor manuals by other brands

Trotec BE16 operating manual

Trotec

Trotec BE16 operating manual

IFM Electronic LR2050 operating instructions

IFM Electronic

IFM Electronic LR2050 operating instructions

RIKEN RX-516 Operation manual

RIKEN

RIKEN RX-516 Operation manual

Pfeiffer Vacuum ASM 390 operating instructions

Pfeiffer Vacuum

Pfeiffer Vacuum ASM 390 operating instructions

ABB Stanlite Nexus RF installation manual

ABB

ABB Stanlite Nexus RF installation manual

GST DC-M9103 quick start guide

GST

GST DC-M9103 quick start guide

IFM Electronic efector500 PI2058 operating instructions

IFM Electronic

IFM Electronic efector500 PI2058 operating instructions

Qvis QFS-CO manual

Qvis

Qvis QFS-CO manual

Blickfeld Cube 1 user manual

Blickfeld

Blickfeld Cube 1 user manual

GST DC-M9103 quick start guide

GST

GST DC-M9103 quick start guide

DSC LC-104-PIMW installation manual

DSC

DSC LC-104-PIMW installation manual

Niko 351-2655 Series quick start guide

Niko

Niko 351-2655 Series quick start guide

V-GREAT VG-6727 Installation and operation manual

V-GREAT

V-GREAT VG-6727 Installation and operation manual

Schulz TES015 instruction manual

Schulz

Schulz TES015 instruction manual

NAPCO GEM-GB manual

NAPCO

NAPCO GEM-GB manual

Airthings Wave operating manual

Airthings

Airthings Wave operating manual

i4Technology BugHunter Professional BH-03 Expert Operation manual

i4Technology

i4Technology BugHunter Professional BH-03 Expert Operation manual

Raymarine Evolution EV-2 installation instructions

Raymarine

Raymarine Evolution EV-2 installation instructions

manuals.online logo
manuals.online logoBrands
  • About & Mission
  • Contact us
  • Privacy Policy
  • Terms and Conditions

Copyright 2025 Manuals.Online. All Rights Reserved.