manuals.online logo
Brands
  1. Home
  2. •
  3. Brands
  4. •
  5. VINNOVA
  6. •
  7. Bathroom Fixture
  8. •
  9. VINNOVA 704160M User manual

VINNOVA 704160M User manual

Page 1 Model: 704160M
Modèle:704160M
*INSTALLING VANITY WITH TWO PEOPLE IS HIGHLY RECOMMENDED*
*L'INSTALLATION DE LA VANITÉ AVEC DEUX PERSONNES EST FORTEMENT RECOMMANDÉE*
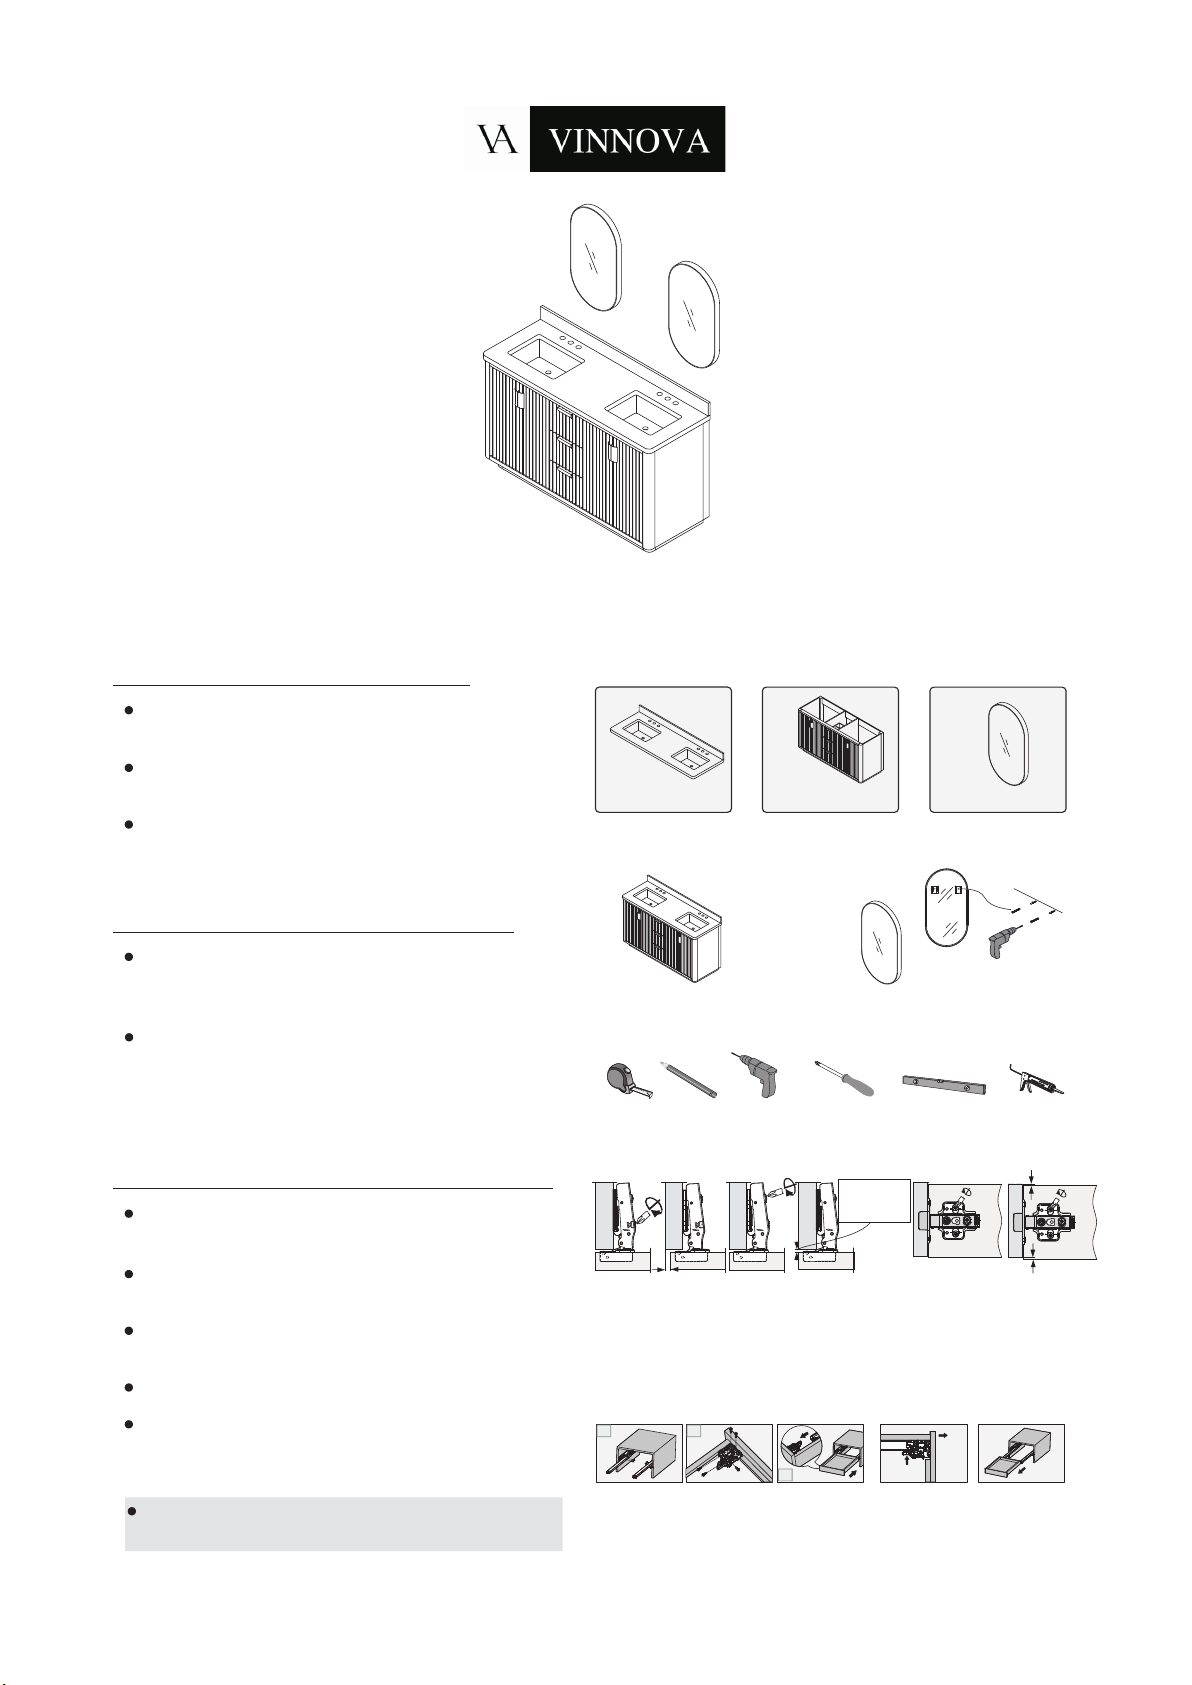
Box Contents/Contenu de la boîte
Ceramic Basin/Countertop
Bassin/comptoir en céramique
Vanity Base/Cabinet
Base de vanité/Cabinet
Vanity Mirror/LED Mirror
Miroir de courtoisie/Miroir à DEL
Installation Tips/Conseils d'installation
Add silicone to attach frame/
Ajouter du silicone pour fixer le cadre
Secure the countertop to the main cabinet/
Fixez le comptoir à l'armoire principale
Please check your product packaging to make
sure the included accessories etc.
Recommended tools/Outils recommandés
Tape measure/
mètre à ruban
Pencil/
Crayon
Screwdriver (Manual/Mechanical)/
Tournevis (manuel/mécanique)
Level/Niveau
Calking & Calking Gun/
Pistolet à calfeutrer et à calfeutrer
Main Body Parts/La partie principale du corps
Main Cabinet Installation Instructions/
Instructions d'installation de l'armoire principale
Ceramic basin
Cuves en céramique/2
Main cabinet
Armoires principal/1
Vanity
Mirror
Miroir de courtoisie/2
Installation tool Outil d'installation/
0
1
234
Tape measure Pencil Level Calking Gun
Screwdriver
Mechanical
Screwdriver
Installation,Removal and Adjustment of Hinges on Vanity
1. Adjusting screws on the hinge arm can adjust thefront and rear of the door panel
Les vis de réglage sur le bras de charnière peuvent ajuster l'avant et l'arrière du panneau de porte
2.Loosen the screw to adjust the door panel vertically ±0.08, the mounting plate can slide up and
down, and tighten the screw after adjustment
Desserrez la vis pour régler le panneau de porte verticalement ± 0,08, la plaque de montage peut
glisser de haut en bas, puis serrez la vis après le réglage
Adjustable cassette/
Cassette réglable
Cassette/
Cassette
+0.08"
-0.08"
+0.11 -0.08
+0.11 -0.04 2.
+0.08 -0.16
1.
1.Install the slide rail with a cross knife
2.Fit the front connector to the bottom of the drawer with a cross knife
3.Put the drawer on the moving rail, and then push the cabinet,The moving rail is snapped
into the front connector, and the installation is complete
Flip the buckle of the front connector, then pull
the drawer out to complete the disassembly
Retournez la boucle du connecteur avant, puis
tirezsortir le tiroir pour terminer le démontage
Flip the
buckle
drawer
pulls out
Removal of slide rail with front connector
Démontage de la glissière avec connecteur frontal
1. 2.
3.
1.
2.Monter le connecteur frontal sur lefond du tiroir avec uncouteau croisé
3.Mettre le tiroir sur le rail mobile,puis poussez l'armoire, le éplacementle
rail est encliqueté dans le connecteur avant,et l'installation est terminée
Installez la glissière avec un couteau en croix
Installation Instruction/Instructions d’installation
1.Main cabinet
Armoires principal
2.Hang the mirror
Accrocher le miroir
On the back
of the mirror
Diagram Specifications
Page 2
Vanity Care Guide
Vanity Care
Countertop Care
Cleaning and maintenance
WARNING WARNING WARNING
Avoid direct contact of sharp objects as they can cause exterior damage.
Do not expose directly to the sun as it can cause aging and cosmetic damage.
Avoid placing hot objects onto the vanity surface.
Avoid using cleaning products that contain Bleach or Ammonia.
Please use wood-friendly products on wooden base vanities.
To adequately clean exterior surfaces, use natural cleaning solutions or soap
This product can expose
you to chemicals including
Nickel compounds,which
is known to the State of
California to cause cancer.
For more information visit
www.P65Warning.ca.gov
This product can expose
you to to Glass wool fibers
(inhalable and biopersistent),
which is known to the State
Of California to cause cancer.
For more information,go
towww.P65Warnings.ca.gov
Serious or fatal crushing
can occur from furniture
tip over . To prevent tip
over this furniture must be
used with the wall attachment
device(s)provided.
Screw(s)and plug(s)for the wall
are not included.Use screw(s)
And plug(s)suitable for your walls.
If you are uncertain,seek professional
Advice. Read and follow each step
of the instruction carefully.
Kindly note that all our tops are sealed before shipping but may stain, scratch, or chip because they are porous by nature.
Do not place hot items directly on the countertop as it can damage it.
To prevent ring marks or staining, dry immediately.
Place table mats beneath objects that can potentially scratch the surface.
Use a clean, soft fabric to dust the vanity.
Occasionally wash with a cloth dampened in warm water. If needed, apply a small amount of mild dishwashing
liquid or stone soap to clean. Dry with a soft cloth.
Refrain from using chemical cleaners,sprays,abrasive cleaners, or products that contain lemon, vinegar, or other acids.
We advise to reseal top annually or when necessary.
17 "
(45cm)
57
20 "
(53cm)
78
18 "
(47cm)
12
11 "
(29.5cm)
58
14 "
(37.5cm)
34
12 "
(31.5cm)
25
20 W×14 D 8 H ×
53 W×37.5 D 21 H cm×
37 1
48 4
φ1 "
( 3.5)φ
38
13 "
(33.4cm)
1713 "
(33.4cm)
17
4"
(10.2cm)
33 "
(85.6cm)
57
22"
(55.8cm)
60"
(152.4cm)
60 W×22 D 1 H ×
152.4 W×55.8 D 3.6 H cm×
37
11 "
(28.5cm)
29
2 "
(6.5cm)
59
19 "
(50cm)
23
Hook up
(7.5cm)
2 "
910
(7.5cm)
2 "
910
(7.5cm)
2 "
910 (7.5cm)
2 "
910
(20cm)
7 "
910
(R25cm)
R9 "
56
(20cm)
7 "
910
(5cm)
1 "
910
36"
(91.4cm)
(9cm)
3 "
12
19 W×1 D 36 H ×
50 W×5 D 91.4 H cm×
92 103
22"
(55.8cm)
1 "
(3.6cm)
37
Solid wood
OUT19 "
(50cm)
23
NI20 "
(53.0cm)
78
60"
(152.4cm)
(6cm)
2 "
38
13 "
(35cm)
79
13 "
(35cm)
79
13 "
(35cm)
79
21 "
(54.8cm)
47
(12cm)
4 "
57
(12cm)
4 "
57
(12cm)
4 "
57
22"
(55.8cm)
30 "
(76.8cm)
14
34"
(86.4cm)
(6cm)
2 "
38
(10cm)
3 "
89
(3.6cm)
1 "
37
(5.5cm)
2 "
16
(5.5cm)
2 "
16
(23.3cm)
9 "
16
(12cm)
4 "
57
(139.4cm)
54 "
78
(30.3cm)
11 "
89
(54.2cm)
21 "
13
(70.4cm)
27 "
57
60 W×22 D 34 H ×
152.4 W×55.8 D 86.4 H cm×

Other VINNOVA Bathroom Fixture manuals

VINNOVA Caparroso 705348 User manual

VINNOVA

VINNOVA Caparroso 705348 User manual

VINNOVA 701248G User manual

VINNOVA

VINNOVA 701248G User manual

VINNOVA 310134-HD-PC User manual

VINNOVA

VINNOVA 310134-HD-PC User manual

VINNOVA 546036 User manual

VINNOVA

VINNOVA 546036 User manual

VINNOVA Milano 308048-HD-PC User manual

VINNOVA

VINNOVA Milano 308048-HD-PC User manual

VINNOVA 701148 User manual

VINNOVA

VINNOVA 701148 User manual

VINNOVA 309148-HD-PC User manual

VINNOVA

VINNOVA 309148-HD-PC User manual

VINNOVA 309134-HD-PC User manual

VINNOVA

VINNOVA 309134-HD-PC User manual

VINNOVA 553036 User manual

VINNOVA

VINNOVA 553036 User manual

VINNOVA 705372 User manual

VINNOVA

VINNOVA 705372 User manual

VINNOVA 545060S User manual

VINNOVA

VINNOVA 545060S User manual

VINNOVA 789048B User manual

VINNOVA

VINNOVA 789048B User manual

VINNOVA 706560M User manual

VINNOVA

VINNOVA 706560M User manual

VINNOVA 703472 User manual

VINNOVA

VINNOVA 703472 User manual

VINNOVA 317131-HD-PC/MB User manual

VINNOVA

VINNOVA 317131-HD-PC/MB User manual

VINNOVA Tuscany 945024-WH-WG User manual

VINNOVA

VINNOVA Tuscany 945024-WH-WG User manual

VINNOVA Lleida 702160 User manual

VINNOVA

VINNOVA Lleida 702160 User manual

VINNOVA 314034-WR-MB User manual

VINNOVA

VINNOVA 314034-WR-MB User manual

VINNOVA Bilbao 701272G User manual

VINNOVA

VINNOVA Bilbao 701272G User manual

VINNOVA 789024B User manual

VINNOVA

VINNOVA 789024B User manual

VINNOVA 710048 User manual

VINNOVA

VINNOVA 710048 User manual

VINNOVA 312052+36P-BN User manual

VINNOVA

VINNOVA 312052+36P-BN User manual

VINNOVA 702072 User manual

VINNOVA

VINNOVA 702072 User manual

VINNOVA 702560M User manual

VINNOVA

VINNOVA 702560M User manual

Popular Bathroom Fixture manuals by other brands

Kohler Mira Sport Max J03G Installation and user guide

Kohler

Kohler Mira Sport Max J03G Installation and user guide

Moen 186117 Series installation guide

Moen

Moen 186117 Series installation guide

Hans Grohe Raindance Showerpipe 27235000 Instructions for use/assembly instructions

Hans Grohe

Hans Grohe Raindance Showerpipe 27235000 Instructions for use/assembly instructions

Signature Hardware ROUND SWIVEL BODY SPRAY 948942 Install

Signature Hardware

Signature Hardware ROUND SWIVEL BODY SPRAY 948942 Install

fine fixtures AC3TH installation manual

fine fixtures

fine fixtures AC3TH installation manual

LIXIL HP50 Series quick start guide

LIXIL

LIXIL HP50 Series quick start guide

KOLO ATOL PLUS installation manual

KOLO

KOLO ATOL PLUS installation manual

Hans Grohe PuraVida 15073000 Instructions for use/assembly instructions

Hans Grohe

Hans Grohe PuraVida 15073000 Instructions for use/assembly instructions

Toto TS111B8 Installation and owner's manual

Toto

Toto TS111B8 Installation and owner's manual

Kohler K-1158-H2 Homeowner's guide

Kohler

Kohler K-1158-H2 Homeowner's guide

Coram Showers OFFSET QUADRANT manual

Coram Showers

Coram Showers OFFSET QUADRANT manual

baliv DU-2010 manual

baliv

baliv DU-2010 manual

odass OD-1710 instruction manual

odass

odass OD-1710 instruction manual

Oxygenics Evolution Easy installation instructions

Oxygenics

Oxygenics Evolution Easy installation instructions

Bradley Express SS Series installation instructions

Bradley

Bradley Express SS Series installation instructions

Helvex TH-974 installation guide

Helvex

Helvex TH-974 installation guide

DURAVIT C.1 C15240 0090 Instructions for mounting and use

DURAVIT

DURAVIT C.1 C15240 0090 Instructions for mounting and use

Sunshower PURE SOLO manual

Sunshower

Sunshower PURE SOLO manual

manuals.online logo
manuals.online logoBrands
  • About & Mission
  • Contact us
  • Privacy Policy
  • Terms and Conditions

Copyright 2025 Manuals.Online. All Rights Reserved.