VIOMI Alpha 2 Pro User manual

Viomi Alpha 2 Pro User Manual
Please read this manual carefully before use and keep it properly.
This product shall be operated only in location at altitude below 2,000 meters.

Safety Information ........................................................................................................................... 01
Packing list .................................................................................................................................... 04
Product Introduction ....................................................................................................................... 05
Instructions on Installation ............................................................................................................... 07
Operation Instructions .................................................................................................................... 07
How to connect to Wi-Fi ..................................................................................................................... 09
Maintenance ................................................................................................................................. 10
Specifications ................................................................................................................................. 14
Trouble Shooting ............................................................................................................................. 15
FAQ ............................................................................................................................................... 15
CONTENTS

01
Safety Information
1. Instructions for use
Please pay aention to the following basic safety precautions
before using the product:
• Read the user manual carefully and follow the instructions in the
user manual when using the product.
• Keep the user manual well for future reference.
• If you need to transfer the product to a third party, please aach
the user manual along with the product.
• Any operation not in conformity to the instructions in the user
manual may result in serious personal injury or damage to the
product itself.
Warning: Instructions against incorrect product use that may
lead to death or serious injury.
Caution: Instructions against incorrect product use that may
lead to minor injury or product damage.
2. Safety precautions
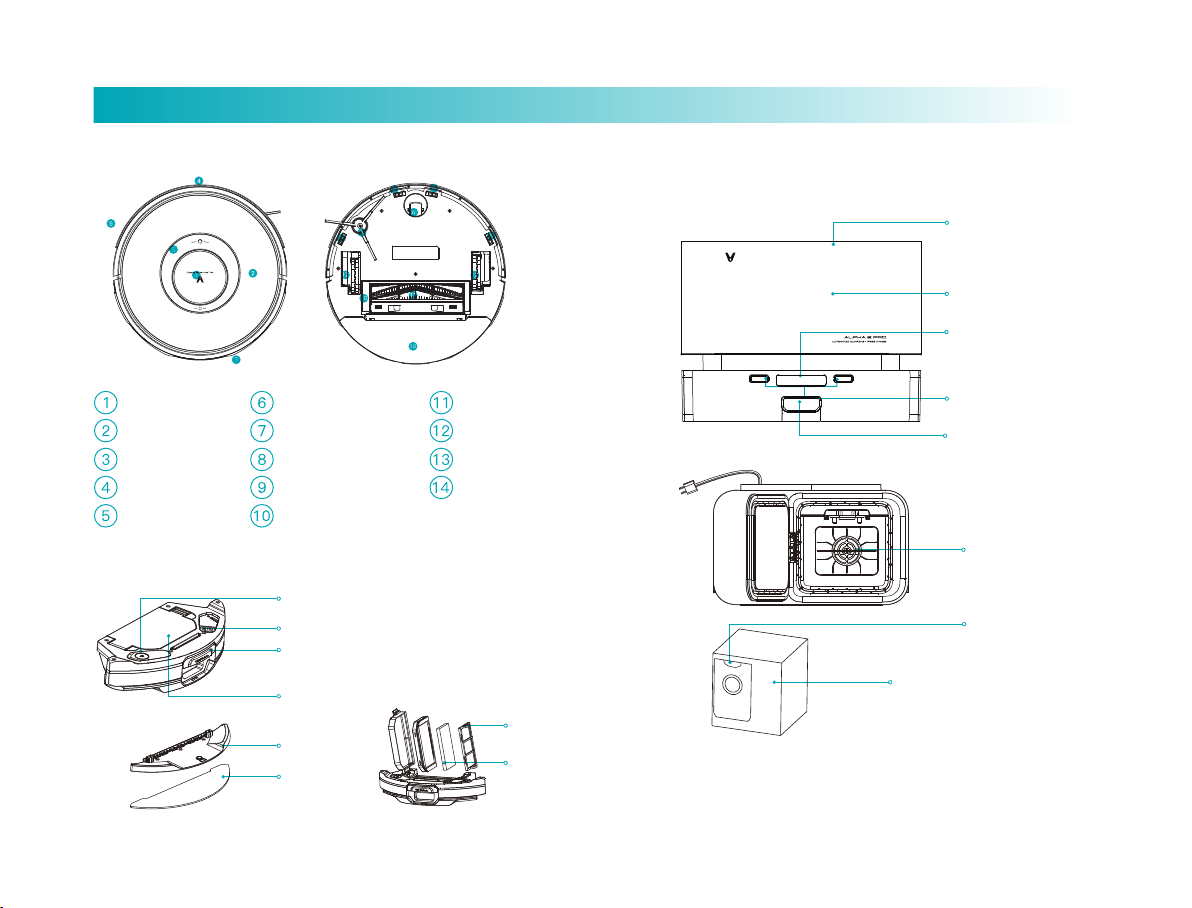
• This product can only use the automatic dirt disposal and baeries
that are provided with this product. Failure to do so may result in
damage to the product, electrical shock, or fire caused by high
voltage.
• Do not use this product if the product and accessories of this
product are found to be damaged. Contact our aer-sales service
department. Except for the service technicians designated or
authorized by our company, no one may disassemble, repair or
modify this product.
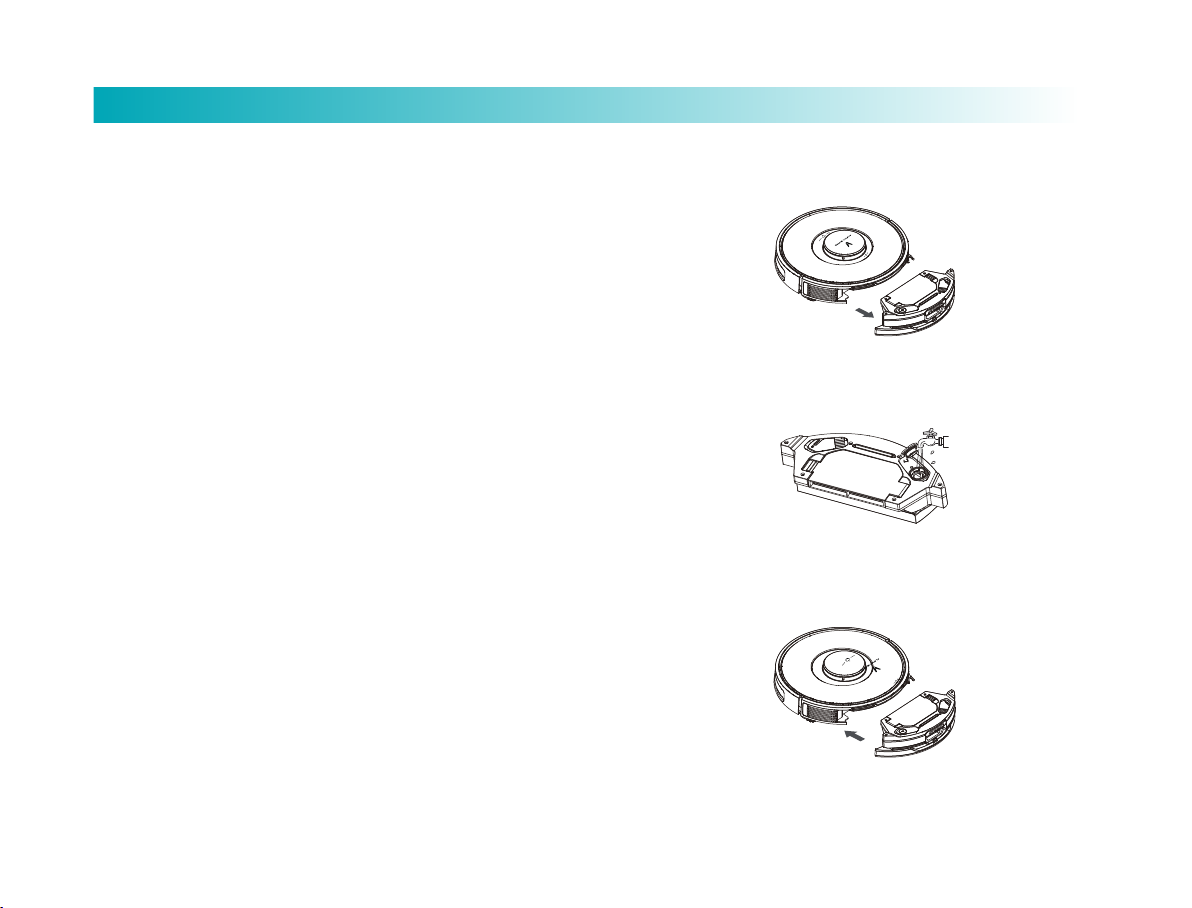
• Unplug the product before maintenance.
• Do not touch the power plug or the product when your hands are
wet, as this may result in electrical shock.
• If the power cord is damaged, it must be replaced by the manufactur-
er, its service department or a similar professional to avoid danger.
• To prevent the product from falling accidentally, do not use this
product in a suspended place without a protective fence, which
may result in personal injury.
• The user shall not replace the baeries privately.
• Prevent clothing or any part of your body (hair, fingers, etc.) from
geing caught in the brush or wheel of the vacuum cleaner. Failure
to do so may result in personal injury.
• Do not place the product near fire or flammable/explosive/corro-
sive materials.
• If the user manual is missing, please contact your local dealer or
call the aer-sales service department to obtain an electronic user
manual.
• If the supply cord is damaged, it must be replaced by the
manufacturer, its service agent or similarly qualified persons in
order to avoid a hazard.
• This appliance contains baeries that are only replaceable by
skilled persons.
• For the purposes of recharging the baery, only use with the
automatic dirt disposal provided with this appliance.
• Check whether there are cigaree bus, matches and other
inflammable and explosive items in the room. If there is one will
need to manually clean up yourself before use of the product.
Flammable items inhaled robot, the body in the use of the process
will heat damage product.
• Clean edge brushes and rollers regularly, clean the dust box
regularly, clean the filter regularly.
• The appliance must be disconnected from the supply mains when
removing the baery.
• The baery is to be disposed of safely.
• The product is only intended to clean floors in a home environment.
Please do not use it outdoors such as on an open balcony or on a
surface that is not a floor like a sofa, or in a commercial or industrial
seing.
Warning
Read operator’s manual
Caution

02
Safety Information
• Prevent the suction of water, oil or other liquids, which may damage
the product.
• Please make sufficient preparations before starting the product to
prevent the noise from causing harm to people or animals.
• Arrange scaered wires on the floor before use for fear of affecting
the normal operation of the product.
• Remove fragile objects before use.
• The charging dock shall be placed against the wall and on a flat floor
for fear of affecting product functionality.
• Unplug the automatic dirt disposal if it remains unused for a long
time.
• When the product is working, removal of the automatic dirt disposal
will affect the normal recharging of the machine.
• Do not use the product to suck in sharp objects (e.g. shaered glass
and nails) for fear of damage to the product.
• Do not use the product at an ambient temperature above 40℃or
below 0℃or in a wet, flammable, explosive or corrosive environment.
• Do not charge at an ambient temperature above 35℃or below 0℃.
• Do not pick up the product by its laser radar cover.
• Make sure the product is turned off and the automatic dirt disposal
is unplugged before cleaning or performing maintenance.
• Do not place children, pets, or any item on top of the product while it
is stationary or moving.
• Do not spray any liquid into the product(make sure the dust
compartment is thoroughly dry before its reinstalling).
• Do not place the product upside down (laser radar housing should
never touch the ground).
• Only use this product as directed in the user manual or quick start
guide. Users are responsible for any loss or damage arising from
improper use of this product.
3. About child safety
• Children shall not play with the product.
• Please keep the main brush cleaning tools out of reach of children.
• This product can be used by children aged from 8 years and above
and persons with reduced physical, sensory or mental capabilities
or lack of experience and knowledge if they have been given
supervision or instruction concerning use of the appliance in a safe
way and understand the hazards involved.
• Cleaning and user maintenance shall not be made by children
without supervision.
4. About the baeries
• This product contains a lithium-ion baery pack.
• Do not expose the appliance or baery to excessive temperatures.
• Be aware of the risk of terminals of the baery-operated appliance
or baery being short-circuited by metal objects.
• Before disposing of the appliance, the baery must be taken out of
the appliance. Take-out steps:
A. Take off the side brush. Use a screwdriver to loosen the screws of
and the base decorative plate.
B. Remove the base trim panel.
C. Take out the baery and unplug the connection line between the
baery and the host.
• The baeries shall be removed when the product is discarded.
• If you need to replace the baery of the host machine, please
contact our aer-sales service department. Use of wrong baeries
may cause a safety accident.
• If the baeries leak, prevent the contact of the liquid with the skin or
clothing. Immediately wipe it with a dry cloth and send it to the
recycling station or designated maintenance point. Do not discard it.
• Please properly dispose of the old baeries of the product. The
baeries contain hazardous substances harmful to the environment.
Please follow the local environmental regulations and send them to
the designated recycling site.

03
Safety Information
5. Scope of use of the product
The product is suitable for the following floors:
Wooden floor, Ceramic tile and Short-staple carpet.
6. Disclaimers
Under any of the following circumstances, the product will be
excluded from the scope of free warranty, but paid repair can be
provided:
A. Damage due to the user’s failure to operate the product in strict
accordance with our user manual or due to improper storage;
B. The machine or parts have exceeded the free warranty period;
C. Damage due to disassembly by those other than the mainte
nance personnel of our company or authorized by our company;
D. A valid purchase voucher number cannot be provided;
E. Damage caused by irresistible factors such as natural disasters;
F. Product failure or damage caused by unexpected factors or
man-made causes (including operational errors, liquid ingress,
improper plugging/unplugging, scratching, handling, bumping,
input of inappropriate voltage, etc.)

Packing list
04
Robot vacuum-mop x 1
Dust bag x 3 Cleaning tool x 1 Main brush
cover x 1
HEPA for automatic
dirt disposal x 1
Automatic dirt disposal x 1 2-in-1 water tank x 1 Main brush x 1 Side brush x 1
Mop holder x 1 Mop x 2Handbook x 1
Quick Guide Manual x 1
HEPA filter x 1
Notes:
HEPA filter and cleaning tool are installed on the 2-in-1 water tank.
2-in-1 water tank, main brush and side brush is installed on the robot.
Dust bags and HEPA is installed on the automatic dirt disposal or accessories box.
Mop is installed on the mop holder.
Disposable mop x 10

Product Introduction
05
Reset buon: for
forcible shutdown.
Short press to switch off
IR sensor
Short press the buon to start/pause cleaning
Long press the buon for 3 seconds to power on/off
White glimmers: robot standby
White: working/pause/full baery
Slowly blinking white: network connecting
Blinking orange: recharging/charging/disposing dirt
Slowly blinking orange: low baery/malfunction
The LED indicator off: indicating power-off/sleep
Network Configuration
When the robot is power-on,
simultaneously press down and hold
and keys for 3 seconds till a voice
prompt “Activate network configuration”
is given, and then release them to
activate network configuration.
When the robot is power-on,
simultaneously press down and hold
and keys for 10 seconds till a voice
prompt "Robot is going to restore
factory seings" is given, and keep
holding the keys for 10 seconds till a
voice prompt "Robot has restored
factory seings successfully" is given. A
reboot is needed aer the restoration.
Power on/off, Global cleaning
Smart recharging
Short press the buon to start smart recharging.
Long press for 5 seconds to enable pair mode

Product Introduction
06
Inlet
Cleaning tool
Dust Compartment
Dust Compartment release buon
Mop holder
Mop
Filter screen clamp
Filter screen
2-in-1 Water Tank Blower filter
Dust bag handle
Dust bag
Dust bag holder
IR lens
Dust collection port
Robot Vacuum-mop and sensor
Laser radar
Surface cover
Buon
IR sensor
Collision sensor
Universal caster
Charging electrode
Side brush
Cliff sensor
Main brush cover
Rolling brush
Le caster
Right caster
2-in-1 water tank
Automatic dirt disposal (Two-in-one for dust
collection and charging)
Top cover
Remove the top cover.
Mount/remove dust
bag.
Recharging/auto-
matic dirt disposal
probe.
Dust bag (include a automatic dirt disposal).
Note: Bust bag is consumable and shall not be re-used.
Replace it regularly.

Instructions on Installation Operation Instructions
07
(1) Place automatic dirt disposal on flat floor near wall, and
connect the plug to a approved socket and switch power supply
on.
(2) Make sure there is no obstacle within 1.2 m in front and 0.5
m at both sides of it.
Place it near wall
Install the automatic dirt disposal Switch on/off
Long press power buon for 3 seconds to switch robot on.
Power LED indicator flashes slowly and then lights on constantly in
white color, and the robot in standby.
When robot stays still, long press the power buon for 3
seconds to switch it off.
Robot will sleep if being idle for more than 10 minutes. In sleep
status shorting press any buon will wake it up.
Tips: During recharging, the robot cannot be switched off or sleep.
Sweeping
In power-on status, short press the buon with voice prompt
"start global sweeping".
During cleaning, short press the buon to pause cleaning.
Tips: At low baery level, cleaning function cannot be started.
Automatic/manual recharging
Upon end of cleaning, a voice prompt "cleaning finished and
recharging started" is given, and the robot starts recharging.
In case of low baery level during cleaning, the robot will start
recharging automatically.
Refilling tank or cleaning mop half-way
Short press buon to pause the robot; remove mopping module,
refill the tank or clean the mop; re-mount the mopping module and
short press the buon again to resume cleaning.

Operation Instructions
08
3. Soak the mop with water and aach it to magic tape
band and tighten it. Inject water through the inlet, and
tighten the cover.
4. Mount the 2-in-1 Dust Compartment with Water Tank
into the robot. To install the Integrated tank back, push it
in with the slot. Then push it to the boom aer hearing a
click.
Fault
In case of fault in the robot, audible and visual alarms will
be given with power LED indicator flashing in orange. For
more details refer to Troubleshooting.
The robot will sleep automatically when being idle for 10
minutes in case of fault.
Network configuration and firmware update
Download Mijia App, and use the mobile client to reset Wi-Fi
according to the APP's tips. Refer to the Quick Guide for
further information. You can check and upgrade firmware
through the App. Make sure the equipment is charging while
upgrade. Read the guide in the App for the details of
upgrade. Configure network according to the tips in the App
aer finishing download. You can use the App for remote
control, reservation and so on as long as it is connected to
network.
How to use
1. Place the robot on flat floor indoors. Remove the limit
protector at both sides of bumper.
2. Press the Dust Compartment release buon to remove the
2-in-1 Dust Compartment with Water Tank.

Operation Instructions How to connect to Wi-Fi
09
5. Long press buon for 3 seconds to switch the
robot on, and then short press buon to recharge it.
The robot will be ready for operation when recharged fully.
Connect to Mijia App
This product works with Mijia app. Control your device, and
interact it and other smart home devices with Mijia app.
Notes: As Mijia App is subject to improvement and update
from time to time, the actual operations may vary from what
is described above. Please perform your operations by
following the instructions in current Mijia App.
Aention: "works with Mijia" validates
in soware level only. MIUI and Mijia is
not responsible for the enterprise and
its production, standard implementa-
tion, quality supervision and other
aspects of the product.
Scan the QR code to download and install
the app. You will be directed to the connec-
tion setup page if the app is installed
already. Or search "Viomi mall/Mijia" in the
app Store to download and install it. Open
the app, tap"+" on the upper right, and then
follow prompts to add your device.
Note:
1. The robot cannot be switched on in case of low baery level. In such case, first
recharge it.
2. In case of low baer level during sweeping, the robot will go to charging dock
for recharging automatically, and then return to the interruption point to
resume cleaning.
3. For the initial use, there may be a very lile water in the tank, which is residual
test sample and at normal condition, and you can use it at ease.
4. Before performing cleaning, please make sure the 2-in-1 dust compartment
with water tank has been well installed on the robot as well as the filter screen
and filter screen clamp of the 2-in-1 dust compartment with water tank have
been installed.
5. Please close the top cover of the automatic dirt disposal before dirt disposal is
performed.
6. Please check whether dust duct is blocked and remove any foreign maer if
the dirt disposal process is abnormal.
6. The robot will return to automatic dirt disposal base
aer operating for more than 1 minute, and start clear-up
process automatically.
The automatic dirt disposal function can be turned on or
off via the APP seings. Aer the automatic dirt disposal
function is turned off, the automatic dirt disposal will not
performed when robot returns to the automatic dirt
disposal base.

MaintenanceHow to connect to Wi-Fi
10
Connect power supply
Connect power plug to the socket.
Reseing Wi-Fi
When your router is replaced or Wi-Fi password is changed, you
have to reset Wi-Fi seings by holding both and keys for
3 seconds till the Wi-Fi indicator light flashes in white color and a
voice prompt is given, indicating that the Wi-Fi seings are reset
successfully.
Bind iOS-based cell phone to Wi-Fi
Select robot's hotspot in Wi-Fi seings of your phone, and
wait for connection; Return to the App, tap "next" and follow
the tips to finish connection.
Notes: Please refer to How to Reset Wi-Fi when your phone is
unable to connect Viomi vacuum (as following); Please
connect to Wi-Fi for optimal user experience.
Bind Android-based cell phone to Wi-Fi
Tap the available product, and tap "connect" to proceed. Just
follow the tips.
Download the App
Search for "Viomi mall" or "Mijia" in app store; or scan the QR
code to download and install the app.
2-in-1 Dust Compartment with Water Tank
1. Press Dust Compartment release buon and pull the tank out
to remove it.
2. Release the Dust Compartment clamp to remove filter screen
clamp.

Maintenance
11
3. Remove the Filter screen.
4. Clean the filter screen and clamp with cleaning brush.
Filter screen clamp
Filter screen
5. Fill the Dust Compartment with water, shake it and then empty
it. Repeat this process till it is clean.
6. Turn the tank over and remove mop for cleaning or replace it.
Tips:
1. Clean the mop regularly, since contaminated mop will impair
sweeping performance.
2. Be sure to remove the mop and clean, and then dry it by twisting. Do
not clean it with it mounted to tank, which may cause damage to
the tank.
3. It is recommended to replace main brush every 1-2 months to
ensure proper cleaning performance.

Maintenance
12
Cleaning main brush
1. The main brush is consumable and shall be cleaned
weekly. It is recommended to replace main brush every
6-12 months to ensure proper cleaning perfor-
mance.Turn cleaner over, remove main brush cover and
the brush by pressing the clamp on the cover.
2. Cut off hairs around the brush with knife, and clean the
main brush with the other end of the knife.
3. Mount the main brush and main brush cover and lock the
clamp.
Main brush cover
Main brush
Clean/replace side brush
1. The side brush is connected by buckles, and can be
removed by hands easily.
2. Mount side rush aer cleaning, or replace the side brush.
Remove
Installation
Tips: It is recommended to replace side brush every 3-6 months to ensure
proper cleaning performance.
Note: Avoid collision when turning it over to avoid
damage to laser radar.

Maintenance
13
1. When the dust bag is full, the orange LED indicator on dirt
disposal will lighting. Please change for a new one.". Please
change dust bag in time when it's full to keep dirt disposal
function normal.
1. Invert the dirt disposal to check whether the dirt tunnel is
blocked by foreign maer. If it is blocked, use screwdriver to
detach the transparency cover and remove the foreign
maer according to the following picture.
Note: Do not dismantle it with excessive force.
Aer finishing clear-up, mount it again in place.
Replace dust bag
Replace dust duct
Clean sensor
1. It is recommended to weekly clean each sensor with clean
and so cloth to ensure proper cleaning performance.
Laser radar
Charging electrode
Robot vacuum-mop:
Cliff sensor×4
Laser sensor×3
Charging electrode×2
Laser radar×1
Charging electrode
Laser sensor
Laser sensor
Cliff sensor
Cliff sensor

SpecificationsMaintenance
14
Maintenance of baery
1. The robot is equipped with a high-performance rechargeable
lithium-ion baery pack. Please keep the baery charged
regularly to maintain its performance.
2. If you do not use it for a long time, please turn it off, and
charge it at least once a month to avoid damage to the
baery due to over-discharge.
Automatic dirt disposal charging dock:
IR lens×1
Automatic dirt disposal charging probe×2
IR lens
Robot Vacuum-mop
Model
Dimensions
Rated voltage
Rate power
φ350mm×95mm
14.4V
55W
V-RVCLMD40B
Baery capacity 5200mAh
Wireless Connectivity Wi-Fi IEEE 802.11b/g/n 2.4GHz
Operation Frequency 2400-2835MHz
Maximum Output Powers ≤18 dBm
Automatic dirt disposal
Rated power
Rated input
Rated output
Rated frequency
Dimensions
1050W
Model V-RVCLMD40B
24V 1.5A
50-60Hz
220 - 240V~
This product is in compliance with Class I laser safety standard
under IEC60825-1:2014, and will not generate laser radiation
hazardous to human.
405*238*295mm
Automatic dirt
disposal
charging probe

Trouble Shooting FAQ
15
Fault Prompt Solution
Error #2. Clean cliff
sensor and relocate the
robot.
Error #3. A strong
magnetic field is
detected. Relocate the
robot and try again.
Error #1. Make sure the
laser ranging sensor is
not blocked.
Error #4. Check collision
sensor and remove any
foreign object on it.
Error#5. The robot is at
abnormal temperature.
Stop operating till
normal temperature is
recovered.
Error #6.Charging fails.
Please clean charging
contact
Check for or remove any foreign
maer around laser radar, or relocate
the robot and restart it.
Clean the cliff sensor and try again
(for more details refer to the user
manual).
Relocate the robot and try again.
Try to press the bumper strip and
remove any foreign maer, and then
restart the robot.
The robot is in too high or low tempera-
ture. Stop operating till normal
temperature is recovered.
Check the adapter, or check
whether the automatic dirt disposal
is at horizontal position. Switch off
the robot and the automatic dirt
disposal, clean their metal
contacts.
Problem Solution
Fails to start sweeping
Fails to recharge
Fails to start up Low baery. Please go to dirt disposal for
recharging before use. Ambient
temperature too low (lower than 0°C) or
too high (higher than 50°C)
Low baery. Please go to dirt disposal for
recharging before use
There are too many obstacles near the
dirt disposal. Please put the dirt disposal
in an open area.
Main machine is too far from the
automatic dirt disposal. Please put it near
the automatic dirt disposal and try again.
Cleaning operation is
noisy.
Cleaning performance
deteriorates or dust
drops.
The machine operates
improperly.
Power it off and than power it on again.
Main brush, side brush or le/right caster
is damaged by foreign object Power off
the machine and remove the foreign
object
The automatic dirt disposal is full of dust.
Please empty the collector.
Filter component is blocked. Please clean
it Main brush is damaged by any foreign
object. Please clean the main brush.
Wi-Fi connection is
unavailable.
Weak Wi-Fi signals. Make sure the robot is
in proper coverage of Wi-Fi signals.
Wi-Fi connection fails. Reset Wi-Fi
connection and download the latest App
and try again.
Robot is always offline. Make sure the machine is connected to
network successfully, and always within
coverage of Wi-Fi.

Breakpoint resume. Make sure non-disturbance mode is not
activated, which will disable proceeding
at breakout point
Proceeding at breakout point is
unavailable when the machine is being
charged.
FAQ
16
Robot fails to return to
charging dock aer
fixed point cleaning or
being repositioned.
Charging fails.
Scheduled cleaning
fails.
Robot fails to be paired
with cell phone.
Problem Solution
As the robot will re-generate a map aer
fixed-point cleaning or being repositioned
by a long distance, it may fail to locate
charging dock for charging. In such case,
place the machine onto charging dock
manually.
Make sure there is sufficient spaces
around charging dock, and there is no dust
or blockage on the surface of electrode of
charging dock.
Make sure the machine has been
connected to the network, as disconnec
tion from network will fail sync and
scheduled cleaning task.
Make sure both charging dock and main
machine are within coverage of Wi-Fi and
good signals, and then reset Wi-Fi
connection for pairing by following the
instructions in the manual.


Manufactured by: Guangdong Lizi Technology Co., Ltd
Address: Room 1-6, North of 1st Floor, Block A, Shengda Industrial Park, North No.2,Xinxi Four
Road,Xiashi Village,Lunjiao Town,Shunde District,Foshan,Guangdong,China
Table of contents
Other VIOMI Vacuum Cleaner manuals