VIOMI V-RVCLM21B User manual

Model : V-RVCLM21B
User Manual
Cleaning Robot
Please read this manual carefully before use and keep it properly. The adapter supplied with this product can only be used at
an altitude below 2000m.

CONTENTS
Product Introduction...........................................................................................................................
Installation Instructions ......................................................................................................................
Operation Instructions........................................................................................................................
Routine Maintenance.........................................................................................................................
Basic Parameters ..............................................................................................................................
Troubleshooting .................................................................................................................................
Common Problems ............................................................................................................................
Restrictions on Use............................................................................................................................
Warranty Certificate ...........................................................................................................................
1-3
4-5
6-7
8-9
10
11
12
13
14

1
Product Introduction
R
obot
Intelligent recharging
S
hort press it to start intelligent recharging
Startup and shutdown/global cleaning
S
hort press it to start/suspend cleaning
Long press it for 3s to start up or shut down the robot
Blue light remains on: Working normally
Y
ellow light blinks slowly: Returning for recharging / low battery
Y
ellow light breathes: Charging
B
lue light blinks slowly: Entering the network configuration mode
B
lue light breathes: Starting up / Upgrading firmware
R
ed light blinks fast: Abnormal state
Network configuration
I
n power-on state, press and hold and
simultaneously for 3s to enter network configuration.
Cover opening
T
ip: The dustbin can be removed by opening the top
cover from here.

2
Product Introduction
Robot and Sensor
Laser radar
Top cover
Button
Infrared receiving sensor
Collision sensor
Universal wheel
Charging electrode
Battery
Side brush
Boundary sensor
Cover for middle motor
Rolling brush
Left wheel
Right wheel

3
Product Introduction
Water Tank
C
harging Dock
Water inlet
Water tank
Water tank clip
Signal
transmitting area
Charging
electrode
Charging indicator
Charging electrode
Cable slot
Dustbin component
Duster component
Duster
Dustbin
H
EPA
Filter mesh
Clip
Sticking area
Duster bracket

4
Installation Instructions
1. Connect the power cord, and collect the redundant cable.
2. Place the charging sock against a wall, and connect the
power supply.
3. Startup and charge.
Long press for 3s; the indicator light on the robot comes
on, connect the robot to the charging dock for charging.
* In case of low battery, it is possible that the robot cannot start up or shut
down. Please directly connect the robot to the charging dock.
* The robot will start up automatically after connection to the charging dock.
* The robot cannot shut down while it is connected to the charging dock.
Blue light remains on: Startup finished / working normally
/ charging finished
Yellow light breathes: Charging
Red light blinks: Abnormal state
>1.5m
>0.5m
>0.5m
* Please put the redundant cable into the cable slot at the bottom
of the charging dock, otherwise the cable may be dragged and
disconnect power supply to the charging dock.
* Please ensure a space of at least 0.5m on both the left and right
sides of the charging dock, and a space of at least 1.5m in front of it;
* Do not expose the charging dock to direct sunlight.

5
Installation Instructions
4. Install the water tank
Open the rubber cover of the water tank;
fill the water tank with water; then close the rubber cover.
①
Install the water tank into the robot in the indicated
direction; confirm that the clip is properly installed.
②
③Attach the duster into the duster bracket, and stick
the duster to the Velcro.
④Manually press the clips on both sides of the duster
bracket, and push the duster bracket to the bottom of
the robot in the indicated direction.
* Do not use the water tank in the first cleaning;
* Do not use the water tank if the robot is unattended;
* Remove the water tank and duster bracket before charging
the robot or leaving it idle;
* If carpets are used in the house, please set virtual walls
in the App.

6
Operation Instructions
1. Startup/shutdown
The robot will start up automatically while it is being charged on the charging dock.
The robot cannot shut down while it is being charged on the charging dock.
Long press the Power Button; the power indicator light comes on, and the robot enters the power-on state; after startup, a prompt tone will be heard.
When the robot is stationary, long press the Power Button to shut it down; there will be a voice prompt indicating shutdown.
2. Cleaning
1. In power-on state, short press the power button; the voice prompt “Enter global cleaning” will be heard.
2. In power-on state, short press the Recharge Button; the voice prompt “Enter recharge mode” will be heard.
3. Enter the device home page via the App; click the “Start” button to start cleaning. The voice prompt “Enter global cleaning” will be heard.
4. Enter the device home page via the App; click the “Recharge” button to start recharging. The voice prompt “Enter recharge mode” will be heard.
* In case of low battery, the cleaning function cannot be enabled.
3. Recharging
1. When the robot finishes cleaning, the voice prompt “Cleaning is finished. Enter the recharge mode” will be heard. The robot will get recharged
automatically.
2. In case of low battery during cleaning, the robot will get recharged automatically; after it gets fully charged, it continues where it stops previously.
3. The robot shuts down automatically if the battery is exhausted, you can manually put back the robot to the charging dock for charging. Please ensure that
the charging electrodes are in good contact.
4. Light indication
1. When the button light on the robot is off, the robot is in “power-off/sleep” state.
2. When the blue button light on the robot blinks continuously, the robot is in “network configuration” state.
3. When the blue button light on the robot flashes in a breathing manner, the robot is in “start/upgrade” state.
4. When the blue button light on the robot remains on, the robot is in “idle/standby/cleaning/pause” state.
5. When the yellow button light on the robot continuously blinks slowly, the robot is in “recharge” state.
6. When the yellow button light on the robot flashes in a breathing manner, the robot is in “charging” state.
7. When the red button light on the robot continuously blinks fast, the robot is in “fault/troubleshooting” state.
8. When the blue light on the charging dock comes on, the charging dock is in power-on working state.
5. Network configuration & firmware upgrade
Scan the QR code on the robot to download the App; reset WiFi according to instructions in the App. Refer to the Quick Guide for details.
With the App, you can directly query and update the device firmware. During upgrade, ensure that the device is in charging state and that the battery level is
no less than 60%. For update steps, please see the guide provided in the App.
* After successful download, carry out network configuration according to the prompts in the App. When the robot is connected to the Internet, you can use the
App to remotely start cleaning, schedule cleaning and realize other functions.
* The robot does not support WiFi networks at 5.8G frequency band.
* App unbinding: Press the Recharge Button for 5s and release it when a sound is heard; then press the Recharge Button again for 5s, and the voice prompt
“Initialization starts / Initialization successful” will be heard.

Pause
When the robot is in operation, press any button to pause; press
to continue cleaning; press to return to the charging dock
and end the current cleaning task.
Sleep
If no operation is performed within 5min, the robot will automatically
enter sleep state. In this state, you can wake up the robot by
pressing the button or via the App.
The robot will not enter sleep state while it is being charged on the
charging dock.
The robot will shut down automatically when the sleep time
exceeds 12h.
Fault state
In case of any abnormality during operation, the red button light will
blink fast and a voice prompt will be heard. For the solution, please
see the “Troubleshooting” section.
If, in fault state, no operation is performed within 5min, the robot will
enter sleep state automatically.
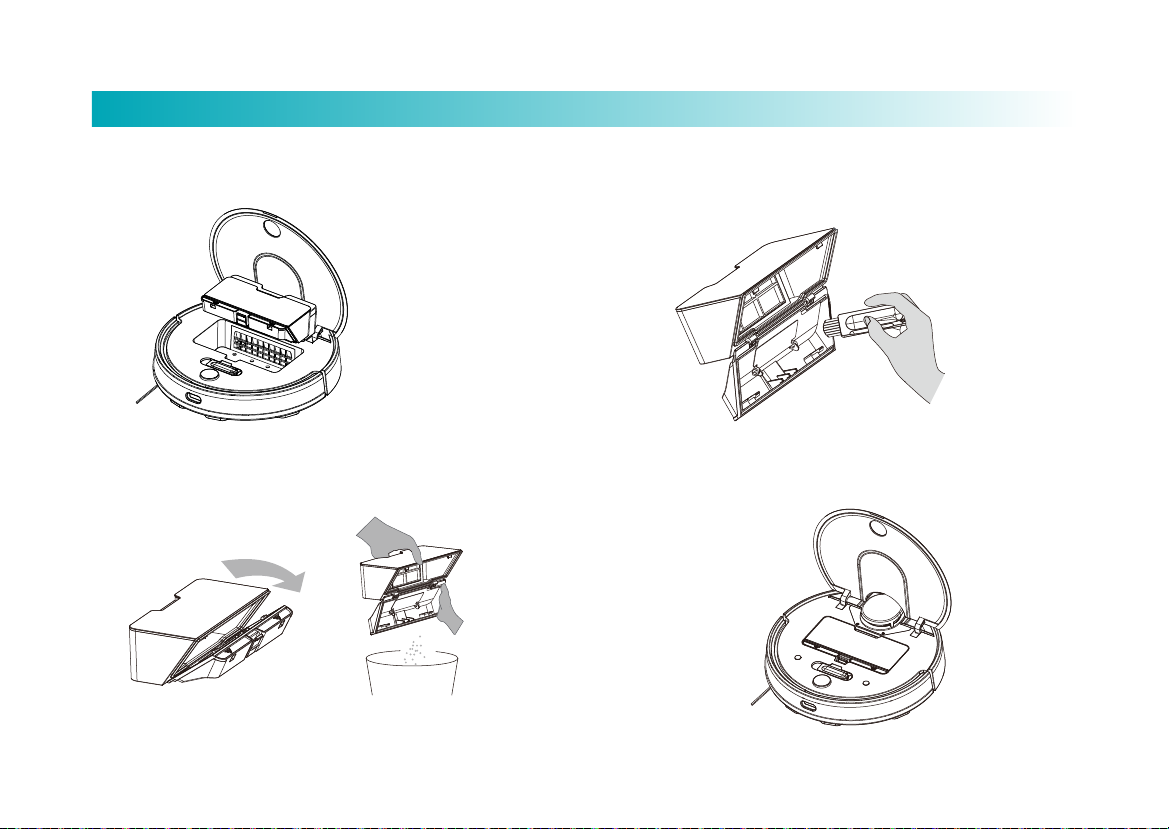
Refill the water tank or clean the duster during cleaning
If it is necessary to add water or clean the duster during cleaning,
first press any button to pause; then remove the water tank, and add
water or clean the duster; after that, put back the water tank and
duster, and press to continue.
Cleaning preference
With the App installed on the mobile phone, you can select a mode
among ECO, Standard and Strong; the default is Standard mode.
Do Not Disturb (DND) mode
In the DND period , the robot will not respond to Resume
Cleaning,
Scheduled Cleaning or give voice prompts. The DND mode is
enabled during 22:00-07:00 by default, and can be disabled via
the App on the mobile phone.
Resume Cleaning mode
The robot resumes where it left off. If the battery runs out during
cleaning, the robot will automatically return to the charging dock to
charge itself. After it is fully charged, it will resume where it
previously stops (if cleaning is manually ended during charging,
the robot will cancel the resume cleaning task).
User-defined area
With the App, you can define the areas to be cleaned, and the
robot will clean these areas.
Clean designated area
With the App, you can designate a target position on the map. The
robot will automatically plan the route to the designated position
and start cleaning in 2*2 square areas.
Scheduled cleaning
With the App, you can schedule the cleaning. The robot will start
cleaning at the designated time, and automatically return to the
charging dock after cleaning.
Virtual walls
With the App, you can set Virtual Walls to prevent the robot from
entering areas that do not require cleaning.
Map memorization
If Memorize Map is enabled in the App, the robot will save the
updated map and virtual walls after cleaning and successful
recharging.
7
Operation Instructions

8
Routine Maintenance
Dustbin
1. Open the top cover to take out the dustbin, as shown in the figure.
2. Open the HEPA component; take it out and empty it.
3. Use the cleaning brush to clean the dustbin,
and put back the HEPA component.
4. Reinstall the dustbin, close the top cover.

9
Routine Maintenance
HEPA Component
Follow the figure to remove the HEPA component and clean it.
Rolling Brush
1. Turn over the lower clip toremove the cover for the middle motor;
2. Take out the rolling rush and clean the bearing;
3. Clean the rolling brush;
4. Reinstall the rolling brush and fasten the clip of the cover.
Note: Replace the rolling brush every 6-12 months to ensure the cleaning
effect.
Side Brush
Remove and clean the side brush regularly.
Boundary Sensor
Clean the boundary sensor with soft cloth regularly
■
■
■
Cover for middle motor
Cl
ip
Ro
lling brush
B
earing
B
oundary sensor
Replace the HEPA component every three months as it is
notwashable;
Clean the HEPA component with cleaning brush regularly
to avoid blockage;
Replace the side brush every three months to ensure the
cleaning effect.

10
Basic Parameters
Robot
Name
Parameter
Over dimensions
Φ350mmx94.5mm
Product weight
Approx. 3.27kg
Rated voltage
14.8V
Rated power
40W
Battery capacity
3200mAh
Charging Dock
Over dimensions 153.9mmx74.6mmx99.5mm
Rated power 24W
Rated input 20V 1.2A
Rated output 20V 1.2A
Rated frequency 50/60Hz
Names and Contents of Hazardous Substances in the Product
Part name
Hazardous substances
Pb
Hg
Cd
Cr(VI)
Pbb
Pbde
Metals
X
Printed circuit boards
Plastics
Standard parts (screw,
washer, etc.)
Other metal structural parts
(motor, decorative part*, etc.)
This table has been prepared in accordance with SJ/T11364-2014
○
○
○
○
○
○
○
○
○
○
○
○
○
○
○
○
○
○
○
○
○
○
○
○
○
○
○
○
○
: Indicates that the content of this hazardous substance in all materials of the corresponding part is below the limit specified in GB/T 26572-2011.
X: Indicates that the content of this hazardous substance in at least one homogeneous material of the corresponding part is above the
limit specified in GB/T 26572-2011.
Currently, the part marked “X” , which contains substances or elements that are not environmentally friendly, cannot be completely
replaced by one containing no such substances or elements due to the limited level of global technology and process. Technological
improvements will be made gradually in the future.
*: Indicates some product models contain this part.
All the above symbols are subject to the Measures for the Administration of the Restricted Use of the Hazardous Substances in China and the supporting
standard SJ/T11364. Long-term use of the product will not cause harm to human health, so you may rest assured.
Marking for the restricon of the
use of hazardous substances

11
Troubleshooting
Fault prompt
Solution
Abnormality 1: Please confirm that the laser radar is not blocked.
Check or clear foreign objects around the laser radar, or move the robot to a new position
and restart it.
Abnormality 2: Please wipe the boundary sensor and move the
robot to a new position for restart.
Wipe the boundary sensor and retry (for the sensor position, please consult the
Instruction Manual).
Abnormality 3: Intense magnetic field is detected. Please move
to a new position and retry.
Move the robot to a new position and retry.
Abnormality 4: Please check and clear up foreign objects on the
collision sensor. Press the collision strip, clear foreign objects and restart.
Abnormality 5: Robot temperature is abnormal. Please wait until
the temperature becomes normal.
The robot temperature is too high or too low. Wait until the temperature becomes normal
before reuse.
Abnormality 6: Charging is abnormal. Please clear up the
charging contact area.
Check whether the power adapter used is the one originally supplied with the product, and
whether the charging dock is placed horizontally. Turn off the robot, cut off power supply
to the charging dock, wipe the metal contacts.

12
Problem
Solution
Power-on failure The battery level is too low; connect the robot to the charging dock for charging.
The ambient temperature is too low (<0℃) or too high (>50℃).
Fail to start cleaning
The battery level is too low; connect the robot to the charging dock for charging.
Recharging failure
There are too many obstacles near the charging dock; place the charging dock in an area free of
obstacles.
The robot is too distant from the charging dock; place the robot near the charging dock and
retry.
Abnormal actions
Shut down and restart the robot.
Abnormal sound during cleaning
The rolling brush, side brush or left/right wheel may be entangled with foreign objects; stop the
robot and clear them up.
Degradation of cleaning capacity or dust come-off
The dustbin is full; clear up the dustbin.
The HEPA component is blocked; clear it up.
The rolling brush is entangled with foreign objects; clear up the main brush.
Fail to connect to Wi-Fi
Wi-Fi signal is weak; ensure that the robot is in an area with good Wi-Fi signal.
Wi-Fi connection is abnormal; reset Wi-Fi and download the latest App, then try again.
Resume cleaning failure Confirm that the robot is not in DND mode since it will not continue cleaning in this mode.
The robot will not continue cleaning when it is manually brought to the charging dock.
Charging failure Ensure that there is sufficient space around the charging dock, and that the surfaces of the
electrodes are free from dust and coverage.
Fail to do scheduled cleaning
Confirm that the device has been connected to the network; otherwise synchronization failure
may result and timed cleaning tasks won't be performed.
The robot is always in off-line state
Confirm that the device has been successfully connected to the network and it is always in the
range covered by Wi-Fi signal.
Fail to pair the mobile phone with the device Ensure that the charging dock and the robot are in the area with good Wi-Fi signal; reset Wi-Fi
according to the steps described in the Instruction Manual; then pair again.
Common Problems

13
Battery and Charging
The laser radar of this product complies with the requirements of IEC 60825-1:2014 on the safety of Class 1 laser products; it will not produce laser radiation
harmful to human health.
■
■
■
■
■
■
■
■
■
■
■
■
■
■
■
■
■
■
■
■
■
■
■
■
This product only applies to cleaning of house floors, and should not be used in outdoor areas (e.g., balcony), areas other than floors (e.g., sofa), or
commercial or industrial environments;
Do not use the product in environments (e.g., duplex floor, balcony, top of furniture) that are not equipped with guardrails;
Do not use the product in environments where the temperature is above 40℃or below 0℃or where any liquid or slime exists on the floor;
Put away all cables in the house prior to use, to prevent them from being dragged during running of the robot;
Put away all fragile objects and sundries (e.g. vase, plastic bag) on the floor, as the robot may get blocked or gently hit obstacles and damage the
valuables in the house;
Never allow any persons with physical, mental or perceptual disorders (including children) to use or operate this product;
Never allow children to play with the robot; when the robot is working, keep children and pets away from it;
Do not place objects, children or pets on the robot whether it is stationary or running;
Do not use the product to clean any burning objects (e.g., burning cigarette butt);
Do not use the product to clean shag carpets (it is possible that some dark carpets cannot be cleaned);
Do not use the product to collect hard or sharp objects (e.g., decoration wastes, glass, iron nails);
Do not use the laser radar protective cover as a handle to move the device;
Clean or maintain the robot and charging dock in power-off or idle state;
Never sprinkle any liquid into the product (the dustbin should be wiped dry before reinstallation);
Do not place the robot upside down as it may damage the laser radar;
Use the product according to the Instruction Manual or the Quick Guide. Any loss or injury caused by improper use shall be on user’s own account.
Do not use any battery, power adapter or charging dock supplied by a third party.
Do not use non-rechargeable batteries.
Never attempt to remove, repair or modify the battery or charging dock.
Do not place the charging dock near heat sources (e.g., heating radiator).
Do not use a wet cloth or any liquid to wipe this product.
Do not dispose of waste batteries at will. It is suggested to hand them over to a professional organization for treatment.
Transport the product in power-off state in the original packaging box.
If the product is to be left unused for a long time, please turn off the robot after full charging, and store it in a cool, dry place; recharge it at least once a
month to avoid battery damage.
Restrictions on Use

14
Warranty Certificate
Non-warranty Regulations
After-sales warranty (repair, replacement and return) are provided for this product strictly according to the Law of the People’s
Republic of China on the Protection of Consumer Rights and Interests and the Law of the People's Republic of China on Product
Quality. The services cover the following:
Warranty Period
■ You may choose to return, replace or repair the product in case of any performance failure not caused by man-made reasons within 7
days from the date of purchase;
■You may choose to replace or repair the product in case of any performance failure not caused by man-made reasons within 15 days from
the date of purchase;
■We will provide maintenance services free of charge for any performance failure not caused by man-made reasons within the warranty
period.
The warranty is valid only when the product is used normally. Any man-made damage and the following situations are not covered by the
warranty:
1. The product gets damaged due to user’s negligence, fault, misuse or disaster (e.g., adherence of food or liquid, water ingress, crack due to
external force, scratches and damage of peripheral components);
2. User has disassembled the device, or repaired or modified the device without authorization by the manufacturer (e.g., damage caused by
change of color, use of additional part, or unauthorized modification);
3. The product gets damaged due to connection with any improper accessory or as a result of transport or other accidents;
4. The Warranty Certificate is absent (expect that user can prove the product is within the warranty period), or the warranty period has
expired;
5. The content indicated in the Warranty Certificate is inconsistent with the actual product or has been altered;
6. The product gets damaged due to force majeure factors.

Warranty Card
Model
Warranty Period
Robot
(DD/MM/YYYY)
User Name Name
Address
Store
Name
Address
Seal
Warranty
(Show This Card before Service)
Period
Items
Warranty Period
Robot
1 year
Battery 6 months
Charging dock, power adapter 6 months
Consumables: side brush,
cleaning tool Not covered
Note: 1. This guarantees basic maintenance services.
The warranty period for any promotional product is
subject to the actual situation.
Thanks for purchasing our smart cleaning robot! In order to guarantee your rights and interests,
Customer Service hereby promises you standard services and is always ready to serve you
whenever you need.
1. Please keep your Warranty Card properly;
2. When the product you purchased needs service, please complete the warranty information
table and make sure your handwriting is clear and legible;
3. To enjoy our after-sales services, please present your Warranty Card and relevant purchase
information. If the product is purchased online, please provide your account on the platform
where you purchased the product so that you can enjoy relevant after-sales services;
Warranty Principles
1. If the product has any quality problem other than those due to man-made damage or
unauthorized disassembly or repair, you may have it replaced at the store where you
purchased the product within 7 days from the date of purchase;
2. The product is entitled to free service within the warranty period;
3. The following situations will void the warranty, but we can provide charged services for which
the accessory and labor costs will be on your own account.
A. Man-made damage, including damage caused by use in abnormal operating environments
or without observing the Instruction Manual;
B. User’s unauthorized disassembly, repair or modification of the product, or repair by a
person not from our service department;
C. Damage caused by force majeure events (e.g., fire, earthquake, lightning stroke);
D. Absence of the Warranty Card or any valid certificate of purchase, and no other means to
verify user’s information;
E. Failure to check and verify the date of purchase.

www.viomi.com
Table of contents
Other VIOMI Vacuum Cleaner manuals