ViOptix Intra.Ox 2.0 User manual

Intra.Ox™ Handheld Tissue Oximeter
Instructions for Use
ViOptix, Incorporated
39655 Eureka Drive
Newark, CA 94560
Phone: 510-226-5860 Fax: 510-226-5864 Website: www.vioptix.com
ViOptix part number for this IFU: OXY-2-DUR-IFU-1

Part number:
OXY-2-DUR-IFU-1 Rev A
CONFIDENTIAL
Page 2 of 26
Contents
1General Information 3
1.1 Overview .................................................................................................................... 3
1.2 Indications For Use ................................................................................................... 3
1.3 Intended User ............................................................................................................ 4
1.4 References.................................................................................................................. 4
2Safety 5
2.1 Contraindications, Warnings, and Cautions .......................................................... 5
2.2 Target Population..................................................................................................... 7
3Installation and Setup 8
4Device Configuration and Interface Elements 8
4.1 Display ....................................................................................................................... 8
4.2 Sensing Surface (Sensor Face) ................................................................................. 9
5Operating the ViOptix Intra.Ox™ 9
5.1 Device Setup .............................................................................................................. 9
5.2 Holding the Device ................................................................................................. 13
5.3 Measuring Percent Oxygen Saturation ................................................................. 14
5.4 Other Device Modes ................................................................................................ 16
5.5 After the procedure................................................................................................. 18
5.6 Resolving Warnings and Errors ............................................................................. 19
6Specifications 21
7Labels 22
7.1 Box and Pouch label (Sterile Sheath).................................................................... 22
7.2 Box label (Re-Usable Main unit) ........................................................................... 23
7.3Box and Pouch label (Battery)............................................................................... 24
7.4 Box and Pouch label (Sterile Optical QC Target) ................................................ 25
7.5 Device label ............................................................................................................. 25
7.6 Glossary of Symbols................................................................................................ 26

Part number:
OXY-2-DUR-IFU-1 Rev A
CONFIDENTIAL
Page 3 of 26
1General Information
1.1 Overview
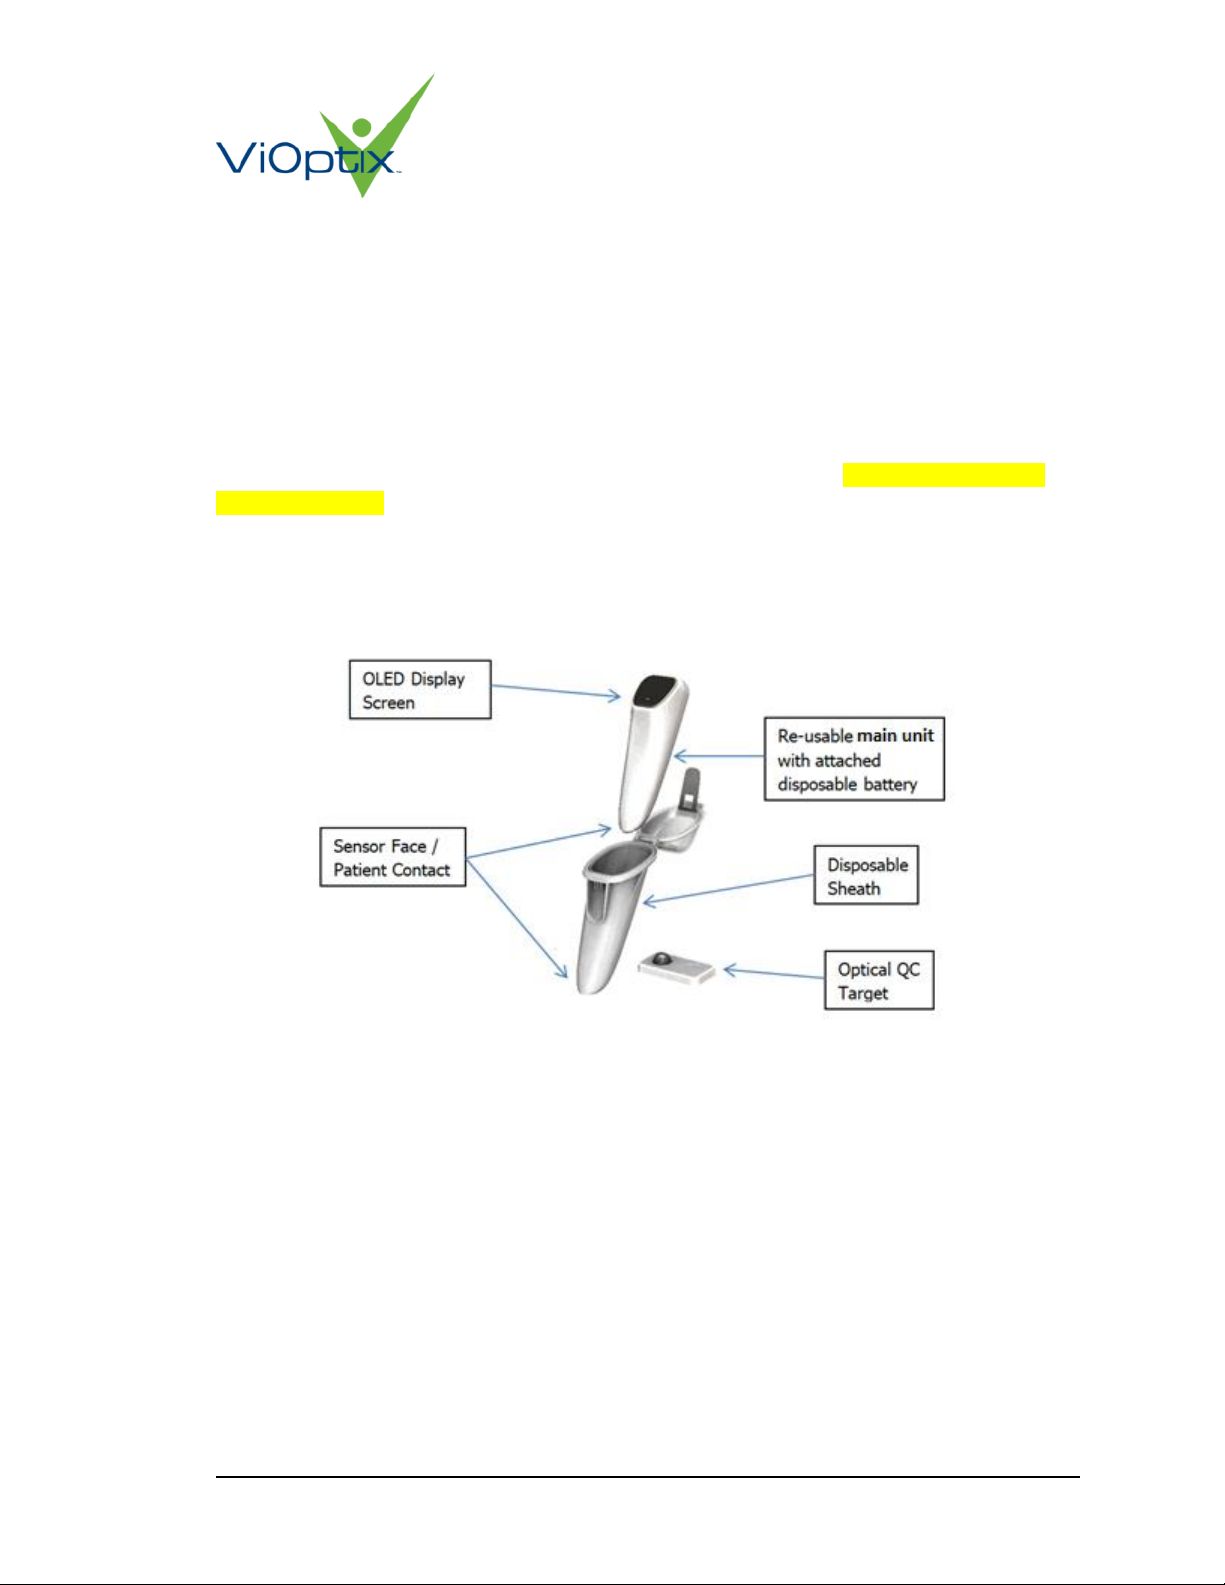
The ViOptix Intra.Ox™ 2.0 Handheld Tissue Oximeter consists of two components: a reusable
main unit that shows a digital readout of %StO2 when the system is in contact with tissue, and a
disposable kit that contains a non-sterile single-use battery pack, sterile single-use disposable
sheath, and QC Optical Target. The Intra.Ox™ 2.0 is abbreviated as Intra.Ox in this document.
This sheath is placed over the reusable main unit with the battery pack attached.
The Intra.Ox™ non-invasively estimates the percent oxygen saturation (StO2) in a volume of
tissue. The device uses spatially-resolved optical measurements at five wavelengths. The device
performs measurements on the patient by direct physical contact to the patient’s tissue and
displays the StO2estimate on the built-in screen. The ViOptix Intra.Ox™ Handheld Tissue
Oximeter is constructed from biocompatible materials that can tolerate bodily fluids and other
liquids such as disinfectants and marking materials.
This manual has been prepared to assist medical personnel in the operation of the ViOptix
Intra.Ox™ Handheld Tissue Oximeter. Prior to operating this device, all personnel must read this
manual and gain a thorough understanding of its proper operation. Special attention should be
directed to all cautions and warnings regarding the use of the product.
ViOptix cannot, and does not intend within this manual, to give medical advice.
1.2 Indications For Use
The Intra.Ox™ 2.0 Handheld Tissue Oximeter is intended to non-invasively estimate the percent
oxygen saturation (StO2) in a volume of tissue.
The Intra.Ox™ 2.0 Handheld Tissue Oximeter is indicated for use in monitoring patients during
circulatory or perfusion examinations.
The Intra.Ox™ 2.0 Handheld Tissue Oximeter is intended to be used by physicians, surgeons,
nurses, or other skilled users in a medical environment.
The Intra.Ox™ 2.0 Handheld Tissue Oximeter should only be used on adult patients.

Part number:
OXY-2-DUR-IFU-1 Rev A
CONFIDENTIAL
Page 4 of 26
1.3 Intended User
This device is intended to be used by physicians, surgeons, nurses, or other skilled users in a
medical environment.
1.4 References
Trademarks
Intra.Ox™ Handheld Tissue Oximeter is a trademark of ViOptix, Inc.
References
References to “ViOptix” in this manual shall imply ViOptix, Inc.
The information in this manual has been carefully checked and is believed to be accurate. In the
interest of continued product development, ViOptix reserves the right to make changes and
improvements to this manual and the products it describes at any time, without notice or
obligation.
Caution: Federal law (US) restricts this device to sale by or on the order of a physician.
Copyright 2020
Covered by one or more of the following US Patents and foreign equivalents:
6,516,209
9,398,870
ViOptix, Incorporated
39655 Eureka Drive
Newark, CA 94560
Tel: 510-226-5860
Fax: 510-226-5864

Part number:
OXY-2-DUR-IFU-1 Rev A
CONFIDENTIAL
Page 5 of 26
2Safety
2.1 Contraindications, Warnings, and Cautions
2.1.1 Contraindications
There are no known contraindications for the use of the Intra.Ox™ Handheld Tissue Oximeter.
2.1.2 Warnings
Warnings alert the operator to potential serious outcomes to the patient or operator.
•Never make direct patient contact between the main unit and the patient. All
measurements should be taken through the sheath to maintain sterility.
•Once inserted into the sheath, the reusable main unit should not be removed during the
course of the procedure.
•Carefully follow all instructions for transfer of the reusable main unit into the sterile field
to ensure that sterility is maintained.
•The Intra.Ox™ Handheld Tissue Oximeter comes packaged with a reusable main unit
that shows a digital readout of %StO2 and a disposable kit that contains a battery pack
and sterile single use disposable sheath, which is placed over the reusable main unit with
the battery pack attached.
•Please note that the Intra.Ox™ Handheld Tissue Oximeter is NOT intended to be used in
an MR environment
•Do not look directly at the light-emitting distal tip of the Intra.Ox™.
•Inspect the sensor before each use for visible damage. Do not use the instrument if the
sensor has visible damage.
•To prevent damage, do not bend or apply torque to the sensor face.
•Hard knocks, particularly at the distal end of the device, may result in damage to the
delicate fiber-optic cables, which could affect instrument performance. Do not use if
there is visible damage to the Handheld Tissue Oximeter.
•Avoid extreme changes in temperature and/or humidity.
•To reduce the risk of electrical shock, do not open the equipment’s inner housing. Refer
servicing to qualified personnel only.
•This device is not to be used in the presence of combustible or flammable gases,
anesthetics, or cleaners/disinfectants.
•Dispose of used Intra.Ox™ Handheld Tissue Oximeter, disposable sheath, and battery
pack using appropriate biohazard precautions.
•This equipment has been tested and found to comply with the limits of the standard for
medical devices, IEC 60601-1-2 for Class A equipment. The limits are designed to
provide reasonable protection against harmful interference in a typical medical
installation. This equipment generates, uses and can radiate radio frequency energy,

Part number:
OXY-2-DUR-IFU-1 Rev A
CONFIDENTIAL
Page 6 of 26
and, if not installed and used in accordance with the manufacturer’s instructions, may
cause harmful interference to other devices in the vicinity. Portable and mobile RF
communications equipment can affect medical electrical equipment. There is no
guarantee that interference will not occur in a particular installation. If this equipment
causes interference with other devices, which may be determined by turning the
equipment off and on, the user is encouraged to try and correct the interference by one
or more of the following measures:
•Reorient or relocate the device receiving the interference
•Increase the separation between the equipment
•Consult the manufacturer for help
2.1.3 Precautions
Precautions alert the operator to conditions that could lead to tissue irritation or erroneous
results.
•Clean tissue if colored disinfectants are used on or near the measurement location.
•Clean blood or other colored liquids off of tissue before measurements.
•Check the sensor application site frequently to assess positioning, circulation, and tissue
sensitivity of the patient. If required, reposition the sensor to a new site or if redness or
irritation is noted. If irritation continues, discontinue use.
•Avoid placement directly over bony prominences, scar tissue, dark birthmarks or other
visibly non-homogenous tissue, as it could provide improper readings.
•If tissue is uneven, gently flatten tissue or move to a new location.
•When repositioning device, pick up sensor and replace; do not drag.
•Use extra caution when placing on thin or delicate tissue

Part number:
OXY-2-DUR-IFU-1 Rev A
CONFIDENTIAL
Page 7 of 26
2.1.4 Disposal
2.1.4.1 Sheath and Optical QC Target
The sheath and the optical QC target should be considered biohazardous waste after the
procedure. They should be disposed of along with ordinary biohazard waste
2.1.4.2 Re-usable Main Unit
The re-usable main unit contains a variety of electronics. It should be disposed of with electrically
hazardous medical waste and in accordance with all local and hospital disposal procedures.
2.1.4.3 Battery Pack
The Intra.Ox™ Handheld Tissue Oximeter battery pack contains lithium batteries and should only
be disposed of with electrically hazardous medical waste and in accordance with all local and
hospital disposal procedures. Contact the hospital or local environmental control agency for
additional instructions. The battery pack must not be incinerated.
2.2 Target Population
The Intra.Ox™ Handheld Tissue Oximeter should only be used on adult patients.
Part number:
OXY-2-DUR-IFU-1 Rev A
CONFIDENTIAL
Page 8 of 26
3Installation and Setup
The Intra.Ox™ Handheld Tissue Oximeter is a prescription-only device. The reusable main unit
comes fully assembled and packaged in a protective box along with storage bags and wipes for
cleaning the sensor tip between uses. The disposable kit contains one disposable sheath in a
sterile double-pouched configuration and one optical QC target in a sterile double-pouched
configuration, along with a non-sterile battery pack. The Intra.Ox™ is handheld, battery
powered, and requires no external power source.
Before using, inspect the device and packaging for any sign of damage. Do not use if unit has
been compromised. No installation is required.
4Device Configuration and Interface Elements
Figure 1: Device Configuration and Interface Elements
4.1 Display
When the battery pack is connected to the reusable main unit, the OLED displays a splash
screen, followed by a series of instructions related to sheathing procedure.
When in use during surgery, the OLED display shows the following:
•Current tissue oxygen saturation value, in percent
•Current measurement quality ‘Q’ on 1-5 scale, represented by a series of ascending
bars
•Total powered-up duration during the current surgery
•A battery life indicator
•The remaining lifetime number of uses for the main unit

Part number:
OXY-2-DUR-IFU-1 Rev A
CONFIDENTIAL
Page 9 of 26
4.2 Sensing Surface (Sensor Face)
The sensor face ,which takes measurements through the sterile sheath, includes:
•Light sources
•Light detectors
5Operating the ViOptix Intra.Ox™
5.1 Device Setup
The procedure for Intra.Ox™ setup requires two operators:
•A ‘sterile operator,’ inside the sterile field. This operator handles the disposable kit,
including the sterile sheath
•A ‘non-sterile operator,’ outside of the sterile field. This operator handles the non-sterile
main unit
The device setup procedure must be followed strictly to ensure sterility of the sterile field.
Figure 2: On overview of the device setup process

Part number:
OXY-2-DUR-IFU-1 Rev A
CONFIDENTIAL
Page 10 of 26
5.1.1 Step 1: Passing components into the sterile field
IMPORTANT: The outer pouches are non-sterile and should only be handled by the non-sterile
operator. The inner pouches are sterile and should only be handled by the sterile operator.
1. The non-sterile operator obtains the double-bagged sheath and double bagged optical
QC target from disposable kit. The outer pouches are non-sterile, and the inner pouches
are sterile.
2. The outer pouches should be opened by the non-sterile operator, and the sterile contents
of the inner pouches slid into the sterile field
5.1.2 Step 2: Removal of Sterile Contents
3. The inner, sterile pouches should be opened by the sterile operator in the sterile field.
The optical QC target and the sheath can be removed from each bag and set aside.

Part number:
OXY-2-DUR-IFU-1 Rev A
CONFIDENTIAL
Page 11 of 26
5.1.3 Step 3: Battery Installation
4. The non-sterile operator holds up the reusable main unit and attaches the battery pack
to the back of the device. It will attach to the device with magnets.
5. As soon as the battery pack is connected, the OLED screen of the device will turn on.
The non-sterile operator will see the Test Pattern, followed by the ViOptix logo.
Figure 3: Left: The test pattern. Right: The ViOptix logo
After a few seconds, the device will authenticate the battery and display the following screen:
Figure 4: Battery and configuration authentication screens
After battery authentication, the both operators will be prompted to work together install the
reusable main unit into the single-use sheath. The device will display an animation of the
process.
5.1.4 Step 4: Tab and Foam Removal
6. The sterile operator obtains the sheath, and removes the tab protecting the window by
pulling upwards on the exposed plastic component.
7. The sterile operator removes the protective foam tab from the device latch by pulling
downwards on the latch
Part number:
OXY-2-DUR-IFU-1 Rev A
CONFIDENTIAL
Page 12 of 26
5.1.5 Step 5: Installation into Sheath
8. The non-sterile operator drops the combined reusable main unit and battery pack into
the sterile sheath at the edge of the sterile field.
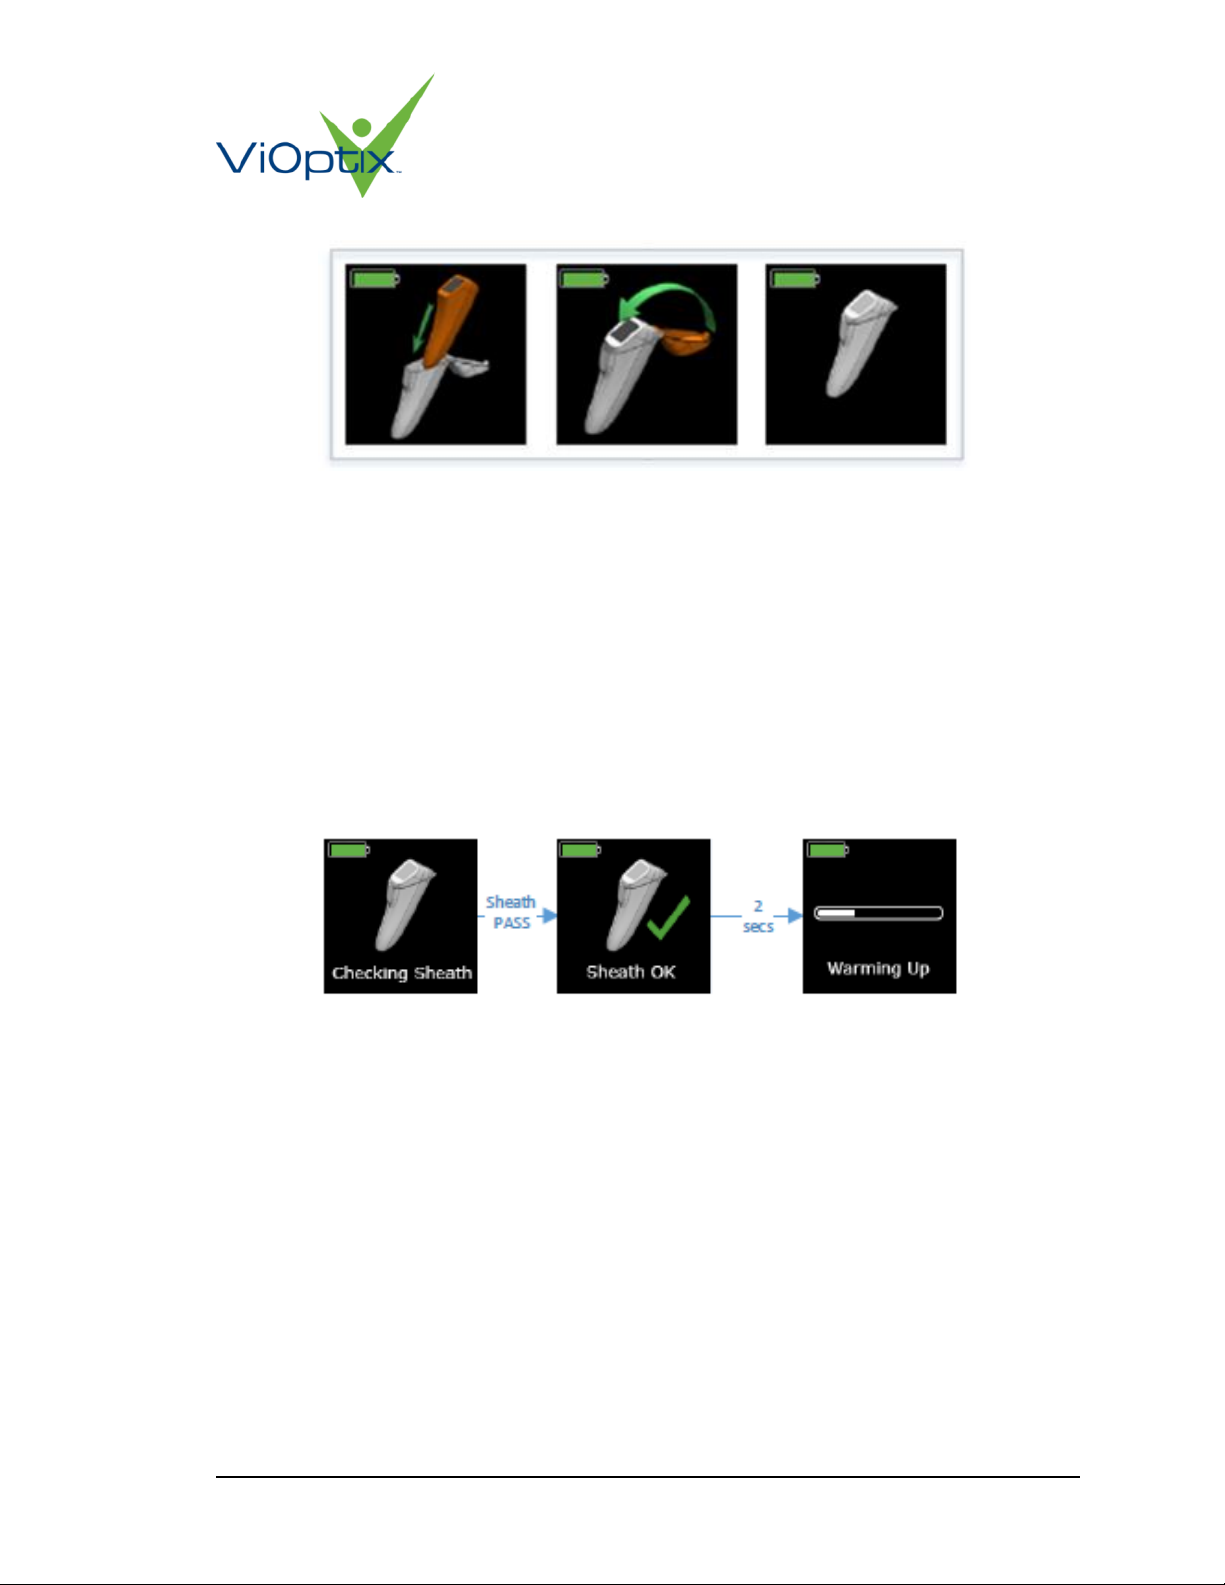
5.1.6 Step 6: Closing the Sheath
9. The sterile operator closes the lid of the sheath until it latches.
At this point, the non-sterile operator has completed their part of the installation process.
Once the sheath is latched closed, it should not be opened again for the duration of the
procedure.
After installation, the system will verify the sheath installation process as it goes through the
below screens.
The device warm-up may take up to ten minutes. Keep the device away from heat sources (such
as bright lights) and from cold circulating air during the warm-up.
If the error ‘Missing Calibration’ appears on-screen during device warm-up, the device cannot be
used. Please use a different reusable main unit for this procedure and contact ViOptix.

Part number:
OXY-2-DUR-IFU-1 Rev A
CONFIDENTIAL
Page 13 of 26
5.1.7 Optical Target Quality-Control Check
To verify the sheath installation process, the sterile operator uses the enclosed optical QC target.
10. First, the distal tip of the device is firmly pressed against the black hemispherical side of
the optical QC target. This ensures good contact between the optics and the window.
11. Next, the device prompts the operator to press the device against the other side of the
optical QC target.
The sterile operator will hold the distal tip of the assembled device in firm, parallel contact
against the plastic. After this check, the device transitions into measurement mode, and the
Intra.Ox™ is ready for use.
5.2 Holding the Device
Hold the tip of the Intra.Ox™ device similarly to a pen, with the wrist in a neutral position. Lightly
rest hand on the patient and use fingers to brace the device for maximum stability. Sensing face
should be parallel to tissue and in gentle contact. Do not apply pressure to the sample site as
blanching may occur, resulting in local ischemia and a misleading measurement.
Avoid non-parallel/angled contact with the tissue as doing so reduces device measurement
accuracy.
Part number:
OXY-2-DUR-IFU-1 Rev A
CONFIDENTIAL
Page 14 of 26
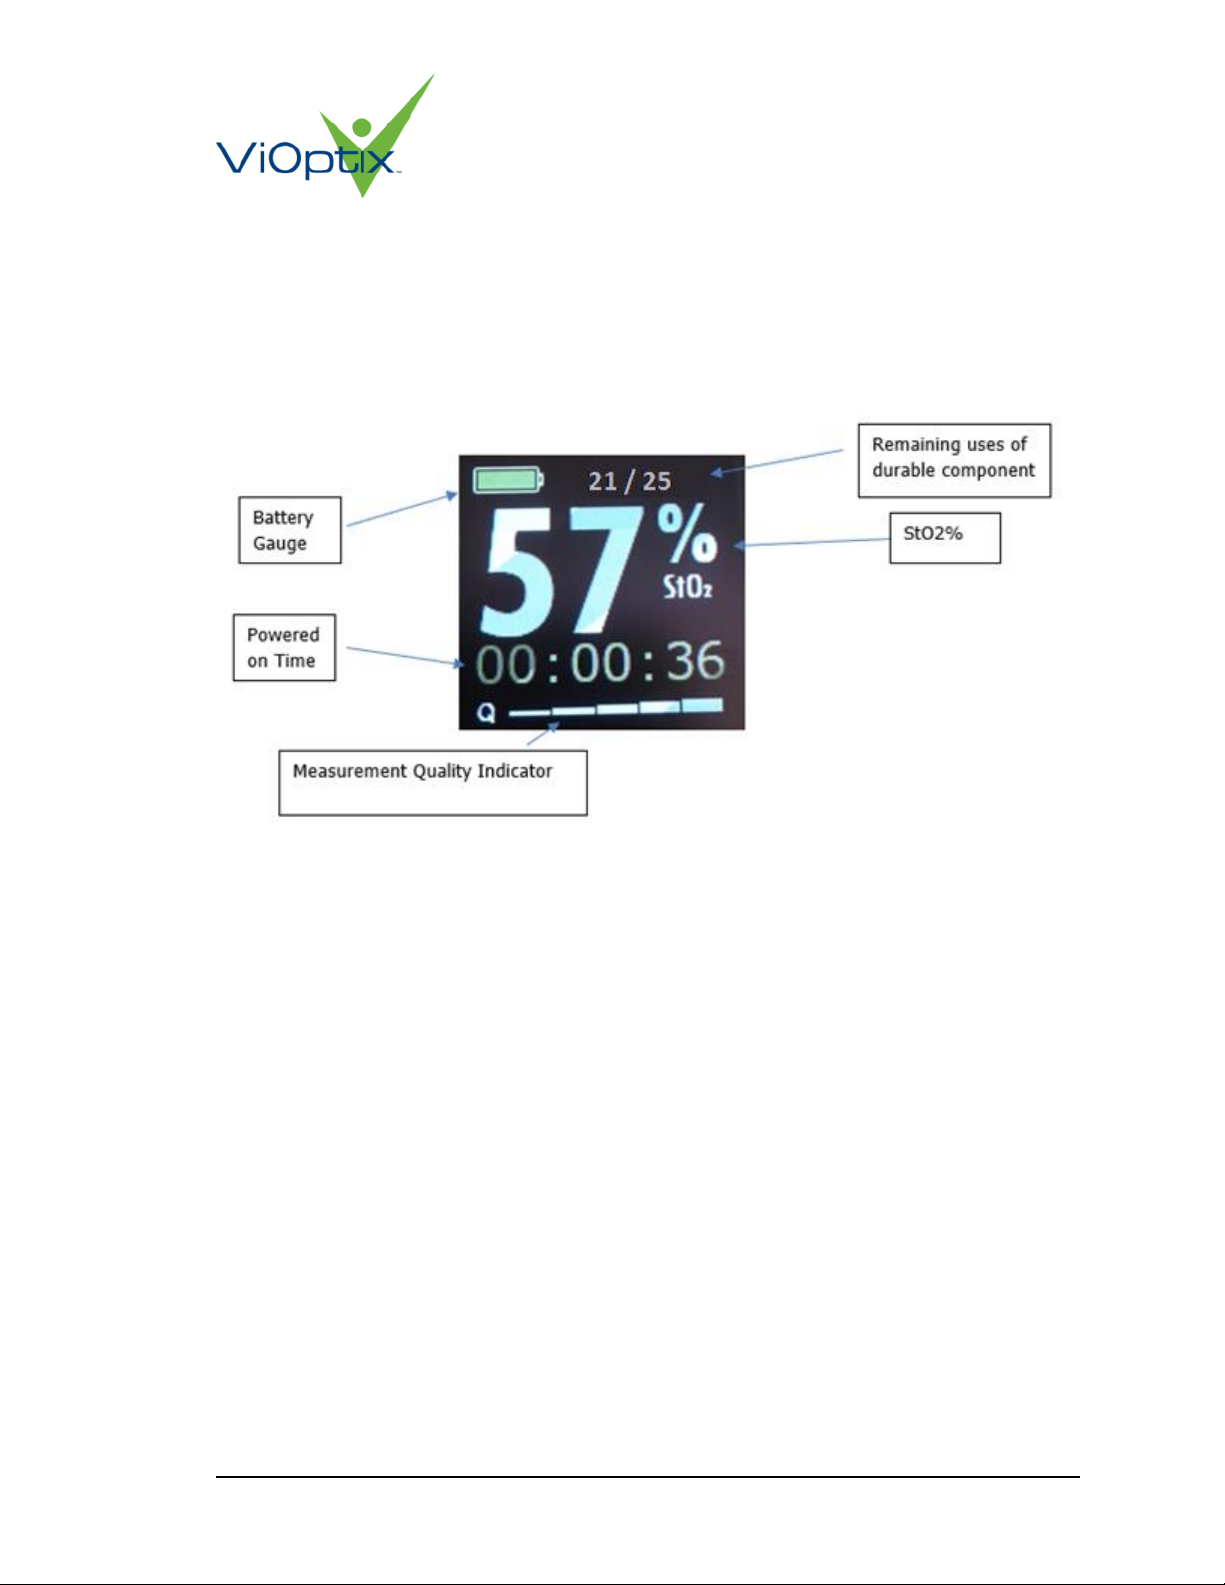
5.3 Measuring Percent Oxygen Saturation
Ensure the tissue is clean and the distal tip of the sheath is dry. Place the sensor face on the
patient in gentle contact with the tissue of interest. Continue to hold the device against the tissue
for a few seconds until an oxygen saturation percentage appears on the display. The display is
organized as depicted below:
Figure 5: Normal Display Layout
5.3.1 Powered Up Time Display
The total elapsed time that the device has been powered up is displayed in hours, minutes and
seconds in the lower left of the display after the device has warmed up.
Battery life is expected to last 8 hours of operating time including time in standby mode
5.3.2 Remaining Device Uses
The fraction at the top of the display indicates the remaining number of procedures for which the
re-usable durable device can be used. The re-usable durable device can be used for a total of 25
procedures.

Part number:
OXY-2-DUR-IFU-1 Rev A
CONFIDENTIAL
Page 15 of 26
5.3.3 Quality Measure
An approximate metric of measurement quality is displayed on the bottom of the screen above
the powered-up time. The metric is on a 1-5 scale, 5 being the most desirable. A low number on
this scale does not necessarily represent poor contact, as the Quality Measure incorporates both
contact quality and tissue homogeneity.
The operator should seek to have both a number displayed for the Quality Measure and to have
that number stay constant for several seconds while in gentle contact with the tissue. If at least a
‘2’cannot be achieved, try taking a measurement on an adjacent measurement site.
5.3.4 Percent Oxygen Saturation Display
The estimated oxygen saturation is indicated in percent in large text, centered on the OLED
screen.
If no sample is detected by the Intra.Ox™ (ie, the device is being held in air), the digits for
Percent Oxygen Saturation and Quality Measure are replaced by dashes:
Figure 6: Invalid Measurement Display
Other warning and error messages are addressed in Section 5.
If the Intra.Ox™ is positioned on tissue, and no percent oxygen saturation value appears, and no
warnings are indicated on the screen, gently wipe the sensor face with a soft cloth moistened
with saline solution to remove any contaminants and dry thoroughly before use.

Part number:
OXY-2-DUR-IFU-1 Rev A
CONFIDENTIAL
Page 16 of 26
5.3.5 Low Battery Indicator Display
The approximate remaining battery life is provided on the top left of the device screen
Figure 7: Low Battery Indicator
The Intra.Ox™ tissue oximeter can continue to be used as long as battery life remains. The
battery is not rechargeable.
5.4 Other Device Modes
5.4.1 Standby Mode
If there are no valid measurements for 2 minutes, the Intra.Ox™ will automatically go into
Standby mode. In this mode, the following screen will appear.
The device will return to normal use mode when it is picked up.

Part number:
OXY-2-DUR-IFU-1 Rev A
CONFIDENTIAL
Page 17 of 26
5.4.2 Device Dropped Mode
The Intra.Ox™ contains an accelerometer that detects if the system is dropped. If it is dropped
on a non-sterile surface, the device cannot continue to be used. However, the Intra.Ox may
continue to be used if dropped onto a sterile surface, such as a table within the sterile field in the
operating room.
In this mode, the device will display the following guidance:
It will then ask the user to re-do the optical QC target checks outlined in Section 0. Assuming
that the optics are still working properly after the drop, the device will return to its typical
measurement mode.
5.4.3 Sheath Open Mode
If at any time during the procedure the sheath is opened, the device will display the following:
The device should not be used for patient contact while the sheath is open. The device can be
returned to measurement mode by re-closing the sheath.

Part number:
OXY-2-DUR-IFU-1 Rev A
CONFIDENTIAL
Page 18 of 26
5.5 After the procedure
5.5.1 Disassembly
Once the sterile field is broken, the Intra.Ox™ device may be removed from the sheath by
pushing upwards on the metal latch on the front of the device. This will result in the ‘Sheath
Open Mode’ warning appearing on-screen. The re-usable main unit and battery pack can be
pulled out of the sheath.
To power off the device, pull apart the battery pack and the re-usable main unit. (see figure
below)
The battery pack and sheath should be disposed-of in accordance with Section 2.1.4.3.
5.5.2 Preparing the re-usable main unit component for the next procedure
After removing the battery pack, the re-usable main unit component requires preparation to get
ready for the next procedure. This requires a two-step process
5.5.2.1 Cleaning the sensor face
Immediately after the procedure, the sensor face at the distal tip of the device should be wiped
down with a wet cloth or gauze pad to remove any traces of adhesive from the window. These
may interfere with device performance if not removed from the device prior to the next device
use.
5.5.2.2 Cleaning the bulk device
After the procedure, the re-usable main unit component should be cleaned and disinfected using
CaviWipesTM. First, use a CaviWipeTM to clean the device, removing any visible debris from the
surfaces of the re-usable main unit component. Then, using additional CaviWipeTM towellettes
disinfect all device surfaces by ensuring all surfacesare wet for at least three minutes. After the
3 minutes of disinfection time allow the device to dry for at least 10 minutes prior to use.

Part number:
OXY-2-DUR-IFU-1 Rev A
CONFIDENTIAL
Page 19 of 26
5.6 Resolving Warnings and Errors
Warning and error conditions may occur that require the display of an error message on the
OLED screen.
5.6.1 Warning Messages
Warning messages appear to alert the user to device conditions. Warnings will display as a yellow
on-screen popup like the below.
The following table lists the conditions resulting in a warning message, the LCD message that will
be displayed on screen and the recommended user action that can be taken following the display
of one of these warnings.
OLED Message
Recommended User Action
OVERHEATED
Place down to cool
Move the device to a cooler
area until condition no longer
exists
Too much light
Reposition Sensor or Reduce
Ambient Light
Correct sensor face placement
to improve tissue contact or
shield the sensor face from
bright light
Low Device Temp
Hold device to warm
Move the device to a warmer
area until condition no longer
exists
High Device Temp
Allow device to cool
Move the device to a cooler
area until condition no longer
exists
Sensor/Tissue Interference
Wipe sensor face or
reposition
Wipe to clean the sensor face
or correct sensor face
placement so it is flat against
the tissue

Part number:
OXY-2-DUR-IFU-1 Rev A
CONFIDENTIAL
Page 20 of 26
5.6.2 Critical Error Messages
Error messages represent situations that prevent the continued use of a device during the
procedure. Critical errors will display as a red on-screen popup like the below.
The possible critical Errors that may appear are as follows:
OLED Message
Recommended User Action
Hardware Failure
Replace Durable
The device is inoperable.
Battery Depleted
Replace Battery
The main unit must be paired
with a new battery back and
sheath to continue
measurements
Sheath Opened
The sheath was opened before
the device was in
measurement mode inside the
sterile field. The sheath and
battery pack must be replaced
Sheath Removed
The sheath was removed
entirely from the device. The
sheath and battery pack must
be replaced
No remaining uses
The main unit has reached end
of life, and cannot be used for
further procedures. Please
contact ViOptix to obtain a
new main unit
Table of contents
Other ViOptix Medical Equipment manuals

Popular Medical Equipment manuals by other brands


Getinge
Getinge Arjohuntleigh Nimbus 3 Professional Instructions for use

Mettler Electronics
Mettler Electronics Sonicator 730 Maintenance manual

Pressalit Care
Pressalit Care R1100 Mounting instruction

Denas MS
Denas MS DENAS-T operating manual

bort medical
bort medical ActiveColor quick guide

AccuVein
AccuVein AV400 user manual


