VISIOMED ASTON VM-AS10 User manual
0197
VM-AS10
Made in China
Visiomed Technology Co., LTD.
2nd Floor of N°.1 building, Jia An
Technological Industrial Park
67 District, Bao An
518101 SHENZHEN - China
VISIOMED GROUP SA
112, Avenue Kléber
75116 PARIS - France
MANUFACTURED FOR

ASTON - Manuel 0820172
LEXIQUE DES SYMBOLES / SYMBOL DEFINITIONS
0197
Conforme à la Directive 93/42/CEE EXIGENCES / 93/42/
EEC CE marking
Voir le manuel d’instructions. Avis sur l’équipement
“Suivre les instructions d’utilisation”. / Refer to
instructions manual. Note on the equipment “Follow
instructions for use”.
Attention / Caution
Garder au sec / Keep dry
Pièce appliquée de type BF / Type BF applied part
Le dispositif, ses accessoires et son emballage doivent
être recyclés de la façon appropriée au terme de leur
utilisation. Veuillez respecter les règlements et règles
locaux. / The device, accessories and the packaging have
to be disposed of correctly at the end of the usage. Please
follow local ordinances and regulations for disposal.
SN
Numéro de série / Serial number
Fabricant / manufacturer
EC REP
Représentant autorisé au sein de la Communauté
européenne / Authorized Representative in the European
Community
Année Mois Jour
Numéro de série
SN
SN:
Numéro de série
FR
0197
VM-AS10
GUIDE D’UTILISATION

ASTON - Manuel 082017 ASTON - Manuel 0820174 5
Cher Client,
Vous venez d'acquérir l’assistant d'écoute Aston VM-AS10 de Visiomed. Afin
de l'utiliser de manière optimale et efficace, nous vous recommandons de
lire attentivement cette notice d’utilisation.
1. CONTENU DE VOTRE PACK ASTON
- 1 assistant d’écoute Aston
- 2 tubes (1 droit, 1 gauche)
- 3 embouts (un petit, un moyen, un grand)
- 1 brossette de nettoyage et tige de nettoyage
- 1 pack de 6 piles
TABLE DES MATIÈRES
1. CONTENU DE VOTRE PACK ASTON....................................................... 5
2. MISES EN GARDE ET PRÉCAUTIONS DE SÉCURITÉ.............................. 6
A. CONSIGNES DE SÉCURITÉ................................................................. 6
B. PRÉCAUTIONS D’UTILISATION......................................................... 7
3. INDICATION............................................................................................. 8
4. UTILISATION............................................................................................ 8
A. MONTAGE DE L’ ASSISTANT D’ÉCOUTE ASTON............................. 8
B. MISE EN MARCHE DE L’ASSISTANT D’ÉCOUTE ASTON.................. 10
C. MISE EN PLACE DE L’ASSISTANT D’ÉCOUTE ASTON ..................... 10
D. RÉGLAGE DU VOLUME ...................................................................... 12
E. BOUTON MÉMOIRE ............................................................................ 12
5. MAINTENANCE ET ENTRETIEN .............................................................. 12
A. CHANGEMENT DES PILES.................................................................. 12
B. CHANGEMENT DE L’EMBOUT ........................................................... 13
C. CHANGEMENT DU TUBE.................................................................... 13
D. NETTOYAGE........................................................................................ 14
6. GUIDE DE DÉPANNAGE.......................................................................... 15
7. MISE AU REBUT ET RECYCLAGE ............................................................ 16
8. CARACTÉRISTIQUES TECHNIQUES ....................................................... 16
Le fabricant se réserve le droit de modifier les caractéristiques techniques
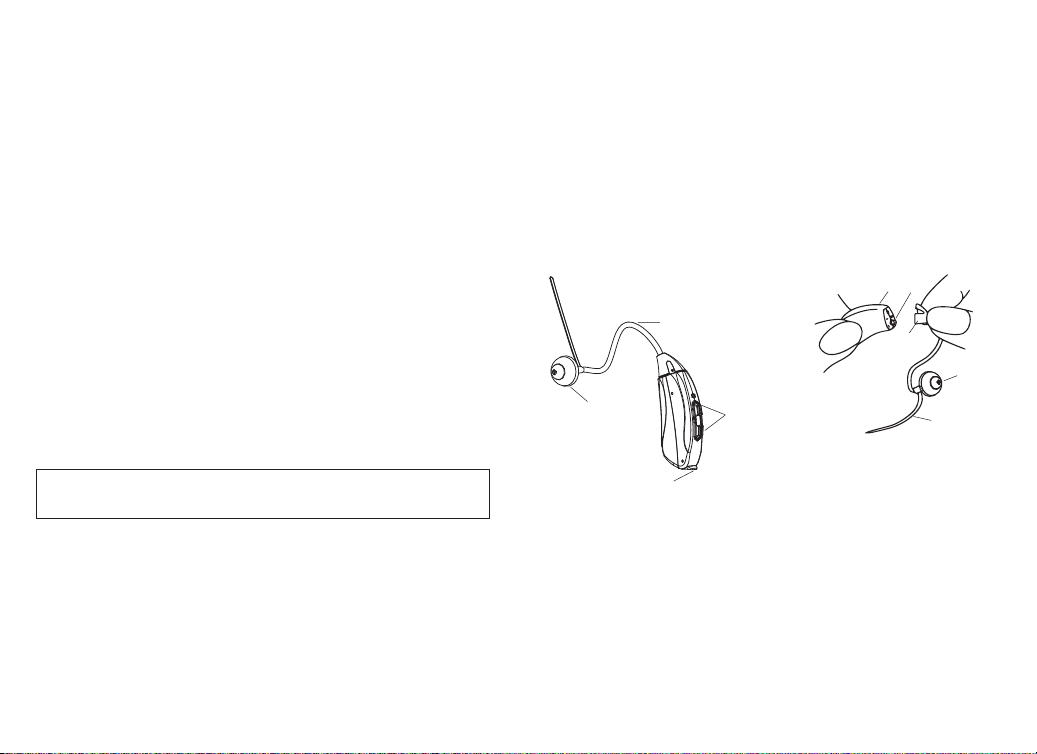
du produit sans préavis. 1. Microphone
2. Base conique du tube
3. Embout
4. Tige de maintien
5. Appareil principal
1. Tube
2. Molettes de réglage
3. Embout
4. Compartiment à pile
1
4
32
5
3
4
2
1

ASTON - Manuel 082017 ASTON - Manuel 0820176 7
- Ne pas mettre à la bouche. En cas d’ingestion, contactez un médecin.
- Ne pas exposer cet appareil aux chocs électriques.
- Ne pas exposer cet appareil à des conditions de températures extrêmes.
- Ne pas exposer cet appareil au soleil, ni à l’eau.
- Ne pas immerger l’appareil dans un liquide.
- N’utiliser que les accessoires et pièces détachées spécifiés par le fabricant
ou vendus avec l’appareil.
- Il est indispensable de retirer votre assistant d’écoute Aston avant de
prendre une douche ou de vous baigner. De manière générale, protégez
votre appareil de l’humidité.
- Cesser d’utiliser l’appareil en cas d’anomalie ou de dysfonctionnement.
- Tenir éloigné d’appareils électroniques, comme un téléviseur ou un
équipement audio.
- Ne jamais utiliser l’appareil pour un usage différent de celui pour lequel
il a été conçu. Tout autre usage doit être considéré comme dangereux et
inapproprié.
- Ne pas laisser à la portée des enfants et des animaux.
- Ce produit n’est pas prévu pour être utilisé par des personnes (y compris
les enfants) dont les capacités physiques, sensorielles ou mentales sont
réduites, ou des personnes dénuées d’expérience ou de connaissance, sauf
si elles ont pu bénéficier par l’intermédiaire d’une personne responsable
de leur sécurité, d’une surveillance ou d’instructions préalables concernant
l’utilisation de ce produit.
- Ce produit ne doit pas inciter à l’automédication ou à l’adaptation de votre
traitement.
B. PRÉCAUTIONS D’UTILISATION
- Ne pas utiliser cet appareil en cas d’infection de l’oreille. Demander conseil
à votre médecin.
- Pour toute question relative à votre perte d’audition, veuillez consulter
votre médecin.
- Cet appareil n’est pas une prothèse auditive.
- Retirer les piles en cas de non utilisation de l’appareil durant une longue
période.
2. MISES EN GARDE ET PRÉCAUTIONS DE SÉCURITÉ
Aston est une aide auditive préréglée. Ce dispositif médical est un
produit de santé réglementé qui, au titre de cette réglementation,
porte le marquage CE. Sa vente est autorisée conformément à l’arrêté
ministériel du 13 Août 2014.
Avertissement :
Avant toute utilisation, vous devez savoir qu’un temps d’adaptation est
nécessaire afin d’apprécier pleinement les qualités de votre produit Aston.
En effet, en amplifiant les sons environnants, votre assistant d’écoute Aston
va vous permettre de percevoir plus du quotidien. Dans un premier temps,
ces bruits pourront vous paraitre perturbants, mais au fur et à mesure, vous
vous familiariserez progressivement avec votre nouvel environnement
sonore.
A. CONSIGNES DE SÉCURITÉ
- Suivre les instructions d’entretien stipulées dans cette notice.
- Cet appareil peut être utilisé pour un usage personnel à domicile.
- Utiliser cet appareil uniquement pour l’usage auquel il est destiné tel que
décrit dans cette notice.
- Utiliser cet appareil dans une plage de température ambiante comprise
entre -10°C et 38°C / 14 - 100.4°F.
- Ne pas utiliser cet appareil à une humidité relative supérieure à 85%.
- Stockage et transport entre -20 et 60°C / -4 et 140°F.
- Cet appareil doit toujours être placé dans un endroit propre et sec.
- Si l’appareil est stocké ou utilisé dans des conditions de température ou
d’humidité excédant les limites spécifiées dans le présent manuel, les
performances de celui-ci, ainsi que sa sécurité, pourraient être altérées.
- Ne pas faire tomber l’appareil, éviter les secousses et les chocs. Un choc
pourrait l'endommager.
- Ne rien insérer dans l’appareil, à l’exception des piles.
- Ne pas essayer d’ouvrir l’appareil. En cas de problème, contactez le service
après-vente.
- Ne pas démonter l’appareil.
ASTON - Manuel 082017 ASTON - Manuel 0820178 9
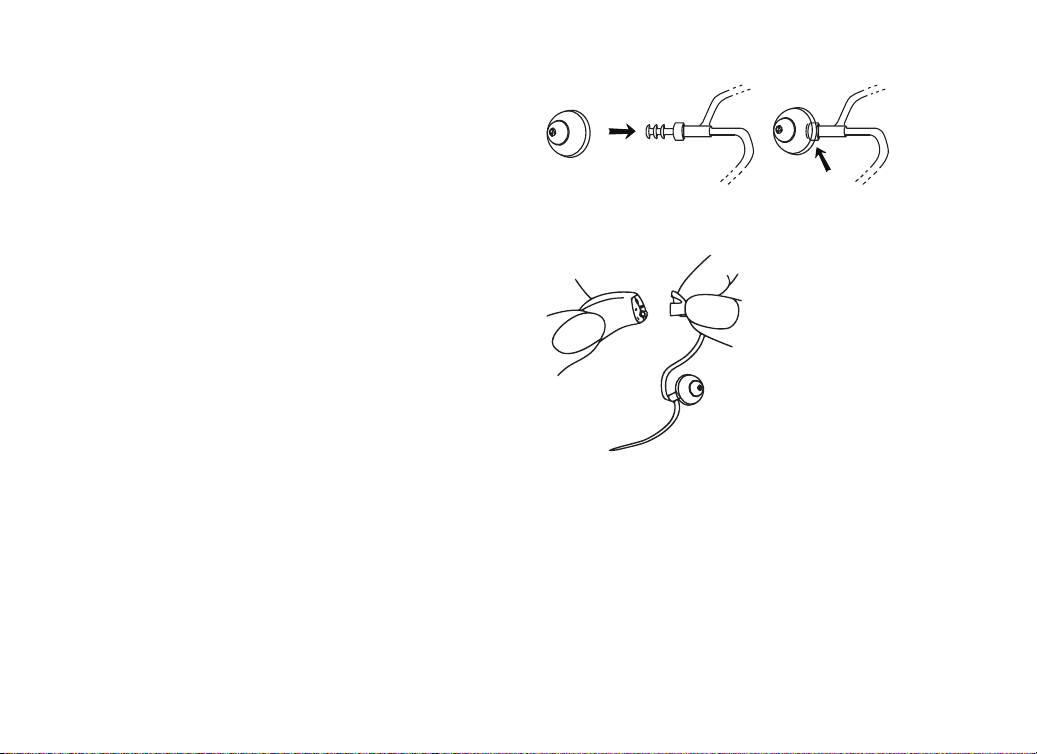
3. Insérer l’extrémité du tube dans l’orifice situé au centre de l’embout et
exercer une légère pression.
4. Connecter l’assistant d’écoute et la base conique du tube en les tenant à
chaque extrémité. Ne pas tordre le tube durant cette opération.
- Ne pas utiliser de piles autres que celles indiquées, ne pas recharger des
piles non rechargeables, ne pas les jeter au feu.
- Veuillezrespecterlapolarité des piles. Une erreur de polarité peut provoquer
l’endommagement et compromettre la garantie de votre appareil.
-Nepasmanipulerle tubeavecvosonglesafind’éviterundysfonctionnement.
- En cas de gêne persistante, d’obstruction du canal auditif ou de réaction
allergique, consultez un spécialiste ORL.
- Une certaine irritation est possible si vous n’êtes pas habitué à porter ce
type d’appareil. En cas de gonflement ou de rougeur, retirez l’appareil et
consultez votre médecin.
3. INDICATION
Correction de presbyacousies (déficience auditive liée à l’âge) légères à
modérées. Il ne s’agit pas d’une prothèse auditive.
Cet assistant d’écoute amplifie les sons environnants et supprime une partie
des bruits de fond. Il permet aux personnes malentendantes de compenser
leur perte d'audition.
4. UTILISATION
A. MONTAGE DE L’ ASSISTANT D’ÉCOUTE ASTON
1. Sélectionner le tube correspondant à l’oreille (droite ou gauche) sur
laquelle doit être porté l’Assistant d’écoute ASTON.
Le tube avec la marque 2B rouge correspond à l’oreille droite. Le tube avec la
marque 2B bleue correspond à l’oreille gauche.
2. Sélectionner l’embout le plus adapté à votre oreille.
Remarque :
Il est conseillé de commencer par le plus gros des embouts. Si celui-ci ne
s’insère pas correctement dans votre conduit auditif, le remplacer par un
embout plus petit.

ASTON - Manuel 082017 ASTON - Manuel 08201710 11
B.MISE EN MARCHE DE L’ASSISTANT D’ÉCOUTE ASTON
1. Décoller la languette collée sur la face plate de la pile.
2. Ouvrir délicatement le compartiment à pile et insérer la pile.
Attention : Manipuler avec précaution le compartiment à pile. Une erreur
de polarité empêche la fermeture de l’appareil. Ne pas forcer la fermeture.
3. L’assistant d’écoute est sous tension et prêt à être utilisé.
Note : Pour une utilisation optimale, il est conseillé de ranger l’assistant d’écoute
dans son boitier, compartiment à pile ouvert lorsque celui-ci n’est pas utilisé.
C. MISE EN PLACE DE L’ASSISTANT D’ÉCOUTE ASTON
Nettoyer l’oreille dans laquelle l’appareil doit être inséré. S’assurer que le
compartiment à pile est bien fermé.
7
1
2
34
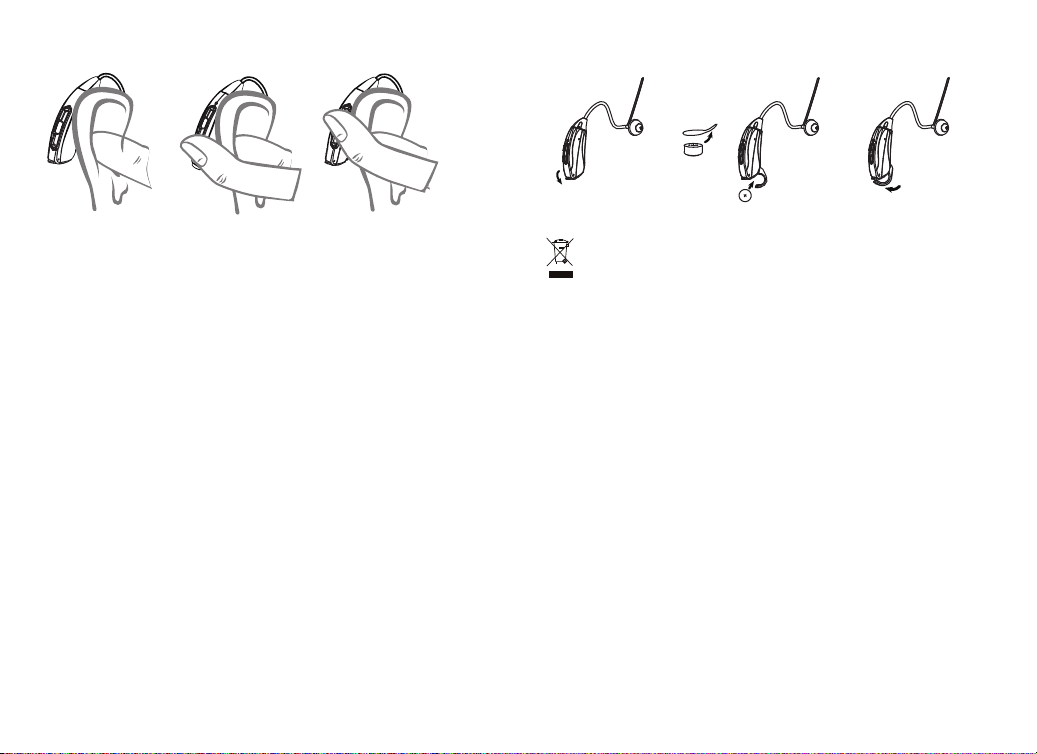
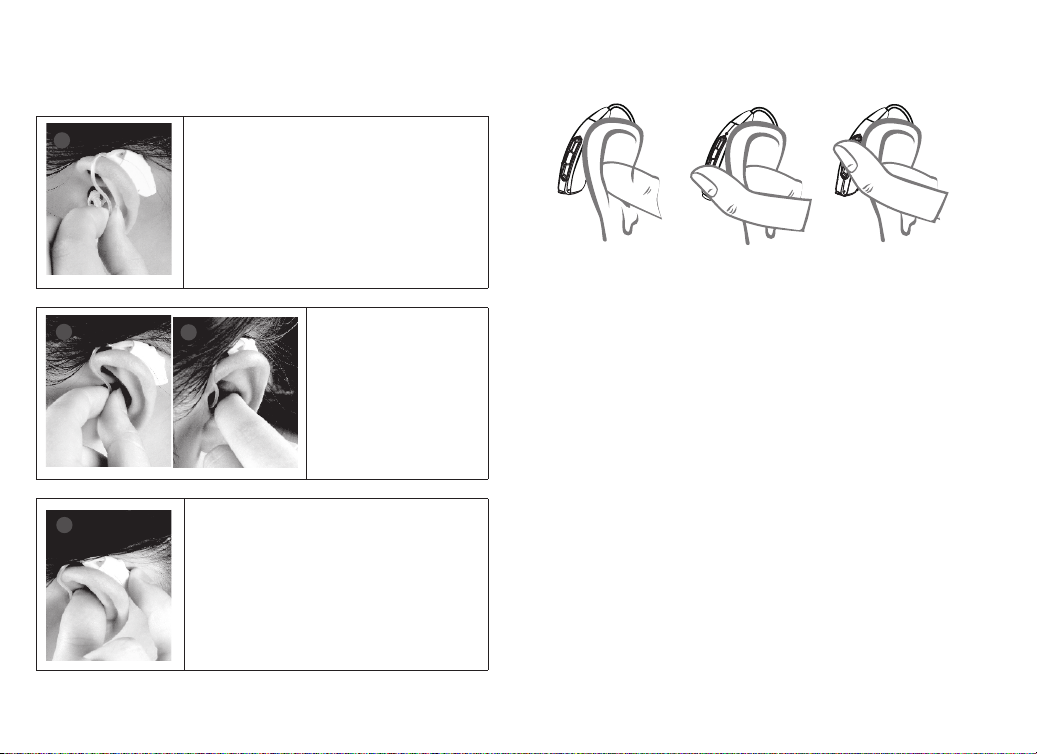
1. Tenir le tube entre le pouce et l’index.
2. Placer le boîtier à l’arrière de l’oreille et faire
passer le tube au-dessus de l’oreille.
7
1 2
3
4
7
1
2
34
3. Insérer délicatement
l’embout dans le
conduit auditif jusqu’à
ce que celui-ci soit bien
positionné et fixé.
7
1 2
3
4
4. Mettre en place la tige de maintien en la
plaçant dans le creux de l’oreille.
Remarque : La tige de maintien peut être ajustée (découpe aux ciseaux) si
celle-ci est trop longue ou inconfortable.
ASTON - Manuel 082017 ASTON - Manuel 08201712 13
3. Manipuler avec précaution le compartiment à pile. Une erreur de polarité
empêche la fermeture de l’appareil. Ne pas forcer la fermeture.
Ne pas jeter vos piles usagées avec vos déchets ménagers. Apporter vos
piles usagées à un organisme collecteur.
En cas de non utilisation prolongée, retirer les piles de l’appareil afin d’éviter
toute fuite de liquide pouvant endommager l’unité. Utiliser des piles de
qualité supérieure afin d’éviter les dysfonctionnements de votre appareil.
Garder les piles hors de portée des enfants. Ne pas mettre à la bouche. En cas
d’ingestion, contacter les services d’urgences.
B. CHANGEMENT DE L’EMBOUT
1. Tenir l’extrémité du tube et tirer légèrement sur l’embout. Ne pas
manipuler le tube avec vos ongles.
2. Remplacer l’embout, comme décrit dans la partie Utilisation.
Afin de préserver au mieux les qualités de votre assistant d’écoute Aston, il
est conseillé de changer d‘embout toutes les 2 semaines.
C. CHANGEMENT DU TUBE
1. Déconnecter le tube de l’appareil principal en faisant pivoter à 90 degrés
la base conique du tube. Tirer fermement sur la base conique afin de la
dégager de l’appareil.
2. Remplacer le tube comme indiqué dans la partie Utilisation > Monter votre
assistant d’écoute.
3. Afin de préserver au mieux les qualités de votre assistant d’écoute Aston, il
est conseillé de changer le tube tous les 3 mois.
D. RÉGLAGE DU VOLUME
Le commutateur de l’appareil sert à contrôler le volume. Appuyer brièvement
le bouton du haut pour augmenter le volume ou le bouton du bas pour
diminuer le volume .
Chaque pression courte ajuste le volume.
E. BOUTON MÉMOIRE
Le commutateur de l’appareil sert également à contrôler les programmes.
Par défaut, l’assistant d’écoute est paramétré sur le programme 1.
Pour passer en programme 2, appuyer durant 3 secondes sur le commutateur
pour changer de programme. L’appareil émet un bip sonore pour le
programme 1, et 2 bips sonores pour le programme 2.
Sélectionner celui qui convient le mieux à votre audition.
5. MAINTENANCE ET ENTRETIEN
A. CHANGEMENT DES PILES
Lorsque l’appareil émet un court bip de façon intermittente, les piles
sont faibles ou déchargées. La qualité sonore peut être affectée, jusqu’à
remplacement de la pile.
Les piles (fournies dans la boîte) permettent une alimentation d’environ 7
jours en continu.
1. Ouvrir le compartiment à pile.
2. Remplacer la pile usagée en prenant bien soin de respecter la polarité.
Ne jamais insérer de piles rechargeables. Utiliser des piles à usage unique.

ASTON - Manuel 082017 ASTON - Manuel 08201714 15
6. GUIDE DE DÉPANNAGE
SYMPTÔME CAUSES POSSIBLES SOLUTIONS
Pas de son Pas de pile Insérez la pile.
Pile déchargée ou
faible
Remplacez la pile.
Pile mal insérée Insérez la pile
correctement.
Cérumen ou débris
dans le microphone
ou le récepteur
Nettoyez le
microphone et le
récepteur avec la
brosse.
Impossible de fermer
le compartiment à pile
La pile est insérée
dans le mauvais sens
(polarité)
Insérer la pile en
respectant la polarité.
Son pas assez puissant Pile déchargée Remplacez la pile.
Embout abîmé Remplacez l’embout.
Volume trop faible Tournez le
condensateur dans le
sens horaire.
Cérumen ou débris
dans le microphone
ou le récepteur
Nettoyez le
microphone et le
récepteur avec la
brosse.
Modification de la
perte auditive
Contactez votre
spécialiste ORL.
Trop de cérumen Consultez votre
spécialiste ORL.
D. NETTOYAGE
Nettoyage de l’appareil principal :
Utiliser un chiffon doux et propre pour essuyer quotidiennement l’appareil
principal après et avant utilisation.
Ne pas utiliser d’eau ni d’autres liquides.
Nettoyage du tube et de l’embout :
Le cérumen est l’une des principales causes de dysfonctionnement de
l’assistant d’écoute. Des filtres et autres dispositifs sont présents à l’intérieur
de l’appareil pour éviter un dépôt de cérumen. Il est plus facile de nettoyer
l’appareil avant de l’utiliser, lorsque le cérumen est sec.
A l’aide de la brossette, retirer les impuretés situées sur l’embout et à
l’intérieur de celui-ci. Retourner la brossette pour retirer les impuretés et
particules de cérumen situées à l’intérieur de l’embout.
Pour nettoyer l’intérieur du tube, insérer la tige de nettoyage dans le tube, et
pousser celle-ci jusqu’à la faire sortir par l’autre extrémité du tube.
Retirer à l’aide de la brossette les impuretés et particules de cérumens,
présentes sur le tube et l’oreillette.
Nettoyer l’intérieur du tube avec le tube de nettoyage (de couleur verte).

ASTON - Manuel 082017 ASTON - Manuel 08201716 17
Sifflement, Larsen Embout pas adapté Essayez un embout
plus large.
Pile faible Changez la pile.
Appareil auditif mal
inséré
Retirez l’appareil et
replacez-le.
Trop de cérumen Consultez votre
spécialiste ORL.
7. MISE AU REBUT ET RECYCLAGE
Mettre votre assistant d’écoute Aston au rebut en respectant les lois et
règlements locaux. Aston contient des composants électroniques et une
pile, celui-ci ne peut pas être mis au rebut avec les déchets ménagers.
8. CARACTÉRISTIQUES TECHNIQUES
Nom du produit Assistant d'écoute ASTON
Modèle VM-AS10 (tube)
Classification Classe IIa
Niveau de pression acoustique
global (dB)
96±3
Niveau de pression acoustique
global HF-Moyen (dB)
86±4
Amplification (dB) 23±5
Amplification HF moyen (dB) 16±5
Bruit d'entrée équivalent (dB) ≤32
Distorsion THD
(%)
500 ≤1
800
1600
Consommation courant ≤1.5
Bande passante
(Hz)
F1 ≤500
F2 ≥3500
ASTON - Manuel 082017 19
EN
0197
VM-AS10
USER MANUAL
ASTON - Manuel 082017 ASTON - Manuel 08201720 21
Dear client,
Thank you for purchasing the VISIOMED Aston VM-AS10 hearing amplifier. In
order to use it optimally and efficiently, we recommend that you read these
instructions carefully
1. CONTENTS OF YOUR ASTON PACK
- 1 Aston hearing amplifier
- 2 tubes (1 right, 1 left)
- 3 ear pieces (small, medium, large)
- 1 cleaning brush and cleaning wire
- 1 pack of 6 batteries
TABLE OF CONTENTS
1. CONTENTS OF YOUR ASTON PACK...................................................... 21
2. WARNINGS AND SAFETY PRECAUTIONS ........................................... 22
A. SAFETY INSTRUCTIONS.................................................................... 22
B. PRECAUTIONS FOR USE ................................................................... 23
3. INDICATION............................................................................................ 24
4. INSTRUCTIONS FOR USE....................................................................... 24
A. ASSEMBLY OF THE ASTON HEARING AMPLIFIER ......................... 24
B. STARTING THE ASTON ASSISTIVE HEARING AMPLIFIER ............. 25
C. STARTING THE ASTON HEARING AMPLIFIER ................................ 26
D. ADJUSTING THE VOLUME................................................................ 27
E. MEMORY BUTTON............................................................................. 27
5. MAINTENANCE AND SERVICE .............................................................. 27
A. CHANGING THE BATTERIES............................................................. 27
B. CHANGING THE EAR TIP................................................................... 28
C. CHANGING THE TUBE....................................................................... 28
D. CLEANING.......................................................................................... 29
6. TROUBLESHOOTING GUIDE ................................................................. 30
7. DISPOSAL AND RECYCLING.................................................................. 31
8. TECHNICAL CHARACTERISTICS............................................................ 31
The manufacturer reserves the right to modify the product technical
specifications without prior notice. 1. Microphone
2. Tube triangular base
3. Ear tip dome
4. Stabilizer bar
5. Main device
1. Tube
2. Adjustment wheel
3. Ear tip dome
4. Battery compartment
1
4
32
5
3
4
2
1

ASTON - Manuel 082017 ASTON - Manuel 08201722 23
- Do not put the device in water.
- Do not bathe with the device. In general, protect the device from moisture.
- Only use accessories and spare parts specified by the manufacturer or sold
with the device.
- It is essential to remove your Aston hearing amplifier before taking a
shower or bath. In general, protect your device from moisture.
- Stop using the device in the event of an abnormality or malfunction.
- Keep away from electronic devices such as TV or audio equipment.
- Never use the device for any purpose other than that for which it
was designed. Any other use should be considered dangerous and
inappropriate.
- Keep out of the reach of children and pets.
- This device is not intended for use by persons (including children) with
impaired physical, sensory or mental capabilities, or persons with no
experience or knowledge of the device, unless they have undergone
supervision or prior instructions concerning the use of this device by a
person responsible for their safety.
- This device should not encourage self-medication or adjusting your
treatment.
B. PRECAUTIONS FOR USE
- Do not use this device in case of ear infection. Ask your doctor for advice.
- For any questions about your hearing loss, please consult your doctor.
- This device is not a hearing aid.
- Remove the batteries when not using the device for a long period.
- Do not use batteries other than the batteries mentioned, do not recharge
non-rechargeable batteries, or throw them into a fire.
- Take care to observe correct battery polarity. A polarity error may cause
damage and void the guarantee.
- Do not handle the tube with your fingernails to avoid malfunction.
- In case of persistent discomfort, ear canal obstruction or allergic reaction,
please consult an ENT specialist.
- Some irritation is possible if you are not used to wearing this type of device.
In case of swelling or redness, remove the device and consult your doctor.
2. WARNINGS AND SAFETY PRECAUTIONS
Aston is a pre-set hearing amplifier. This medical device is a regulated
health product, which, under these regulations, bears CE marking. Its
sale is authorised in accordance with the ministerial decree of August
13, 2014.
WARNING :
Before use, an adjustment period is necessary in order to fully appreciate
the qualities of your Aston product. Certainly, by amplifying the surrounding
sounds, your Aston hearing amplifier will open up a new world to you.
At first, these sounds may seem disruptive, but as you progress, you will
gradually become familiar with the new sound in your environment.
A. SAFETY INSTRUCTIONS
- Follow the maintenance instructions in this manual.
- This device is suitable for home use.
- Use this device only for its intended use as described in this notice.
- Use this device in an ambient temperature range between 10°C - 38°C /
14 - 100.4°F.
- Do not use this device in relative humidity greater than 85%.
- Storage and transport between -20 and 60°C / -4 - 140°F.
- This device should always be stored in a clean and dry area.
- If the device is stored or used in temperature or humidity conditions
exceeding the limits specified in this manual, its performance and safety
may be corrupted.
- Do not drop the device, avoid jolts and shocks. A shock could damage it.
- Do not insert anything into the device except the batteries.
- Do not attempt to open the device. In case of problems, contact the after
sales service department.
- Do not disassemble the device.
- Do not put it in your mouth. If swallowed, contact a doctor.
- Never drop the device. A shock may damage it.
- Do not expose this device to electric shock.
- Do not expose this device to extreme temperature conditions.
- Do not expose this device to direct sunlight or water.

ASTON - Manuel 082017 ASTON - Manuel 08201724 25
4. Connect the hearing amplifier and the triangular base of the tube by
holding them at each end. Do not twist the tube during this operation.
B. STARTING THE ASTON ASSISTIVE HEARING AMPLIFIER
1. Peel off the tab on the flat side of the battery.
2. Carefully open the battery compartment and insert the battery.
Caution: Handle the battery compartment carefully. A polarity error prevents
closing of the device. Do not force closure.
3. The hearing amplifier is on and ready for use.
Note: For optimal use, we recommend putting the hearing amplifier in its case
with the battery compartment open when not in use.
3. INDICATION
Correction of mild to moderate age-related hearing loss (presbycusis). It is
not a hearing aid. This hearing amplifier amplifies surrounding sounds and
removes some of the background noise. It allows hearing-impaired people
to compensate for their hearing loss.
4. INSTRUCTIONS FOR USE
A. ASSEMBLY OF THE ASTON HEARING AMPLIFIER
1. Select the tube corresponding to the ear (right or left) on which the ASTON
Hearing amplifier must be worn.
The tube with the red mark 2B corresponds to the right ear. The tube with
the blue mark 2B corresponds to the left ear.
2. Select the ear tip best suited to your ear.
Note: It is advisable to start with the larger ear tips. If it does not fit properly into
your ear canal, replace it with a smaller size.
3. Insert the end of the tube into the hole in the centre of the ear tip and exert
a slight pressure.
ASTON - Manuel 082017 ASTON - Manuel 08201726 27
C. STARTING THE ASTON HEARING AMPLIFIER
Clean the ear in which the device is to be inserted. Make sure the battery
compartment is securely closed.
7
1
2
34
1. Hold the tube between the thumb and
forefinger.
2. Place the device behind your ear and pass the
tube over your ear.
7
1 2
3
4
7
1
2
34
3. Gently insert the dome
into your ear canal until
it is correctly positioned.
7
1 2
3
4
4. Put the retainer in place by placing it in the
hollow of your ear.
Note: If too long or uncomfortable the stabilizer can be adjusted (cut by scissor).
D. ADJUSTING THE VOLUME
The switch on the unit is used to control the volume. Briefly press the top
button to increase the volume or the lower button to decrease the volume.
Each short press adjusts the volume.
E. MEMORY BUTTON
The switch on the unit is also used to choose the programmes. By default,
the hearing amplifier is set to programme 1.
To switch to programme 2, press the switch for 3 seconds to change
the programme. The device beeps once for programme 1 and twice for
programme 2.
Select the one that best suits your hearing.
5. MAINTENANCE AND SERVICE
A. CHANGING THE BATTERIES
When the device emits a short intermittent beep, the batteries are low or
empty. The sound quality may be affected until the battery is replaced.
The batteries (supplied in the box) allow a continuous supply of about 7 days.
1. Open the battery compartment.
2. Replace the used battery, taking care to observe polarity. Never insert
rechargeable batteries. Use disposable batteries.
3. Handle the battery compartment carefully. A polarity error prevents
closing of the device. Do not force shut.

ASTON - Manuel 082017 ASTON - Manuel 08201728 29
D. CLEANING
Cleaning the main device:
Use a soft, clean cloth to wipe the main device daily before and after use.
Do not use water or other liquids.
Cleaning the tube and the ear tip:
Ear wax is one of the main causes of malfunction of the hearing amplifier.
Filters and other devices are present inside the device to prevent wax
deposit. It is easier to clean the device before using it, when the earwax is dry.
Using the brush, remove the impurities located on the ear tip and inside it.
Twist the brush to remove impurities and cerumen particles inside the ear
tip. To clean the inside of the tube, insert the cleaning wire inside the tube,
and push it until it comes out through the other end of the tube.
Remove the impurities and particles of cerumen from the tube and ear tip
with the brush.
Clean the inside of the tube with the cleaning wire (green).
Do not dispose of old batteries with household waste. Take your used
batteries to a collection point.
If not used for a long period of time, be sure to remove the battery from the
device to prevent leakage of liquid that may damage the device. Use high-
quality batteries to prevent malfunctions.
Keep batteries out of the reach of children. Do not put the device in your
mouth. If swallowed, contact the emergency services.
B. CHANGING THE EAR TIP
1. Hold the end of the tube and gently pull on the ear tip. Do not handle the
tube with your fingernails.
2. Replace the ear tip as described in the section Instructions for use.
In order to preserve the quality of your Aston hearing amplifier, it is advisable
to change the ear tips every 2 weeks.
C. CHANGING THE TUBE
1. Disconnect the tube from the main unit by rotating the triangular base of
the tube by 90 degrees. Pull the triangular base firmly to release it from
the device.
2. Replace the tube as indicated in the instructions for use section > Assemble
your hearing amplifier.
3. In order to preserve the quality of your Aston hearing amplifier, it is
advisable to change the tube every 3 months.

ASTON - Manuel 082017 ASTON - Manuel 08201730 31
Whistling, Larsen Ear tip not adapted Try a larger ear tip.
Battery low Replace the battery.
Hearing amplifier
incorrectly inserted
Remove the device
and replace it.
Too much earwax Contact your ENT
specialist.
7. DISPOSAL AND RECYCLING
Dispose of your Aston hearing amplifier in accordance with local laws and
regulations. Aston contains electronics and a battery; it cannot be disposed
of with household waste.
8. TECHNICAL CHARACTERISTICS
Product name Aston hearing amplifier
Model VM-AS10 (tube)
Classification Class IIa
Overall sound pressure level (dB) 96±3
Overall sound pressure level HF-
Medium (dB)
86±4
Amplification (dB) 23±5
Average HF amplification (dB) 16±5
Equivalent Input Noise (dB) ≤32
THD Distortion
(%)
500 ≤1
800
1600
Current consumption ≤1.5
6. TROUBLESHOOTING GUIDE
SYMPTOM POSSIBLE CAUSES SOLUTIONS
No sound No battery Insert the battery.
Battery low or empty Replace the battery.
Battery incorrectly
inserted
Insert the battery
correctly.
Earwax or debris in
the microphone or
receiver
Clean the microphone
and receiver with the
brush.
The battery
compartment cannot
be closed
The battery is inserted
in the wrong direction
(polarity)
Insert the battery with
the correct polarity.
Sound not powerful
enough
Battery empty Replace the used
battery.
Damaged ear tip Replace the ear tip.
Volume too low Turn the condenser
clockwise.
Wax or debris in
the microphone or
receiver
Clean the microphone
and receiver with the
brush.
Change in hearing
loss
Contact your ENT
specialist.
Too much earwax Contact your ENT
specialist.

ASTON - Manuel 082017 ASTON - Manuel 08201732 33
Bandwidth (Hz) F1 ≤500
F2 ≥3500
NL
0197
VM-AS10
HANDLEIDING

ASTON - Manuel 082017 ASTON - Manuel 08201734 35
Geachte klant,
U hebt de Aston VM-AS10 luisterhulp van Visiomed recentelijk ontvangen.
Om deze optimaal en efficiënt te gebruiken, raden wij u aan om deze
handleiding aandachtig te lezen
1. INHOUD VAN UW ASTON-PAKKET
- 1 Aston luisterhulp,
- 2 buisjes (1 rechter, 1 linker)
- 3 opzetstukken (klein, gemiddeld, groot)
- 1 borstel en reinigingsstaaf
- 1 pack van 6 batterijen
INHOUDSOPGAVE
1. INHOUD VAN UW ASTON-PAKKET ..................................................... 35
2. WAARSCHUWINGEN EN VEILIGHEIDSMAATREGELEN..................... 36
A. VEILIGHEIDSVOORSCHRIFTEN ...................................................... 36
B. VOORZORGSMAATREGELEN VOOR GEBRUIK.............................. 37
3. AANWIJZING ......................................................................................... 38
4. GEBRUIK................................................................................................. 38
A. MONTAGE VAN DE ASTON-LUISTERHULP.................................... 38
B. INSCHAKELING VAN DE ASTON-LUISTERHULP ........................... 39
C. PLAATSING VAN DE ASTON-LUISTERHULP ................................. 40
D. VOLUME INSTELLEN........................................................................ 42
E. GEHEUGENKNOP.............................................................................. 42
5. REINIGING EN ONDERHOUD................................................................ 42
A. BATTERIJEN VERVANGEN............................................................... 42
B. VERVANGEN VAN HET OPZETSTUK............................................... 43
C. VERVANGEN VAN DE BUIS.............................................................. 43
D. REINIGING......................................................................................... 44
6. PROBLEEMOPLOSSING ........................................................................ 45
7. VERWIJDERING EN RECYCLING........................................................... 46
8. TECHNISCHE KENMERKEN................................................................... 46
De fabrikant behoudt zich het recht voor om specificaties te wijzigen zonder
voorafgaande kennisgeving. 1. Microfoon
2. Kegelvormige onderkant
van de buis
3. Opzetstuk
4 .Oorgreep
5. Hoofdapparaat
1. Buis
2. Regelknoppen
3. Opzetstuk
4. Batterijcompartiment
1
4
32
5
3
4
2
1

ASTON - Manuel 082017 ASTON - Manuel 08201736 37
- Niet in de mond steken. In geval van inslikken dient u onmiddellijk een arts
te raadplegen.
- Stel het apparaat niet bloot aan elektrische schokken.
- Stel dit apparaat niet bloot aan extreme temperaturen.
- Stel het apparaat niet bloot aan zonlicht of water.
- Dompel het apparaat niet onder in een vloeistof.
- Gebruik uitsluitend accessoires en onderdelen die door de fabrikant
worden gespecificeerd of verkocht met het apparaat.
- Het is essentieel om uw Aston-luisterhulp te verwijderen vóór het nemen
van een douche of wanneer u gaat zwemmen. In het algemeen moet het
apparaat worden beschermd tegen vocht.
- Stop met het gebruik van het apparaat in geval van een storing of defect.
- Houd de luisterhulp uit de buurt van elektronische apparaten, zoals een tv
of audio-apparatuur.
- Gebruik het apparaat nooit voor een ander doel dan waarvoor het
ontworpen is. Elk ander gebruik wordt beschouwd als gevaarlijk en
ongepast.
- Niet binnen het bereik van kinderen en huisdieren laten.
- Dit product is niet bedoeld voor gebruik door personen (inclusief kinderen)
met verminderde lichamelijke, zintuiglijke of geestelijke vermogens, of
gebrek aan ervaring en kennis, tenzij deze zijn gegeven door tussenkomst
van een persoon die verantwoordelijk is voor hun veiligheid, toezicht of
voorafgaande instructies hebben ontvangen over het gebruik van het
apparaat.
- Dit apparaat mag niet aanzetten tot zelfmedicatie of een aanpassing van
uw behandeling.
B. VOORZORGSMAATREGELEN VOOR GEBRUIK
- Gebruik dit apparaat niet in geval van een oorontsteking. Vraag uw arts
om advies.
- Voor vragen over uw gehoorverlies, raadpleeg uw arts.
- Dit product is geen hoortoestel.
- Verwijder de batterijen als als het apparaat voor een lange periode niet
wordt gebruikt.
2. WAARSCHUWINGEN EN VEILIGHEIDSMAATREGELEN
Aston is een vooraf ingestelde luisterhulp. Dit medische apparaat is
een gereglementeerd gezondheidsproduct dat volgens de
voorschriften de CE-markering draagt. De verkoop is toegestaan in
overeenstemming met het ministerieel besluit van 13 augustus 2014.
Waarschuwing:
Voor gebruik moet u weten dat een aanpassingsperiode nodig is om volledig
te kunnen genieten van de kwaliteiten van uw Aston-product. Sterker nog,
door de omgevingsgeluiden te versterken zal uw Aston-luisterhulp u in
staat stellen om meer van uw dagelijkse omgeving waar te nemen. In eerste
instantie kunnen deze geluiden storend lijken, maar geleidelijk aan raakt u
vertrouwd met uw nieuwe geluidsomgeving
A. VEILIGHEIDSVOORSCHRIFTEN
- Volg de onderhoudsinstructies in deze handleiding.
- Dit apparaat kan worden gebruikt voor persoonlijk gebruik thuis.
- Gebruik dit apparaat alleen voor het beoogde gebruik, zoals beschreven in
deze handleiding.
- Gebruik dit apparaat in een omgevingstemperatuur tussen -10°C - 38°C /
14 - 100.4°F.
- Gebruik dit product bij een relatieve luchtvochtigheid boven de 85%.
- Opslag en transport tussen -20 en 60°C / -4 - 140°F.
- Dit apparaat moet altijd in een schone, droge plaats worden geplaatst.
- Als het apparaat wordt opgeslagen of gebruikt bij een temperatuur
of luchtvochtigheid die hoger zijn dan deze gespecificeerd in deze
handleiding, dan kunnen de prestaties en veiligheid ervan worden
gewijzigd.
- Laat het apparaat niet vallen, voorkom stoten en schokken. Een schok kan
het beschadigen.
- Steek niets in het apparaat, behalve de batterijen.
- Probeer niet om het apparaat te openen. In geval van problemen, neem
contact op met de klantenservice.
- Haal het apparaat niet uit elkaar.

ASTON - Manuel 082017 ASTON - Manuel 08201738 39
4. Verbind de luisterhulp met de kegelvormige onderkant van de buis door
ze aan elk uiteinde vast te houden. Let op dat u de buis niet verdraait tijdens
deze handeling.
B. INSCHAKELING VAN DE ASTON-LUISTERHULP
- Gebruik geen andere dan de vermelde batterijen, laad geen niet-
oplaadbare batterijen op, gooi ze niet in het vuur.
- Respecteer de polariteit van de batterijen. Een foute polariteit kan schade
veroorzaken en afbreuk doen aan de garantie van uw apparaat.
- Raak de buis niet aan met uw nagels om storingen te voorkomen.
- In geval van aanhoudende klachten, obstructie van de gehoorgang of een
allergische reactie, raadpleeg een KNO-specialist.
- Er is een zekere irritatie mogelijk als u niet gewend bent om dit type
apparaat te dragen. Bij zwelling of roodheid, verwijder het apparaat en
raadpleeg uw arts.
3. AANWIJZING
Correctie van lichte tot matige presbyacousies (gehoorverlies gerelateerd
aan de leeftijd). Dit is geen hoortoestel.
Deze luisterhulp versterkt de omgevingsgeluiden en verwijdert een deel
van de achtergrondruis. Het stelt slechthorende mensen in staat om hun
gehoorverlies te compenseren.
4. GEBRUIK
A. MONTAGE VAN DE ASTON-LUISTERHULP
1. Kies de buis die overeenkomt met het oor (links of rechts) waar u de
ASTON-luisterhulp zult dragen.
De buis met de rode 2B-markering is ontworpen voor het rechteroor.
De buis met de blauwe 2B-markering is ontworpen voor het linkeroor.
2. Selecteer het opzetstuk dat best geschikt is voor uw oor.
Opmerking:
Het wordt aanbevolen om te beginnen met de grootste opzetstukken. Als deze
niet goed past in de gehoorgang kunt u ze vervangen door een kleiner opzetstuk.
3. Schuif het buiseinde in het gat in het midden van het opzetstuk en druk
lichtjes aan.
Table of contents
Languages:


