OTOFONIX Sona User manual

Sona
User Manual

“
I had no idea how much of
life I was missing out on. I
can hear the birds chirping
again on my daily walks
outside. I’m amazed at the
dierence it has made.
–Sally N.

1
We’re Here to Help
We are thrilled to be able to help you hear more of life.
Our dedicated USA-based hearing specialists are happy to
guide and assist you with any questions you may have.
Please review this user guide to get the most out of your Sona hearing device.
Please feel free to reach out to us here at Otofonix for any FREE support at:
704-380-0508 or Otofonix.com.
© Copyright 2021. Otofonix All rights reserved
1

Note: If you experiencing any itching in your ear canal while getting used to the ear domes, we
recommend using Miracell Pro Ear, or olive oil. Use less than a drop and apply around the circumfer-
ence of the ear dome to relieve itching.
An Open Style Dome has large vent holes and is intended for people with the typical mild
to moderate high frequency hearing loss who do not need much amplification in the low
frequencies. The larger openings in the dome allow for low frequency sounds to pass though
the dome with minimal amplification and a more natural sound. It eliminates the “occlusion eect” which
is similar to putting your fingers in your ear and hearing yourself talk. On the negative side, open domes
are the most prone to feedback (whistling).
AClose Style Dome has no vent holes. This allows the device to more aggressively boost the
sound levels as much as 15 dB, especially in the low speech frequencies. Often closed domes
are the better answer for people suering from a more severe level of hearing loss. These
Dierent Domes (Eartips) can completely change
the sound and feel of your hearing device
2

domes virtually eliminate all feedback that occurs from higher amplification, but they also maximize the
“occlusion eect”.
A Hybrid Style Dome has a small hole or vent and features of both the open and closed dome.
These domes provide greater amplification in the low frequencies than the open domes. The
smaller vent also significantly minimizes the “occlusion eect” and reduces feedback, making
them more comfortable than the closed domes. These domes are recommended for those with a mild to
moderate hearing loss.
ZipTip domes are the best hybrid domes that we have found to date. They provide a superb
fit and use a single 3mm vent hole which reduces the “occlusion eect” while increasing
amplification and providing for the most comfortable fit.
We highly recommend that you contact us about a complimentary set of ZipTips if you are not
getting the proper fit, or enough amplification from your device. Call (704) 380-0508.
3

The first time you use the Sona, some sounds may seem very loud. You may hear the faucet drip, beeps
from electronics, crumpling paper, sounds you may not have heard in a long time. This can be over-
whelming at first. Don’t worry, your brain will adjust to these forgotten sounds after a short time. Keep in
mind that your brain has not heard these sounds for years. Before long, your brain will quickly recognize
and learn to filter out irrelevant background sounds, just as it did once before.
We recommend starting slowly. Eventually, your brain will learn to “turn down” some sounds, like
crumpling paper, while “turning up” the sounds you want to hear, like conversations with loved ones.
The process can take up to 21 days to become fully adjusted to your new hearing device.
Start by first wearing them for 20 – 30 minutes at a time in a more private/quiet setting. Avoid noisy
areas like restaurants at first. Gradually start wearing your new hearing devices for longer time periods
and in dierent settings until you are able to wear them all day.
In a few weeks, your brain will become “re-programmed,” conversations will be easier to hear and
follow, and you will find yourself more relaxed and confident in social situations.
First Time Users of Hearing Devices
4

Important Information 6
What’s In the Box 7
Features 8
Quick Start Guide 9
Step 1: How to Open the Battery Door 10
Step 2: How to Load the Battery 11
Step 3: How to Power On/O 12
Step 4: How to Place on Your Ear 13
Step 5: Program & Volume Control 14
Changing Programs 15
Care and Cleaning 16
Helpful Tips 18
Ordering Replacements 19
Table of Contents
Using the Telephone 20
Protection Plan 21
Troubleshooting Your Hearing Device 22
If Sound is Distorted or Intermittent 23
If Device Makes a Whistling Sound 24
If Device has a Weak or No Sound 25
Warranty and Repairs 26
Return Policy 28
Warning to Hearing Aid Dispensers 29
Important Notice for Users 31
FCC Regulations 32
X-ray, MRT, CT, PET Scanning, Electro-therapy 34
Technical Data 35
5

IMPORTANT
LEADING CAUSE FOR LITTLE OR NO AMPLIFICATION
It is very important to keep your ears clear of ear wax in order to get the best
performance and life from your device, so we strongly suggest using an ear irrigation
system on a regular basis. Our favorite is available at waxBgone.com.
6
WaxBgone Earwax Removal System was Designed by
a Board Certified ENT Physician. What makes this product
unique is the SoftSpray® Irrigation Tip which makes ear
wax irrigation safer, more eective, and more comfortable.
Irrigation is the safest in-home method of removing ear
wax. Get 10% o with Coupon Code: otofonix10
(Please avoid using cotton swabs, as this can easily drive the wax into your ear canal)

What’s In the Box
7

Battery Compartment
Memory Switch
Microphone
Dome
Retention Lock
Sound Tube
Features
8

Quick Start Guide
Four Easy Steps for Using Your Otofonix Sona
Step 1: Loading the Battery
Step 2: Loading the Battery
Step 3: Turn Sona On
Step 4: Place On Ear
Step 5: Program & Volume
Control
To Identify Left/Right Sona
Hold an aid upright in each hand, with controls facing you.
The tips/tubing point toward each other when in the correct hand.
Blue Characters
Left Sona Right Sona
Red Characters
9

Step 1: How to Open the Battery Door
1
Hold the Sona by pinching the
unit on right and left sides, as
shown in the image (do not
hold from front and back or you
will be holding the door closed)
2
The Sona has a 2 stage battery
door. Press down on the
battery door tab until the door
opens sightly (as shown in
image). This stage will power
o the unit to save battery,
while ensuring that the battery
doesn’t fall out of the device.
3
Continue to lower the door and
it will open all the way to insert
or replace the battery
10

11
Step 2: How to Load the Battery
1
Open the battery door.
2
Insert the battery with
“+” facing the Otofonix
label.
3
Remove the battery tab
and wait one minute
for the battery to
activate.
4
Close the battery door.

Step 3: How to Power On/O
The Sona has a 2 stage
battery door. Press down on
the battery door tab until the
door opens sightly (as shown
in image). This stage will power
o the unit to save battery,
while ensuring that the battery
doesn’t fall out of the device.
To power on, gently insert the
battery and close the door. The
device has a built-in power on
delay, this is to allow time for you
to put the device on your ear with
time to hear the program notifica-
tion beeps. This can remind you
which program you are on.
Open fully to replace battery.
12 3
12

13
Hook body of device
behind the ear.
Tuck stabilizer bar into
outer bowl of the ear so
ear dome stays in place.
Insert ear dome into ear canal
with gentle pressure until
snugly seated in ear canal.
Step 4: How to Place on Your Ear
123

14
Step 5: Program & Volume Control
To change the program manually, press and hold the memory button until you hear the beep(s).
The number of beeps indicates which program you are on. Alternatively you can also use the Otofonix
App to change the program.
Adjust volume level using your Otofonix App. (Please See App Manual for details and illustrations)
Program Control Volume Control

15
To change your program press and release the Memory Switch down for 3 seconds at the lower
portion of the Memory Switch. The number of beeps you hear will indicate what program you are on.
The Otofonix App can also be used to change programs. (See App Guide)
Memory Feature and Adjustment Tips
When the device is turned on, it will revert to the last program and volume setting. To limit whistling
from your device when changing volume/programs, approach the device from behind your ear rather
than over the top. Support the bottom of the device with thumb when changing programs with the
button. Otofonix.com/Resources/Videos
Changing Programs
Program Beeps Best For
1. Conversation 1 Beep Everyday listening, low noise reduction (quiet family time)
2. Restaurant (Directional Mic) 2 Beeps Medium-High noise reduction (conference, church, restaurants)
3. Trac 3 Beeps Medium-High noise reduction (driving, noisy environments)
4. Outdoor (Directional Mic) 4 Beeps Medium noise reduction, less high frequency amplification
(running, wind)
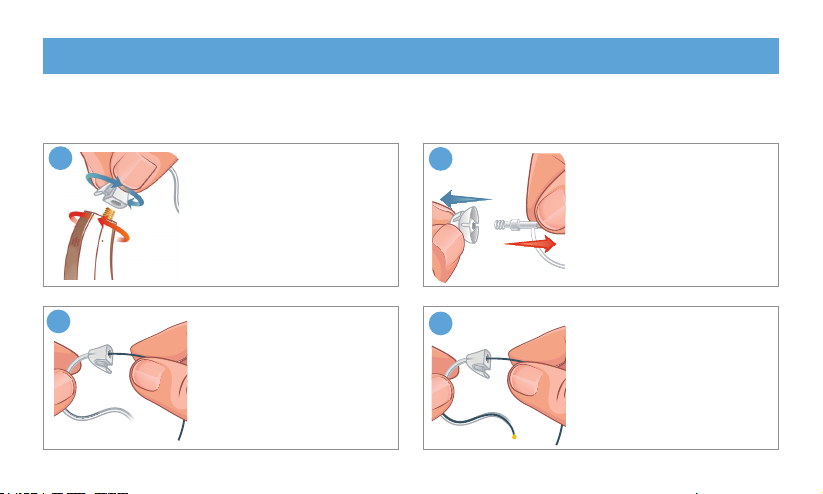
Thread wire through
tubing base and out the
tip. Wipe end of wire clean
and repeat if needed.
For optimal performance, keep the sound tube and ear dome clean. Use cleaning brush daily to clear ear
dome of wax. Clean sound tube often and anytime amplification stops or seems reduced.
Remove sound tube: Turn
base of tube counter-
clockwise and body of
device clockwise
Remove ear dome from
sound tube by inverting
ear dome and pulling
straight o
Insert wire through base
of sound tube and pull
out the opposite end
1
Care and Cleaning
2
34
16

Brush microphone
and ear dome
clean (DAILY)
Please note: the hearing device body can be utilized for either ear. Only the thin sound tubing is
ear-specific. Red markings under the stabilizer bar is for the right and the blue marking is for the
left. Tubing can be ordered at Otofonix.com.
Reattach the sound
tube: Turn base of tube
clockwise and body
of device counter-
clockwise so it is flush
with the body
56
17
Helpful Videos
Check out our library of videos for helpful tips Otofonix.com/Resources

lAvoid physical shock, such as dropping on the floor
lStore in a cool dry place
lDo not get your Otofonix Sona wet
lDo not wear your Sona while spraying hair spray or using a hairdryer
lDo not expose your Sona to excessive heat or moisture (use a hearing aid dehumidifier each night if
you live in a humid climate)
lKeep sound tubes and domes clean. Even the smallest piece of ear wax can obstruct the sound tube
and prevent sound from reaching your ear canal. See page 16 & 17 for instructions on cleaning the
sound tube with the included filament wire.
Helpful Tips
18
Table of contents
Other OTOFONIX Hearing Aid manuals

OTOFONIX
OTOFONIX Encore User manual

OTOFONIX
OTOFONIX Encore User manual

OTOFONIX
OTOFONIX Encore User manual

OTOFONIX
OTOFONIX GROOVE User manual

OTOFONIX
OTOFONIX GROOVE User manual

OTOFONIX
OTOFONIX OTOFONIX User manual

OTOFONIX
OTOFONIX Apex User manual

OTOFONIX
OTOFONIX HELIX User manual

OTOFONIX
OTOFONIX HELIX User manual

OTOFONIX
OTOFONIX Apex User manual


