VisionTek VT8000 User manual

QUAD DISPLAY DOCK
VT8000
USER MANUAL

1
lntroduction ............................................................................
Features ...................................................................................
Contents ..................................................................................
System Requirements ...........................................................
Docking Station Conguration ...........................................
Driver Installation (Windows)...............................................
Windows Setup ......................................................................
Driver Installation (macOS) ..................................................
Managing Multiple Displays (macOS) ...............................
Conguring Displays from the Menu Bar (macOS) .........
Warranty ..................................................................................
TABLE OF CONTENTS
2
3
3
4
5
8
11
13
16
18
19

2
INTRODUCTION
Your new Quad 4K Docking Station can connect to any host with USB A or Type C connectors
providing a fully backward-compatible and future-proof docking solution. Allowing you to
connect up to four additional monitors through a single USB cable.
The Quad 4K Docking Station Software allows full conguration of all additional USB displays,
including:
• Support for up to 4 additional USB Displays (Windows)
• Support for up to 4 additional USB Displays (Mac OS X)
• Expand USB 3.0 connectivity
• Supports 4 Displays
• 2.5 Gigabit Ethernet
• Mic In and Audio out
• Extended, Mirrored, Primary Display
• Extend left, right, above, or below
• Rotation
• Layout of displays
• Color Depth

3
FEATURES
CONTENTS
• Compatible with both Type-C and Type-A Laptops and Desktop Computers
• Supports 2 displays at resolutions up to 5K (5120 x 2880@60Hz) when using dual DP ports
simultaneously
• Quad 4K Output
• Supports Extend and Mirror Display Mode
• Supports 5.1 Channel Surround Sound
• Built-in USB GPU, Plug and Display
• Combo microphone input and audio output
• SuperSpeed USB 3.0, speeds up to 5Gbps and backward compatible with 2.0/1.1
• SuperSpeed+ USB 3.1 Gen2 port up to 10Gbps
• Built-in 2.5 Gigabit Ethernet RJ45 for increased network performance
• Power Delivery up to 100W over USB Type-C connection
• USB-C 30W charging port for phones and tablets
• VT8000 Docking Station
• Power Adapter 180W
• USB-C to USB-C Cable (1M)
• USB-C to USB-A 3.0 Adapter
• USB-C Cable Screw Adapter
• Quick Start Guide

4
SYSTEM REQUIREMENTS
DisplayLink USB Graphics Software for Windows
Windows 7 (32-bit and 64-bit editions)
Windows 8 (32-bit and 64-bit editions)
Windows 8.1 Update 2015 (32-bit and 64-bit editions)
Windows 10 (32-bit and 64-bit edition)
DisplayLink USB Graphics Software for macOS
Big Sur 11
Catalina 10.15
Mojave 10.14
High Sierra 10.13
Sierra 10.12
El Capitan 10.11
Yosemite 10.10
Mavericks 10.9
Mountain Lion 10.8

5
Step 1
Connect the USB-C to USB-C cable to the Docking Station. Plug the USB cable into your Laptop/
Desktop Computer, Connect the power adapter and turn it on.
DOCKING STATION CONFIGURATION
Display 1
DP, HDMI
Display 3
DP, HDMI
Display 4
DP, HDMI
2.5 G
Ethernet
USB-C
To System
Power In Kensington
Lock
Display 2
DP, HDMI
Video Stream A
DP++
HDMI HDMI HDMI HDMI
DP++ DP++ DP++
Video Stream B Video Stream C Video Stream D
PowerUSB 3.0
PC

6
DOCKING STATION CONFIGURATION (Continued)
Step2
Connect your displays to the Docking Station
Each Video Stream supports 1 display up to 4K @ 60Hz for a total of 4 displays
HDMI Cable
(Not Included)
Connect to HDMI Monitor
DisplayPort Cable
(Not Included)
Connect to DisplayPort Monitor
OR
Per Video Stream
HDMI DisplayPort
7
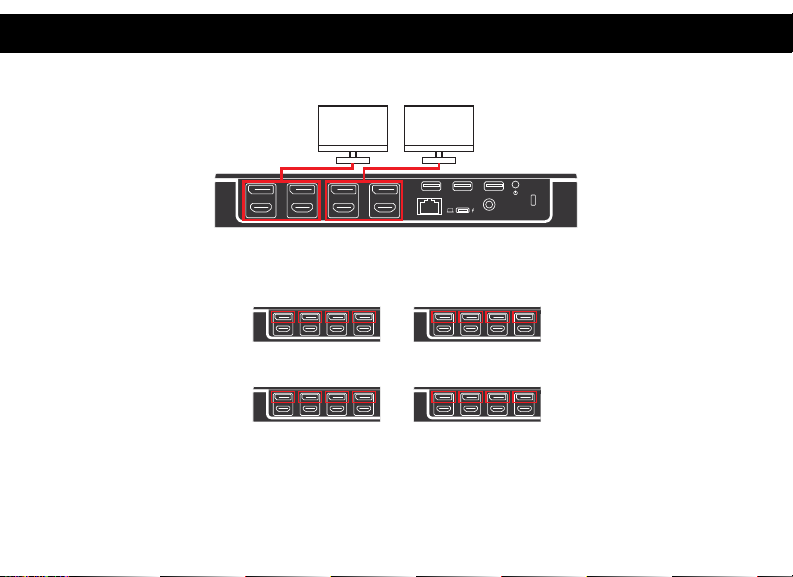
DOCKING STATION CONFIGURATION (Continued)
Monitor 2Monitor 1
Correct way to connect 5K displays
Wrong ways to connect 5K displays
X
1212
X
1221
X
2112
X
2121
Note:
You can only connect either the left two DP ports or right two, you cannot
interconnect them randomly.

8
Step 1
The following section shows you how to install the Docking Station software on dierent
operating systems.
Download and install the latest Displaylink software. Select the driver according to your operating
system.
Please visit displaylink.com/downloads and download the latest drivers. Displaylink-provided
drivers are always compatible with the USB Docking Station.
Step2
Select the downloaded le double click to begin
the DisplayLink software installer
Step3
Once the installer begins a window will pop up
and verify that your system is compatible with
DisplayLink USB Graphics.
DRIVER INSTALLATION (Windows)

9
Step4
Click ”Install”
DRIVER INSTALLATION (Windows Continued)
Table of contents
Other VisionTek Docking Station manuals

VisionTek
VisionTek VT350 User manual

VisionTek
VisionTek VT4900 User manual

VisionTek
VisionTek VT2000 User manual

VisionTek
VisionTek VT2900 User manual

VisionTek
VisionTek VT2600 User manual

VisionTek
VisionTek VT4000 User manual

VisionTek
VisionTek VT4950 User manual

VisionTek
VisionTek VT400 User manual

VisionTek
VisionTek VT7400 User manual

VisionTek
VisionTek VT4900 User manual


