VisionTek VT4950 User manual

USB-C KVM DOCKING STATION
VT4950
USER MANUAL

1
TABLE OF CONTENTS
SAFETY INSTRUCTIONS......................................................
INTRODUCTION..................................................................
FEATURES............................................................................
CONTENTS..........................................................................
SYSTEM REQUIREMENTS....................................................
DOCKING STATION PORTS................................................
DOCKING STATION SETUP.................................................
SUPPORTED RESOLUTIONS...............................................
DRIVER INSTALLATION (Windows)....................................
WINDOWS SETUP...............................................................
KM LINK (Windows)...........................................................
GO! BRIDGE (Windows)....................................................
DRIVER INSTALLATION (macOS) ......................................
DISPLAYLINK MANAGER CONFIGURATION (macOS)......
DISPLAY SETTINGS (macOS).............................................
KM LINK (macOS)..............................................................
GO! BRIDGE (macOS)........................................................
FAQ.....................................................................................
NOTICE...............................................................................
WARRANTY / SUPPORT.....................................................
2
3
3
3
4
5
7
12
14
16
18
20
21
24
27
29
31
32
35
36

2
SAFETY INSTRUCTIONS
COPYRIGHT STATEMENT
DISCLAIMER
WEEE DIRECTIVE & PRODUCT DISPOSAL
Always read the safety instructions carefully.
Keep the User Manual for future reference.
Keep this equipment away from humidity.
If any of the following situations arise, have the equipment checked by a service technician immediately:
• The equipment has been exposed to moisture.
• The equipment has obvious signs of breakage.
• The equipment has not been working well or you cannot get it to function according to this manual.
No part of this publication may be reproduced in any form by any means without prior written permission.
All trademarks and brand names mentioned herein are trademarks or registered trademarks of their
respective companies.
Information in this document is subject to change without notice. The manufacturer does not make any
representations or warranties (implied or otherwise) regarding the accuracy and completeness of this
document and shall in no event be liable for any loss of profit or any commercial damage, including but not
limited to special, incidental, consequential, or other damage.
At the end of its serviceable life, this product should not be treated as household or general waste. It should
be handed over to the applicable collection point for the recycling of electrical equipment, or returned to the
supplier for disposal.

3
Take your dual system setup to the next level. Easily switch between work and home. Share keyboard,
mouse, displays, wired networking and USB devices between two systems. Extend up to 3 displays, 4K @
60Hz, (depending on the host device). Expand your laptop capabilities - add USB ports, charge your mobile
devices and deliver up to 100W of power to each laptop through one convenient USB-C Cable.
FEATURES
INTRODUCTION
CONTENTS
• Compatible with USB-C systems
• Share and switch displays, keyboard, mouse and accessories between 2 systems
• USB-C Power Delivery up to 100W to each laptop
• USB-C Power Delivery mobile device charging up to 7.5W
• Supports up to 3 Displays, 2 via DisplayLink and 1 via DP Alt Mode
• Supports extended and mirrored modes
• USB 3.2 Gen 2 10Gbps USB-A / USB-C ports
• Gigabit Ethernet
• Standard Kensington Lock Support
• VT4950 KVM Dock
• 230W Power Adapter
• (2) USB-C to USB-C Cable
• User Manual

4
Compatible Devices
System with USB-C port for two displays, system with USB-C port that supports DisplayPort over USB-C (DP Alt
Mode) for 3 displays or MacBook with USB-C port that supports DisplayPort over USB-C for 3 displays.
For USB-C charging, a system with a USB-C port that supports USB-C Power Delivery 3.0 is required
Operating System
Windows 11, 10, 8.1, 8, 7
macOS 10.12 or Later
SYSTEM REQUIREMENTS
*Note: Maximum resolution and number of extended displays is dependent on host system specifications.

5
DOCKING STATION PORTS

6
Port Description
1. Display Mode Switch Switch between KVM display modes
2. Power LED Power LED indicator light
3. USB 2.0 Keyboard Connect a USB-A keyboard
4. USB 2.0 Mouse Connect a USB-A mouse
5. Audio Jack Connect headphones, headset or other devices with 3.5mm connector
6. USB-A 3.1 Gen 2 Ports Connect a USB-A device, supports 10Gbps transfer speeds, up to 7.5W charging
7. USB-A 3.1 Gen 2 Port Connect a USB-C device, supports 10Gbps transfer speeds, up to 7.5W charging
8. Power Switch Toggle docking station power On/Off
9. 20V DC Power Supply In Connect the included 230W 20V/11.5A Power Supply
10. USB-C Host A Upstream Port Connect to a laptop or PC, up to 10 Gbps to host, DP Alt Mode Video and USB-C
Power Delivery charging up to 100W
11. USB-C Host B Upstream Port Connect to a laptop or PC, up to 10 Gbps to host, DP Alt Mode Video and USB-C
Power Delivery charging up to 100W
12. HDMI 2.0 Port (DP Alt Mode) Display 1 - Connect a display with an HDMI port to stream video up to 4K@60Hz*
13. DP 1.2 Port (DisplayLink 1) Display 2 - Connect a display with a DP port to stream video up to 4K@60Hz
14. DP 1.2 Port (DisplayLink 2) Display 3 - Connect a display with a DP port to stream video up to 4K@60Hz
15. RJ45 Gigabit Ethernet Connect a network router or modem at 10/100/1000 Mbps
16. Kensington Security Slot Attach a standard Kensington Lock to secure docing station
DOCKING STATION PORTS (Continued)
*Note: 4K @ 60Hz max single display resolution, maximum resolution dependent on host system
specifications.
7
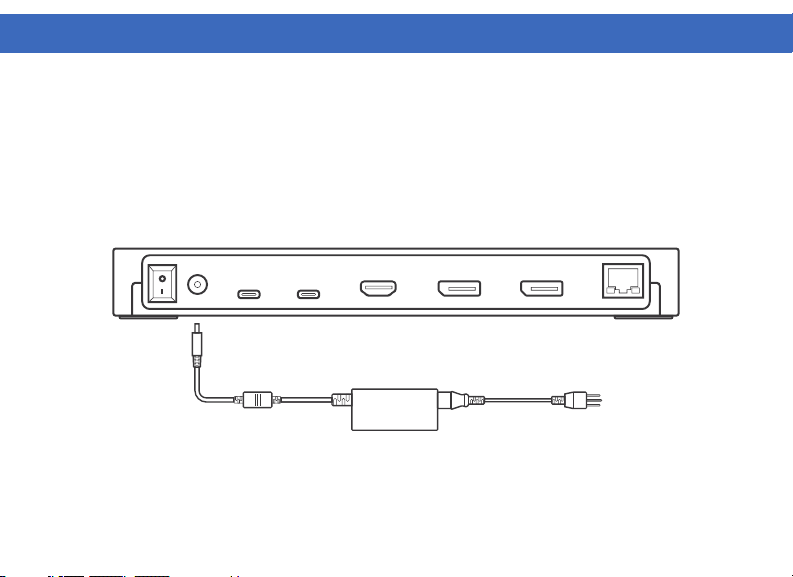
DOCKING STATION SETUP
Connecting Power
1. Plug the power adapter into the 20V DC Power In port on the back of the dock. Connect the other end into
a power outlet.
Note: Power supply is required for dock operation.

8
Connecting Systems
1. Connect the included USB-C cable to the USB-C Host A port on the back of the VT4950. Connect the other
end to your host laptop, PC or Mac.
2. Connect the included USB-C cable to the USB-C Host B port on the back of the VT4950. Connect the other
end to your host laptop, PC or Mac.
3. The VT4950 has high resolution DP and HDMI outputs. Resolutions up to 3840 x 2160 @ 60Hz are
supported depending on monitors connected and the host system capabilities.
DOCKING STATION SETUP (Continued)
USB-C
Host A
USB-C
Host B

9
DOCKING STATION SETUP (Continued)
Single Display Setup
1. Connect your monitor to the Display A - DisplayPort, Display B - DisplayPort or Display C - HDMI.
Note: Display C HDMI outputs video via USB-C DP Alt Mode and will only output video when connected to a
host system with this feature.
Table of contents
Other VisionTek Docking Station manuals

VisionTek
VisionTek VT2900 User manual

VisionTek
VisionTek THUNDERBOLT VT5400 User manual

VisionTek
VisionTek VT350 User manual

VisionTek
VisionTek VT4900 User manual

VisionTek
VisionTek VT4000 User manual

VisionTek
VisionTek VT7400 User manual

VisionTek
VisionTek VT2000 User manual

VisionTek
VisionTek VT400 User manual

VisionTek
VisionTek VT4900 User manual

VisionTek
VisionTek VT8000 User manual


