Vissani HVBC58STF User manual

THANK YOU
We appreciate the trust and confidence you have placed in Vissani through the purchase of this wine and beverage
cooler. We strive to continually create quality products designed to enhance your home. Visit us online to see our full
line of products available for your home improvement needs.
Thank you for choosing Vissani!
USE AND CARE GUIDE
VISSANI 5.1 CU. FT. WINE AND BEVERAGE COOLER S/S
Questions, problems, missing parts? Before returning to the store, call Vissani Customer Service
8 a.m. – 7 p.m., EST, Monday-Friday, 9 a.m. – 6 p.m., EST, Saturday
1-855-847-7264
HOMEDEPOT.COM
Item # 1001 689 149
Model #HVBC58STF

2
Table of Contents
Table of Contents................................................................ 2
Safety Information............................................................... 3
Warranty................................................................................4
Limited Warranty................................................................4
Limitations of Remedies and Exclusions.......................... 4
Pre-Installation.....................................................................5
Operation..........................................................................8
Changing the Reversible Door........................................9
Care and Cleaning..........................................................10
Cleaning Your Appliance .............................................10
Vacation Time..............................................................
10
Moving Your Appliance................................................10
Energy Saving Tips......................................................10
Changing the Inner Light..............................................
10
Automatic Defrost........................................................10
Troubleshooting..............................................................11
Planning Installation.......................................................... 5
Package Contents.............................................................
Installation............................................................................ 6
Electrical Connection.........................................................
7
Built-in Installation.............................................................6
To Remove a Shelf .......................................................7
To Replace a Shelf .......................................................7
5
Free-Standing Installation................................................. 6
Bottle Arrangement............................................................
7
Wine Shelves.....................................................................7
Beverage Shelves...............................................................
7

3
Safety Information
WARNING:
To reduce the risk of fire, electrical shock, or injury follow these basic precautions when using your refrigerator.
WARNING----Keep ventilation openings in the appliance enclosure or in the built-in structure clear of
obstruction.
WARNING----Do not touch the interior of the chiller compartment with wet hands. This could result in frost bite.
WARNING----Do not use mechanical devices or other means to accelerate the defrosting process, other than
those recommended by the manufacturer.
WARNING----Do not damage the refrigerant circuit when handling, moving, or using the refrigerator.
WARNING----Do not use electrical appliances inside the food storage compartment of the refrigerator, unless
they are of the type recommended by the manufacturer.
WARNING-DANGER----Never allow children to play with, operate, or crawl inside the refrigerator.
Risk of child entrapment. Before you throw away your old refrigerator:
1. Take off the doors.
2. Leave the shelves in place so that children may not easily climb inside.
Unplug the refrigerator before carrying out user maintenance on it.
This appliance is not intended for use by persons (including children) with reduced physical, sensory or mental
capabilities, or lack of experience and knowledge, unless they have been given supervision or instruction concerning
use of the appliance by a person responsible for their safety. Children should be supervised to ensure that they do not
play with the appliance.
If a component part is damaged, it must be replaced by the manufacturer, its service agent, or similar qualified persons
to avoid a hazard.
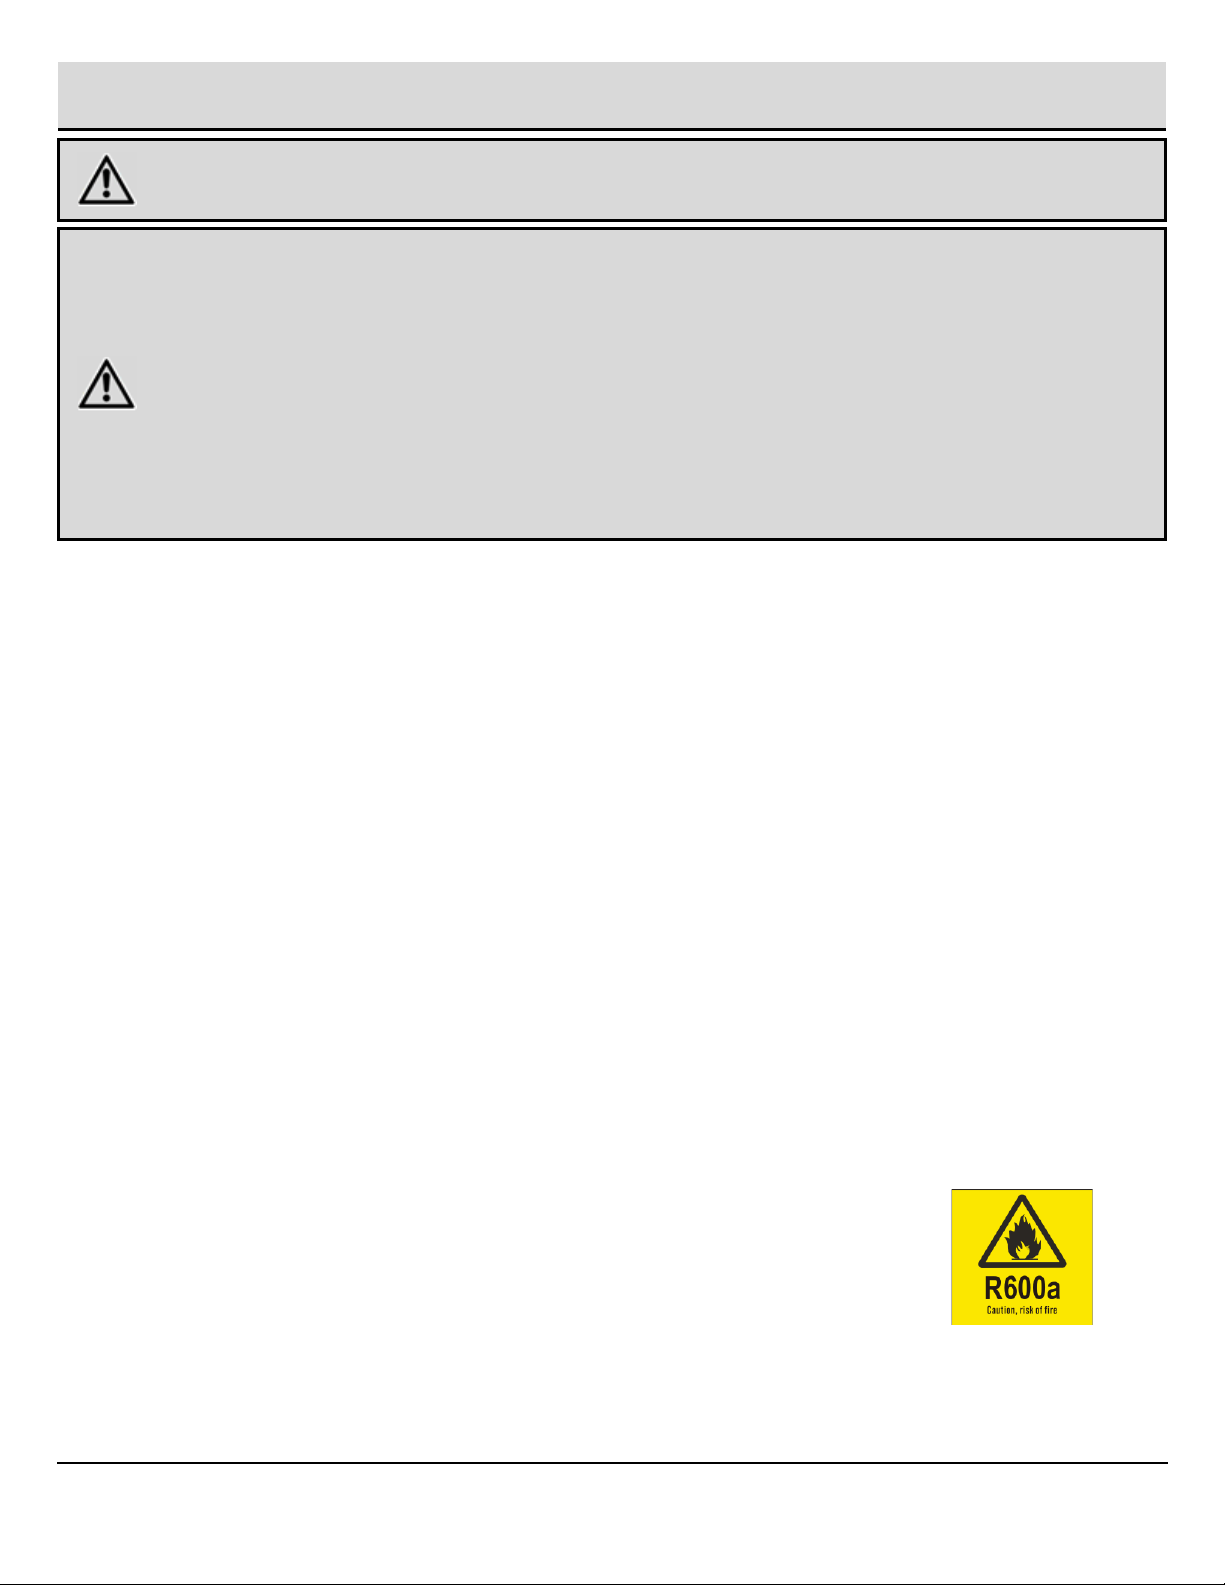
Follow local regulations regarding disposal of the refrigerator due to flammable refrigerant and gas. All refrigeration
products contain refrigerants, which under the guidelines of federal law must be removed before disposal. It is the
consumer’s responsibility to comply with federal and local regulations when disposing of this product.
This refrigerator is intended to be used in household and similar environments.
Do not store or use gasoline or any flammable liquids inside or in the vicinity of this refrigerator.
Do not use extension cords or ungrounded (two prong) adapters with this refrigerator. If the power cord is too short,
have a qualified electrician install an outlet near the refrigerator. Use of an extension cord can negatively affect the
refrigerator’s performance.
If the power cord is damaged, it must be replaced by the manufacturer, its service agent or similarly qualified person to
in order to avoid a hazard.
Do not store explosive substances, such as aerosol cans with a flammable propellant, in this
appliance.
This appliance is intended to be used in household and similar applications such as:
Staff kitchen areas in shops, offices, and other working environments.
Farmhouses and by clients in hotels, motels, and other residential type environments.
Bed and breakfast type environments.
Catering and similar non-retail applications.
The LED light is to be replaced only by professionals.
HOMEDEPOT.COM
Please contact 1-855-847-7264 for further assistance.

4
Damages due to shipping damage or improper installation.
Damages due to misuse or abuse.
Punctures to the evaporator system due to improper defrosting of the unit.
Content losses due to failure of the unit.
Repairs performed by unauthorized service agents.
Service calls that do not involve defects in material and workmanship, such as instruction on proper use of the
product or improper installation.
Replacement or resetting of house fuses or circuit breakers.
Failure of this product if used for purposes other than its intended purpose.
Disposal costs of failed units not returned to our factory.
Any delivery or installation costs incurred as the result of a unit that fails to perform as specified.
Expenses for travel and transportation for product service if your appliance is located in a remote area where
service by an authorized service technician is not available.
The removal and reinstallation of your appliance if it is installed in an inaccessible location or is not installed in
accordance with published installation instructions.
Refunds for non-repairable products are limited to the price paid for the unit per the sales receipt.
This warranty is non-transferable. This warranty applies only to the original purchaser and does not extend to any
subsequent owner(s).
Limitations of Remedies and Exclusions
Product repair in accordance with the terms herein, is your sole and exclusive remedy under this limited warranty. Any
and all implied warranties including merchantability and fitness for a particular purpose are hereby limited to one year or
the shortest period allowed by law. MC Appliance Corporation is not liable for incidental or consequential damages and
no representative or person is authorized to assume for us any other liability in connection with the sale of this product.
Under no circumstances is the consumer permitted to return this unit to the factory without the prior written consent of
MC Appliance Corporation.
Some states prohibit the exclusion or limitation of incidental or consequential damages, or limitations on implied
warranties. This warranty gives you specific rights, and you may also have other rights which vary from state to state.
Model Parts & Labor Compressor (Parts Only) Type of Service
HVBC58STFOne Year Five Years In-Home
Contact the Customer Service Team at 1-855-847-7264 or visit www.homedepot.com.
Warranty
Limited Warranty
MC Appliance Corporation warrants each new wine and beverage cooler to be free from defects in material and
workmanship and agrees to remedy any such defect or to furnish a new part(s) (at the company’s option) for any part(s)
of the unit that has failed during the warranty period. Parts and labor expenses are covered on this unit for a period of
one year after the date of purchase. A copy of the dated sales receipt /invoice is required to receive warranty service,
replacement or refund.
In addition, MC Appliance Corporation warrants the compressor (parts only) to be free from defects in material and
workmanship for a period of five years. The consumer is responsible for all labor and transportation expenses related to
the diagnosis and replacement of the compressor after the initial one-year warranty expires. In the event that the unit
requires replacement or refund under the terms of this warranty, the consumer is responsible for all transportation
expenses to return the unit to our factory prior to receiving a replacement unit or refund. A refund or replacement will be
issued at the discretion of MC Appliance Corporation.
This warranty covers appliances in use within the contiguous United States, Alaska, Hawaii, Canada and Puerto Rico.
The warranty does not cover the following:

5HOMEDEPOT.COM
Please contact 1-855-847-7264 for further assistance.
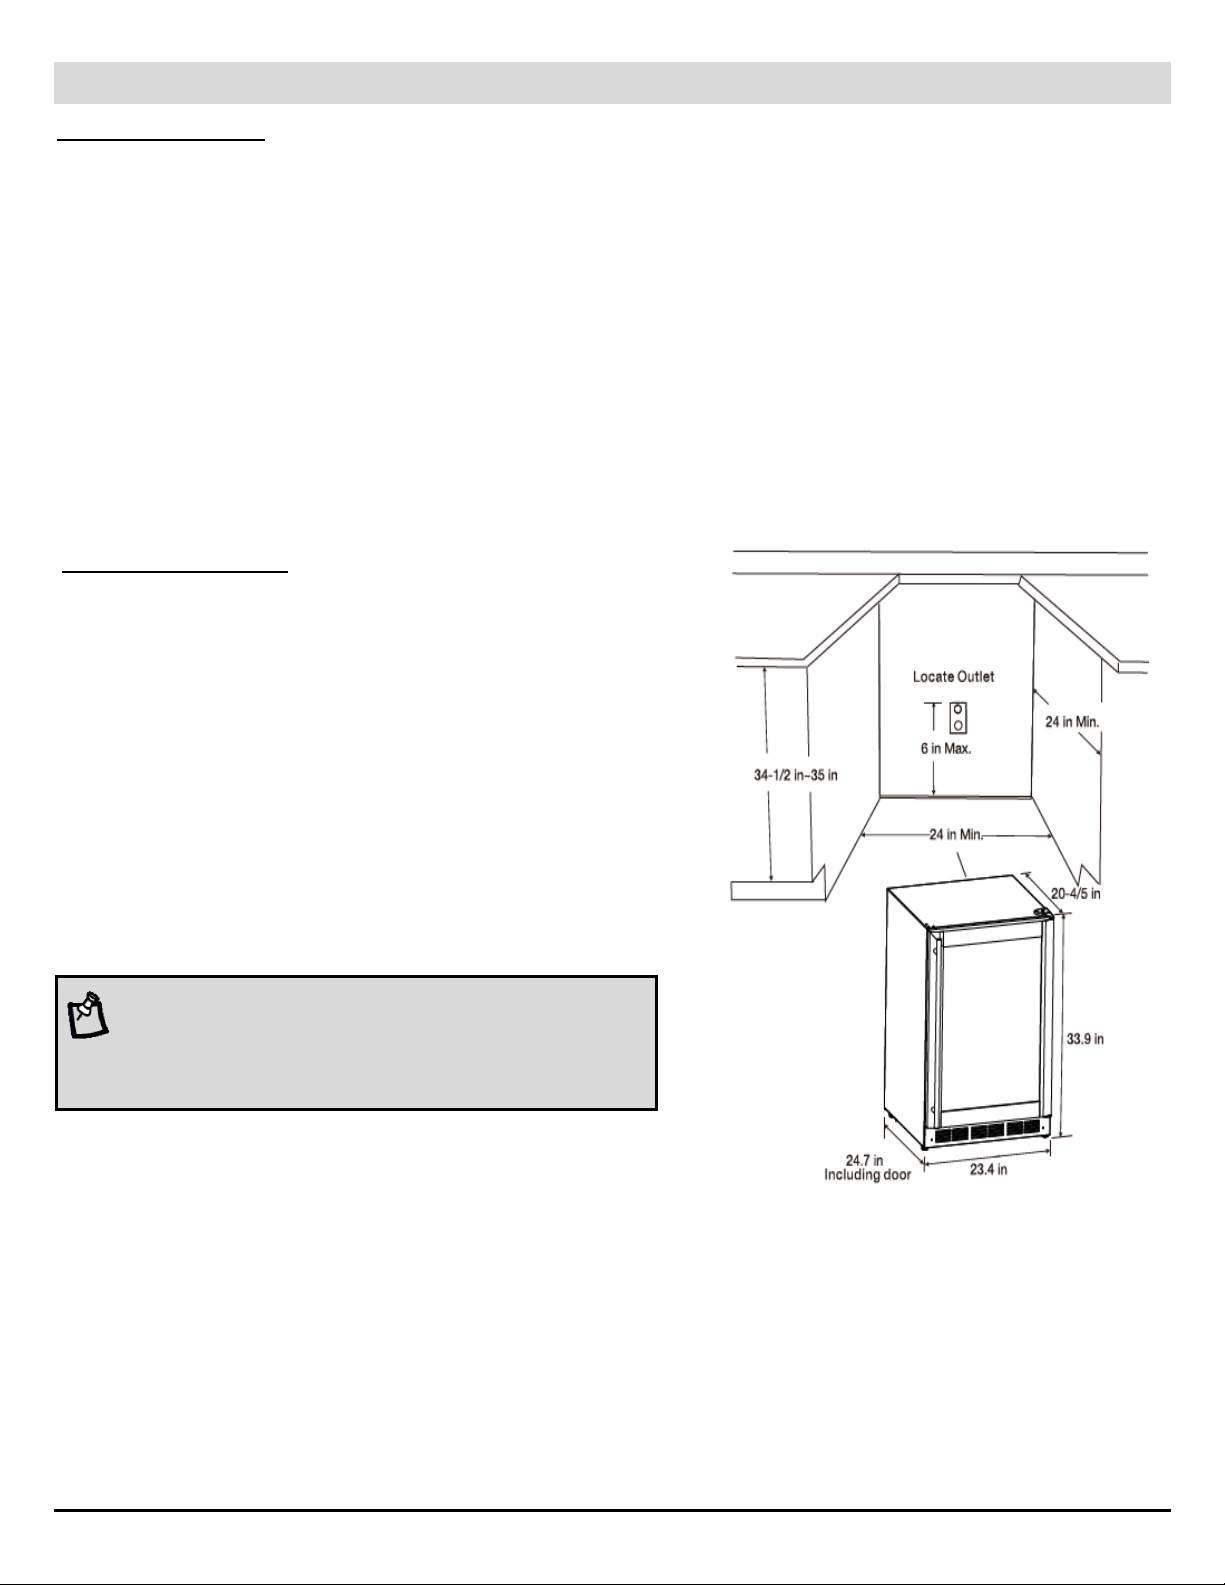
Pre-Installation
PACKAGE CONTENTS
PLANNING INSTALLATION
¨Remove the exterior and interior packing.
¨Before connecting the appliance to the power source, let it stand upright for approximately 4 hours. This will reduce
the possibility of a malfunction in the cooling system from improper handling during transportation.
¨Clean the interior surface with lukewarm water using a soft cloth. (See Care and Cleaning section on page #11)
¨Save these instructions.
Unit Dimensions
( inches )
Width Height Depth
23.4 in. 33.9 in. 24.3 in.
Net Weight ( pounds) 103 pounds
WARNING:
¨Read all instructions before using the wine or beverage cooler.
¨Never clean appliance parts with flammable fluids. The fumes can create a fire hazard or explosion.
¨Do not store or use gasoline or any other flammable vapors and liquids in the vicinity of this or any
other appliance. The fumes can create a fire hazard or an explosion.
C
D
A
B
E
F
Parts Description Quantity
Electronic thermostat
Beverage shelf
Door gasket
3
1
1
Glass door 1
Cabinet 1
Wine shelf 6
A
C
D
E
Parts
F
B

6
Installation
Free-Standing Installation
This appliance is designed to be installed built-in or free standing.
Locate the appliance away from direct sunlight and sources of heat (stove, heater, radiator, etc.). Direct sunlight may
affect the acrylic coating and heat sources may increase electrical consumption. Ambient temperature below 55℉
(12.8℃) or above 90℉ (32℃) will hinder the performance of this appliance. This unit is not designed for use in a
garage or any other outside installation.
Avoid locating the appliance in moist areas.
Plug the appliance into dedicated, properly installed, grounded wall outlet. Do not under any circumstances cut or
remove the third (ground) prong from the power cord. Any questions concerning power and/or grounding should be
directed toward a certified electrician or an authorized service center. This unit is not designed to be installed in an
RV or used with an inverter.
After plugging the appliance into a wall outlet, turn the unit on and allow the unit to cool down for 3–4 hours before
placing wine bottles or beverages in the appliance.
¨
¨
¨
¨
¨
Built-in Installation
The cutout dimension illustrated in figure (A) allows for door
swing and access to the pull-out shelves when installed as a
built-in appliance. If installing between frameless cabinets,
a 1/2 in. wide filler strip or side panel may be needed on hinge
side. The filler strip will act as a spacer between the
appliance case and adjacent cabinet door swing.
The width of the opening must include the filter panels.
¨
NOTE:
The door should protrude at least 1 in. beyond the surrounding
cabinets. If door reversal is desired, please follow Changing the
Reversible Door on page 9 of this manual prior to installation.
The cutout depth must be 24 in.
7HOMEDEPOT.COM
Please contact 1-855-847-7264 for further assistance.
¨This appliance should be properly grounded for your safety. The power cord of this appliance is equipped with a
three-prong plug which mates with standard three prong wall outlets to minimize the possibility of electrical shock.
¨Do not, under any circumstances, cut or remove the third ground prong from the power cord supplied.
¨This appliance requires a standard 115 Volt A.C. /60Hz electrical outlet with three-prong ground.
¨This appliance is not designed to be used with an inverter.
¨The cord should be secured behind the appliance and not left exposed or dangling to prevent accidental injury.
¨Never unplug the appliance by pulling the power cord. Always grip the plug firmly and pull straight out from the
receptacle.
¨Do not use an extension cord with this appliance. If the power cord is too short, have a qualified electrician or service
technician install an outlet near the appliance. Use of an extension cord can negatively affect the performance of the
unit.
¨If any problems with the appliance persist, please contact our Vissani Customer Service. to consult with a
representative at 1-855-847-7264.
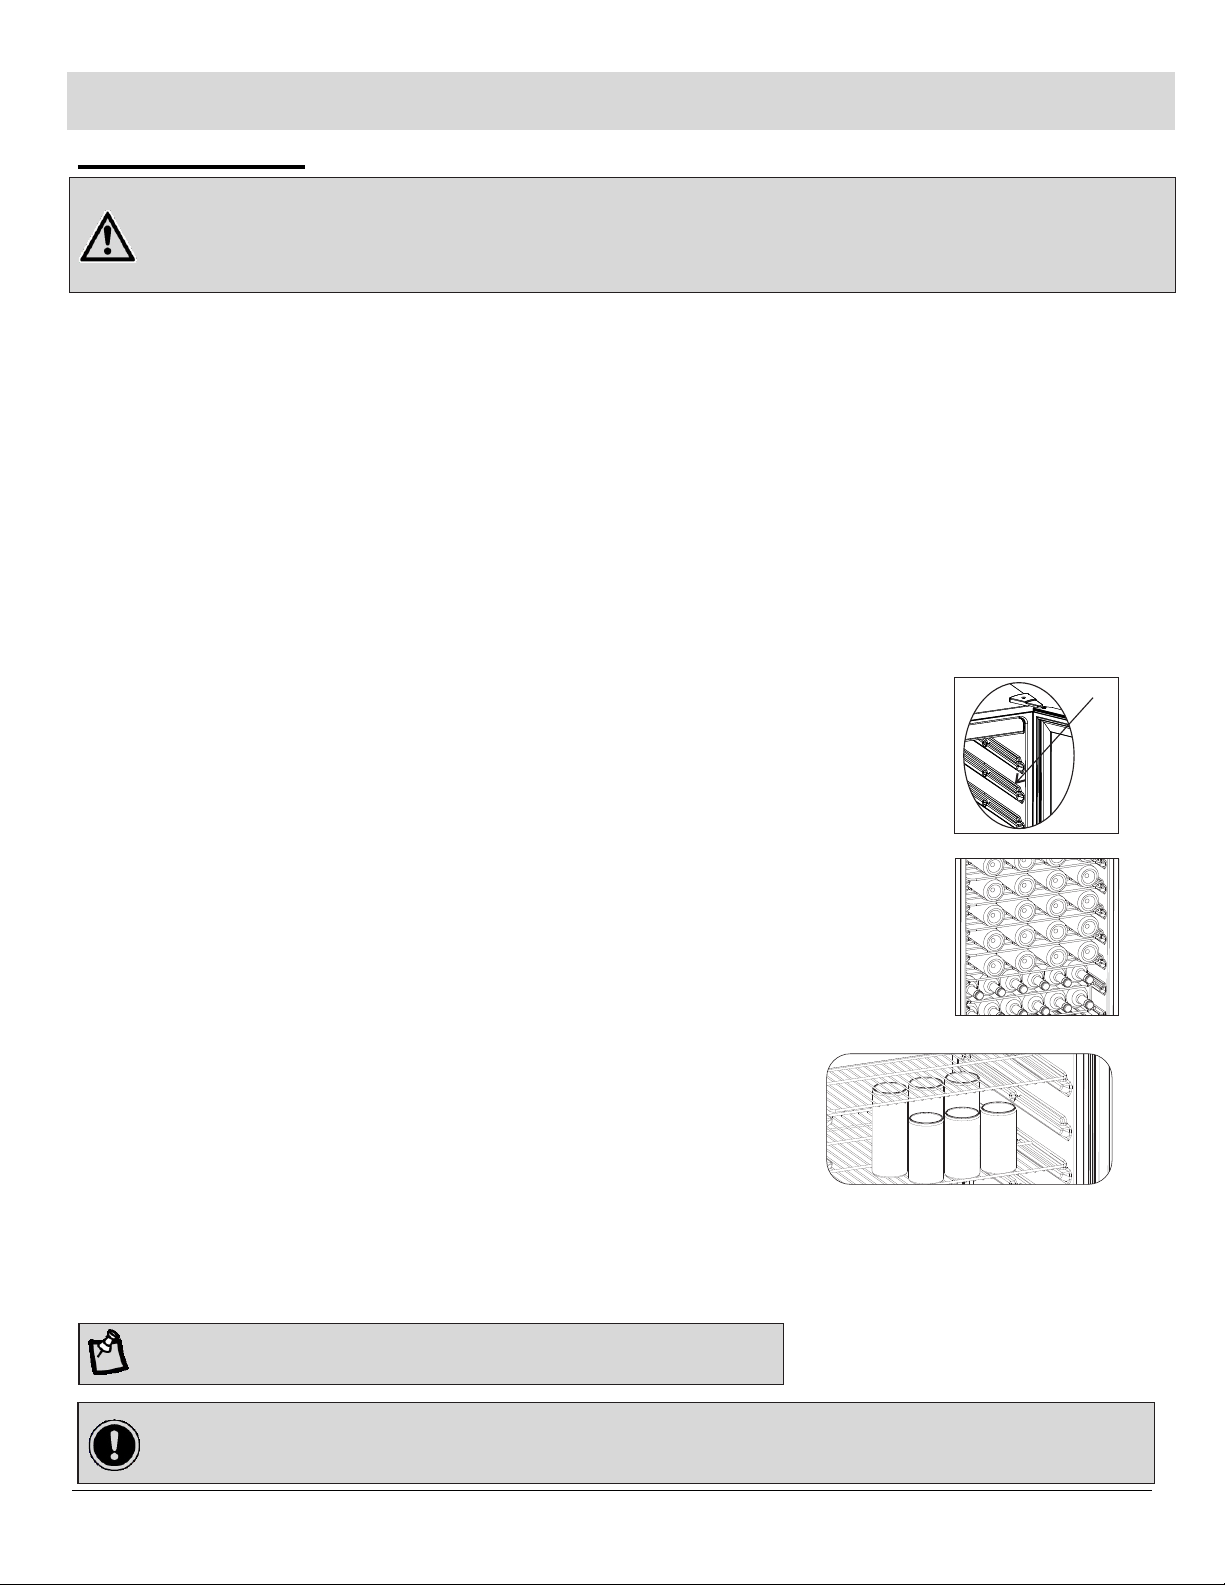
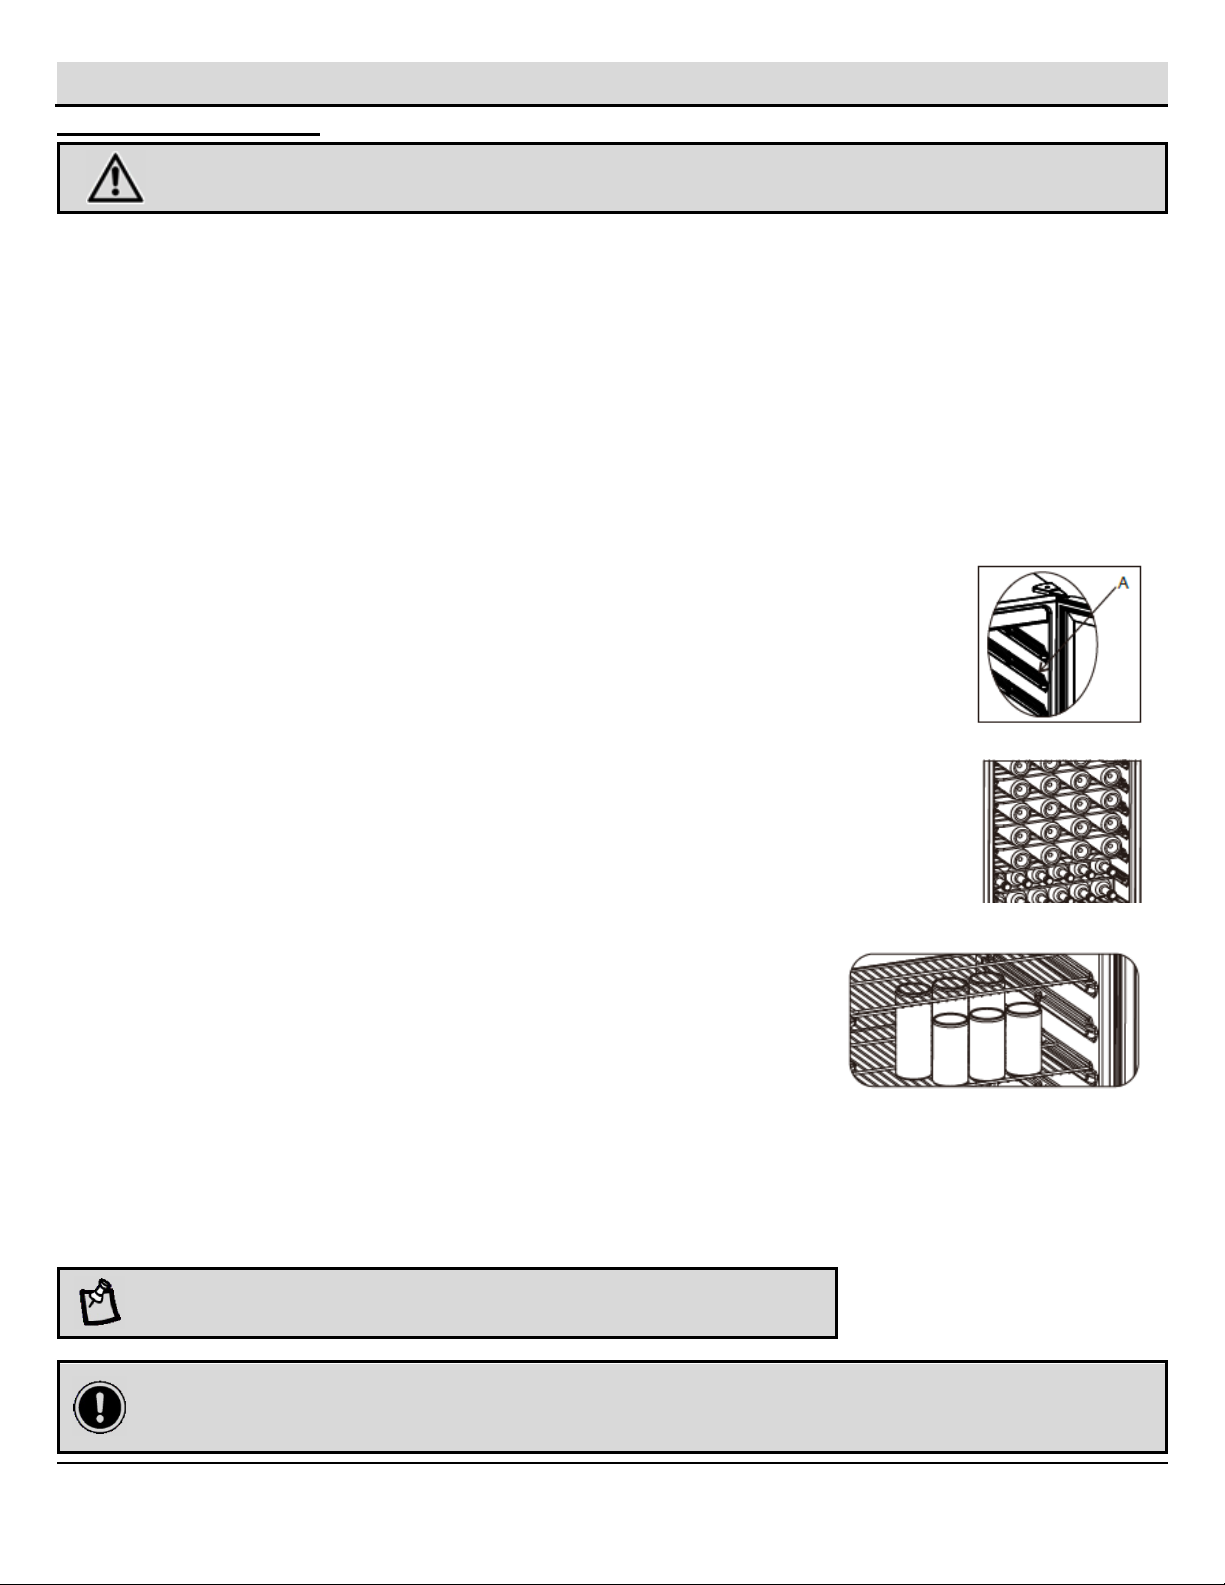
¨There are five wine shelves of full depth in upper part of cabinet to store wine bottles.
The second supporting guide (counted from top, see illustration “A”) is not
designed for wine shelf. It is only for beverage shelf.
All the top five wine shelves have tabs to connect to the cabinet on both sides.
Any of the wine shelves can be removed to accommodate larger bottles.
¨
¨
¨
Bottle Arrangement
¨The top five shelves each hold 8 bottles with the bottle necks alternating front to back.
¨The bottom rack, which consists of two stories, each holds 6 bottles with bottle necks
facing the front.
There are three steel shelves to store beverage cans or bottles.
All three steel shelves have tabs to connect to the cabinet on both sides.
The shelves may be arranged on any supporting guide as preferred.
Any of the steel shelves can be removed to accommodate larger
cans or bottles.
¨
¨
¨
¨
Place the sides of the shelf back onto the supporting guides of the cabinet and push back until the shelf tabs slide
into place.
To Remove a Shelf:
¨Remove all cans or bottles from the shelves.
¨Lift the shelf upwards and then gently pull out the shelf.
NOTE:
Ensure that the tabs are firmly engaged in place before storing any beverages.
IMPORTANT:
Do not press/jostle the circulation fan in the cabinet when you place in or remove the beverage cans or bottles. Properly
store your beverages so that the cans or bottles do not hinder air circulation inside the cabinet.
¨
Wine Shelves
Beverage Shelves
To Replace a Shelf:
A
Electrical Connection
WARNING:
Improper use of the grounded plug can result in the risk of electrical shock. If the power cord is damaged, have it
replaced by an authorized service center.
Installation(continued)

8
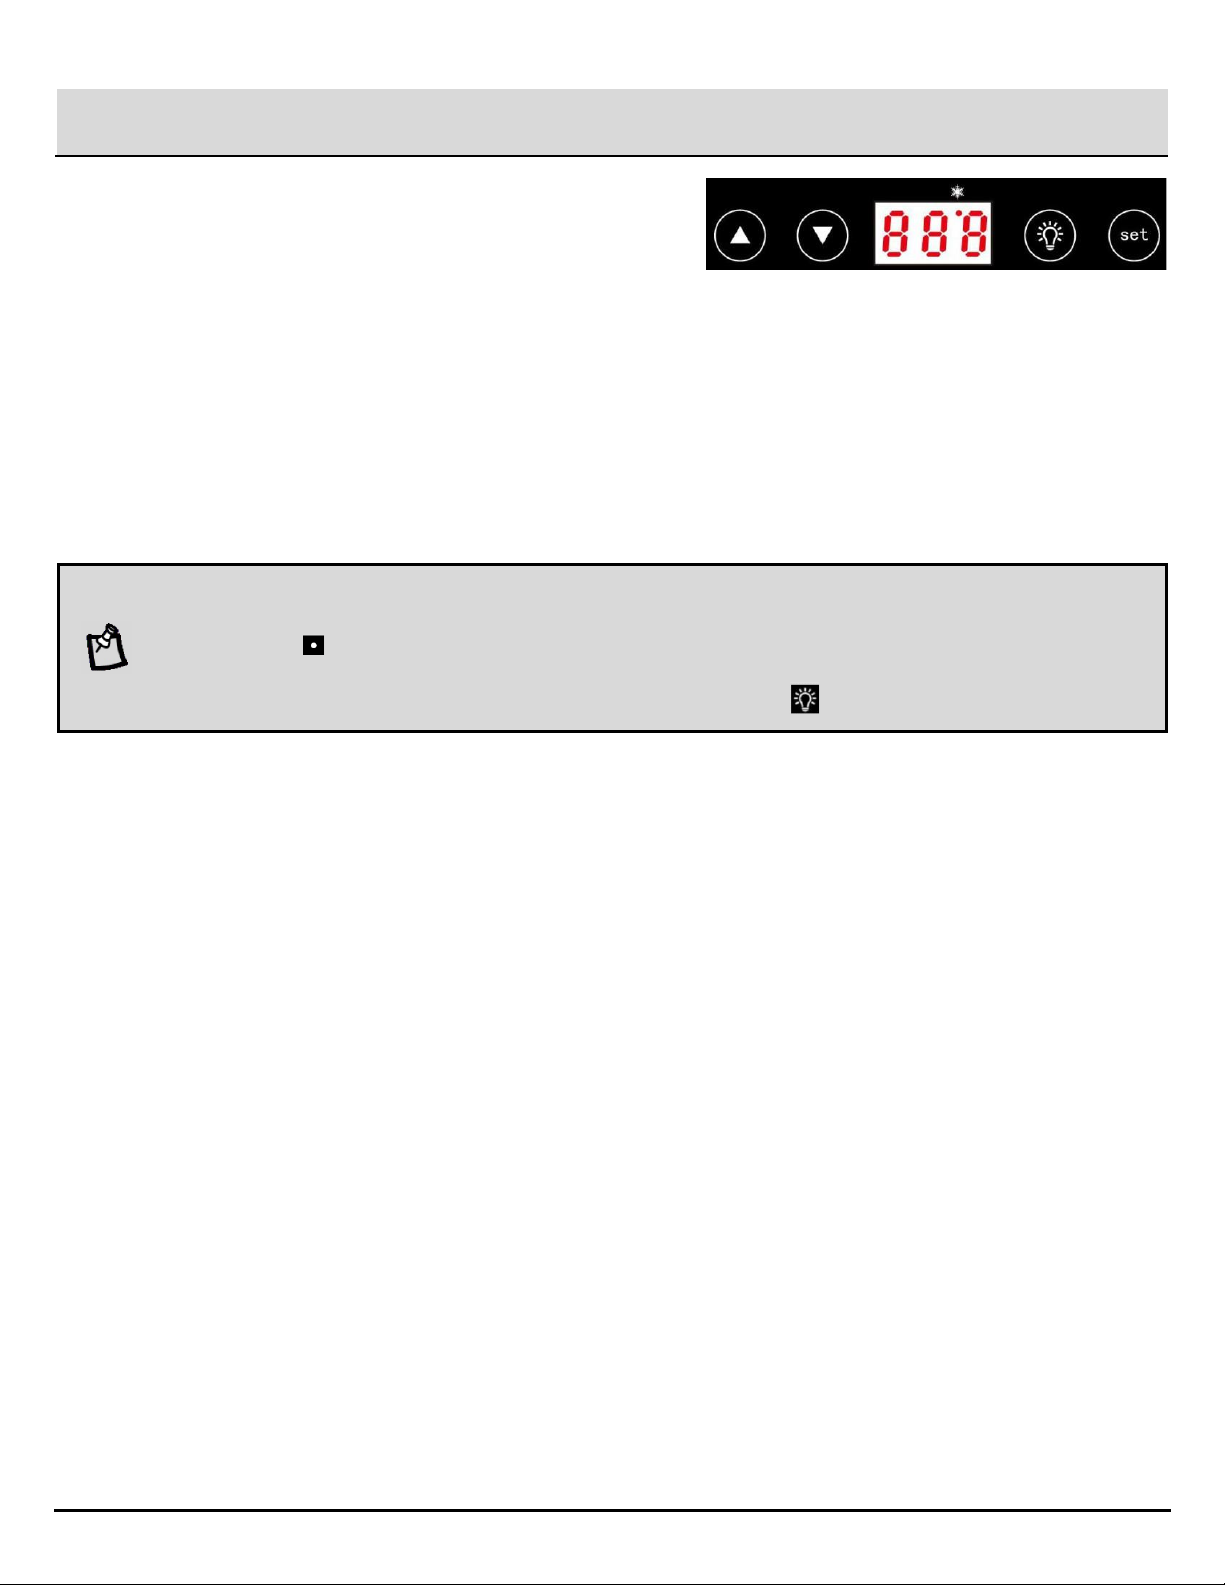
The temperature range of the wine and beverage
cooler is for 37℉-61℉ (3℃-16℃) . +/- 5℉.
The display indicates the average temperature
of the appliance at the moment.
When the appliance is switched on, or the ▲pad is pressed, the appliance runs on the temperature setting of
45℉ (7℃).
The temperature of the wine and beverage cooler can be set anywhere between 37℉-61℉ (3℃-16℃) by pressing
temperature up ▲ and temperature down▼pads as follows:
¨
¨
Normal Temperature Setting
¨
Manual Temperature Setting
¨
Operation
Press the [SET] pad until you hear a “Beep” sound (approximately 2 seconds).
Pr ▲▼
ess the pads to increase or decrease the desired temperature in increments of one degree.
Press the [SET] pad to confirm your desired temperature setting. If no pad is pressed within 10 seconds, your
selected temperature setting will be automatically confirmed.
¨
¨
¨
NOTE:
To select temperature display between Celsius (℃) or Fahrenheit (℉), press the ▲ pad for approximately 2 seconds.
The indicator (under the snow mark) will remains on when compressor working, and will turns off when in neutral.
To switch the interior light ON/O F F ,press the .pad

9HOMEDEPOT.COM
Please contact 1-855-847-7264 for further assistance.
Changing the Reversible Door
This appliance is built with a reversible door. You have the choice of either opening it from the left or the right side. In order
to reverse the opening direction of your door, please follow these simple instructions.
NOTE:
If desired, please change the door swing prior to appliance installation.
CAUTION:
To avoid personal injury to yourself and/or property, we highly recommend that someone assist you during the door
reversal process.
1) Remove the two screws holding the air duct grille and
remove it from the cooler.
2) Remove the screw holding the hinge cover and lift the
cover off the hinge.
3) While holding the door in place, unscrew the bolts on
the top hinge and pull the hinge up and out of the door.
4) Carefully lift the door up off of the bottom hinge and set
it to the side.
5) Gently pry the plug buttons and bushing out of the door
and body of the unit.
6) Unscrew the bolts holding the bottom hinge and remove
the hinge.
Hinge Cover Screw Hinge Cover
Top Hinge
Plug Buttons
Air Duct Grille
Plug Button
Right Door
Stopper
Screw Bushing
Lower Hinge
Hinge
Pin
Lower Hinge
Assembly
7) Unscrew the hinge pin from right hole on
the lower hinge and screw it into the hole on the left.
8) Reattach the bottom hinge on the opposite side of
the cooler.
9) On the bottom of the door, remove the screw holding the
the right door stopper and remove the stopper and the
door bushing.
10) Insert the plug button and bushing from the top of
door into the holes for the right stopper and screw.
11) Flip the door assembly over and install the left door
stopper (from accessory pack) and bushing into the
bottom of the door on the left side.
12) Carefully lower the door onto the lower hinge so the
bushing on the bottom left fits over the bottom hinge pin.
13) Line up the pin on the top hinge with the bushing on the
top of the door and, with the door in the closed position,
use the bolts to reattach the top hinge to the unit.
14) Use the screws from Steps 1 and 2 to put the hinge cover
and air duct grille on, and insert the plug buttons into the
holes on the right where the top hinge was removed.
Left Door
Stopper
Screw
Bushing
Hinge Cover Hinge Cover Screw
Top Hinge Plug Buttons
Plug Button
Bushing
Hinge Bolts
Bushing
Bottom
Hinge
10
Care and Cleaning
Cleaning Your Appliance
¨Upon installation of your new appliance, it is recommended that it be cleaned thoroughly.
¨Turn off the appliance first and then unplug the unit from the wall outlet.
¨Remove all contents.
¨Wash the inside with a damp warm cloth soaked in lukewarm water and baking soda
solution.
¨The solution should be about 2 tablespoons of baking soda to a quart of water.
¨Be sure to keep the door gasket (seal) clean to keep the unit running efficiently.
¨The outside of the appliance should be cleaned with mild detergent and warm water.
¨Dry the interior and exterior with a soft cloth.
¨Dust or anything else blocking the vent may hinder the cooling efficiency of the appliance.
¨Vacuum the vent if necessary.
Vacation Time
¨Short vacations: Leave the appliance operating during vacations of less than three weeks.
¨Long vacations: If the appliance will not be used for several months, remove all content and
unplug the power cord. Clean and dry the interior thoroughly. To prevent odor and mold growth,
leave the door open slightly: blocking it open if necessary.
Moving Your Appliance
¨Turn off the appliance first and then unplug the unit from the wall outlet.
¨Remove all the contents.
¨Securely tape down all loose items inside your appliance.
¨Tape the doors shut.
Energy Saving Tips
¨The appliance should be located in the coolest area of the room, away from heat producing
appliances or heating ducts, and out of the direct sunlight.
¨Ensure that door is closed when the appliance is turned on.
Changing the Inner Light
¨Before removing the inner light, turn off the appliance first and then unplug the unit from the wall outlet. Failure to
do so could result in electrical shock or personal injury.
¨Remove two screws that hold the control box. While holding the control box, disconnect the LED connector to the
main PCB.
¨Remove the LED array by removing two screws.
¨Replace a new LED array and connect it to the main PCB.
¨Reinstall the control box.
Automatic Defrost
¨There is no need for manual defrosting of this appliance due to automatic defrosting function.
¨The ice build-up on the inner back wall during compressor operation will be automatically defrosted once the
compressor cycle is off.
¨Defrost water will drain out passing through the drain outlet in the inner back wall into a drain pan located above the
compressor, from where it evaporates.
IMPORTANT:
The replacement of LED light can only be performed by an
authorized technician..
11 HOMEDEPOT.COM
Please contact 1-855-847-7264 for further assistance.
Troubleshooting
You can solve many common appliance problems easily, saving you the cost of a possible service call. Try the suggestions
below to see if you can solve the problem before calling for service.
PROBLEM POSSIBLE CAUSE
¨Temperature control is set too cold.
¨Turn the control to a warmer setting and allow several hours
for the temperature to stabilize.
¨Not plugged in.
¨The circuit breaker tripped or a blown fuse.
Appliance does not operate.
¨Temperature control is set too warm.
¨Turn the control to a cooler setting and allow several hours
for the temperature to stabilize.
¨Door is kept open too long or is opened too frequently.
¨Warm air enters the appliance every time the door is opened.
¨Open the door less often.
¨The door is not closed completely.
¨The door gasket does not seal properly.
¨The appliance has recently been disconnected for a period of
time.
¨Four hours are required for the appliance to cool down
completely.
Temperature inside the appliance is too warm.
Temperature inside the appliance is too cold.
¨Check to assure that the appliance is on a level surface.
¨The appliance is touching the wall.
¨Relevel the appliance and move it from the wall.
¨If continued vibration occurs, turn off the appliance and unplug
the power plug.
¨Contact Vissani’s Customer Service Department for further
assistance.
Vibrations.
Moisture forms on inside appliance walls.
¨Door is slightly open.
¨Door is kept open too long, or is opened too frequently.
¨Open the door less often.
¨The door is not sealed properly.
¨Door is slightly open, causing cold air from inside the
appliance to meet warm moist air from outside.
Moisture forms on outside of appliance.
¨The appliance is not on a level surface.
¨The gasket is dirty.
The door will not close properly.

Questions, problems, missing parts? Before returning to the store,
call Vissani Customer Service
8 a.m. – 7 p.m., EST, Monday-Friday, 9 a.m. – 6 p.m., EST, Saturday
1-855-847-7264
HOMEDEPOT.COM
Retain this manual for future use.

Article n° 1001689 149
Modèle #HVBC58STF
MERCI
Nous apprécions votre confiance envers Vissani lors de l’achat de ce refroidisseur pour vin et boissons. Nous nous
efforçons de créer continuellement des produits de qualité conçus pour améliorer votre foyer. Consultez notre site
Internet pour découvrir notre gamme complète de produits disponible pour les besoins d’amélioration de votre foyer.
Merci d’avoir choisi Vissani!
GUIDE D’UTILISATION ET
D’ENTRETIEN
REFROIDISSEUR S/S POUR VIN ET BOISSONS VISSANI DE 5,1 PI3
Questions, problèmes, pièces manquantes? Avant d’effectuer un retour vers notre boutique, appelez
le service client Vissani, du lundi au vendredi de 8 h à 19 h EST et le samedi de 9 h à 18 h EST
1-855-847-7264
HOMEDEPOT.COM

2
Table des matières
Table des matières...................................................2
Informations de sécurité..........................................3
Garantie ....................................................................4
Garantie restreinte..................................................4
Restrictions de recours et exclusions......................4
Avant l’installation....................................................5
Planification de l’installation....................................5
Contenu.................................................................5
Installation................................................................6
Installation sur pied................................................6
Installation encastrée.............................................6
Raccordement électrique........................................7
Étagères à vin........................................................7
Agencement des bouteilles.....................................7
Étagères à boissons...............................................7
Comment retirer une étagère :...........................7
Comment remplacer une étagère :.....................7
Fonctionnement .......................................................8
Changement de la porte réversible .........................9
Entretien et nettoyage............................................10
Nettoyage de votre appareil.................................10
Période d’absence...............................................10
Déplacement de votre appareil............................10
Conseils d’économie d’énergie ............................10
Changement de l’éclairage interne.......................10
Dégivrage automatique........................................10
Dépannage..............................................................11
3
HOMEDEPOT.COM
Veuillez appeler le 1-855-847-7264 pour obtenir
une aide supplémentaire.
Informations de sécurité
AVERTISSEMENT :
Afin de réduire les risques d’incendie, de décharge électrique ou de blessure, suivez ces précautions de base
lorsque vous utilisez votre réfrigérateur.
AVERTISSEMENT
Conservez les ouvertures de ventilation sur l’appareil ou dans la structure intégrée à l’abri
des risques d’obstruction.
AVERTISSEMENT
Ne touchez pas l’intérieur du compartiment refroidisseur avec les mains humides. Ceci
pourrait entraîner des gelures.
AVERTISSEMENT
N’utilisez pas de dispositifs mécaniques ou autres moyens pour accélérer le processus de
dégivrage, à l’exception de ceux recommandés par le fabricant.
AVERTISSEMENT
Attention à ne pas endommager le circuit réfrigérant lors de la manipulation, du
déplacement ou de l’utilisation du réfrigérateur.
AVERTISSEMENT
N’utilisez pas d’appareils électriques à l’intérieur du compartiment de conservation des
aliments, à moins
AVERTISSEMENT
Conservez les ouvertures de ventilation sur l’appareil ou dans la structure intégrée à l’abri
des risques d’obstruction.
L’enfant pourrait se retrouver coincé. Avant de vous débarrasser de votre ancien réfrigérateur :
1. Retirez la porte.
2. Laissez les étagères en place pour qu’aucun enfant ne puisse se glisser à l’intérieur.
Débranchez le réfrigérateur avant d’effectuer la procédure d’entretien.
Cet appareil n’est pas destiné à une utilisation par des personnes (y compris des enfants) avec des capacités
physiques, sensorielles ou mentales réduites, ou qui manquent d’expérience ou de connaissance, à moins qu’elles
soient supervisées ou qu’elles aient eu connaissance des instructions concernant l’utilisation de l’appareil par une
personne responsable de leur sécurité. Les enfants doivent être supervisés afin de garantir qu’ils ne jouent pas avec
l’appareil.
Si un composant est endommagé, il doit être remplacé par le fabricant, son intermédiaire de service ou une autre
personne qualifiée afin d’éviter un danger.
Suivez les réglementations locales concernant la mise au rebut du réfrigérateur en raison de réfrigérants et gaz
inflammables. Tous les produits de réfrigération contiennent des réfrigérants, qui, selon les directives de la loi fédérales,
doivent être retirés avant la mise au rebut. Il incombe au client de se conformer aux réglementations fédérales et locales
lors de la mise au rebut de ce produit.
Ce réfrigérateur est destiné à une utilisation résidentielle ou dans des environnements similaires.
Ne conservez pas et n’utilisez pas de l’essence ou tout autre liquide inflammable à l’intérieur ou à proximité de ce
réfrigérateur.
N’utilisez pas de rallonges ou d’adaptateurs souterrains (à deux trous) avec ce réfrigérateur. Si le cordon d’alimentation
est trop court, faites installer une prise de courant à proximité du réfrigérateur par un électricien qualifié. L’utilisation
d’une rallonge peut avoir des effets négatifs sur les performances du réfrigérateur.
Si le cordon d’alimentation est endommagé, il doit être remplacé par le fabricant, son intermédiaire de service ou une
autre personne qualifiée afin d’éviter un danger.
Ne conservez pas de substances explosives, telles que des bombes aérosol avec un agent propulseur inflammable,
dans cet appareil.
Cet appareil est destiné à une utilisation résidentielle ou dans des environnements similaires, tels que :
Zones pour le personnel de cuisine dans les boutiques, bureaux ou autres
environnements de travail.
Logements agricoles et par clients dans les hôtels, motels et autres environnements de
type résidentiel.
Environnements de types chambre et petit déjeuner.
Ravitaillement et autres applications similaires non destinées à la vente au détail.
L’éclairage DEL doit uniquement être remplacé par des professionnels.

4
Garantie
Garantie restreinte
MC Appliance Corporation offre une garantie sur chaque refroidisseur pour vin et boissons en cas de défauts de
matériau et de main-d’œuvre, et accepte de remédier à tout défaut ou de fournir la ou les nouvelles pièces (au choix de
l’entreprise) pour remplacer toute pièce de l’appareil qui serait endommagée pendant la période de garantie. Les
dépenses concernant les pièces et la main-d’œuvre sont couvertes pour cet appareil pendant une période de un an
après la date d’achat. Une copie du reçu de vente daté/de la facture est nécessaire pour recevoir une réparation sous
garantie, un remplacement ou un remboursement.
En outre, MC Appliance Corporation offre une garantie sur le compresseur (ses pièces uniquement) en cas de défauts
de matériau et de main-d’œuvre pendant une période de cinq ans. Le consommateur est responsable de toutes les
dépenses liées à la main-d’œuvre et au transport concernant le diagnostic et le remplacement du compresseur après
l’expiration de la garantie initiale d’un an. Dans le cas où l’appareil nécessite un remplacement ou un remboursement en
vertu des conditions de cette garantie, le consommateur est responsable de toutes les dépenses liées au transport pour
le retour de l’appareil dans notre usine avant la réception d’un appareil de rechange ou le remboursement. Un
remboursement ou un remplacement sera délivré au bon vouloir de MC Appliance Corporation.
Cette garantie couvre les appareils en utilisation au sein des États-Unis contigus, de l’Alaska, d’Hawaï, du Canada et de
Porto Rico. La garantie ne couvre pas les éléments suivants :
Les dommages dus à l’expédition ou à une mauvaise installation.
Les dommages dus à une mauvaise utilisation ou à un mauvais traitement.
Les perforations sur le système d’évaporation dues à un mauvais dégivrage de l’appareil.
Les pertes de contenu dues à une défaillance de l’appareil.
Les réparations réalisées par des intermédiaires de service non autorisés.
Les appels de service qui n’impliquent pas de défaut de matériau ni de main-d’œuvre, tel que les instructions pour une
utilisation correcte du produit ou une mauvaise installation.
Le remplacement ou le réajustement des installations électriques ou des disjoncteurs.
Les défaillances de ce produit s’il est utilisé à des fins autres que son utilisation prévue.
Les frais de mise au rebut des appareils défaillants qui n’ont pas été renvoyés à notre usine.
Tous frais de livraison ou d’installation afférents comme le résultat d’un non-respect des exigences spécifiées lors de
l’utilisation d’un appareil.
Les dépenses liées au voyage et au transport pour l’entretien du produit si votre appareil est situé dans une région
éloignée où l’entretien par un technicien de service autorisé n’est pas disponible.
Le retrait et la réinstallation de votre appareil si ce dernier est installé à un emplacement inaccessible ou s’il n’est pas
installé conformément aux instructions d’installation publiées.
Les remboursements pour les produits irréparables sont limités au tarif payé pour l’appareil selon le reçu de vente.
Cette garantie n’est pas transférable. Cette garantie s’applique uniquement à l’acheteur d’origine et ne s’étend pas à
tout propriétaire suivant.
Restrictions de recours et exclusions
La réparation du produit conformément aux conditions ci-incluses est votre seul et unique recours en vertu de cette
garantie restreinte. Toutes les garanties impliquées, y compris la qualité marchande et l’adaptabilité à une utilisation
particulière, sont limitées par la présente à un an ou la période la plus courte autorisée par la loi.
MC Appliance Corporation n’est pas tenue responsable de tout incident ou dommage consécutif, et aucun représentant
ni aucune personne n’est autorisé à assumer pour nous toute autre responsabilité en relation avec la vente de ce
produit. Le consommateur n’est autorisé en aucune circonstance à renvoyer cet appareil dans notre usine sans le
consentement écrit préalable de MC Appliance Corporation.
Certains états interdisent l’exclusion ou la limitation des dommages indirects ou consécutifs, ou les limitations sur les
garanties impliquées. Cette garantie vous donne des droits spécifiques, et vous pouvez obtenir d’autres droits, qui
varient selon les états.
Modèle
Pièces et main-d’œuvre
Compresseur (pièces uniquement)
Type de service
HVBC58ST
Un an
Cinq ans
À domicile
Contactez l’équipe du service client au 1-855-847-7264 ou consultez le site www.homedepot.com.

5
HOMEDEPOT.COM
Veuillez appeler le 1-855-847-7264
pour obtenir une aide
supplémentaire.
Avant l’installation
PLANIFICATION DE L’INSTALLATION
AVERTISSEMENT :
Lisez toutes les instructions avant d’utiliser le refroidisseur pour vin et boissons.
Ne nettoyez jamais les pièces de l’appareil avec des liquides inflammables. Les fumées peuvent créer un
danger d’incendie ou une explosion.
Ne conservez pas et n’utilisez pas de l’essence ou tout autre vapeur ou liquide inflammable à proximité de
cet appareil ou de tout autre appareil. Les fumées peuvent créer un danger d’incendie ou une explosion.
Retirez le conditionnement extérieur et intérieur.
Avant de connecter l’appareil à la source d’alimentation, laissez-le à la verticale pendant environ 4 heures. Ceci réduira
la possibilité d’un dysfonctionnement du système de refroidissement en raison d’une mauvaise manipulation pendant le
transport.
Nettoyez la surface intérieure à l’eau tiède avec un chiffon doux. (Voir la section Entretien et nettoyage à la page #11)
Protégez ces instructions.
CONTENU
Pièces
Description des pièces
Quantité
A
Thermostat électronique
1
B
Étagère à boissons
3
C
Joint de porte
1
D
Porte en verre
1
E
Coffret
1
F
Étagère à vin
6
Dimensions de l’appareil
(pouces)
Largeur
Hauteur
Profondeur
23,4 po
33,9 po
24,3 po
Poids net (livres)
103 livres
A
B
E
C
D
F
6
Installation
Installation sur pied
Cet appareil est conçu pour une installation encastrée ou sur pied.
Installez l’appareil à l’abri de la lumière directe du soleil et des sources de chaleur (fourneau, appareil de chauffage,
radiateur, etc.). La lumière directe du soleil peut affecter le revêtement acrylique et les sources de chaleur peuvent
augmenter la consommation électrique. Une température ambiante comprise entre 55 °F (12,8 °C) et 90 °F (32 °C)
entravera les performances de cet appareil. Cet appareil n’est pas conçu pour une utilisation dans un garage ou
toute autre installation en extérieur.
Évitez d’installer l’appareil dans des zones humides.
Branchez l’appareil dans une prise murale prévue à cet effet, correctement installée et mise à la terre. Ne coupez en
aucune circonstance ni ne retirez la troisième broche (à la terre) du cordon d’alimentation. Toute question concernant
l’alimentation et/ou la mise à la terre doit être posée à un électricien certifié ou un centre de service autorisé. Cet
appareil n’est pas conçu pour être installé dans un VR ou utilisé avec un convertisseur.
Après le raccordement de l’appareil dans la prise murale, allumez-le et laissez-le refroidir pendant 3 à 4 heures avant d’y
insérer des bouteilles de vin ou des boissons.
Installation encastrée
Les dimensions de découpe illustrées à la figure (A)
permettent l’ouverture et la fermeture de la porte ainsi que
l’accès aux étagères coulissantes lorsque l’appareil est
encastré. S’il est installé entre des placards sans cadre, une
bande de bourrage de 1/2 po de large ou un panneau
latéral peut être nécessaire sur le côté de la charnière.
La bande de bourrage agira en tant que cale
d’espacement entre l’appareil et la porte du placard
adjacent.
La largeur de l’ouverture doit inclure les panneaux du filtre.
Figure A
La profondeur de découpe doit être
de 24 po.
REMARQUE :
La porte doit faire saillie à au moins 1 po au-delà des
cabinets adjacents. Si l’inversion de la porte est souhaitée,
veuillez suivre les instructions Porte réversible à la page 9
du présent manuel avant l’installation.
7
HOMEDEPOT.COM
Veuillez appeler le 1-855-847-7264 pour
obtenir une aide supplémentaire.
Installation (suite)
Raccordement électrique
AVERTISSEMENT :
Une mauvaise utilisation de la prise reliée à la terre peut entraîner un risque de décharge électrique. Si le cordon
d’alimentation est endommagé, faites-le remplacer par un centre de service autorisé.
L’appareil doit correctement être mis à la terre pour assurer votre sécurité. Le cordon d’alimentation de cet appareil est équipé
d’une prise à trois broches qui correspond aux prises murales régulières à trois trous afin de minimiser la possibilité de
décharge électrique.
Ne coupez en aucune circonstance ni ne retirez la troisième broche (à la terre) du cordon d’alimentation fourni.
Cet appareil nécessite une prise électrique régulière de 115 volts C.A./60 Hz avec une masse à trois broches.
Cet appareil n’est pas conçu pour être utilisé avec un convertisseur.
Le cordon d’alimentation devrait être sécurisé derrière l’appareil et ne pas être exposé ou ne pas pendre afin d’éviter une
blessure accidentelle.
Ne débranchez jamais l’appareil en tirant sur le cordon d’alimentation. Tenez toujours la prise fermement et tirez droit.
N’utilisez pas de rallonge pour cet appareil. Si le cordon d’alimentation est trop court, faites installer une prise de courant à
proximité de l’appareil par un électricien qualifié ou un technicien de service. L’utilisation d’une rallonge peut avoir des effets
négatifs sur les performances de l’appareil.
Si un problème survenu sur l’appareil persiste, veuillez contacter notre service client Vissani pour discuter avec un représentant,
au 1-855-847-7264.
Étagères à vin
Cinq étagères à vin d’une profondeur totale sont disponibles dans la partie supérieure du coffre pour
conserver les bouteilles de vin.
Le deuxième guide porteur (à partir du haut, voir l’illustration « A ») n’est pas conçu comme une
étagère à vin. Il s’agit uniquement d’une étagère à boissons.
La totalité des cinq étagères à vin supérieures dispose de tablettes qui se connectent au coffre des
deux côtés.
Chaque étagère à vin peut être retirée pour insérer de plus grosses bouteilles.
Agencement des bouteilles
Les cinq étagères supérieures peuvent contenir 8 bouteilles avec le goulot des bouteilles positionné
alternativement vers l’avant et vers l’arrière.
Le casier inférieur, qui est constitué de deux étages, peut contenir 6 bouteilles à chaque étage avec le
goulot des bouteilles positionné vers l’avant.
Étagères à boissons
Trois étagères en acier sont disponibles pour conserver les canettes ou bouteilles de
boisson.
La totalité des trois étagères en acier dispose de tablettes qui se connectent au coffre
des deux côtés.
Les étagères peuvent être agencées comme souhaité sur les guides porteurs.
Chaque étagère en acier peut être retirée pour insérer de plus grosses canettes ou
bouteilles.
Comment retirer une étagère :
Retirez toutes les canettes ou bouteilles des étagères.
Soulevez l’étagère à la verticale, puis tirez délicatement dessus.
Comment remplacer une étagère :
Positionnez à nouveau les côtés de l’étagère sur les guides porteurs du coffre et poussez jusqu’à ce que les tablettes de
l’étagère glissent en place.
REMARQUE :
Assurez-vous que les tablettes sont fermement positionnées avant de conserver
toute boisson.
IMPORTANT :
N’appuyez pas/ne bousculez pas le ventilateur de recirculation du réfrigérateur lorsque vous positionnez ou retirez les
canettes ou bouteilles de boisson. Conservez correctement vos boissons de manière à ce que les canettes ou bouteilles
ne gênent pas la circulation de l’air dans le réfrigérateur.
8
Fonctionnement
La plage de température du refroidisseur de vin et de boissons
est comprise entre 37 °F et 61 °F (3 °C et 16 °C) +/- 5 °F.
L’affichage indique la température moyenne de l’appareil au
moment présent.
Réglage normal de température
Lorsque l’appareil est allumé, ou que le bouton ▲est enfoncé, l’appareil fonctionne avec un réglage de la
température à 45 °F (7 °C).
Réglage manuel de température
Le refroidisseur pour vin et boissons peut être réglé à une température comprise entre 37 °F et 61 °F (3 °C à 16 °C)
en appuyant sur les boutons de hausse de température ▲ et de baisse de température ▼comme suit :
Appuyez sur le bouton [SET] jusqu’à ce que vous entendiez un « Bip » (environ 2 secondes).
Appuyez sur les boutons ▲▼pour augmenter ou diminuer la température souhaitée par incréments d’un
degré.
Appuyez sur le bouton [SET] pour confirmer le réglage de température souhaité. Si vous n’appuyez sur aucun
bouton pendant 10 secondes, votre réglage de température sélectionné sera automatiquement confirmé.
REMARQUE :
Pour sélectionner l’affichage de la température en Celsius (°C) ou en Fahrenheit (°F), appuyez sur le bouton ▲
pendant environ 2 secondes.
L’indicateur (sous le marqueur neige) restera allumé lorsque le compresseur fonctionnera, puis s’éteindra
lorsqu’il sera en position neutre.
Pour allumer ou éteindre l’éclairage interne, appuyez sur le bouton
This manual suits for next models
1
Table of contents
Languages:
Other Vissani Kitchen Appliance manuals


