Visual Tools AX-TV User manual
HDMI video decoder
ENGLISH
AX-TV
User manual
User Manual - 2
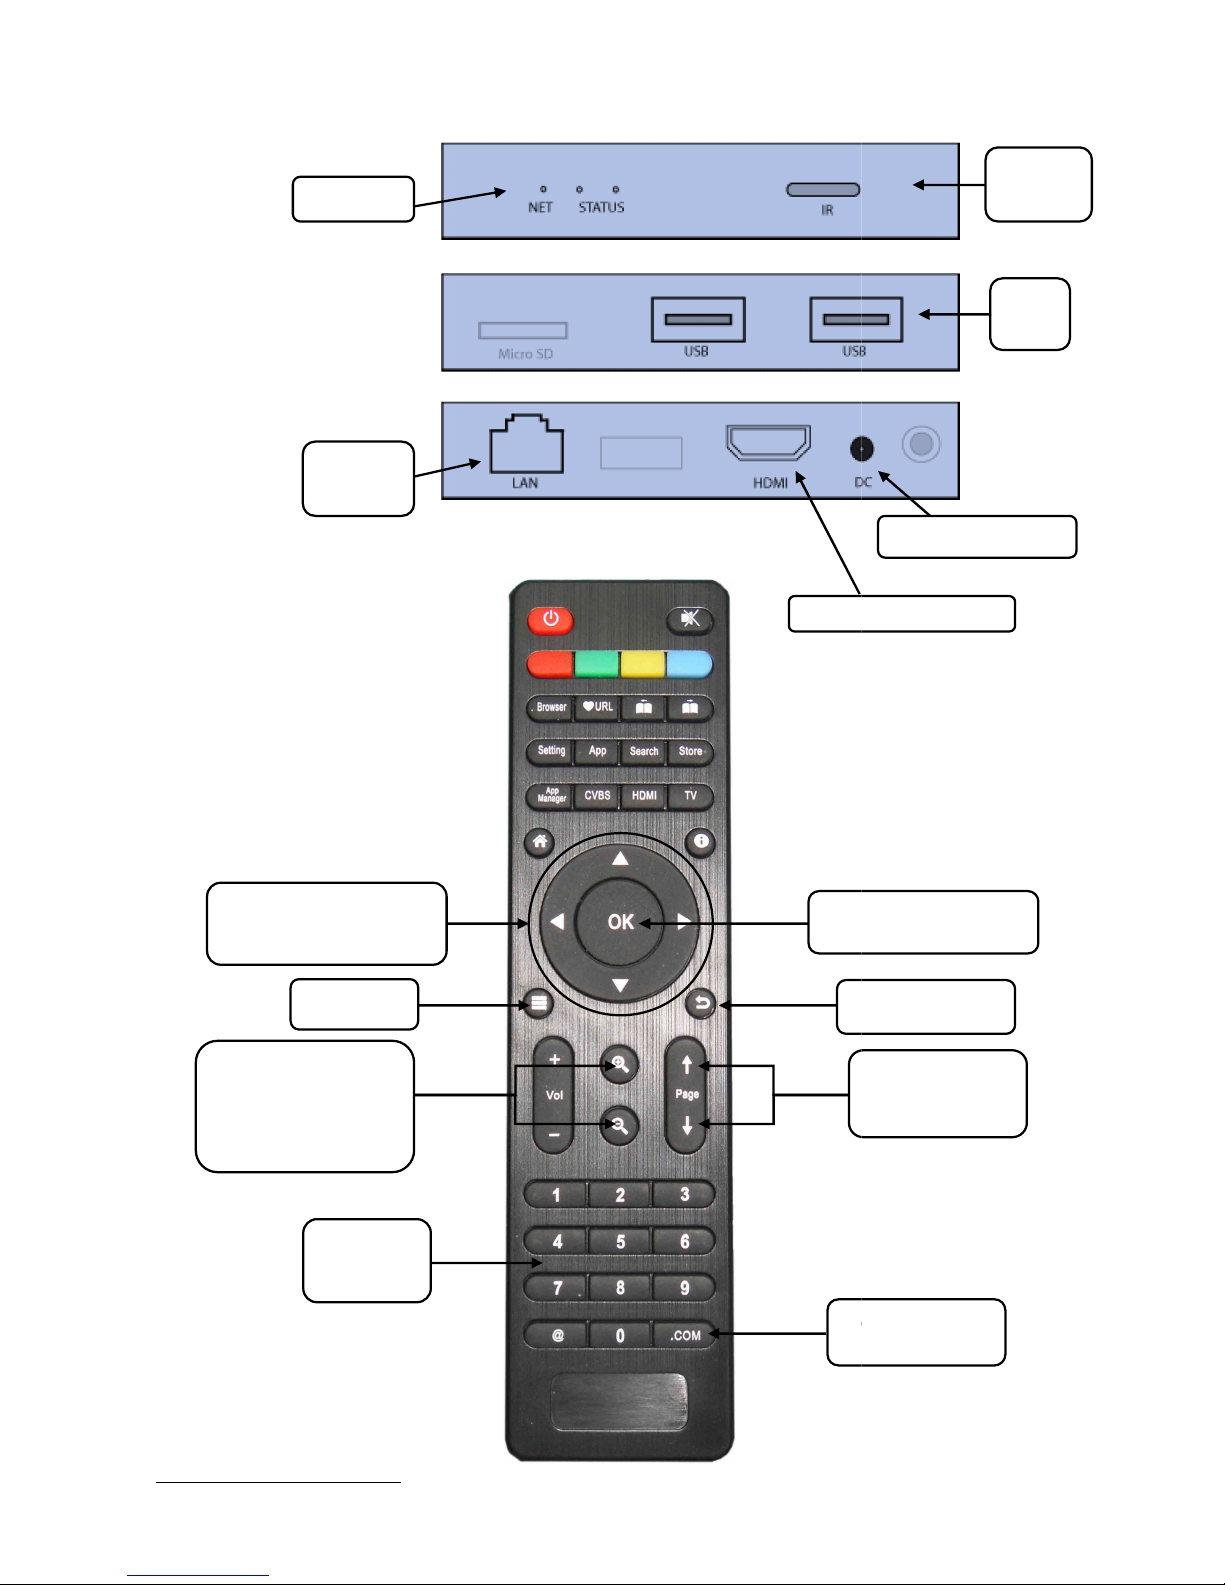
FRONT VIEW:
SIDE VIEW:
REAR VIEW:
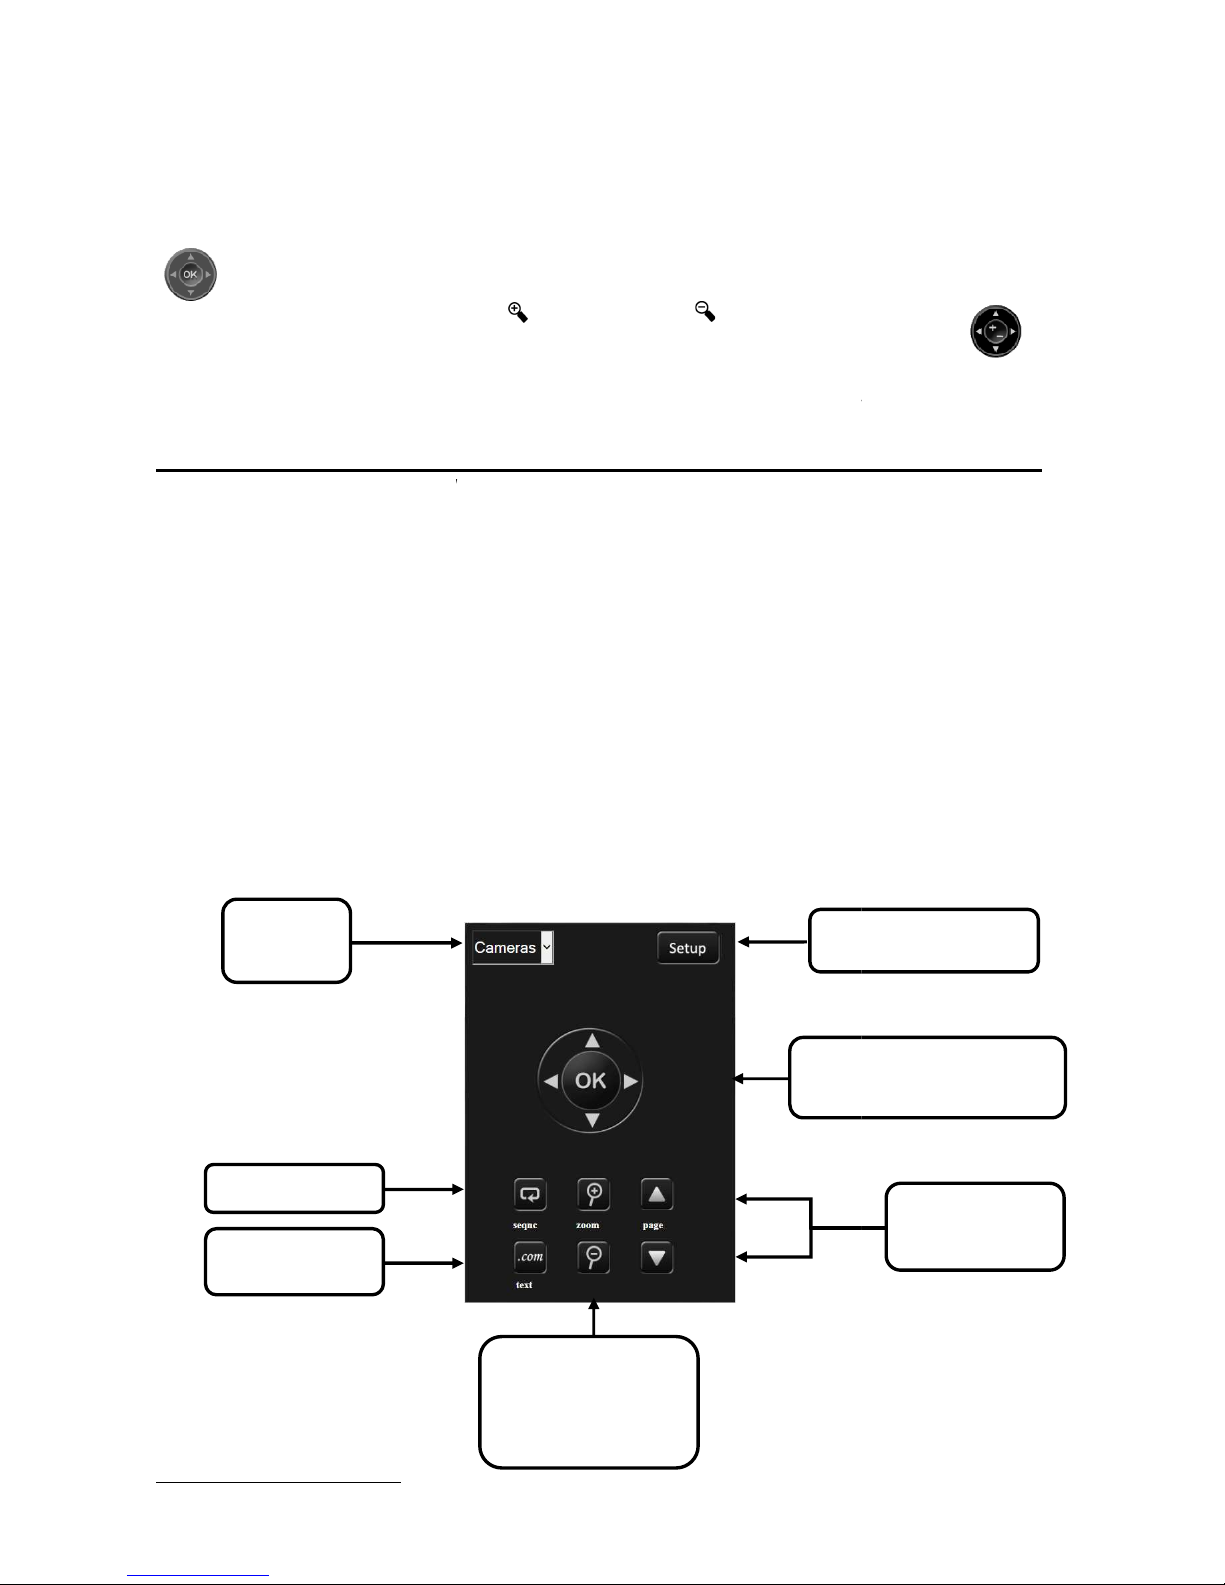
REMOTE CONTROL:
Network
connection
Status leds
Menu
Camera
Selection
Change quad view:
1, 4, 9 & 16
/
PTZ: Zoom+ & Zoom-
Cursor movement
PTZ: Pan & Tilt
HDMI
video connection
Show / Hide camera
Menu options selection
USB
ports
Remote
control
video connection
Power Supply
Exit / Back
Show / Hide camera
names
Next / Previous
camera or group of
cameras
Menu options selection
PTZ: activation

User Manual - 3
INDEX
1 CONTENTS ............................................................................................................................................4
2 INSTALLATION AND SET UP ..............................................................................................................4
3 SETTINGS ..............................................................................................................................................5
3.1 EDITION WITH THE REMOTE CONTROL AND THE VIRTUAL KEYBOARD ...................................................5
3.2 SETTINGS MENU .............................................................................................................................5
3.3 NETWORK SETTINGS .......................................................................................................................6
3.4 CAMERAS CONFIGURATION .............................................................................................................7
3.5 MOVIE CONFIGURATION ..................................................................................................................9
3.6 SEQUENCE CONFIGURATION ........................................................................................................ 10
3.7 ADVANCED CONFIGURATION ......................................................................................................... 11
3.8 IMPORT / EXPORT CONFIGURATION ............................................................................................... 12
3.9 SYSTEM SETTINGS ....................................................................................................................... 12
3.10 DISPLAY SETTINGS....................................................................................................................... 12
4 UNIT OPERATION .............................................................................................................................. 13
4.1 OPERATION WITH THE REMOTE COMMAND ..................................................................................... 13
4.2 OPERATION FROM A WEB BROWSER ............................................................................................. 14
5 UPGRADING AND REMANUFACTURING WITH THE FACTORY IMAGE...................................... 15
5.1 SOFTWARE UPGRADING ............................................................................................................... 15
5.2 FACTORY IMAGE .......................................................................................................................... 16
APPENDIX 1: CHANGING AXIS CAMERAS SETTINGS ......................................................................... 17
APPENDIX 3: ONVIF SUPPORTED CAMERAS ...................................................................................... 18
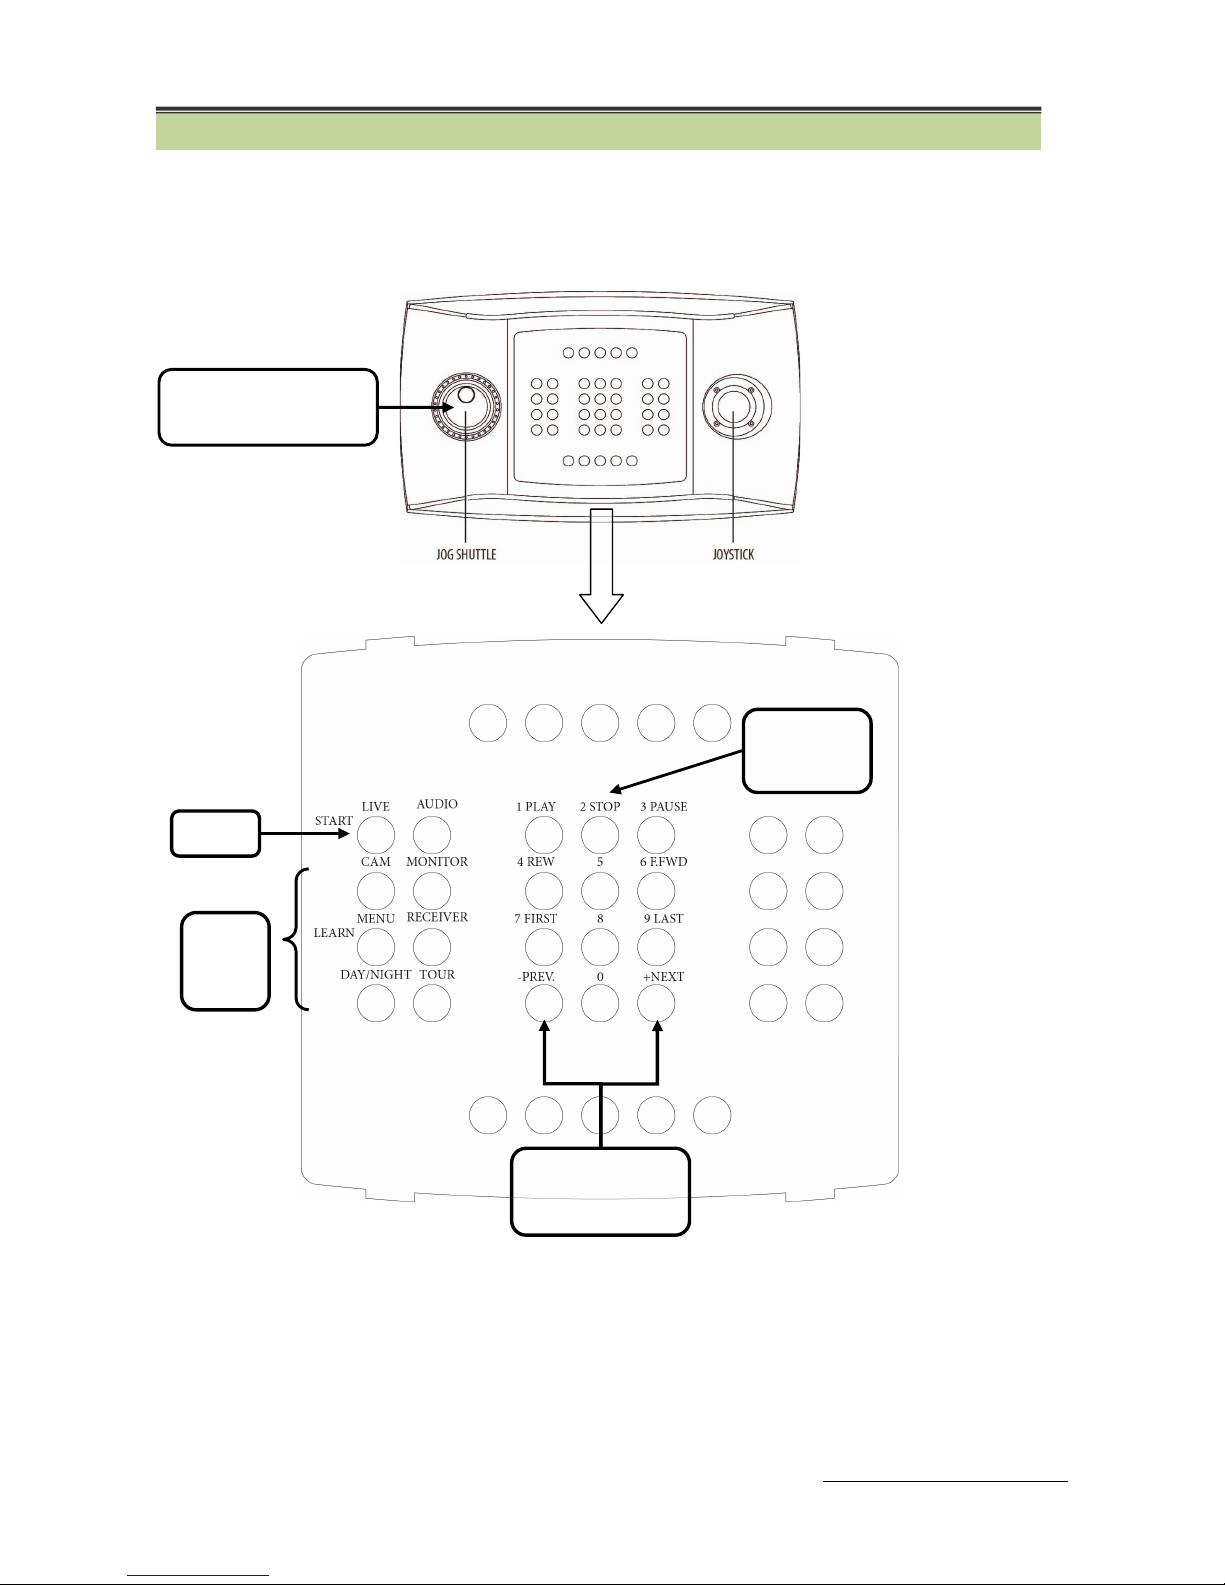
APPENDIX 3: OPERATION WITH THE VIDEOTEC DCZ JOYSTICK ..................................................... 19
APPENDIX 4: TECHNICAL SPECIFICATIONS ........................................................................................ 20

User Manual - 4
1 Contents
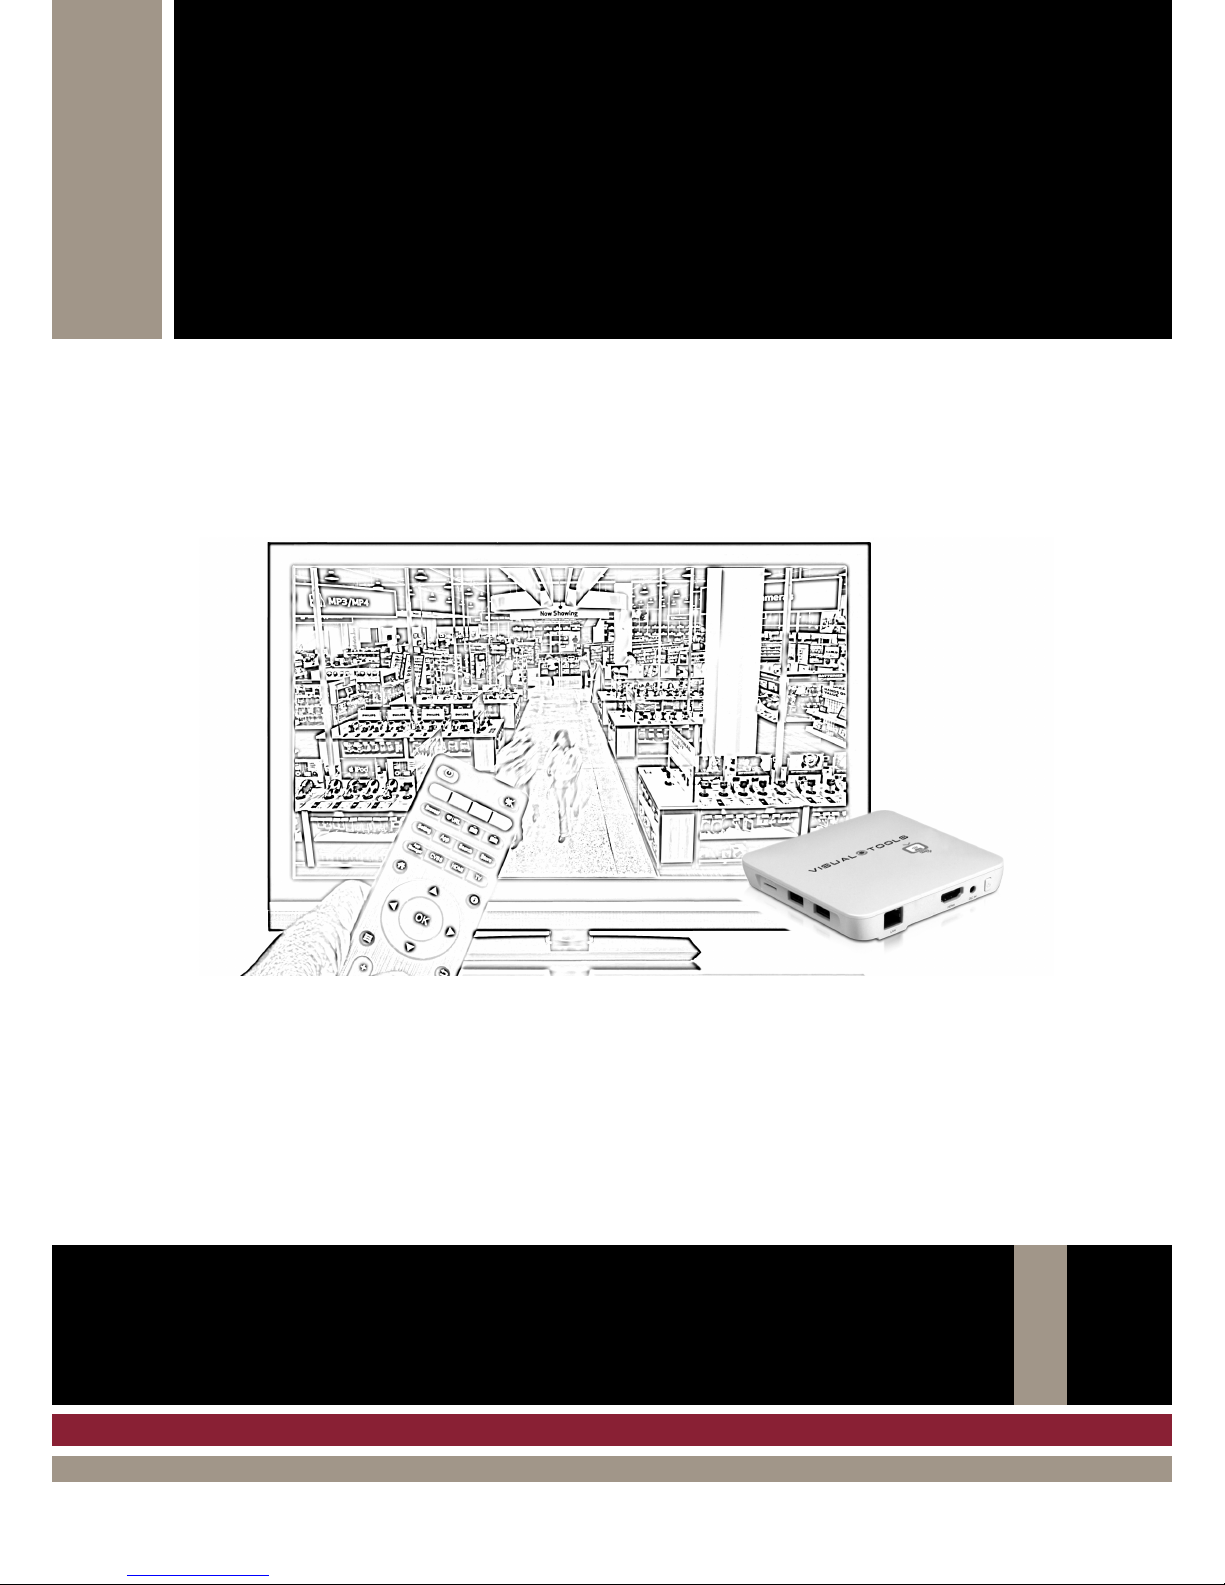
AX-TV is a video decoder used to display live video from all kind of AXIS IP cameras, ONVIF
cameras (please consult the supported camera’s model on the Appendix2 table) as well as VX and
NVX video recorders from Visual Tools.
Connect the AX-TV to a TV or a monitor with the HDMI cable and you will have your cameras on
screen connected via WIFI or LAN.
The AX-TV can be controlled from its remote control, a web browser, the Supervisor X software or
any other software integrated with the AX-TV (there is an integration API available)
Package contents
Open the packaging and check that the following items are included;
AX-TV Unit
HDMI cable
Network cable
Remote control and batteries
Power supply
2 Installation and set up
Installation
Connect the unit to the power supply, the HDMI video cable to the monitor/TV and the network cable
if the connection is going to be via LAN.
The unit has to be installed in a visible place to be able to command it with the remote control. If you
are planning to control the AX-TV by other means you can hide it after the first configuration.
Don’t place the unit in a closed place, it is necessary to leave some space for the ventilation.
Start-up
Select on your monitor/TV the HDMI input corresponding to the AX-TV to be able to see the
configuration menus on screen.
The first configuration of the unit has to be made with the remote control. You can connect a USB
keyboard to ease the input of text.
If you have a LAN connection and your router has DHCP the unit will get connected to the network
automatically, without need to edit the network configuration.
If the connection is via Wi-Fi the first thing you have to do is enter the network configuration menu to
select your Wi-Fi network and configure its password.

3 Settings
The first configuration of the unit has to be made with the remote control and optionally a USB
keyboard
to ease the text input. Once the AX
complete the cameras configuration remotely from a web br
3.1
Edition with the remote control and the virtual keyboard
Use the arrow buttons [< ^ >]
to scroll through options, the
[Exit ] button to go back.
To show the virtual keyboard
, select a text box and press
on screen. Select the character
key
Next
key on the virtual keyboard to enter the text and move to the next text box.
exit the virtual keyboard.
The numbers can be typed directly with the number buttons of the remote
control.
To modify a text it is convenient to place first the cursor
the end of the text to delete it, and then press [OK] to open
You can use
a mouse and a USB keyboard
faster. Bear in mind that only
QWERTY
3.2 Settings menu
Press the [Menu
] on the remote control button to show the
main menu options. Enter the
Settings
In the Settings menu there are the following options:
The first configuration of the unit has to be made with the remote control and optionally a USB
to ease the text input. Once the AX
-TV is set-
up for the first time it is possible to edit or
complete the cameras configuration remotely from a web br
owser.
Edition with the remote control and the virtual keyboard
to scroll through options, the
[OK]
button to select an option and the
, select a text box and press
[OK].
The virtual keyboard will be shown
key
with the arrow buttons and press [OK]
to choose.
key on the virtual keyboard to enter the text and move to the next text box.
The numbers can be typed directly with the number buttons of the remote
To modify a text it is convenient to place first the cursor
where you want to insert characters, or at
the end of the text to delete it, and then press [OK] to open
the virtual keyboard.
a mouse and a USB keyboard
connected to the AX-TV
to enter the configuration data
QWERTY
keyboards are supported.
] on the remote control button to show the
Settings
option.
In the Settings menu there are the following options:
User Manual - 5
The first configuration of the unit has to be made with the remote control and optionally a USB
up for the first time it is possible to edit or
Edition with the remote control and the virtual keyboard
button to select an option and the
The virtual keyboard will be shown
to choose.
Select the
key on the virtual keyboard to enter the text and move to the next text box.
Press [Exit ] to
The numbers can be typed directly with the number buttons of the remote
where you want to insert characters, or at
to enter the configuration data

User Manual - 6
3.3 Network settings
You need to configure the network parameters to connect to the cameras. Choose the connection
you prefer, either Ethernet or
WIFI, and make sure that the corresponding checkbox is selected or
the communications will not be active.
Ethernet Settings
Menu
>> Settings >> Network settings >> Ethernet settings
Connect the local network cable. The DHCP protocol automatically configures the network
parameters. If you want to edit the network parameters select the
edit the parameters you need.
Note: the MAC address
that appears in the lower part of the unit corresponds to the Ethernet
connection.
Wi-Fi Settings
Menu >> Settings >> Network settings >> WIFI settings
Select the
WIFI network and enter the c
you will see a Connected
label under the selected name’s network.
You need to configure the network parameters to connect to the cameras. Choose the connection
WIFI, and make sure that the corresponding checkbox is selected or
the communications will not be active.
>> Settings >> Network settings >> Ethernet settings
Connect the local network cable. The DHCP protocol automatically configures the network
parameters. If you want to edit the network parameters select the
Ethernet settings
edit the parameters you need.
that appears in the lower part of the unit corresponds to the Ethernet
Menu >> Settings >> Network settings >> WIFI settings
WIFI network and enter the c
orresponding password. When the connection is active
label under the selected name’s network.
You need to configure the network parameters to connect to the cameras. Choose the connection
WIFI, and make sure that the corresponding checkbox is selected or
Connect the local network cable. The DHCP protocol automatically configures the network
Ethernet settings
option and
that appears in the lower part of the unit corresponds to the Ethernet
orresponding password. When the connection is active
3.4
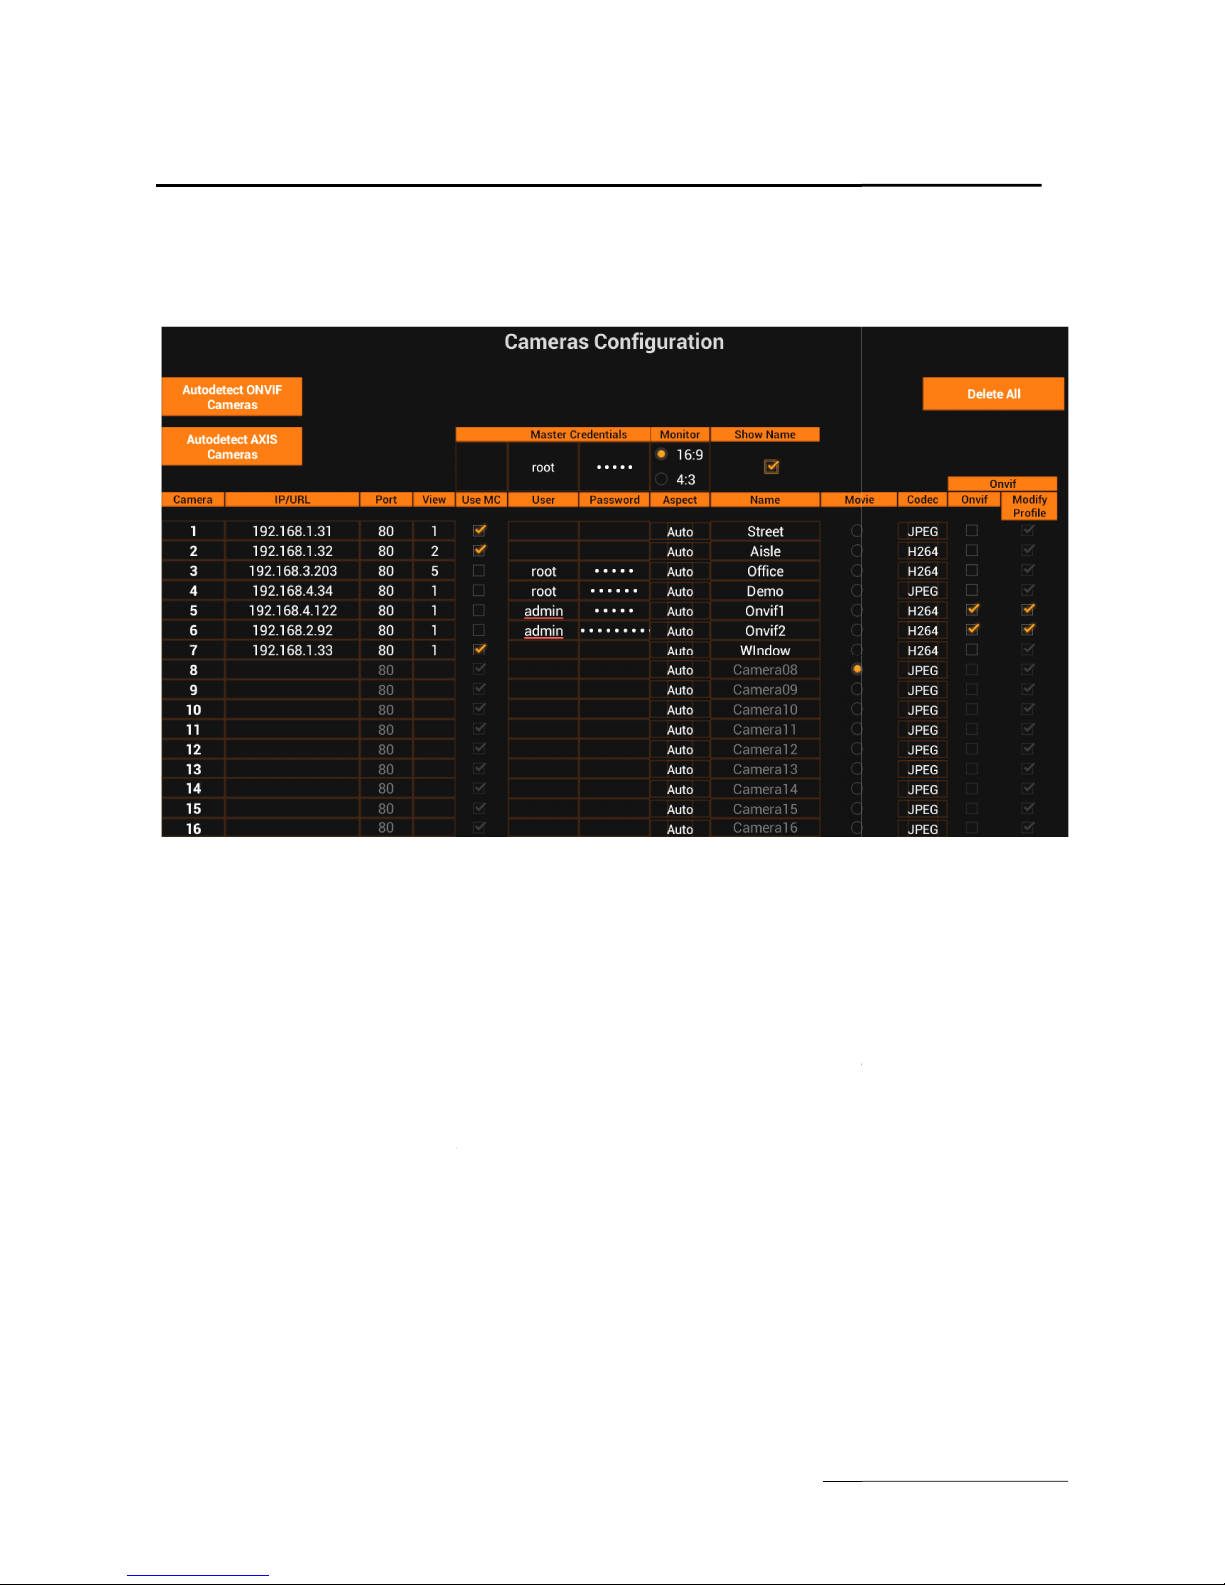
Cameras Configuration
Menu >> Settings >> C
ameras configuration >>
The cameras used by the AX-TV
and some display adjustments a
The unit comes with a sample co
nfiguration that you can change. S
press OK: th
is option deletes the sample
with the default values.
In order t
o ease the addition of new cameras,
the Master Credentials (MC)
. The master credentials are the default user and password that will be
used for any new camera unless you unc
password for the camera.
The Monitor
option configures the aspect of the AX
of the cameras have a 4:3 aspect it is recommendable to put the monitor in 4:3
The Show Name
checkbox is used to overwrite the camera names on the video. The button
the remote control can change its status as well.
You can
add the cameras manually
can combine both
methods, as well as edit a camera added by auto
3.4.1 Cameras
configuration: Manual edition
The following parameters are needed to set
IP/URL address
of the camera or
Port: It is the video TCP port.
By default 80 and should
View:
A camera may have several extra views, as well a VX/NVX recorder have several video
channels. The View
field specify the view or channel number. The default view is 1.
Cameras Configuration
ameras configuration >>
Cameras
and some display adjustments a
re defined on this screen
nfiguration that you can change. S
elect the
Delete All
is option deletes the sample
cameras and allows you to s
tart with a blank configuration
o ease the addition of new cameras,
it is advisable to
enter first the user and password for
. The master credentials are the default user and password that will be
used for any new camera unless you unc
heck the ‘Use MC’ o
ption and enter a particular root and
option configures the aspect of the AX
-TV video output. It is 16:9
by default
of the cameras have a 4:3 aspect it is recommendable to put the monitor in 4:3
checkbox is used to overwrite the camera names on the video. The button
the remote control can change its status as well.
add the cameras manually
editing this table or by means of the auto
-
methods, as well as edit a camera added by auto
-detection.
configuration: Manual edition
The following parameters are needed to set
-up a new camera:
of the camera or
the VX / NVX recorder you want to display
By default 80 and should
only be changed
if necessary.
A camera may have several extra views, as well a VX/NVX recorder have several video
field specify the view or channel number. The default view is 1.
User Manual - 7
re defined on this screen
.
Delete All
button and
tart with a blank configuration
enter first the user and password for
. The master credentials are the default user and password that will be
ption and enter a particular root and
by default
, but if most
checkbox is used to overwrite the camera names on the video. The button
.com in
-
detection tool. You
if necessary.
A camera may have several extra views, as well a VX/NVX recorder have several video
field specify the view or channel number. The default view is 1.
User Manual - 8
Credentials: Check Use MC to use the master credentials defined for all the cameras, or uncheck it
to specify a particular user and password for the camera.
Aspect: The aspect-ratio is set in automatic by default. This way the AX-TV chooses the best
resolution for the camera in every moment depending on the viewer size.
Name: You can change the camera name here. To show this name on live video, mark the check-
box Show Name or press the button [.com] on the remote control when the AX-TV is in operation.
Movie: You can select one of the AX-TV channels to show a commercial video instead of a live
camera. The configuration of the movie is explained in a later chapter.
Codec: Choose which video format to request the camera: JPEG or H264.
Onvif: Check this option to connect the camera using the Onvif protocols. Otherwise the Axis
protocols will be used.
Modify Profile: Check this option to let the AX-TV modify the Onvif profile in the camera to optimize
it to the visualization needs. Otherwise the video stream is used as it is configured in the camera. By
default this option is checked, and the AX-TV is allowed to modify the Onvif profile video. Uncheck it
if for example the camera only has one configurable profile and it is being used by a video recorder.
Once finished press the [Exit ] button and wait until the connection to the cameras is checked,
and the video is shown on screen. If an error occurs check the camera configuration.
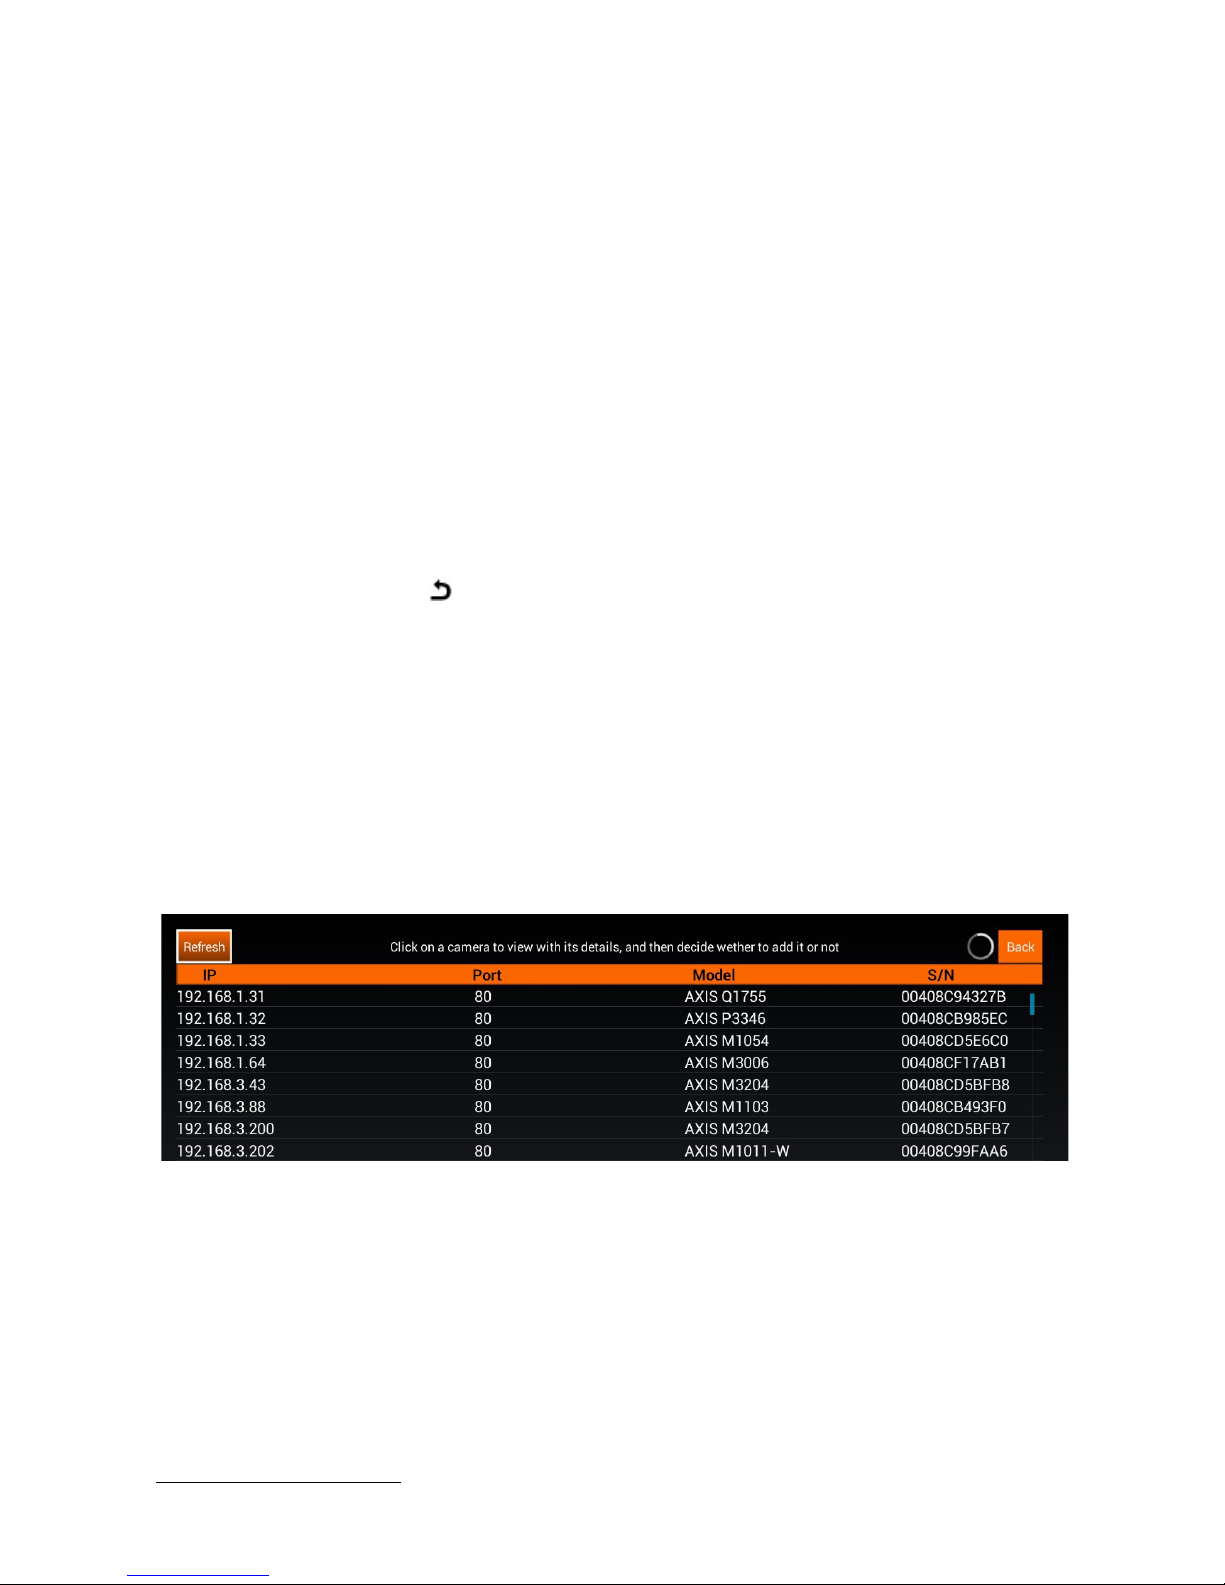
3.4.2 Cameras configuration: Adding cameras with auto-detection
Select Autodetect Axis Cameras or Autodetect Onvif Cameras and you will get a list of the cameras
detected in your local network.
Note: if a camera is not installed in the same network segment of the AX-TV, or it is not detected for
any other reason, you can always add it manually as explained in the previous title.
Once the cameras have been detected the result is shown as follows:
If you think there haven’t been detected all the cameras, click on Refresh to launch a new
autodetection.
User Manual - 9
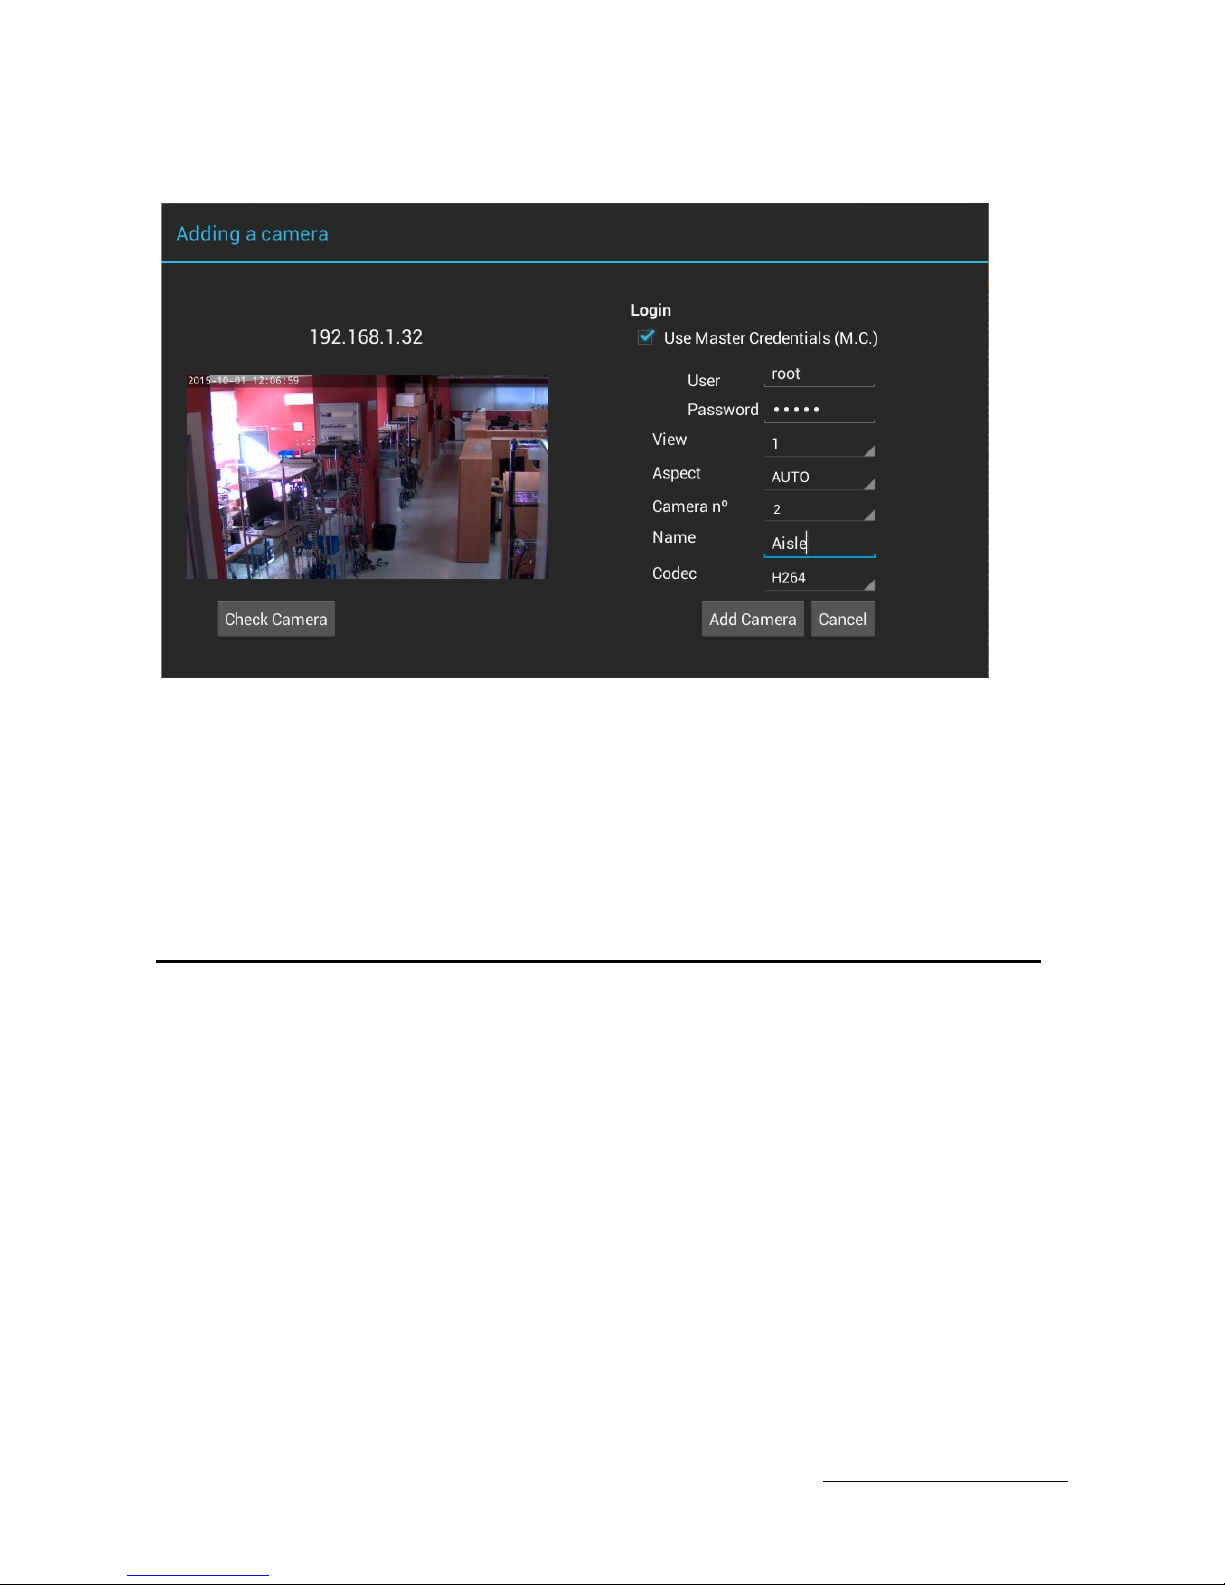
Select one camera to display its details:
This screen lets you define the camera configuration, but the IP and port that are autodetected. The
parameter Camera nº refers to the position of the camera in the list of cameras. The rest of the
parameters are explained in the previous title.
Select Check Camera to check the camera configuration and see an image from the camera
Select Add Camera to include in the list of cameras of the AX-TV, or select Cancel to return to the
autodetection list without saving changes.
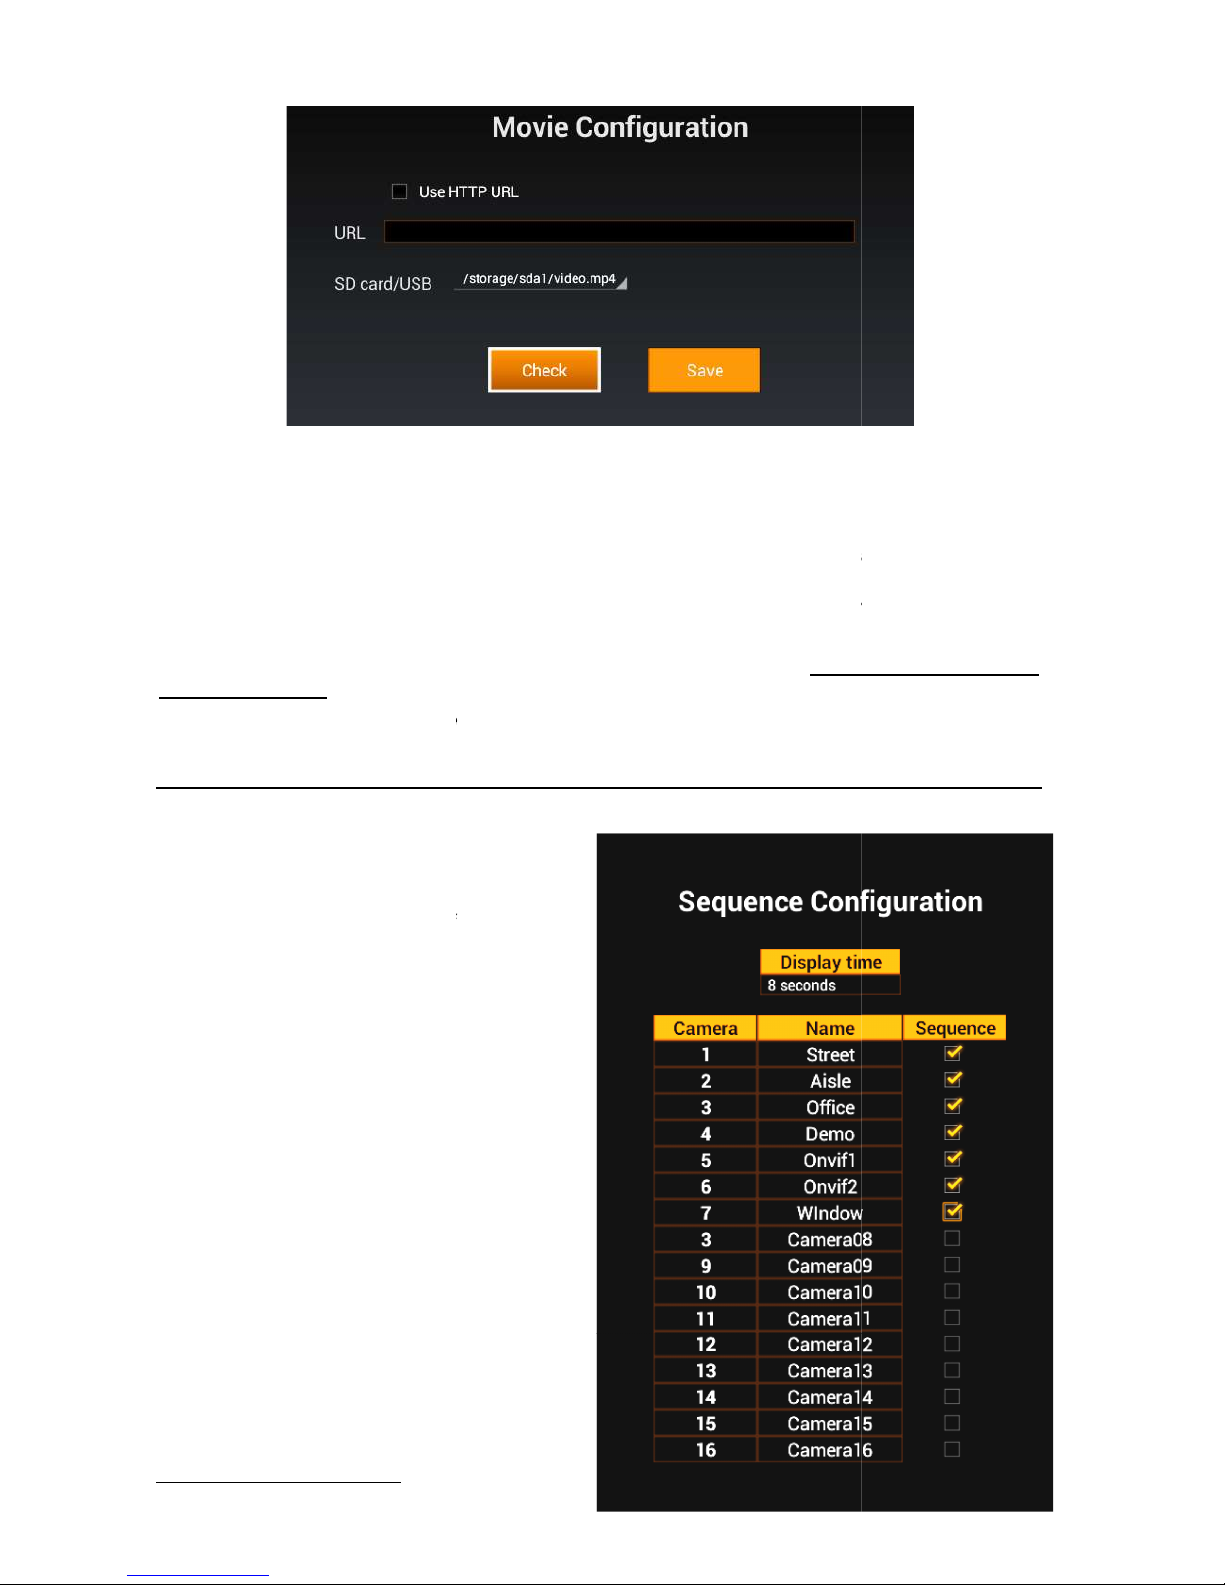
3.5 Movie Configuration
In this section you can define the movie to playback instead of a camera. This way it is possible to
show on screen a commercial video in quadrants among other camera views or in full screen as
well.
The selection of the ‘camera’ that shows the movie is made in the Cameras Configuration screen
(Movie option).
User Manual - 10
The movie has to be a video recorded in .mp4, .mkv, .mpg or .avi format. The recommended
resolution is 1280x720 or lower.
Copy the movie into a microSD
detects
the movie formats and show
you want to show.
A video from a web server can also be played
th
e video URL. The URL format will be similar to this one
Once selected the desired video
–
playing completely. Then select
Save
Warning: If you press Save before the movie ends the configuration is not saved.
3.6
Sequence Configuration
You can visualize the cameras
on a sequence
select the cameras you want to include in
sequence and the displa
y time of each one (5,
8, 12 or 20 seconds).
The movie has to be a video recorded in .mp4, .mkv, .mpg or .avi format. The recommended
card or a USB memory
and plug it in the AX
the movie formats and show
s the compatible files in the
drop down list
A video from a web server can also be played
-back. In this case, check
‘Use HTTP URL’
e video URL. The URL format will be similar to this one
:
http://www.myweb.net/myvideo.mp4
–
SD, USB or HTTP-, select Check and
wait for the video to finish
Save
to apply the new movie configuration.
Warning: If you press Save before the movie ends the configuration is not saved.
Sequence Configuration
on a sequence
:
select the cameras you want to include in
the
y time of each one (5,
The movie has to be a video recorded in .mp4, .mkv, .mpg or .avi format. The recommended
and plug it in the AX
-TV. The AX-TV
drop down list
. Choose the video
‘Use HTTP URL’
and input
http://www.myweb.net/myvideo.mp4
wait for the video to finish
Warning: If you press Save before the movie ends the configuration is not saved.
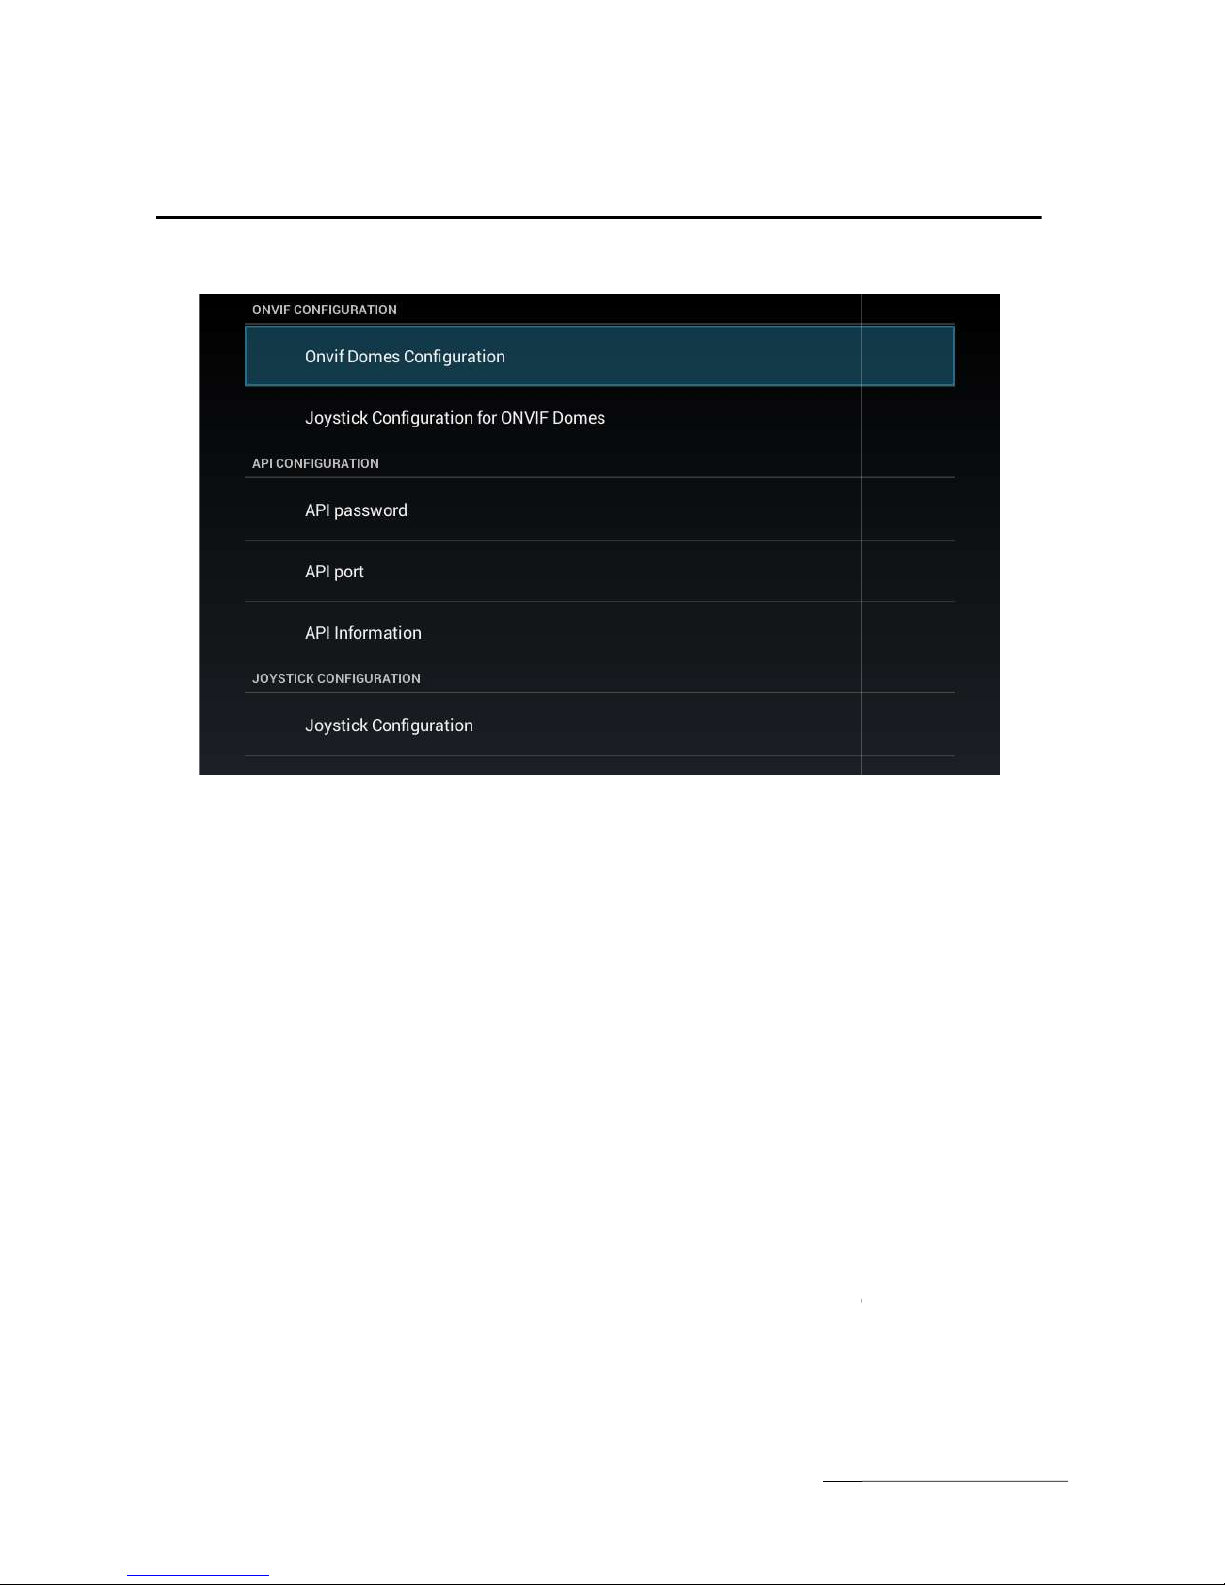
3.7 Advanced
configuration
3.7.1 ONVIF configuration
The ONVIF domes
(PTZ cameras) may
have different responses.
In this section you can modify the
and the zoom speed for Onvif
3.7.2 API Configuration
The API is an
interface to communicate
Supervisor X
or the web interface
password and a
communication port.
The password by default i
s
port into the API
configuration menu.
In the ‘API Information’
option you can find the current
port are necessary for a Supervisor X, a web browser or any other application can connect to
the AX-TV and command it.
3.7.3
Joystick Configuration
The AX-TV has the pos
sibility to be commanded by
On this screen you
can see the joystick status (connected or not). For further information
please consult the Appendix 3
configuration
(PTZ cameras) may
require some adjustment
as each manufacturer may
In this section you can modify the
horizontal speed, ve
and the zoom speed for Onvif
cameras and the joystick.
interface to communicate
different software applications,
like
or the web interface
. To make this communication effective you must
communication port.
s
vtapi and the port 8080
. You can modify the pass
configuration menu.
option you can find the current
IP address
of the AX
port are necessary for a Supervisor X, a web browser or any other application can connect to
Joystick Configuration
sibility to be commanded by
a USB joystick
, model
can see the joystick status (connected or not). For further information
please consult the Appendix 3
of this manual.
User Manual - 11
as each manufacturer may
horizontal speed, ve
rtical speed
like
the AX-TV with the
. To make this communication effective you must
set a
. You can modify the pass
word and the
of the AX
-TV. This IP and
port are necessary for a Supervisor X, a web browser or any other application can connect to
, model
Videotec DCZ.
can see the joystick status (connected or not). For further information

User Manual - 12
3.8 Import / Export configuration
This option eases the camera configuration export and import between AX-TV units, and lets you
load the previous configuration after a factory setting.
You can export the configuration to a microSD card or a USB memory. In case you have connected
both types of devices, the USB has the priority.
Select Export configuration to start the process. An axtv.xml file is exported to the external
memory device root. In case there is a file with the same name it will be replaced.
To import a configuration select the Import configuration option, the AX-TV will search a file with
the same name into the root of the connected device.
3.9 System settings
There are three options in this section:
3.9.1 Language settings
You can choose one of the following languages: English, French, Italian, Portuguese or Spanish.
3.9.2 Set date and Time
3.9.3 Factory settings
This option returns the AX-TV unit to its factory default settings, except for the network configuration,
display position, date and time.
If you want to load a complete image of the factory software see the appropriate chapter below
3.10 Display settings
Here you can adjust the size and position of the image on your TV screen by using the arrow buttons
[< ^ >]. Use this option only if necessary.
User Manual - 13
4 Unit operation
Every time the unit starts, if there are cameras configured and network connection, it automatically
shows on screen the last view of cameras used.
4.1 Operation with the remote command
Use the numeric buttons [1 to 16] to select a single camera on screen.
[Zoom-in ] and [Zoom-out ] are used to change the quadrant layout: 1,4,9 or 16 cameras
on screen.
Press [Page ] or [Page ] to change to the next / previous camera or group of cameras in a quad
view.
Press the [.COM] button to show or hide the camera names on the video.
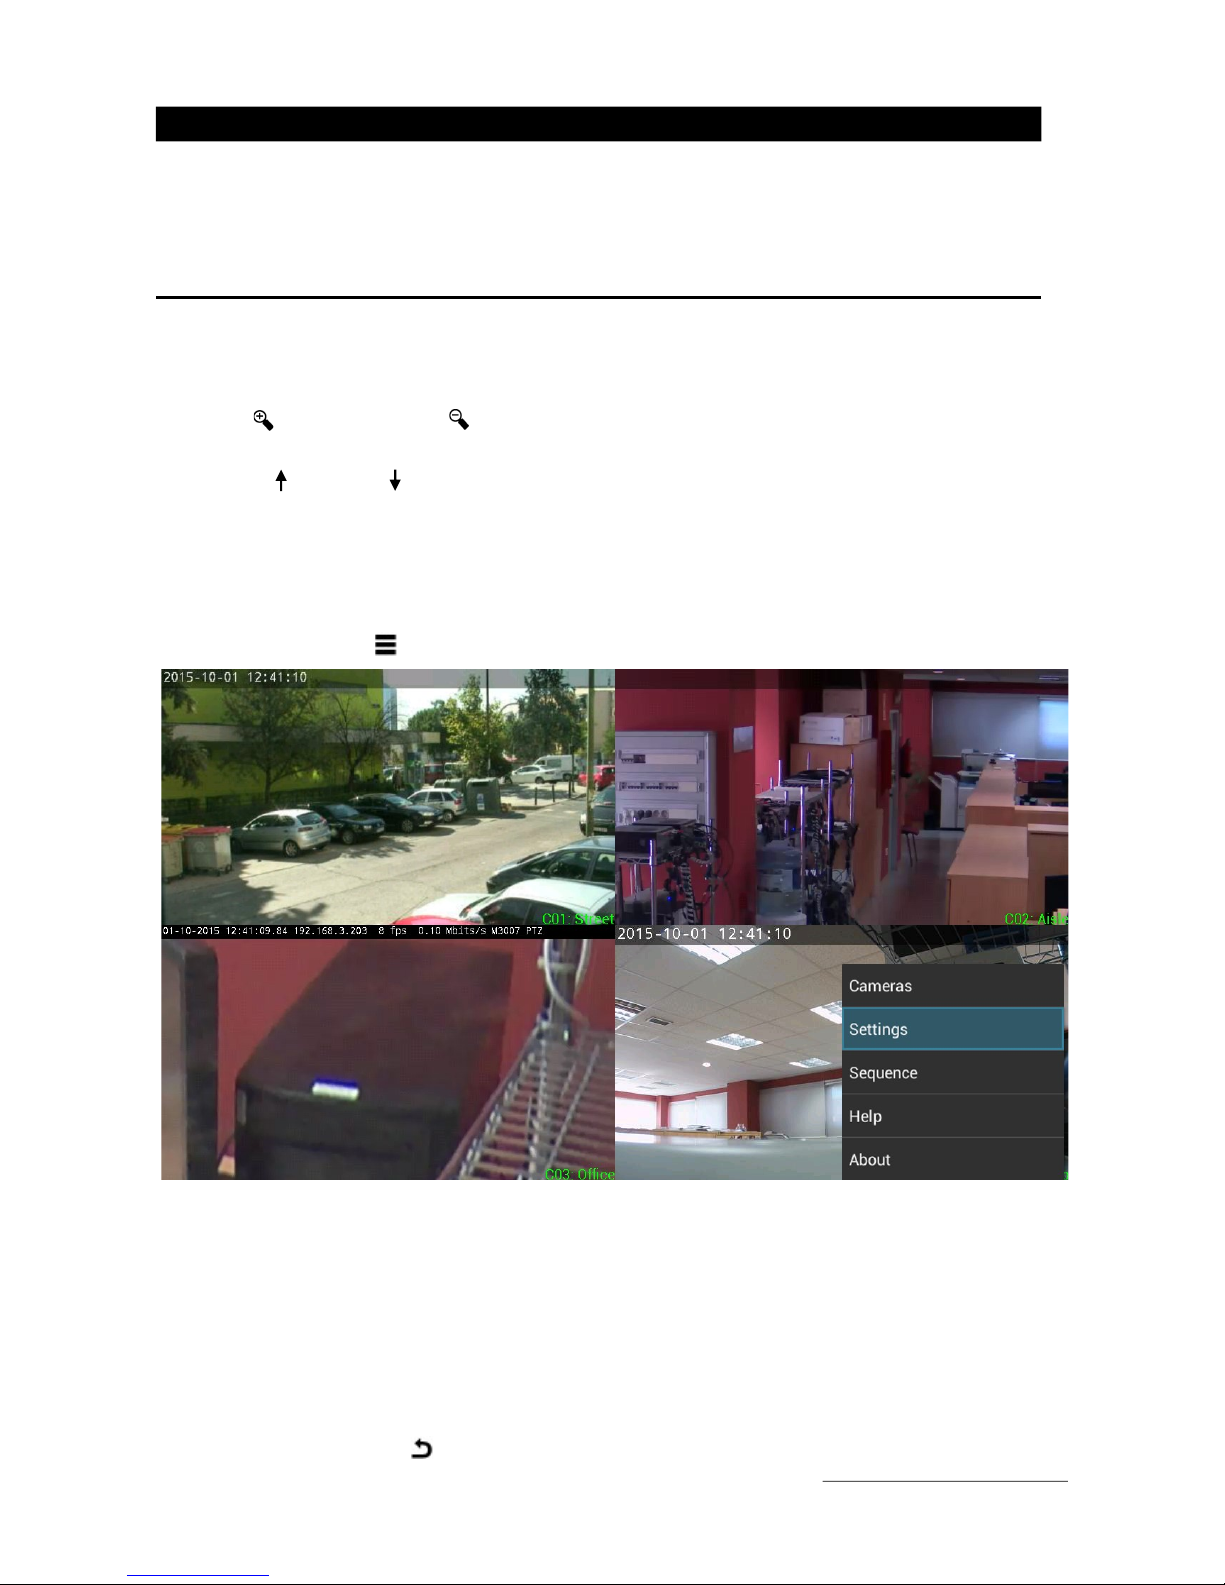
4.1.1 Main menu
Press the button [Menu ] to show on screen the main menu options, which are the following:
Cameras: Shows a list of cameras and allows the user to select one
Settings: Enters the configuration menus
Sequence: Displays the cameras configured in the sequence one by one with the defined time
interval. Exit the sequence pressing any button.
Help: Displays an operation guide
About: Shows the software version and the contact info
To exit the menu press [Exit ] at any time
User Manual - 14
4.1.2 Dome operation
(PTZ)
When a camera is a dome the AX
To activate
the dome control press the
Use the zoom keys
[Zoom
the arrow keys [< ^ >]
to pan and tilt.
You can also use t
he Videotec DCZ joystick and or
4.2 Operation from a
Web
The AX-TV can be commanded
established from a computer
, a tablet,
HDMI monitor connected to the AX
You need the following data to connect
configuration section:
AX-TV IP address (
in
Http port (in
API port
API
user and password
E
nter in your browser the IP address followed by
login is then required: enter the
shown.
Camera
selection
Show / Hide camera
names
Sequence
(PTZ)
When a camera is a dome the AX
-TV identifies it displaying
the dome icon on the screen.
the dome control press the
[OK]
button and the icon will change its appearance.
[Zoom
-in ] and [Zoom-out ] to
control the zoom
to pan and tilt.
To disable the dome control press [OK]
again.
he Videotec DCZ joystick and or
web/mobile interface to control the domes.
Web
browser
and configured from a web interface
. The connect
, a tablet,
or a mobile phone,
while the video is always shown on the
HDMI monitor connected to the AX
-TV.
You need the following data to connect
to it, available in the
Advanced C
in
API information)
API port
). By default 8080
user and password
(in API password). By default is api
and
nter in your browser the IP address followed by
the port. For example:
http://192.168.1.1
login is then required: enter the
user and password. A window with the AX
-
Camera configuration
Navigation and selection
PTZ: activation and movement
Change quad view: 1, 4, 9
and 16
/
PTZ: Zoom+ and Zoom-
the dome icon on the screen.
button and the icon will change its appearance.
control the zoom
, and
again.
web/mobile interface to control the domes.
. The connect
ion can be
while the video is always shown on the
Advanced C
onfiguration / API
and
vtapi respectively.
http://192.168.1.1
0:8080. A
-
TV controls will be
Camera configuration
Navigation and selection
PTZ: activation and movement
Change / Back to the
next camera or
camera’s group

User Manual - 15
This windows works like the AX-TV remote control, but can be used in any mobile device with
network connection.
4.2.1 Configuration from a Web browser
Click on the setup button to enter the camera configuration screens of the AX-TV
Any configuration related to the cameras can be edited, but you cannot modify the system settings
like the network, language or the advanced configuration.
See the Settings chapter for more details
5 Upgrading and Remanufacturing with the factory image
5.1 Software Upgrading
The unit has a firmware updating system to upgrade the AX-TV. The upgrades can be obtained from
our Web site www.visual-tools.com. You will need a USB memory to put the upgrade on the AX-TV.
The process is as follows:
1.- Download the .ZIP file with the update.
2.- Unzip the downloaded file and check it has the .IMG update file and the .TXT documents with
instructions.
3.- Copy the .IMG file on the USB memory root. Warning: make sure that you copy the .IMG file,
not the .zip one.
4. - The AX-TV has to be connected to the TV/monitor to follow this process. Connect the USB
memory with the image file to the AX-TV.
5. – Remove the AX-TV power supply. Turn the AX-TV upside down and press with a sharp object
the firmware upgrade button marked “upgrade” on the case.

User Manual - 16
6. – Connect the power supply again, holding the upgrade button pressed for a few more
seconds. The screen will show a menu with several options.
7. - Select with the remote control buttons the ‘Apply Update’ option and confirm with [OK].
8. - In the following menu choose the ‘Udisc’ option and select the .IMG file with the upgrade you
want to apply. Press the [OK] button to run the upgrade.
9.- When the upgrade is loaded a new menu appears on screen. Restart the unit by selecting the
‘Reboot System Now’ option and press [OK].The unit reboots, check on your TV that the AX-TV
starts properly.
5.2 Factory image
The unit has a complete software image of the date it was manufactured.
The procedure is similar to the upgrading but you don’t need to use a USB memory or download the
upgrade.
1. - The AX-TV has to be connected to the TV/monitor to follow this process.
2. – Remove the AX-TV power supply. Turn the AX-TV upside down and press with a sharp object
the firmware upgrade button marked “upgrade” on the case.
3. – Connect the power supply again, holding the upgrade button pressed for a few more
seconds. The screen will show a menu with several options.
4. - Select with the remote control buttons the Apply Update option and confirm with [OK].
5. - In the following menu choose the media option and select the default_recovery.IMG file.
Press the [OK] button to run the factory image.
6.- When the image is loaded a new menu appears on screen. Restart the unit by selecting the
Reboot System Now option and press [OK].The unit reboots, check on your TV that the AX-TV
starts properly.
For any questions or concerns about this process please contact the support department:
support@visual-tools.com.

User Manual - 17
Appendix 1: Changing AXIS cameras settings
The Ax-Tv unit will request a video stream from the camera as necessary in each case (resolution,
compression, etc.) for optimum operation as digital cameras (VX units) as IP cameras and IP ONVIF
cameras.
You have the option to create profiles to adjust the cameras appearance, resolution, compression
and image size, only for native AXIS cameras (without ONVIF protocol active), if you deem it
necessary to modify the AXIS cameras operation.
You can create up to four profiles that correspond to the four different views that are available on the
AX-TV. The profile name is AX-TV x where x correspond to the view type that the Ax-Tv provides (1,
4, 9 o 16 cameras).
To create these profiles you have to access the IP camera Setup menu, in the list on the left select
Video & Audio and then, select Stream Profiles.
In this window are the camera list profiles, press the Add button to create a new profile.
1. - Into the Image section insert the camera name, AX-TV x and select into Video Encoding
section the MPEG option.
2. - In the Image Appearance section select the resolution. Shown below are the maximum values
that can be selected for each profile.
16:9 4:3
AX-TV1 1280 x 720 800 x 600
AX-TV4 640 x 360 480 x 360
AX-TV9 480 x 270 320 x 240
AX-TV16 320 x 180 240 x 180
Into this section you can increase the compression if necessary.
3. - In the Video Stream section you can configure the maximum frame rate via two options, select
unlimited or set a limit (maximum is 30 images/frames per second.
4. - In the MJPEG tab you can specify the maximum frame size or select the size by default.

User Manual - 18
Appendix 3: ONVIF supported cameras
ONVIF supported cameras for this AX-TV version:
ONVIF AXIS cameras
Acti B47
Ademco 068
Avigilon 2.0W-H3PTZ-DP20
D-Link DCS-2132LB1
Hikvision DS-2CD2612F-I
Hikvision DS-2CD2412F-IW
Safire IPC-CV012FHD-H
Samsung SNB-6010
Samsung SND-6084
Samsung SNV-6013
Sony SNC-CH140
Vivotek IP8173H
Other camera models can operate, but there must be tested before to validate its correct operation.
User Manual - 19
Appendix 3: Operation with the Videotec DCZ joystick
Commands for the Videotec DCZ working with an AX-TV
To use the joystick, connect it to the AX-TV through a USB port and restart the AX-TV.
Change quad view: 1, 4, 9
and 16
Cameras
selection
Change / Back to the
next camera or
camera’s group
Home
Preset 1
to
Preset 7
User Manual - 20
Appendix 4: Technical specifications
MODEL: HDMI video decoder
RESOLUTION: 1280 x 720
COMUNICATION: Ethernet RJ45 10/100M adapter. Built in 802. 11 b/g/n Wi-Fi inside.
VIDEO OUTPUT: 1 HDMI 1.3 output
CAMERAS AXIS cameras, VX units and ONVIF H264 and JPEG cameras
REMOTE CONTROL Infrared remote control
DISPLAY: Cameras one by one or quads 2x2, 3x3 and 4x4
PERFORMANCE Default refresh rate 16 fps (Q1x1) and 15 fps (Q4x4) Up to 16
cameras in H264
POWER: External power supply 110-240, power consumption DC 5V 2A
PHYSICAL DATA: Width: 100 mm x High: 17mm x Depth: 100 mm.
Other manuals for AX-TV
3
Table of contents
Other Visual Tools Media Converter manuals


