VisualSonics Vevo 3100 User manual


Legal
FUJIFILM VisualSonics, Inc.
VisualSonics – North America – Corporate: 3080 Yonge Street, Suite 6100, Box 66,
Toronto, Ontario, CANADA, M4N 3N1. Telephone +1 (416) 484-5000; Toll-free (North
America): 1-866-416-4636
VisualSonics – North America – Manufacturing/Service: 21919 30th Drive SE, Bothell,
Washington, USA, 98021-3904. Telephone +1 (416) 484-5000; Toll-free (North America): 1-
866-416-4636
VisualSonics – Europe: FUJIFILM SonoSite, B.V., Science Park 402, 1098 XH Amsterdam,
The Netherlands. Telephone Tel: +31 20 751 2020; Toll-free +800 0751 2020
Internet: www.visualsonics.com
VisualSonics, Vevo, MicroMarker, RMV, EKV, MicroScan, Insight Through In Vivo Imaging are
trademarks and registered trademarks of FUJIFILM SonoSite, Inc. in various jurisdictions. All
other trademarks are the property of their respective owners.
Patents: 5,840,023; 5,964,707; 6,851,392; 6,984,284; 7,052,460; 7,133,713; 7,230,368;
7,255,678; 7,426,904; 7,434,542; 7,740,585; 7,750,536; 7,798,963; 7,808,156; 7,901,358;
8,078,256; 8,275,449; 8,310,133; 8,316,518; 8,317,714; 8,343,289; 8,708,909; D520,140;
D520,139; D531,316; D518,574 and D541,942.
Notice of non-liability: FUJIFILM VisualSonics, Inc. is providing the information in this document to you as is
with all faults. FUJIFILM VisualSonics, Inc. makes no warranties of any kind (whether express, implied or
statutory) with respect to the information contained herein. FUJIFILM VisualSonics, Inc. assumes no liability
for damages (whether direct or indirect), caused by errors or omissions, or resulting from the use of this
document or the information contained in this document or resulting from the application or use of the product
or service described herein. FUJIFILM VisualSonics, Inc. reserves the right to make changes to any
information herein without further notice.
Copyright © 2001-2016 by FUJIFILM VisualSonics, Inc. | All Rights Reserved
Copyright © 2016 by Bracco Suisse SA | All Rights Reserved.
Revision 1.1 April 21, 2016. Part number 51394.

Contents
Legal 2
Contents 3
Overview 4
Unpack the box 5
Set up the ramp 6
Remove the system 8
Set up the system 10
Connect the system to power 13
Basic operating instructions 15
Connecting and Disconnecting Transducers 16
Turning the system on and off 18
Product Safety 21
Warnings 21
Cautionary Notes 25
Vevo 3100 Imaging System Safety Labels 25
- 3 -

Overview
The Vevo 3100 Getting Started Guide explains how to unpack, set up, and begin using
the Vevo®3100 Imaging System.
For more in-depth instructions on how to use the system, see either:
lVevo 3100 Help, available on the system. To access Help on the system, tap
More and then tap Help.
lVevo 3100 User Manual, available on the Instructions for Use USB flash drive
(PN 52782) included with the system.
- 4 -

Unpack the box
The packing box includes an accessory box, and a crate that holds the system in
place.
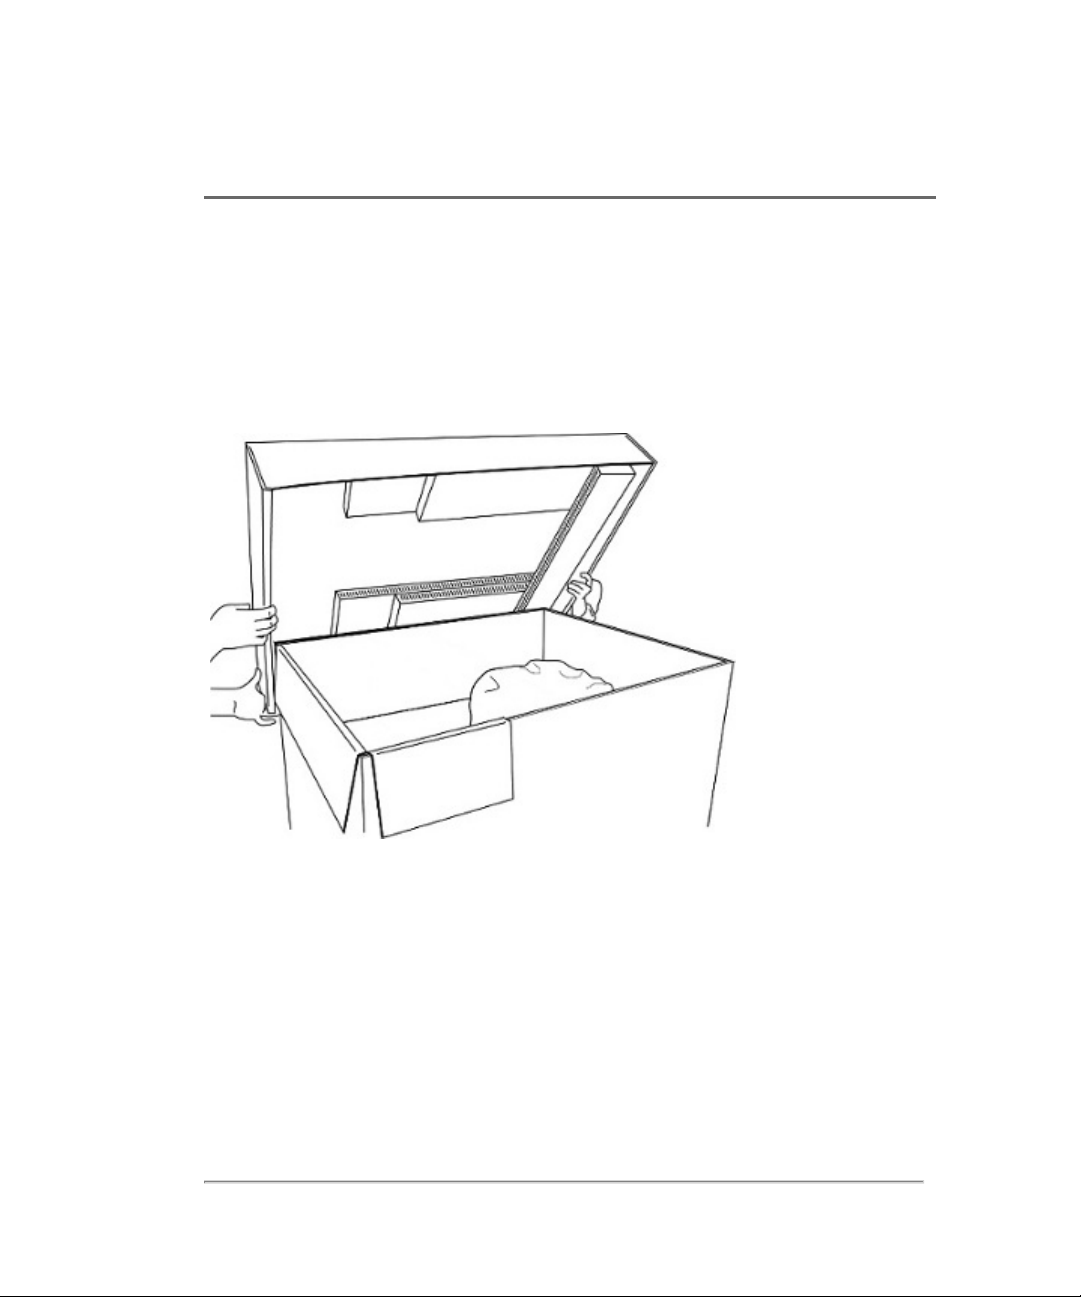
1Remove the straps from the packing box.
2Raise the lid on the packing box. Avoid damaging the lid, as it will be used later as a
ramp.
Figure 1-1 The Vevo 3100 Imaging System packing box with
lid.
3Remove the sides of the packing box.
4If a transducer is included with the system, remove the transducer box:
aRemove the strap from the transducer box on the back of the crate.
bRemove the transducer box and set aside.
- 5 -

Set up the ramp
The crate lid can be used as a ramp that allows you to remove the system from the
crate.
1With a box cutter, cut all four corners of the lid so that it lays flat.
2With the corrugated ramp supports on the bottom, place the highest end of the ramp
next to the base of the crate.
3Insert the end flaps of the lid into the metal brackets as shown in Figure 1-2.
Figure 1-2 Placing the ramp.
- 6 -

4Using a 3/8-inch wrench, loosen and remove the wheel clamps.
Figure 1-3 Removing the wheel clamps.
- 7 -

Remove the system
1To unlock the wheels, press upon the rear of the locking lever on the wheels.
2Roll the system down the ramp.
Figure 1-4 Roll the system down the ramp.
3Remove the plastic bag and packaging materials from the system and inspect the
system for damage.
- 8 -

4Wheel the system to its intended destination. When transporting the system, push
forward instead of pushing downward on the bar or pushing the display monitor.
Figure 1-5 Push forward to wheel the system.
5When the system is at its desired location, lock the wheels: press down on the
lever on the wheels.
- 9 -

Set up the system
1Raise and adjust the display monitor:
aGrasp the display monitor on both sides and fold it upward.
Figure 1-6 Folding the display monitor up.
bGrasp the display monitor on both sides and tilt or rotate it to adjust its angle.
- 10 -

2Grasp both sides of the touch panel and pull it forward or push it backward to the
desired angle.
Figure 1-7 Angling the touch panel display.
- 11 -

3When you are finished, your system should look as it does in Figure 1-8.
Figure 1-8 Vevo 3100 Imaging
System.
- 12 -

Connect the system to power
Warning: Verify that the supply voltage corresponds to the power supply
voltage range. Using incorrect voltage may damage the system.
Warning: Plug the system only into a grounded outlet. Using a non-
grounded outlet may damage the system.
Warning: Use only power cords provided by FUJIFILMVisualSonics with
the system. Using power cords from other sources, may damage the
system.
1Connect the AC power cord, located in the accessory box, to the stand base and
secure the AC power cord with the retainer wire.
Figure 1-9 The AC power cord connector,
retainer wire and power switch.
2Connect the AC power cord to an outlet.
3Turn the power switch to the ON position.
- 13 -

4When connected to AC power, the system can be turned on by the power button
and used immediately.
Figure 1-10 The power button.
- 14 -

Basic operating instructions
For detailed instructions on using the Vevo 3100 Imaging System, please refer to one
of the following sources:
lVevo 3100 Help, available on the system. To access Help on the system, tap
MORE, and then tap Help.
lVevo 3100 User Manual, available on the Instructions for Use USB flash drive
(PN 52782) included with this system
To use the system, perform these basic operating steps:
1Turn on the system.
2Connect a transducer.
3Select the application.
4Scan.
5Enter study and series information.
6Export data.
- 15 -

Connecting and Disconnecting Transducers
Caution: Only MX series transducers manufactured by FUJIFILMVisualSonics
may be used with the Vevo 3100 Imaging System. Using transducers not
manufactured by FUJIFILMVisualSonics will cause damage to the system.
Caution: Only use coupling gels that are specifically approved for use with the Vevo
3100 Imaging System. Using coupling gels that are not approved, may cause
damage to the transducers.
Caution: If damage is evident, do not use the transducer, and contact
FUJIFILMVisualSonics or your local representative.
Transducer interface Transducer connector
To connect the transducer to the system
1Turn the handle on the transducer clockwise to the vertical (unlocked) position.
Follow the directional label on the transducer to lock and unlock the handle.
2Slide the transducer connector into the transducer bay underneath the control panel.
3Push the transducer connector into the transducer interface.
- 16 -

4Rotate the handle on the transducer counterclockwise to the horizontal (locked)
position and push down on the handle to lock the transducer.
To disconnect the transducer from the system
1Flip the lock handle up and rotate clockwise to the vertical (unlocked) position.
2Pull the transducer connector away from the transducer interface.
3Slide the connector up and out of the transducer bay.
Figure 1-11 Transducer bay with
transducer connected
- 17 -

Turning the system on and off
Warning: Verify the supply voltage corresponds to the power supply voltage
range. Using incorrect voltage will damage the system.
Warning: Plug the system only into a grounded outlet. Using a non-
grounded outlet will damage the system.
Warning: Use only power cords provided by FUJIFILMVisualSonics with
the system. Using power cords from other sources, may damage the
system.
To turn the system on
To turn on the Vevo 3100 Imaging System, you must connect the AC power cord to an
outlet first, then turn on the system using the power switch and then the power button.
1Connect the AC power cord to the stand base and secure the AC power cord with
the retainer wire.
Figure 1-9 The AC power cord connector,
retainer wire and power switch.
- 18 -

2Connect the AC power cord to an outlet.
3Turn the system ON using the power switch. See "On (supply)" on page 25
4Press the power button.
Figure 1-10 The power button.
Caution: Do not use the system if an error message appears on the display monitor.
Note the error code and turn off the system. Call FUJIFILMVisualSonics
Caution: When using AC power, position the system to allow easy access to
disconnect it.
- 19 -

To turn the system off
Before unplugging the AC power cord or using the power switch, turn off the system
using the power button.
1Press the power button.
2Turn off the power switch. See "Off (supply)" on page 25.
3Unplug the AC power cord from the outlet.
4Release the retainer wire and disconnect the AC power cord from the stand base.
Note: Restarting the system while it is performing data-intensive background
activities, such as exporting data files, can result in loss of data.
FUJIFILMVisualSonics recommends waiting at least 3 minutes before restarting an
unresponsive system. To power down an unresponsive system, press the power
button and wait until the system shuts down. This procedure may take 1 to 2 minutes.
- 20 -
Other manuals for Vevo 3100
1
Table of contents
Other VisualSonics Medical Equipment manuals