VITINNI AC801E User manual

VITINNI™ DIGITAL 8-IN-1 MULTI-COOKER
USER MANUAL
Model Number: AC801E
SAP Code: JF07528001
FOR DOMESTIC USE ONLY
PLEASE READ INSTRUCTIONS CAREFULLY BEFORE ASSEMBLY
RETAIN THIS MANUAL FOR FUTURE REFERENCE

SAFETY INSTRUCTIONS
Please read these instructions thoroughly before use and keep them in a safe place for future
reference. Include these instructions if you pass the appliance to a third party.
Failure to follow these instructions can result in damage to the appliance and harm to the user.
No liability is accepted if these instructions are not followed or if damage results through
improper use. Any attempt to alter the appliance or not follow instructions may result in harm
and will also void any warranty.
This appliance can be used by children aged from 8 years and above and persons with reduced
physical, sensory or mental capacities or lack of experience or knowledge only if they have been given
supervision or instruction concerning use of the appliance in a safe way and understand the hazards
involved. Children shall not play with the appliance. Cleaning and user maintenance shall not be made
by children without supervision.
This appliance should be stored out of the reach of children. Keep packaging away from children.
Please handle with care.
This appliance is intended for domestic use only; it is not suitable for commercial use.
Suitable for indoor use only.
The appliance must only be used for its intended purpose.
Check that the voltage shown on the appliance corresponds with the local network before connecting to
the mains supply.
Check the cord and appliance before each use to ensure it is undamaged and in full working order. Do
not use if the power cord, plug or any part of the appliance show signs of damage.
Never leave the appliance unattended whilst in use.
For use on a stable, heat resistant surface.
Do not move the appliance whilst it is in use.
Ensure the appliance has cooled fully after use before cleaning, servicing or storing.
Ensure the appliance is turned off and unplugged during cleaning and after use.
Store the appliance in a clean and dry place away from extreme temperatures and moisture. Do not
store in direct sunlight.
Keep the appliance and its power cord away from liquids, heat sources and sharp edges.
Do not allow the appliance, cord or plug to get wet; never immerse in water or any other liquid. Do not
operate the appliance with wet hands.
Ensure the power cord is kept away from hot surfaces, including parts of the appliance that may
become hot during use.
Do not pull the cord to disconnect from the socket; always switch off the appliance, grasp the plug firmly
and pull to disconnect.
This appliance contains no user serviceable parts. Do not try to repair the appliance yourself as this
may cause harm and could also void your warranty.
If the supply cord is damaged, it must be replaced by the manufacturer, its service agent, or similarly
qualified persons.
Only use manufacturer-approved accessories and spare parts.
Use of an extension cord is not recommended.
Do not operate the appliance by means of an external timer or separate remote control system.
PRODUCT SPECIFICATION
Voltage: 200-240V
Frequency: 50Hz/60Hz
Wattage: 1500W
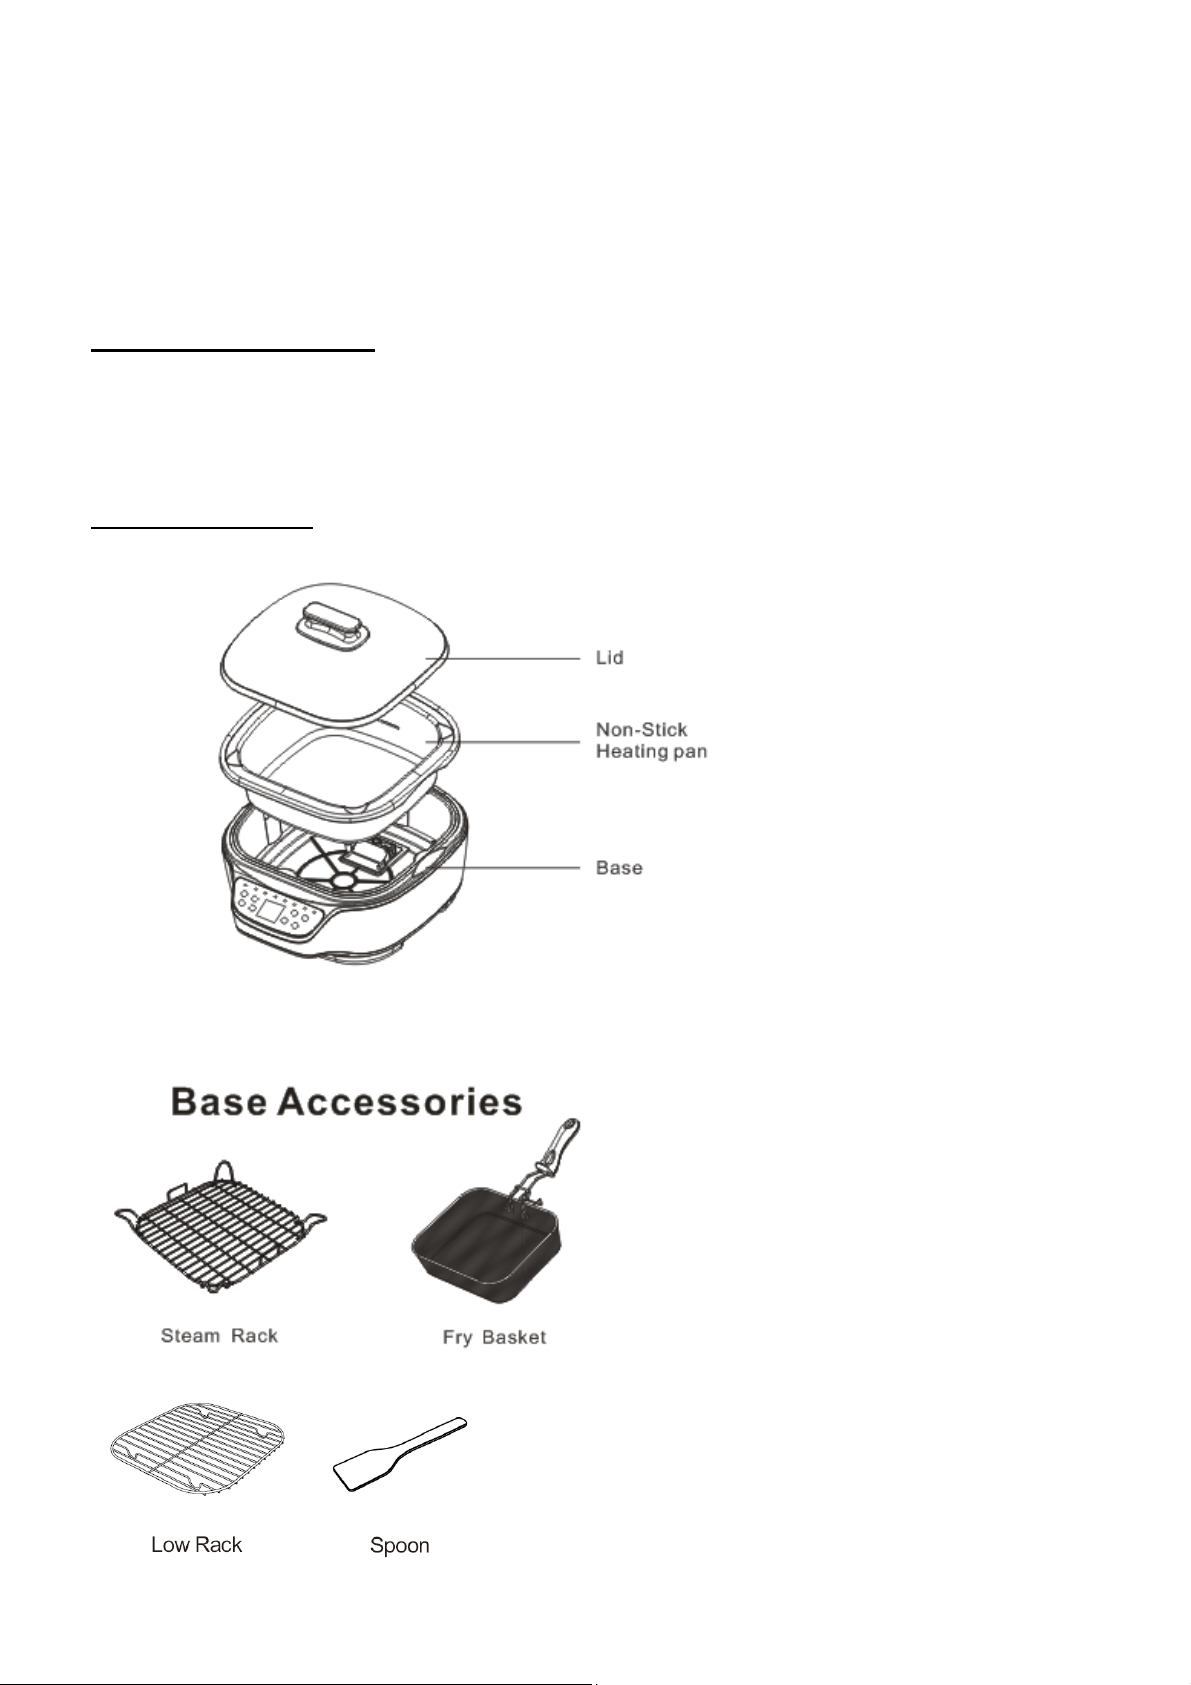
DIAGRAM OF PARTS
INSTRUCTIONS FOR USE
VITINNI™ Digital 8-in-1 Multi-Cooker is a versatile cooking appliance that is an essential for the
modern home. Its functions include; boil, stir-fry, hot pot, slow cook, steam, fry, sauté/grill, and
roast.
1. Remove all packaging materials, making sure items are received in good condition.
2. Check that there is nothing (packing, paper etc.) stuck between the non-stick heating pan and
the power base of the appliance.
3. Carefully hand-wash all of the accessories. Rinse and dry thoroughly.
4. Clean the inside of the non-stick heating pan with a damp sponge then dry thoroughly.
5. Attach the non-stick heating pan to power base
6. Place the non-stick heating pan into the four holes in the metal plate at the base of the unit
properly.
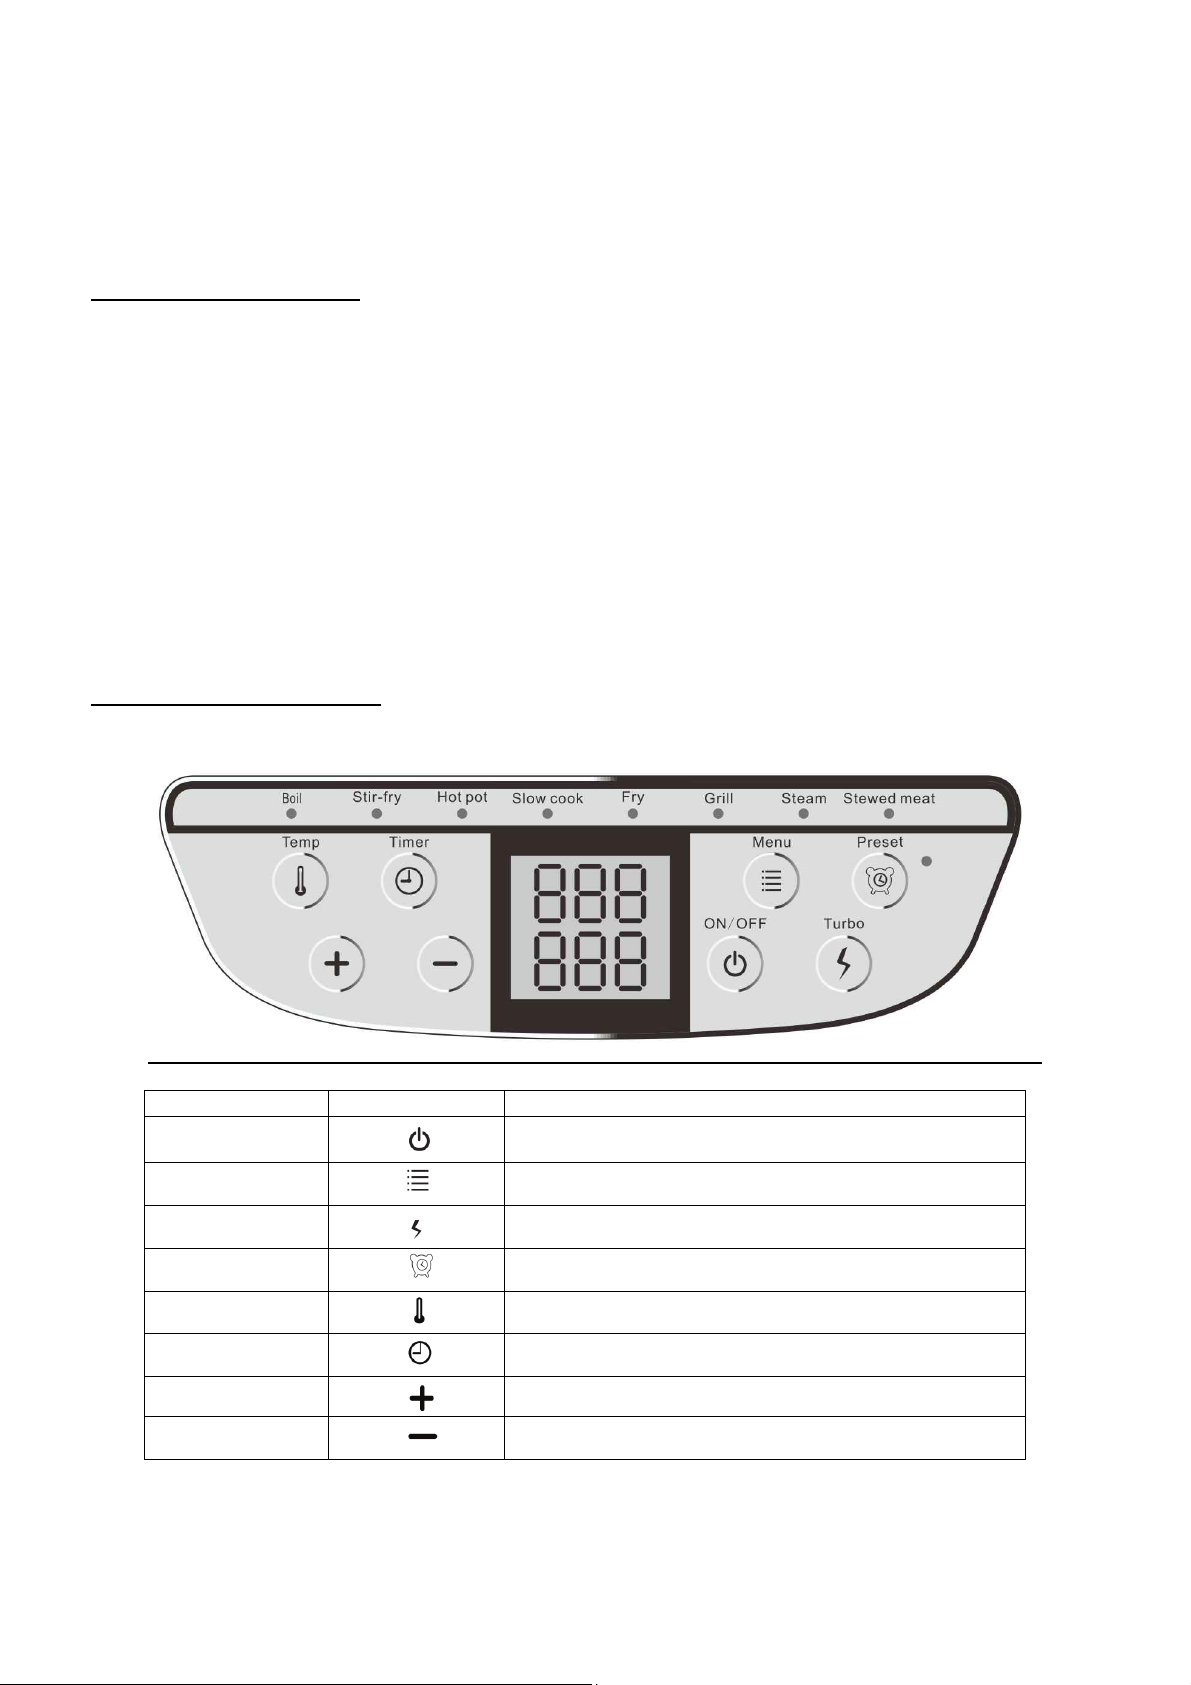
OPERATING PROCEDURES
Symbol
Function
ON/ OFF
Switches the appliance on/off
Menu
Cooking mode selection
Turbo
Maximum power level
Preset
Preset the cooking time and mode
Te m p
Set your desired cooking temperature
Timer
Set your desired cooking time
Increase
Increase temperature or cooking time
Decrease
Decrease temperature or cooking time

USING YOUR APPLIANCE
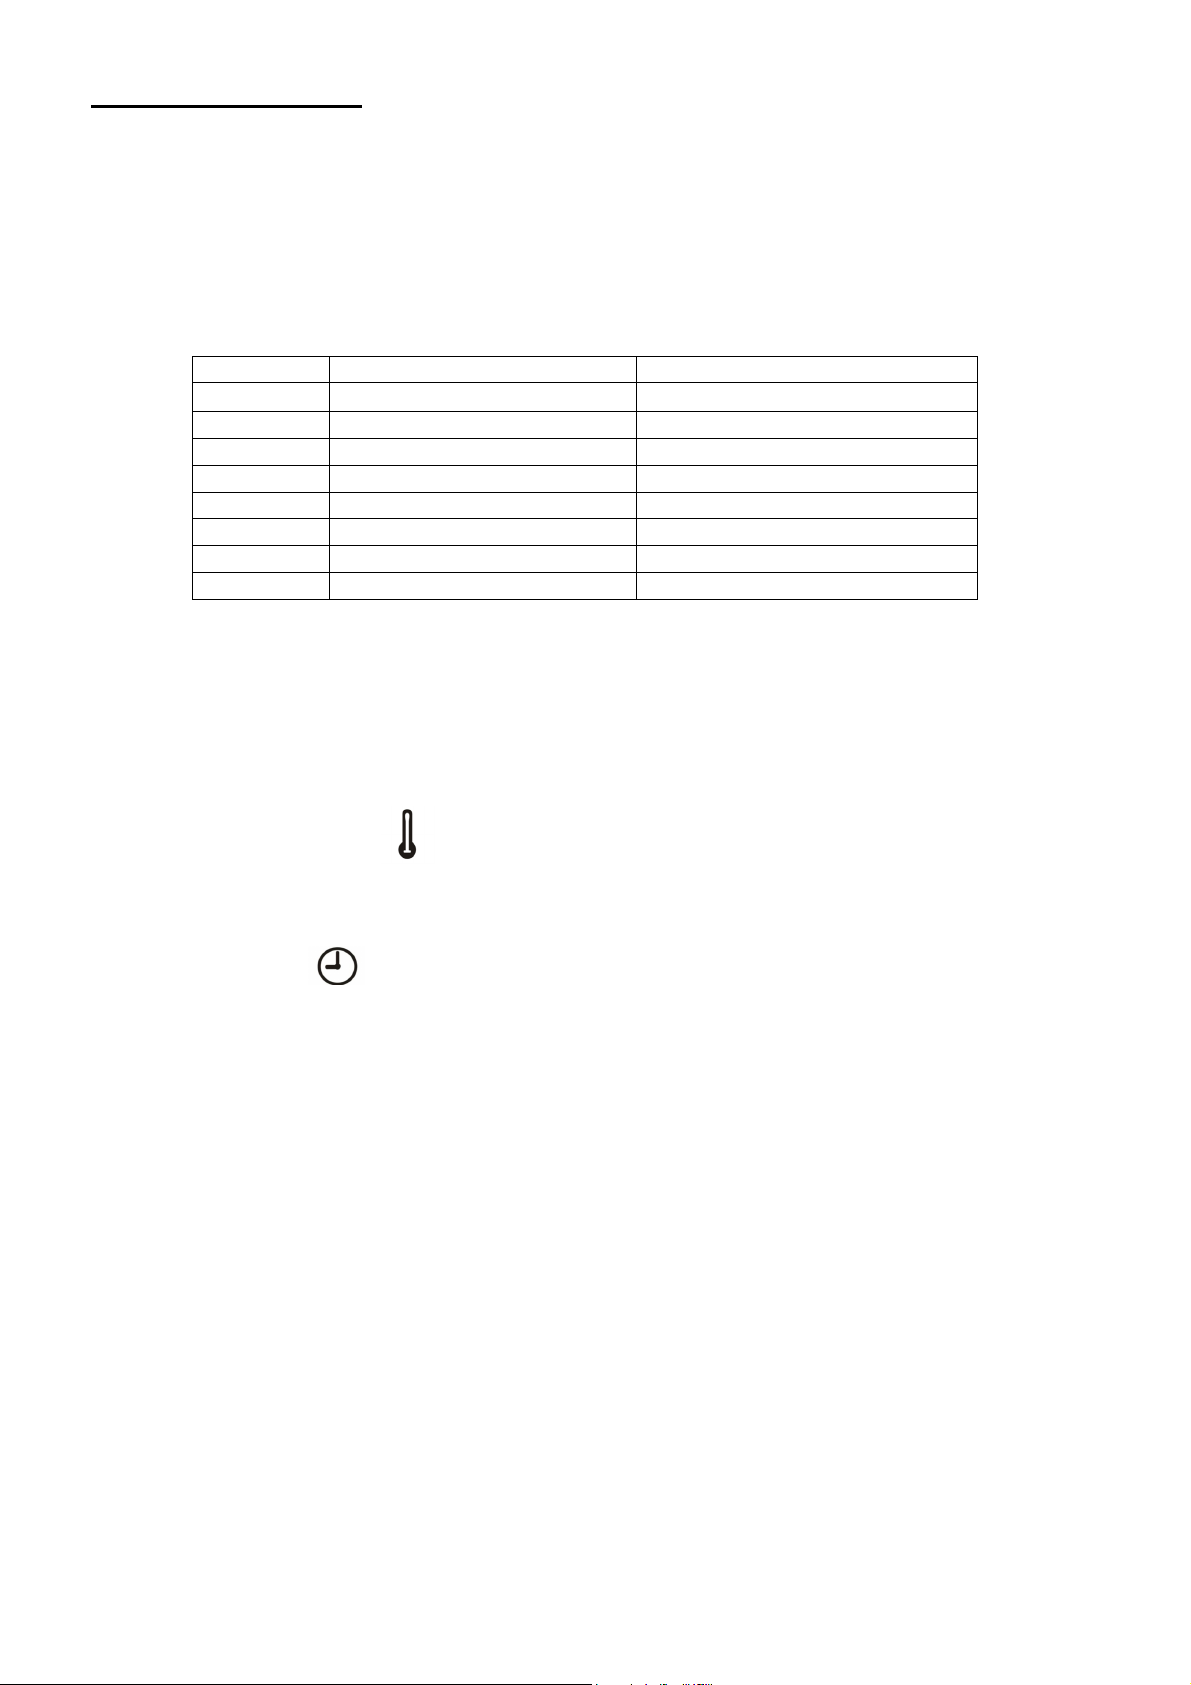
Cooking temperature/time
Press the ‘temp/timer’ button to adjust to your desired cooking temperature and time, refer to specific
recipe/cooking instructions. Below are our suggested temperature/time combinations per cooking
method.
Function
Temperature
Time
Boil
200℃
25 mins
Stir-fry
150℃
15 mins
Hot pot
220℃
60 mins
Slow cook
120℃
3 hours
Fry
150℃
15 mins
Grill
240℃
30 mins
Steam
220℃
5 mins
Stew meat
120℃
2 hours
Set the cooking temperature and time
•Select required cooking method using menu button.
•After choosing your required cooking method, you will then need to set the time and
temperature.
•Press the ‘temp’ button to set the cooking temperature it will begin to flash when selected
•The temperature icon will start to flash; you can now press ‘+’ or ‘-‘ to set the desired
temperature.
•Note: every click is a 10℃adjustment. The minimum cooking temperature is 50℃and the
maximum is 240℃.
•The timer icon will start to flash; you can now press ‘+’ or ‘-‘ to set the desired cooking time.
•Every click is a 1 minute adjustment. The maximum cooking time is 10 hours.
•Repeat for ‘timer’ option.
Preset Function
•Whilst in standby mode, press the PRESET button, and then set the required time using the
timer button.
•The default setting is 60 minutes.
•Every click is a 1 minute adjustment. The minimum cooking time is 1 hour and the maximum is
10 hours.
•By continuously pressing ‘+’ and ‘-‘; this will adjust the time by 10 minutes.
•If you want to change the cooking temperature and time, please press the "menu" button to
reset the time and temperature.
•Press the “ON/OFF” button to confirm the preset function, the cooking time will then count down.
Set the cooking temperature and time
•Select the required cooking method using the menu button.
•After choosing your required cooking method, you will then need to set the time and
temperature.
•Press the ‘temp’ button to set the cooking temperature. Hold the button down to select.

•The temperature digital display will start to flash; you can now press ‘+’ or ‘-‘ to set the desired
temperature.
•Note: every click is a 10℃adjustment. The minimum cooking temperature is 50℃and the
maximum is 240℃.
•Press the ‘timer’ button to set the cooking time. Hold the button down to select.
•The timer digital display will start to flash; you can now press ‘+’ or ‘-‘ to set the desired cooking
time.
•Every click is a 1 minute adjustment. The maximum cooking time is 10 hours.
•Press the “ON/OFF” button to start cooking.
Steam
•Use the stackable steam rack for steaming.
•Place the stackable steam rack over the non-stick heating pan.
•Add 200ml of water (keep the water level below the rack) and close the lid.
•Select the Steam setting by pressing the menu button. The indicator light
will turn on.
•You will also need to set the timer and press “ON/OFF” to start cooking.
•To retain heat and moisture during cooking, it is advised not to lift the lid.
•When steaming is complete, wait until the unit is fully cool before removing any components,
including the steam rack.
•Only use wooden or heat proof plastic utensils to prevent damage to the non-stick heating pan’s
surface. Never use metal utensils.
_________________________________________________________________________
Slow cook
•We advise priming the non-stick pan with a small amount of oil or butter before adding
ingredients.
•Once all of the ingredients are in the pan, please ensure there is no more than 4.3L, to avoid
spillages when food is boiling.
•Select the Slow Cook setting by pressing the Menu button. The indicator light will turn on.
•You will also need to set the time by pressing the time button and using ‘+’ or ‘-‘ to set the
desired cooking time.
•Press the ‘temp’ button to set the cooking temperature. Hold the button down to select.
•The temperature digital display will start to flash; you can now press ‘+’ or ‘-‘ to set the desired
temperature.
•Press “ON/OFF” to start cooking.
•To retain heat and moisture during cooking, it is advised not to lift the lid.
•When slow cooking is complete, wait until the unit is fully cool before removing any components,
including the non-stick pan.
•Only use wooden or heat proof plastic utensils to prevent damage to the non-stick heating pan’s
surface. Never use metal utensils.

Stir Fry
•Select the Stir Fry button setting using the menu button. The indicator light will turn on. Adjust
the timer and temperature to your needs.
•Add a small amount of cooking oil, butter or margarine to the non-stick heating pan.
•Exercise care when handling oil as oil is highly flammable and can cause injury. Never
add water to hot oil.
•When stir frying is complete, remove the food.
•Only use wooden or heat proof plastic utensils to prevent damage to the non-stick heating pan’s
surface. Never use metal utensils.
Grill
•Use the low rack for grilling.
•Add a small amount of cooking oil, butter or margarine to the non-stick heating pan.
•Exercise care when handling oil as oil is highly flammable and can cause injury. Never
add water to hot oil.
•Place the low rack at the bottom of the non-stick heating pan.
•Ensure none of the ingredients are touching the bottom or the sides of the pan to avoid burning.
•Select the Grill button setting using the menu button. The indicator light will turn on.
•Change the timer/ temperature to your preference.
•To retain heat and moisture during cooking, it is advised not to lift the lid.
•Only use wooden or heat proof plastic utensils to prevent damage to the non-stick heating pan’s
surface. Never use metal utensils.
Boil
•Place the desired liquid or food (depending on recipe/cooking instructions) directly into the non-
stick heating pan and close the lid.
•Once all of the ingredients are in the pan, please ensure there is no more than 4.3L, to avoid
spillages when food is boiling.
•Select the Boil setting using the menu button. The indicator light will turn on.
•To retain heat and moisture during cooking, it is advised not to lift the lid. Always make sure
there is sufficient liquid to cover the food.
•Only use wooden or heat proof plastic utensils to prevent damage to the non-stick heating pan’s
surface. Never use metal utensils.
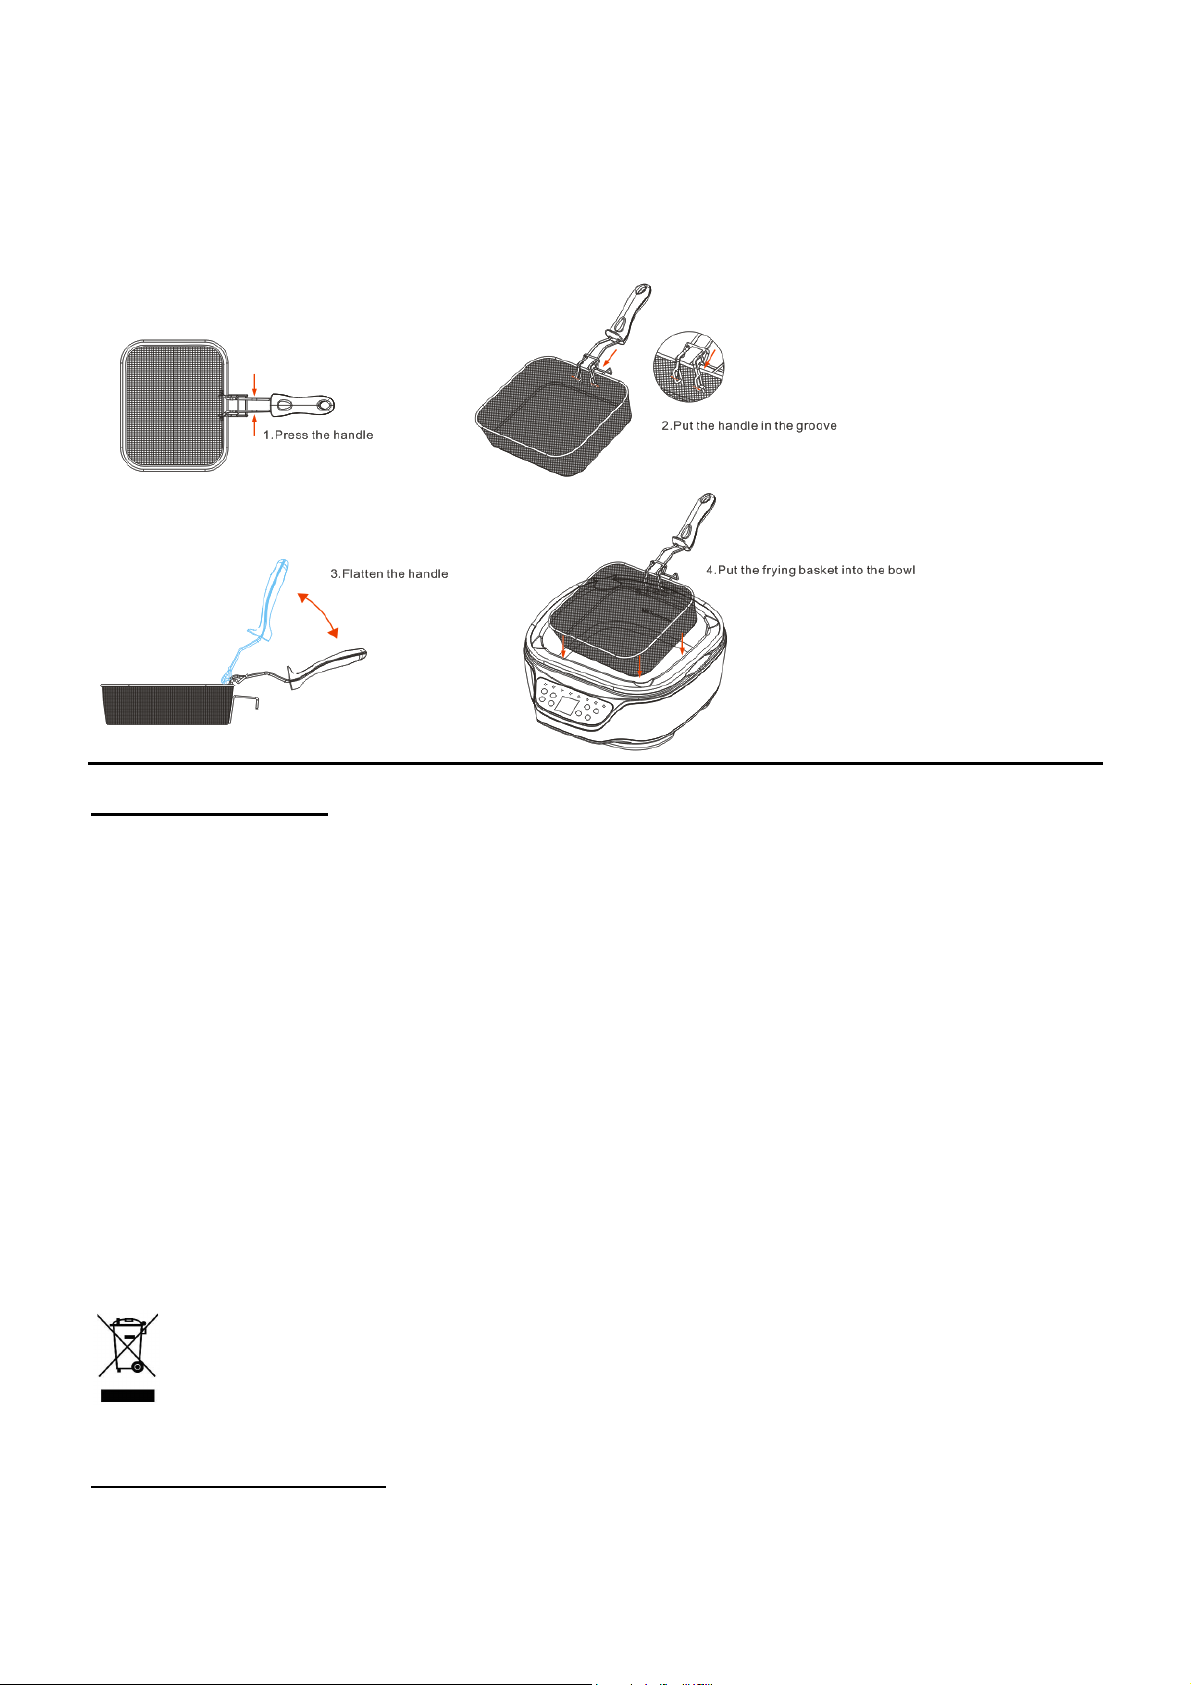
Fry
•Pour oil into the non-stick heating pan, whilst the pan is cool.
•We recommend filling it half way: 2L – 2.5L
•DO NOT OVER FILL. Please allow room for a full frying basket to sit safely in the oil and
not spill over the sides.
•Exercise care when handling oil as oil is highly flammable and can cause injury. Never
add water to hot oil.
•Press the Menu button to select the Fry setting. The Fry indicator light will turn on.
•Press Temp/Timer and ‘+/-‘ buttons to select and adjust the temperature and cooking time.
•Press the “ON/OFF” button to start cooking.
•Place food in to the frying basket and carefully place it in the non-stick heating pan.
•Only use wooden or heat proof plastic utensils to prevent damage to the non-stick heating pan’s
surface. Never use metal utensils.
CLEANING AND CARE
Before cleaning, please allow the appliance to cool down completely and ensure it has been unplugged.
The appliance is not dishwasher safe; do not put any part of this appliance into the dishwasher.
The accessories are not dishwasher safe; do not put any of the accessories into the dishwasher.
Clean the surface of the appliance with a damp cloth; never immerse in water, and ensure all parts are
fully dried.
Do not use any abrasive detergents or alcohol-based cleaning products.
Once fully dry keep all accessories together for ease of use next time, and store the appliance in a
clean and dry place away from extreme temperatures and moisture. Do not store in direct sunlight.
Never pour cold water into warm non-stick heating pan.
Environmental protection:
To avoid environmental or health problems due to hazardous substances in electrical and
electronic goods, appliances marked with this symbol mustn’t be disposed of with unsorted
municipal waste, but recovered, reused, or recycled.
GUARANTEE AND SERVICE
Your new VITINNI™ product comes with a 12 month warranty.
Defects affecting product functionality may be corrected by replacement or repair provided the product
is used and maintained in accordance with the instructions. This does not apply to damage or wear

sustained by improper use of the accessories or the appliance. Your statutory rights are not affected.
Documentation, packaging, and product specifications may change without notice.
CUSTOMER SERVICE
If you wish to return your product for a full refund the item must be unused, in its original packaging and
returned in a sellable condition. Please contact our Customer Service team within 24 hours who will be
able to assist with your enquiry
The product is not user-serviceable; do not attempt to repair it yourself as this may put you at risk of
harm from live components, and will also void your warranty.
If the appliance is not working please read the instructions and check the plug, fuse, and circuit breaker.
If this doesn’t solve the problem please ring our Customer Service team, as they may be able to offer
advice.
If you ring Customer Service, please have the SAP code ready to help us assist you with your enquiry.
This can be found on page 1 of this manual.
If they advise you to return the product to us please pack it carefully and include a note with your name,
address, daytime telephone number and details of the fault. If the product is still under guarantee
please include proof of purchase.
CONTACT US
Phone: 01706 716 116 (Mon-Fri 9am to 5pm)
Email: support@vitinni.co.uk
Address: Vitinni, Vale Mill (Rochdale) Ltd, Robinson Street, Rochdale, OL16 1TA
Table of contents
Other VITINNI Kitchen Appliance manuals


