VITRA V-Care 5674/431470 User manual

V-Care Intellgent
WC User Manual
V-Care toilet
Gebruikershandleiding
321029
310120-01
ENEN
NL

Contents
1. Product Overview
2. Safety Instructions
3. Product Properties
4. Toilet & Seat
5. Remote Control
6. Checklist Before Use
7. Basic Operation Instructions
8. Detailed Operation Instructions
9. Additional Functions
10. Public Area Usage Set-Up- ID Setting
11. Basic Maintenance
12. Troubleshooting
13. Error Code Explanation
14. Product Specification
EN
26

Safety Instructons
Please follow these nstructons as t provdes gudelnes for the safe and
accurate use of the product and prevents unpredcted danger or damage.
Safety
Instructons are dvded as follows dependng on the severty of antcpated
danger, damage, and the urgency of danger.
Fatal or severe njury
from mproper handlng
Warnng
Cauton
!Injury from mproper handlng
Never
Dsassemble
Never dsassemble
!Always Execute
Do not nstall n
humdplaces. It may
cause fire
or electrocuton.
EN
27

V-Care, the new generaton of ntellgent tolet from VtrA. Combnes the 1.
functonalty of a tolet and the cleanng propertes of a bdet whle offerng an
mpressve desgn and ncreased comfort.WC
. A premum touch remote control: V-Care comes wth remote control, whch 2
allows the user to operate all avalable functons wth a touch.
Dfferent washng optons: The "Comfort" verson has oscllatng and pulsatng 3.
washng optons for even more thorough cleanng effect.
Seat / Water Temperature Adjustment: For cold wnter days V-Care offers seat 4.
and water temperature adjustment for more comfortable usage.
Soft open/close seat & cover: V-Care s equpped wth soft-close damper 5.
system that allows the seat and cover to open and close softly.
Stanless steel, self cleanng nozzle: V-Care s equpped wth stanless steel 6.
nozzle to provde the users wth more santary washng experence. The nozzle
cleans tself before and after usage to provde more santary envronment.
Dryng Optons: (Avalable n Comfort Verson) For more comfortable usage 7.
V-Care offers dryng functon and also dryng temperature adjusment after washng
Sensor operated seat & cover: (Avalable n Comfort Verson) For the "Comfort" 8.
verson of V-Care, the seat and cover opens/closes automatcally as the sensor
detects the presence and/or absence of the user. The user may use the remote
control to open and/or close the seat and cover.
Auto deodorzaton / Odor absorbton: The deodorzer automatcally actvates 9.
as soon as the user sts on the seat to mnmze odor.
Low temperature burn preventon: Low temperature burn preventon s 10.
equpped for the safety of elderly, chldren and dsabled who may not be able to
adjust the seat temperature easly on ther own.
Freeze preventon: Wth the power on, the heater automatcally actvates to 11.
prevent water from freezng when the water temperature drops below 5ºC.
Self dagnoss: V-Care performs self dagnoss and warns the user n case of 12.
malfuncton wth flashng s and melody.LED
13. Decalcficaton: V-Care s equpped wth decalcficaton to get rd of unwanted
calcum buld-up perodcally.
14. Slent mode: The slent mode swtches off the audble key sound durng normal
operaton of the control.
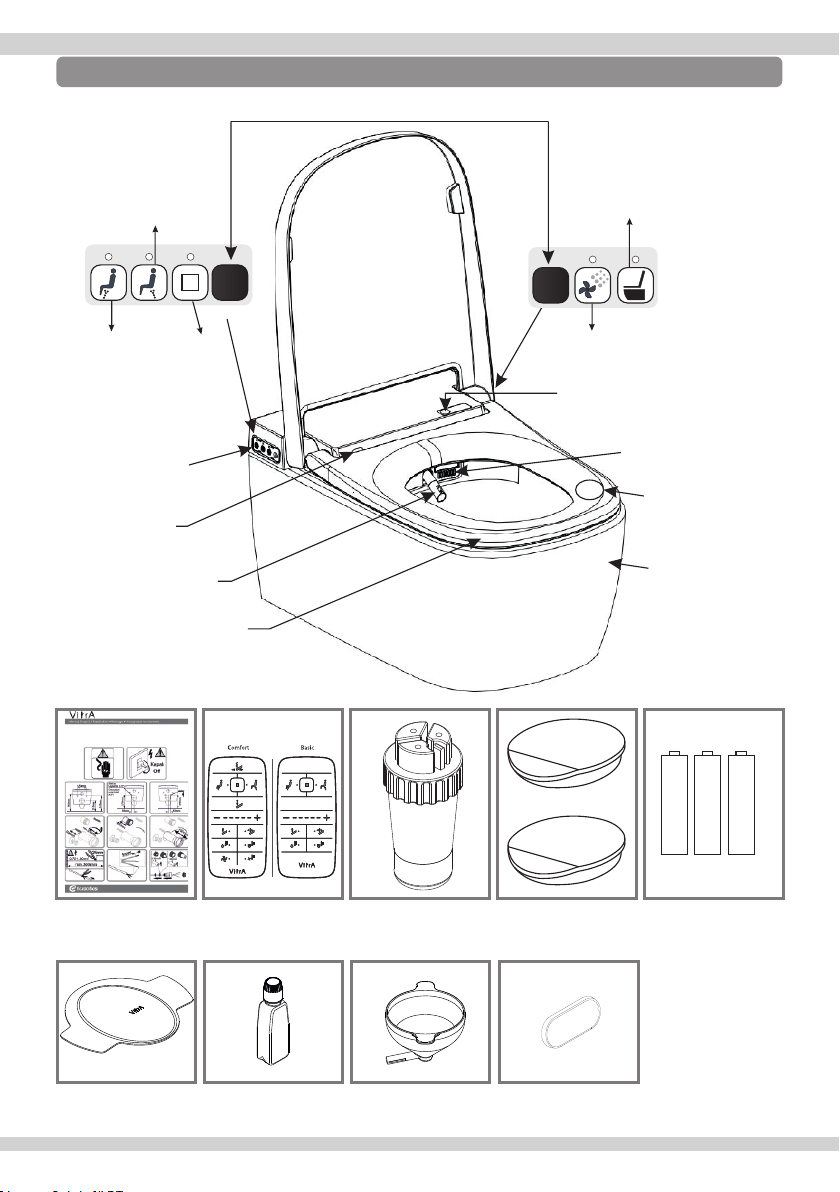
Product Overvew
EN
28

Warning
WARNING
1. When installing the product in humid places such as bathrooms, make sure to
install a ventilation fan or otherwise, make sure the air is well circulated (this is to
prevent the risk of fire or electrocution).
Make sure the electrical insfracture has a properly working ground connection.2.
Do not connect or disconnect electric connector with wet hands (there is a risk 3.
of electrocution).
Disconnect electricity when cleaning (there is a risk of electrocution).4.
When assembling the water proof connector to the service wire within the wall, 5.
make sure that the grounding wire is properly connected before connecting the
live and neutral wires (Inability to do so may cause product damage and/or
electrocution).
6. Allow disconnection of the appliance after installation, by accessible plug or
a switch in the fixed wiring, the disconnection must be incorporated in the fixed
wiring in accordance with the wiring rules)
7. This appliance can be used by children aged from 8 years and above and
persons with reduced physical, sensory or mental capabilities or lack of
experience and knowledge if they have been given supervision or instruction
concerning use of the appliance in a safe way and understand the hazards
involved. Children shall not play with the appliance. Cleaning and user
maintenance shall not be made by children without supervision.
- Do not pull the water proof connector by force.
Damaged cords and/or connector can cause electric leakage or fire.
- Make sure that the cords and connectors are not damaged before use.
Damaged plugs can cause electrocution or fire. Please consult the venton
regarding repair of cords and plugs.
- When discovering any abnormality suchas strange smells or noises,
disconnect the water proof connector.
!After checking that there is no smoke coming from the product, call the
service center for repair.
- Do not connect or disconnect the water proof connector with wet
hands.
Touching water proof connector with wet hands may cause electrocution.
- Do not spray water or detergent on the product and avoid using in
humid areas.
This may cause fire or electrocution.
!
EN
29

Disregarding these precautions may result in death or severe injury.
- Make sure that the freeze prevention is turned on when using in cold
weather.
Freezing could damage the pipes and/or the water tank within the product,
which may lead to water leakage causing electrocution.
!
- Do not use product when any part of it is damaged.
This may lead to injury caused by electrocution.
- Do not block the dryer and/or deodorization outlet.
This can cause fire, breakdown and noise.
- For safety reasons, disconnect the product from all electricity when
cleaning.
Inability to do so may cause fire, breakdown, and electrocution.
!
- Do not stand on the product or apply any unnecessary force on the
product.
This can cause injury or breakdowns.
- Always use a service wire that has a ground line.
!
Warning
WARNING
EN
30

Disregarding these precautions may result in injury or physical damage.
!
- Do not connect the product to anything other than the tap water
supply.
Inability to do so may cause cystitis or dermatitis. It can also cause
malfunction due to pipe blockage.
- Do not apply excessive force on the toilet seat cover.
It can cause damage to the seat cover causing injury.
- Do not excessively pull on the water supply hose.
This can cause water leakage.
- Be careful not to get your ngers caught when opening and closing
the seat and cover.
- Be careful not to wet the nozzle or air outlets with urine.
This may cause an unpleasant smell or malfunction.
- When moving the product, do not hold the product by the seat or the
cover.
Holding by the seat or cover alone can cause the them to fall off causing
injury.
!
CAUTION
EN
31
- Do not operate the child mode when nobody is seating.
!
- If there is a power failure during the cycle after the descaling process is started,
repeat the descaling process without adding the descaling fluid when the
power failure is removed.
!

PROPER USE
Following these precautions may help you prolong the product's life span
and save energy.
- Do not put your nger or any other objects in the air outlets.
This can cause burns or electrocution.
- Do not ush down objects that can cause blockage such as
newspapers, papers, diapers or sanitary towels.
Items such as combs, toothbrushes, pencils will cause blockage inside.
Therefore, if these are dropped, pull them out before flushing.
!
- Do not connect the product to industrial water supply.
This can cause skin inflammation.
- Do not disassemble, repair or remodel.
This can cause a fire or electrocution.This will also void your warranty.
- Be careful not to wet the product andthe water proof connector with
water, detergent or urine.
This can cause a fire or electrocution.
- Disconnect the water proof connector when cleaning.
Inability to do so could cause fire or electrocution.
!
- It is recommended to use toilet paper before using dryer.
Recommended for complete cleaning and shorter drying times.
!
- Set the air and seat temperature to lower levels during hot weather.
This may help you save electricity.
!
- Keep the seat cover closed whenever possible.
This may help you save electricity while seat heater is on.
!
- Drain the water and turn the power switch "off" when leaving the
house for a long time.
This may help you save electricity and prevent the waterfrom freezing.
!
- Do not expose the product directly to the sun light.
This may cause discoloration or make the toilet seat temperature to be
uneven.
- Keep the product away from ammable substances such as cigarettes.
This may cause a fire.
- Use diluted kitchen detergent when cleaning. Do not use the following
substances (Toilet detergent, house detergents, benzene, thinner and
powder detergent, nylon scrubber etc).
This can cause the plastic to break and cause injury.
!
EN
32

- It is recommended to turn off the auto open-close seat feature for
users whokeep pets in residence.
Avoiding to risk of miscomfort of pets.
!
- Remote control must be treated gentlyand not to be used with sharp
nails.
This can cause scratchs on the remote control.
- Remote control starts blinking in case of low battery. Please replace
all the batteries.
Inability to do so could lead misfunction of remote control.
!
PROPER USE
Following these precautions may help you prolong the product's life span
and save energy.
!
- It is recommended to press the ush button before using dryer.
Prevent to spread of bad odor
!
EN
33

WC & Seat
Box Contents
Comfort or Basc
+
-
+
-
+
-
USER MANUAL
321029
REMOTE CONTROL
317008 (Comfort)
317009 (Basc)
WATER PROOF ELECTRIC
CONNECTOR
315283
FIXER COVER(2EA)
315283
ALKALINE
BATTERIES
(AAA, 3EA)
Product Propertes and Accessores
FEMININE
WASHING
REAR
WASHING
STOP/
POWER
Remote control signal receiver
SIDE-CONTROL
AUTO OPEN/CLOSE
SENSOR ON/OFF
(only on comfort Verson)
DEODORIZATION
ON/OFF
SIDE-CONTROL
AUTO OPEN/CLOSE
SENSOR
(only on Comfort verson)
DRYER/
DEODORIZATION
SEAT SENSOR
WC
SIDE CONTROL
STAINLESS
STEEL NOZZLE
SEAT
WATER GUARD
424903
FUNNEL
317010
DECALCIFICATION
SOLUTION
316061
DECALCIFICATION
HOLE COVER
317011
DECALCIFICATION
HOLE
EN
34

Make sure that the supplied rated voltage is AC 220V~240V before connecting
the water proof connector. Then turn on the power switch located at the buttom
of the product.
Connect the water supply hose and open the water ON/OFF valve.
Press the rear washing and female washing button at the side control together
for 3 seconds to fill up the water with water.(You will hear a beeping sound as
the water starts to fill up.When doing so, do not touch the seat or sit on the seat.
The beeping sound stops when the wateris properly filled up.
Touch the lower right part of the seat to check if the seat sensor works properly.
You will hear a beeping sound when the sensor works properly.
While still touching the seat, press rear washing button to check if the washing
function works properly.
Note: make sure to cover the front of the nozzle so as not to be sprayed by the
water coming out from the nozzle.
Checklist before use
EN
35

At the same time, the deodorization will
activate automatically.
Comfort & Basic Version
Sit on the seat. You will hear a beeping
sound which signals that the seat has
acknowledged the user.
Press dry to dry the wet area.
Check if the power is supplied properly by
checking the LED light on the
POWER button on the side control.
If not, provide power by pressing
POWER button on the side
control.
After using the WC, press rear
washing or female washing to
perform desired washing.
You may change the levels of various
adjustable functions as the washing
function is on going.
Press stop to end washing.
When stop is not pressed, the
on-going washing function stops
automatically after 40 seconds.
Unless you press stop , the dryer
continues to function for 3 minutes.
Basic operation instructions
Only Comfort Version
EN
36

Comfort Version
Please avoid installing the remote control directly under the three wave length
lamp and/or direct sun light. Doing so may cause interference in the remote
control signals.
Detailed operation instructions
1
2
3
4
5
9
8
11
10
6
7
12
13
14
15
OPENS/CLOSES SEAT AND SEAT COVER
STOP
• Press to stop any on-going function.
• Press for 3 seconds to activate power saving mode.
REAR WASHING
• Press while sitting to eject the nozzle and begin rear washing.
+ (INCREASE) LEVEL ADJUSTMENT BUTTONS
• After pressing an adjustable function button, press "+" to
increase the adjustable levels.
NOZZLE POSITION
• Press to adjust the nozzle position. Use "-" or "+" to shorten
or elongate the nozzle length respectively.
SEAT TEMPERATURE
• Press to adjust the seat temperature level. Use "-" or "+" to
decrease or increase seat temperature respectively.
DRYER TEMPERATURE
• Press to adjust the dryer temperature level. Use "-" or "+" to
decrease or increase dryer temperature respectively.
DRYER
• Press while seated to activate drying.
WATER TEMPERATURE
• Press to adjust the water temperature level. Use "-" or "+" to
decrease or increase water temperature respectively.
WATER PRESSURE
• Press to adjust the water pressure level. Use "-" or "+" to
decrease or increase water pressure respectively.
- (DECREASE) LEVEL ADJUSTMENT BUTTONS
• After pressing an adjustable function button, press "-" to
decrease the adjustable levels.
PULSATING WASHING
• Press to adjust the water pressure repeatedly from high to low
to have a massaging effect.
FEMALE WASHING
• Press while sitting to eject the nozzle and begin female washing.
OSCILLATING WASHING
• Press to move the nozzle rare and front for more thorough
cleansing effect.
OPENS/CLOSES SEAT COVER
1
2
3
4
5
6
7
8
9
10
11
12
13
14
15
EN
37

Basic Version
Please avoid installing the remote control directly under the three wave
length lamp and/or direct sun light. Doing so may cause interference in the
remote control signals.
Detailed operation instructions
1
2
3
4
5
9
8
7
6
STOP
• Press to stop any on-going function.
• Press for 3 seconds to activate power saving mode.
REAR WASHING
• Press while sitting to eject the nozzle and begin rear washing.
+ (INCREASE) LEVEL ADJUSTMENT BUTTONS
• After pressing an adjustable function button, press "+" to
increase the adjustable levels.
NOZZLE POSITION
• Press to adjust the nozzle position. Use "-" or "+" to shorten
or lenghten the nozzle length respectively.
SEAT TEMPERATURE
• Press to adjust the seat temperature level. Use "-" or "+" to
decrease or increase seat temperature respectively.
WATER TEMPERATURE
• Press to adjust the water temperature level. Use "-" or "+" to
decrease or increase water temperature respectively.
WATER PRESSURE
• Press to adjust the water pressure level. Use "-" or "+" to
decrease or increase water pressure respectively.
- (DECREASE) LEVEL ADJUSTMENT BUTTONS
• After pressing an adjustable function button, press "-" to
decrease the adjustable levels.
FEMALE WASHING
• Press while sitting to eject the nozzle and begin female
washing.
1
2
3
4
5
6
7
8
9
EN
38

Rear
washing While sitting, press to activate
rear washing for 40 seconds.
Water pressure might become weaker if the rear
washing is activated right after flushing.
Female
washing While sitting, press to activate
femalewashing for 40 seconds.
Water pressure might become weaker if the rear
washing is activated right after flushing.
Nozzle
position Press to set the level adjustment
buttonsto nozzle position mode.
Press "+" or "-" to adjust the
nozzle position as prefered.
The nozzle can be ejected in 5 different positions.The
previous user's setting applies when no adjustment is
made by the current user. Nozzle position is adjustable
anytime during activation.
Press to set the level adjustment
buttons to water pressure mode.
Press "+" or"-" to adjust the water
pressure as prefered.
Water
pressure
There are 5 water pressure levels available.The
previous user's setting applies when no adjustment is
made by the current user. Water temperature is
adjustable anytime during activation.
Water
temperature
Press to set the level
adjustment buttons to water
temperature mode. Press
"+" or "-" to adjust the water
temperature as prefered.
There are 5 water temperature levels available.The
previous user's setting applies when no adjustment is
made by the current user.
Seat
temperature
Press to set the level adjustment
buttons to seat temperature
mode. Press "+" or"-" to adjust
the seat temperature as prefered.
There are 5 seat temperature levels available.The
previous user's setting applies when no adjustment is
made by the current user.
Oscillatin
gwash
While washing is activated,
press to initiate oscillating
movement of the nozzle.This
moves the nozzle back and forth
for more thorough cleansing
effect.
Press once more to stop.
Comfort
only
Pulsating
wash
Press once more to stop.
Comfort
only
While washing is activated,
press to initiate pulsating water
pressure. Thisadjusts the water
pressure from high to low
repeatedly for massaging effect.
Detailed operating instructions
EN
39

While sitting, press to activate
dryer to dry wet parts after
washing.
Activates for 3 minutes before automatically stopping.
If you wish to stop before 3 minutes is over, press
stop or simply leave the seat.
Comfort
only
Dryer
temperature
There are 5 dryer temperature levels available.The
previous user's setting applies when no adjustment is
made by the current user. Dryer temperature is
adjustable anytime during activation.
Comfort
only
Press to set the level
adjustment buttons to dryer
temperature mode. Press
"+" or"-" to adjust the dryer
temperature as prefered.
Dryer
Press "seat cover" button to
open and/or close the seat
cover.
Depending on the seat cover's initial position, pressing
the button opens or closes the seat cover.Seat cover
closes automatically when motion sensor detects no
movement for 90 seconds.
Comfort
only
Automatic
Seat &
Cover
Press "seat cover" button to
open and/or close the seat
cover.
Depending on the seat cover's initial position, pressing
the button opens or closes the seat cover.Seat cover
closes automatically when motion sensor detects no
movement for 90 seconds.
Comfort
only
Automatic
Seat &
Cover
Detailed operating instructions
EN
40

Deodorization
ON/OFF
Press to turn ON or turn OFF
the automatic deodorization.
(Located on the right
side-control)
While the it's is ON, deodorization automatically
activates whenever the seat sensor senses the user.
Then it turns off 1 minute after the user leaves the
seat.
Press to turn ON or turn OFF the
motion sensor.(Located on the
right side-control)
While it's on, the seat cover opens automatically when
it senses the user approach V-Care.
When no movement is detected for 90 seconds, both
seat and seat cover closes automatically.
Motion
sensor
ON/OFF
Nozzle
ejection
Press rear and female
washing together for 3
seconds to eject the nozzle
for manual cleaning of the
nozzle.
Press stop to return the nozzle to its original position.
The rear and female washing buttons on the left
side-control can also be used for the same purpose.
+Pres and hold
for 3 seconds
Burn
prevention
V-Care is equipped with low
temperatureburn prevention
to protect children, elderly
and the disabled from burning
themselves without knowing.
When seat temperature remains over 38ºC for more
than 10 minutes, low temperature burn prevention
automatically activates to lower the seat temperature
to below 38ºC.
Power
saving mode
Press the stop button on the
remotecontrol for 3 seconds
to set V-Care onpower saving
mode.
A beeping alarm will signal the start of power saving
mode.To end power saving mode, press and hold the
stop buttonfor 3 seconds again(another beeping
alarm will sound tosignal the end of power saving
mode).
Pres and hold
for 3 seconds
When power saving mode os
ON,the seat and water
temperature will be
automatically set to 24ºC
when not in use.
Power saving mode turns off automatically when the
usersits on the seat, returning the temperature
setting to the previous user's settings. 10 minutes
after the user leaves the seat, the power saving
mode turns back on to return the temperatures
back to 24ºC
Power
saving mode
Seat sensor
The user's skin trggers the
seat sensor. When the seat
sensor acknowledges
theuser, V-Care then goes
into "ready" mode.
None of the function works while the seat is
unoccupied(except for automatic seat & seat cover
for Comfort version).The sensor is located on the 5
o'clock position of the seat.
V-Care is equipped with freeze
prevention to prevent water in
the tank from freezing during
cold weather.
When water temperature reaches below 5ºC, the
freeze prevention automatically activates.
Freeze
prevention
Seat
Additional functions
EN
41

Battery
life
indication
When the battery reaches
approximately 10% of its
capacity, the LED lights in
the remote control blinks to
warn the user.
The lights on the remote control do not blink during
stand by.The blinking happens only during use.
Press the STOP/POWER
button on the right
side-control for 3 seconds to
turnon of turn off V-Care.
Turning off with the STOP/POWER button does not
cut the electricity completely.To cut electricity
completely, use the power switch located onthe
buttom left side of V-Care.
Power
ON/OFF
Pres and hold
for 3 seconds
Additional functions
Child
Mode
Press STOP+FRONT WASHING
button on the right side-
control for 3 seconds to
perform Child Mode.
(Works whether or not the
sensor senses the user)
Performs for 40 seconds with oscillation at level 1
water temperature and level 5 nozzle length.
++
+
Pres and hold
for 3 seconds Pres and hold
for 3 seconds
Decalcication
Cycle
Press WATER TEMP+SEAT
TEMP button on the remote
control for 3 seconds to
perform Decalcication.
(Works only when there is
no one sitting on the seat)
None of the other function works during
Decalcification process.
Silent
Mode
Press NOZZLE POSITION+
WATER PRESSURE button
on the remote control for 3
seconds to go into Silent Mode
To stop Silent Mode, press NOZZLE POSITION+
WATER PRESSURE button on the remote control
for 3 seconds again.
Pres and hold
for 3 seconds
EN
42

ID Setting
On instances where you have to install
2 or more V-Cares in a close area, you
have to set ID codes for each V-Care so
that their remote controls will not send
out signals to the neighboring V-Care.
This is done by pairing a remote
controlwith a V-Care unit through
designating anID code for each pair.
You may set upto 15 ID codes which
meansyou can install up to 15
V-Cares in one area.
Press "-" and "+" buttons together
for 3 seconds to set the level
adjustment buttons to ID setting
mode. When doing so, make sure
that the neighboring V-Cares are
turned off. +
When the level adjustment LED
lights start to blink,set the ID by
pressing "-" and/or "+".When you
have chosen the desired ID code,
leave theremote control untouched
for 5 seconds. The leveladjustment
LED lights will turn off and the ID
setting will be completed.
ID LED DISPLAY ID LED DISPLAY
1
2
3
4
5
6
7
8
9
10
11
12
13
14
15
The 15 available ID codes are shown in the table below.
Public Area Usage Set-Up- ID Setting
ID Setting
EN
43

Place WATER GUARD between the seat and WC. (A)
Press WATER TEMP+SEAT TEMP button on
the remote control for 3 seconds to start Decalcification.
(A single beeping sound will start from this moment)
Nozzle will be extracted. Then water will be dumped
through the nozzle into the bowl for 20 seconds.
When water dumping stops, (B) open the Decalcification
cover and (C) insert funnel through the opening.
(D) Pour the entire decalcification solution into the funnel
slowly and remove the funnel when pouring is finished,
close the cover.
(A double beeping sound will start from this moment)
Wait for about 3 minutes. During this time, the
decalcification solution will soften the calcium build-up
within the tank.
After 3 minutes up, V-Care will perform the following;
3 cycles each of 40 seconds of REAR WASHING + 40
seconds of FEMALE WASHING + 40 seconds of
NOZZLE CLEANSING.
(A single beeping sound will start from this moment)
Nozzle retracts to its' original position and
decalcification is concluded. Remove the water guard.
(The beeping sound stops) The complete descaling
process does not take longer than 10 minutes.
Do not pour more than one bottle (125 ml)
decalcication solution inside the product
for one decalcication cycle.
Clean remaining water on the product after
decalcication cycle with a soft cloth
Do not use sharp objects for opening
decalcication hole cover
Decalcication cycle must be applied every
four months (3 times) in a year
Please clean the funnel with water before
decalcication cycle application to prevent
dust, dirt etc.
Do not use any liquid other than the Durgol
descaling agent supplied with the product.
!
A
B
C
D
Basic maintenance
How to apply Decalcication Cycle
+
EN
44
This manual suits for next models
1
Table of contents
Languages:
Other VITRA Toilet manuals

VITRA
VITRA AQUACARE User manual

VITRA
VITRA V-Care User manual

VITRA
VITRA V-Care User manual

VITRA
VITRA V-Care Prime 7231B403-6216 User manual

VITRA
VITRA V-Care User manual

VITRA
VITRA Falcon D59000-002 User manual

VITRA
VITRA V-Care User manual

VITRA
VITRA SANIBELLE 7551B003-0075 User manual

VITRA
VITRA S20 Operating instructions

VITRA
VITRA V-Care Prime 7231B403-6245 User manual