viveroo one kiosk Installation and operating instructions

User manual & Installation guide
one kiosk
viveroo GmbH
Wewelsburger Straße 4
33154 Salzkotten
Germany
www.viveroo.com
REV20200619

Safety information
free flex, User manual & Installation guide !!!!!! !page of2 11
! Warning
Please read the assembly instructions included carefully. Please read
this free flex user manual completely before using your free. Please
follow the instructions and recommendations to ensure proper use
and maximum enjoyment.
Safety
information
free flex is intended for use in enclosed and dry living spaces.
The following conditions must be provided:
-Operating temperature between 0° C (32° F) and 35° C (95° F).
-Relative humidity (during use): 20"% to 90"%, non-condensing.
-No external environmental influences such as oil, chemicals, salt,
extensive dust, etc.
Installation, service or repairs, if necessary, may only be performed by
authorized persons.
The maximum altitude is 2.000m.
The installer is responsible for selecting the proper mounting location
and safe installation of free flex. This also applies to installation in
movable parts, such as doors. The installer is responsible for
performing and documenting all necessary safety tests.
All electrical installation work may only be conducted by authorized,
trained electricians, always adhering to the general rules and
regulations applying to electrical installation.
Should it become apparent that safe operation of free flex is not
assured, then free must immediately be taken out of service and
secured against potential misuse. If the free flex functions are limited,
blocked or disabled, if an unusual odor is present, if noises such as
scratching are audible or damage is visible, safe operation can no
longer be guaranteed.
Care and
Cleansing
Cleanse your free flex as needed with a soft micro fiber cloth and clear
water only. Dampen the micro fiber cloth and wipe the surfaces gently.
Use stainless steel cleaner to clean pipe and base.
! WARNING: The interior of the free flex must remain dry. To ensure
this, use only a damp cloth for cleansing.
! WARNING: Never scratch, scrape or scrub free flex surfaces with
abrasive materials.
!

Technical Data
free flex, User manual & Installation guide !!!!!! !page of3 11
Measurements
in millimeter
Measurements one kiosk frame.
one for …
… iPad mini 4/5
… iPad 10.2“ (7. Gen; 2019), iPad Air (2019), iPad Pro 10,5“
… iPad Pro 11“ (2018/2020)
… iPad Pro 12.9“ (2018/2020)
225 x 143
272 x 183
270 x 187
303 x 224
Depth of the frame
15
Diameter Standpipe
60
Diameter Standbase
180
Weight in gram
one kiosk Frame, Standpipe, Standbase, Installation material
… iPad Mini
… iPad 10,2“, Air (2019), iPad Pro 10,5“
… iPad Pro 11“
… iPad Pro 12,9“ (2018)
1.830
1.940
1.980
2.340
Electrical
connections
Power supply
Power consumption
100-240Vac, 50-60Hz
12,5Watt - 18Watt depending
on iPad and psu
Removal from
power supply
free flex may be removed from the power supply via the circuit breaker in the respective rooms.
CE & Co.
All one kiosk have CE certification. one kiosk is quality "Made in Germany". We use only high-quality parts
and components produced by market leaders. One kiosk customers are proud of their iPad stand.
Technical changes and mistakes are excepted.
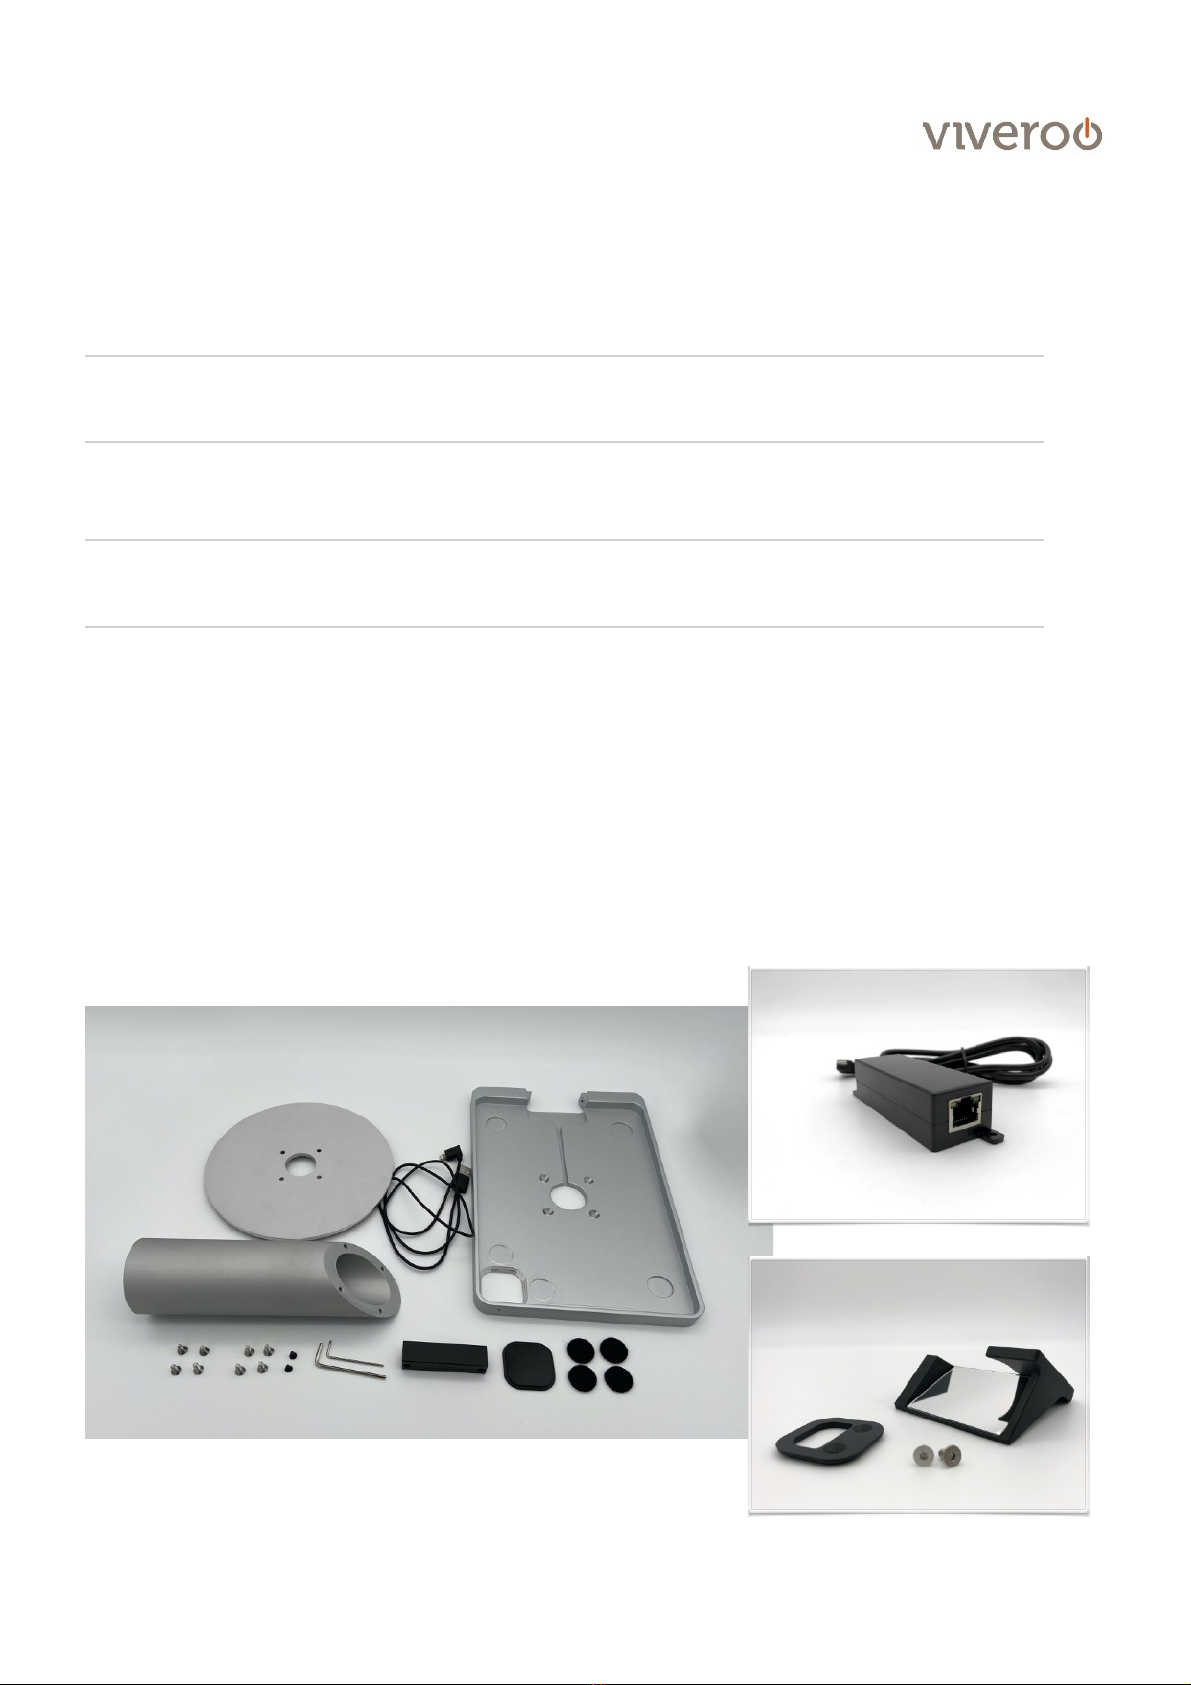
Product
contents
-User Manual & Installation Guide one kiosk
-one kiosk frame made of aluminum and painted
-Standpipe made of aluminum and painted
-Standbase made of aluminum and painted with rubber points.
-Closure Cap
-Installation material: Screws and felt points
- Cable (jLightning/USB-C depending on the iPad Generation)
Compatability
Electrical operation of free flex is permitted only in connection with viveroo or Apple power supply units.
Operation of free without it will lead to immediate loss of guarantee and warranty.
Installation
Delivery Contents
Illustrations and texts are exemplary. Depending on the iPad and USB port, other power supplies or cables may be supplied.
free flex, User manual & Installation guide !!!!!! !page of4 11
1
Mounting of one kiosk with power cable (Lightning and USB-C)
pp 5-7
2
Mounting of one kiosk with PoE Adapter
If you use an iPad Pro with USB-C Adapter in combination with PoE, please directly skip to 2.6
pp 8-9
3
Mounting of Accessory „Scanning Module“
p 10
one kiosk with power cable
PoE Adapter (Accessory)
Scanning Module (Accessory)

Installation
Illustrations and texts are exemplary. Depending on the iPad and USB port, other power supplies or cables may be supplied.
1. Mounting of one kiosk with a power cable. If you use an iPad Pro with USB-C cable, the installation works
similarly. You only have a USB-C instead of the Lightning cable.
If you use the one kiosk with a PoE Adapter, please see 2 (pp 8-9).
free flex, User manual & Installation guide !!!!!! !page of5 11
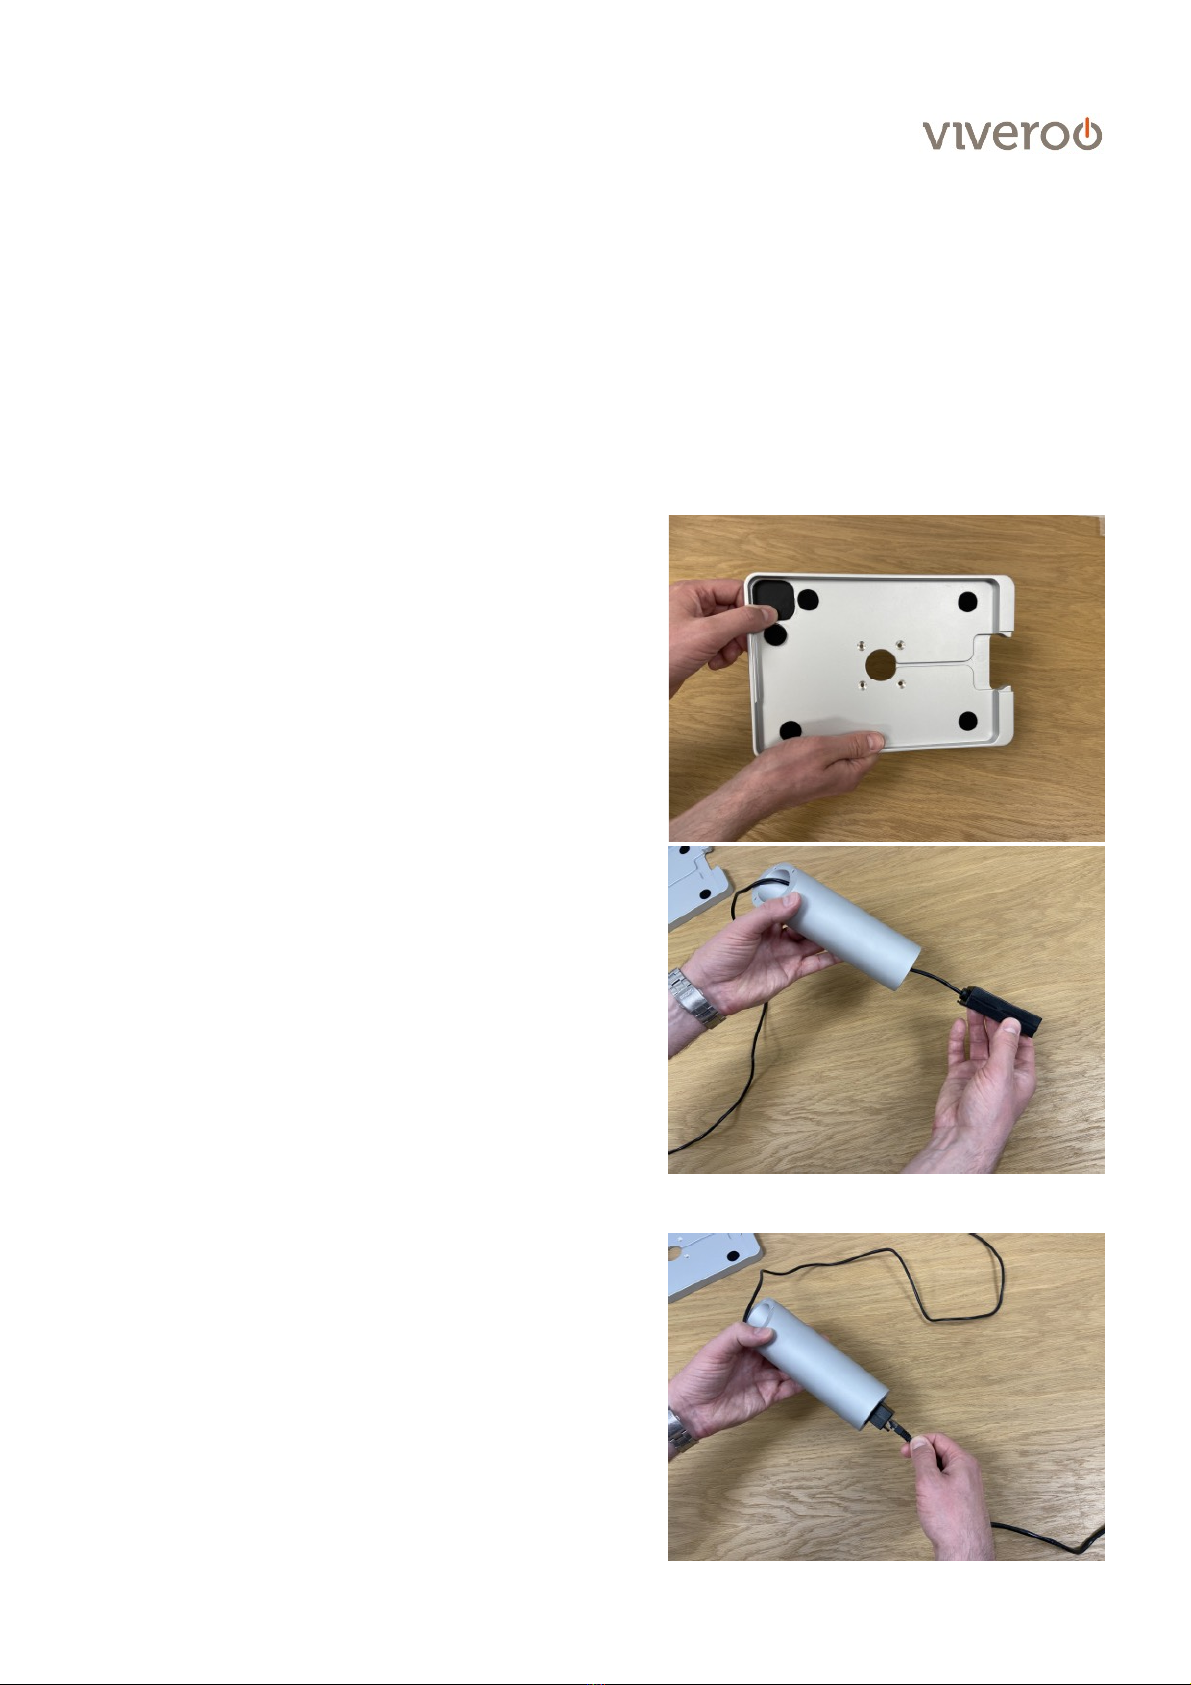
Step 1.1
Make sure that all of the felt points are stuck to the
appropriate place on the cover. Insert the shutter for the
camera cutout.
Step 1.2
Guide the Lightning USB cable through the standpipe.
! Note: Make sure that the cable is inserted so that the
Lightning adapter runs to the bevelled side of the tube
and the USB adapter to the right-angled one (the
direction doesn't matter for the USB-C cable for the
iPad Pro).

Installation
free flex, User manual & Installation guide !!!!!! !page of6 11
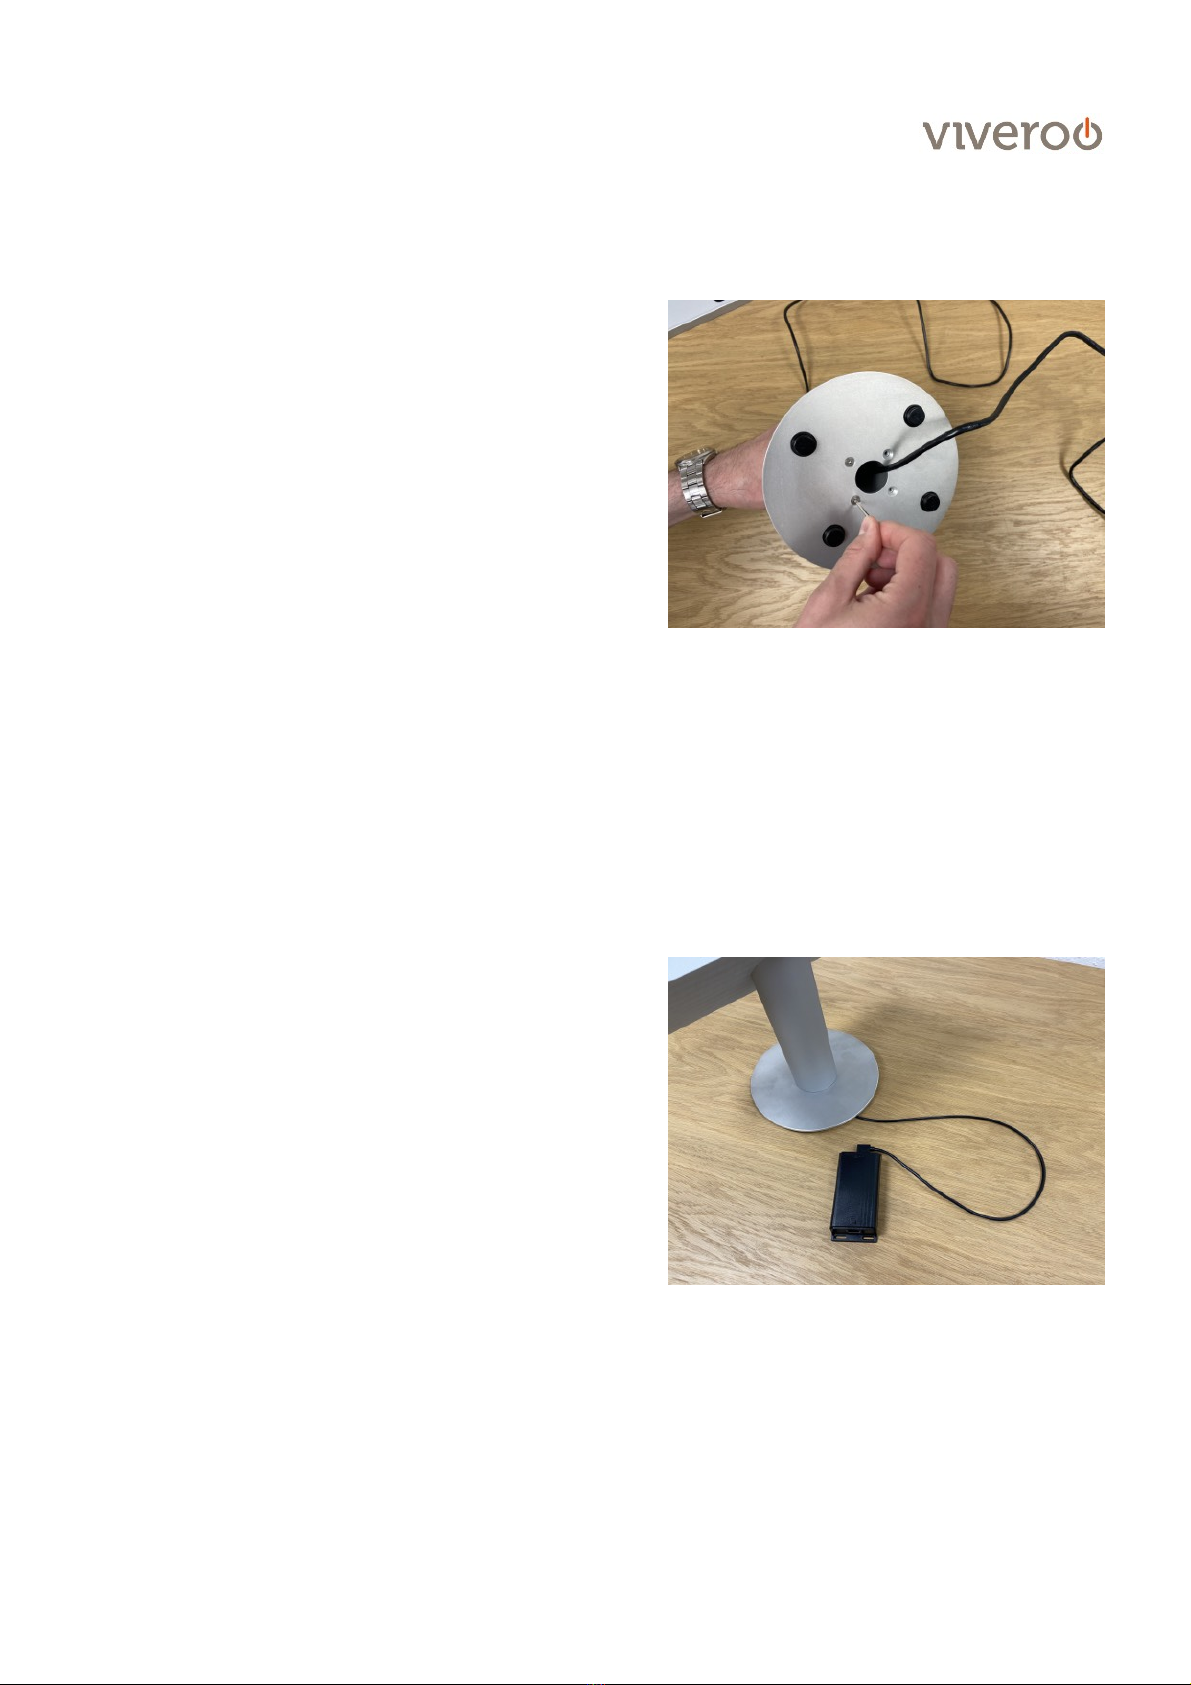
Step 1.3
Screw the standpipe to the stand.
! Note: The stand is mounted on the right-angled side
of the tube.
Step 1.4
Now run the cable through the recess in the cover and
then screw the frame onto the standpipe.
! Note: You can already insert the cable into the cable
duct in this step. The cable should run to the right
side.
! Note: The cover can also be mounted in portrait
format.
Step 1.5
Place the iPad in the holder and insert the Lightning
connector.
! Note: Make sure that the cable is in the intended
cable duct so that the iPad sits straight in the holder.

Installation
free flex, User manual & Installation guide !!!!!! !page of7 11
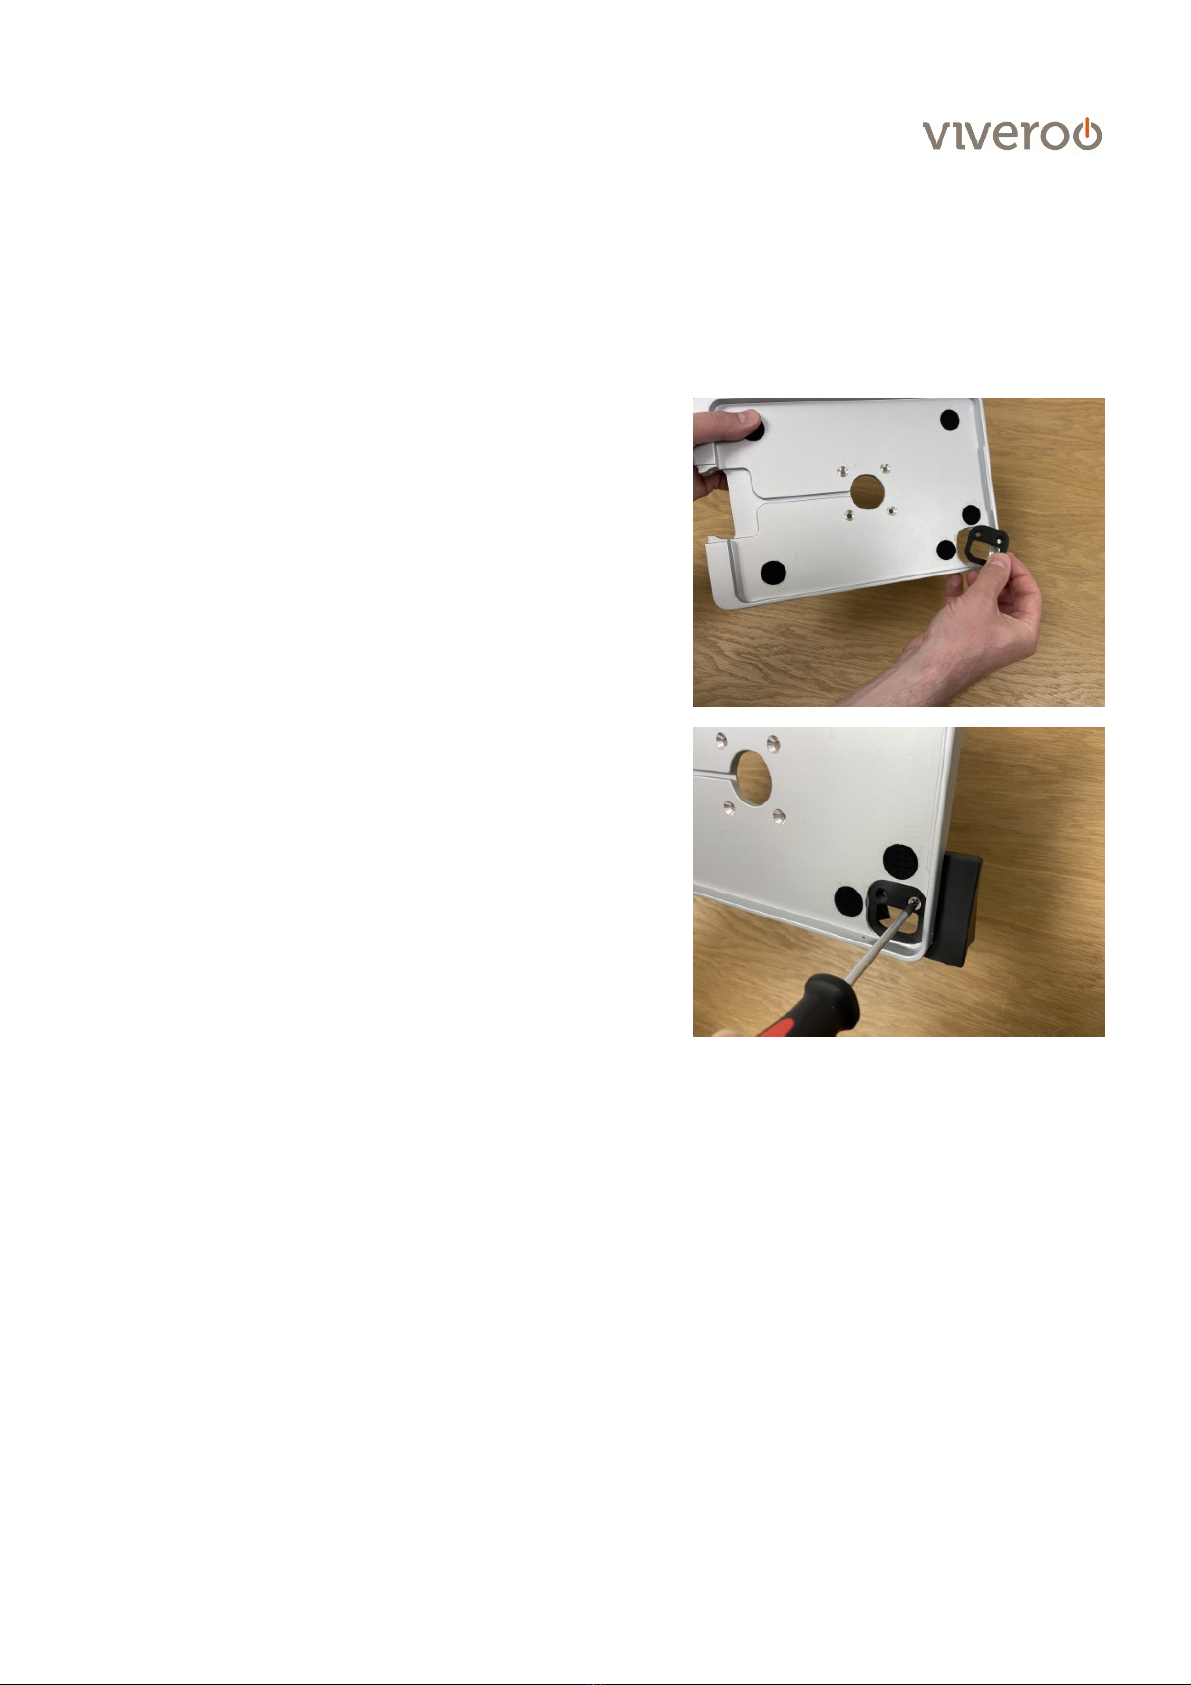
Step 1.6
Cover the Lightning adapter with the closure cap.
Step 1.7
Fix the closure cap with the enclosed screws. The iPad
can no longer be removed from the holder without
loosening the cap.
Installation
2. Mounting of viveroo one kiosk with a PoE Adapter. These steps describe the installation of one kiosk for iPads
with the Lightning connector in combination with PoE.
! If you use an iPad Pro with USB-C Adapter, please directly skip to 2.6
free flex, User manual & Installation guide !!!!!! !page of8 11
Step 2.1
Make sure that all of the felt points are stuck to the
appropriate place on the cover. Insert the shutter for the
camera cutout.
Step 2.2
Guide the PoE adapter through the standpipe.
! Note: Make sure that the cable is inserted so that the
Lightning adapter runs to the slanted side of the tube
and the PoE adapter to the right-angled one.
Step 2.3
Connect the PoE adapter to your LAN cable.
! Note: If the LAN cable has to be connected to your
switch / injector beforehand, run the LAN cable
through the base plate of the one kiosk before.
Installation
free flex, User manual & Installation guide !!!!!! !page of9 11
Step 2.4
Screw the stand base to the pipe. The PoE adapter
disappears in the standpipe. So all connections are
hidden and secured.
Step 2.5
Mount the frame now
To do this, follow steps 1.4 to 1.7.
Step 2.6
Option
PoE für
USB-C
If you are using an iPad Pro with USB-C connection and
at the same time represent the power and data supply
via PoE, carry out the installation according to 1. (pages
5 to 7).
Then connect the PoE adapter for USB-C to the cable
and connect it to your LAN cable.
Installation of Accessory „Scanning
Module“
Illustrations and texts are exemplary. Depending on the iPad and USB port, other power supplies or cables may be supplied.
free flex, User manual & Installation guide !!!!!! !page of10 11
Step 3.1
Insert the adapter plate into the camera opening. If you
have already inserted the camera cover (see p.5, 1.1),
remove it.
Step 3.2
Mount the scanning module over the designated points
on the adapter plate.
Step 3.3
Do the further assembly steps according to items 1.2 to
1.7 (or 2.2 to 2.6 for PoE).
! Note on 1.4: The holder is turned by 180 degrees and
screwed onto the standpipe. The cable outlet leads to
the left side.
! Note on 1.4: An optimal use of the scan function is
only possible when mounting in landscape format.
This is the only way to create the scan area below the
holder.

Warranty
free flex, User manual & Installation guide !!!!!! !page of11 11
Warranty
free flex comes with a one year warranty from date of purchase by
the original end customer, unless the device was repaired or replaced
during the warranty period. In this case, the warranty is valid until the
end of the regular two year warranty or six months following the
repair/replacement, whichever comes first.
Warranty claims and
verification
Should your free flex for any reason not perform as expected, please
contact your dealer and provide the original invoice with serial
number as well as a brief description of your complaint.
Warranty claims and
verification
The following devices are excluded from the warranty
Devices with damages caused by:
-acts of nature,
-misuse, including but not limited to disregarding the user manual and
mounting instructions,
-inappropriate handling,
-connection to an incorrect power supply,
-repairs or attempted repairs by unauthorized persons,
-use of the device in connection with third party products,
devices on which the serial number of the producer has been changed,
deleted, removed or made illegible.
Apple, iPad and Lightning are registered trademarks of Apple Inc.
Other manuals for one kiosk
1
Table of contents
Other viveroo Tablet Accessories manuals


