Tern HSD Owner's manual
HSD SUPPLEMENTAL INSTRUCTIONS
Original Instructions
INSTRUCCIONES SUPLEMENTARIAS DE HSD
Traducción de las Instrucciones Originales
HSD INSTRUCTIONS SUPPLÉMENTAIRES
Traduction des Instructions Orginales
MANUALE SUPPLEMENTARE PER BICICLETTA HSD
Traduzione delle Istruzioni Originali
ZUSÄTZLICHE BEDIENUNGSANLEITUNG ZUM HSD
Übersetzung der Original-Bedienungsanleitung
EN
ES
FR
IT
DE
2
EN
ES
FR
IT
DE
Contents
1. General Information.............................................. 3
Meaning of Icons ................................................... 4
Intended Use.......................................................... 4
2. Weight and Loading ............................................. 5
HSD Limits .............................................................. 5
Kickstand Weight Limit ......................................... 6
HSD Attachment Limits......................................... 6
Recommendations for Safe and Happy Riding . 7
Passenger Considerations .................................... 8
Getting Off and On the Bike ................................ 8
3. Flat Fold .................................................................. 9
4. Vertical Parking...................................................... 12
5. Child Seat Mounting ............................................. 14
6. Frame and Battery Lock........................................ 15
7. Suspension Fork .................................................... 16
Preload Adjuster .................................................... 16
Speed Lock Adjuster ............................................. 16
Tire Clearance ........................................................ 16
Wheel Removal...................................................... 17
8. Suspension Seatpost............................................. 18
Selecting Elastomers............................................. 18
9. Trailer Mounting .................................................... 19
10. Belt Drive System .................................................. 20
Visual Inspection.................................................... 20
Checking Belt Tension........................................... 21
Belt Tension Adjustment Procedure.................... 22
11. Enviolo AUTOMATiQ ............................................ 23
Shifting .................................................................... 23
Enviolo App............................................................ 24
Cleaning.................................................................. 24
Lubrication.............................................................. 24
Storage.................................................................... 24
12. HSD Accessories.................................................... 25
Edition 1 Rev 0. September 2019
3
EN
ES
FR
IT
DE
3
1
4
5
7
2
6
9
10
11
12
13
8
1. General Information
Congratulations on your purchase of the Tern HSD, a mighty but mini ebike that is easy to handle, easy to share
and carries a whole lot of cargo. For most riders, the HSD is just the right amount of bike for them.
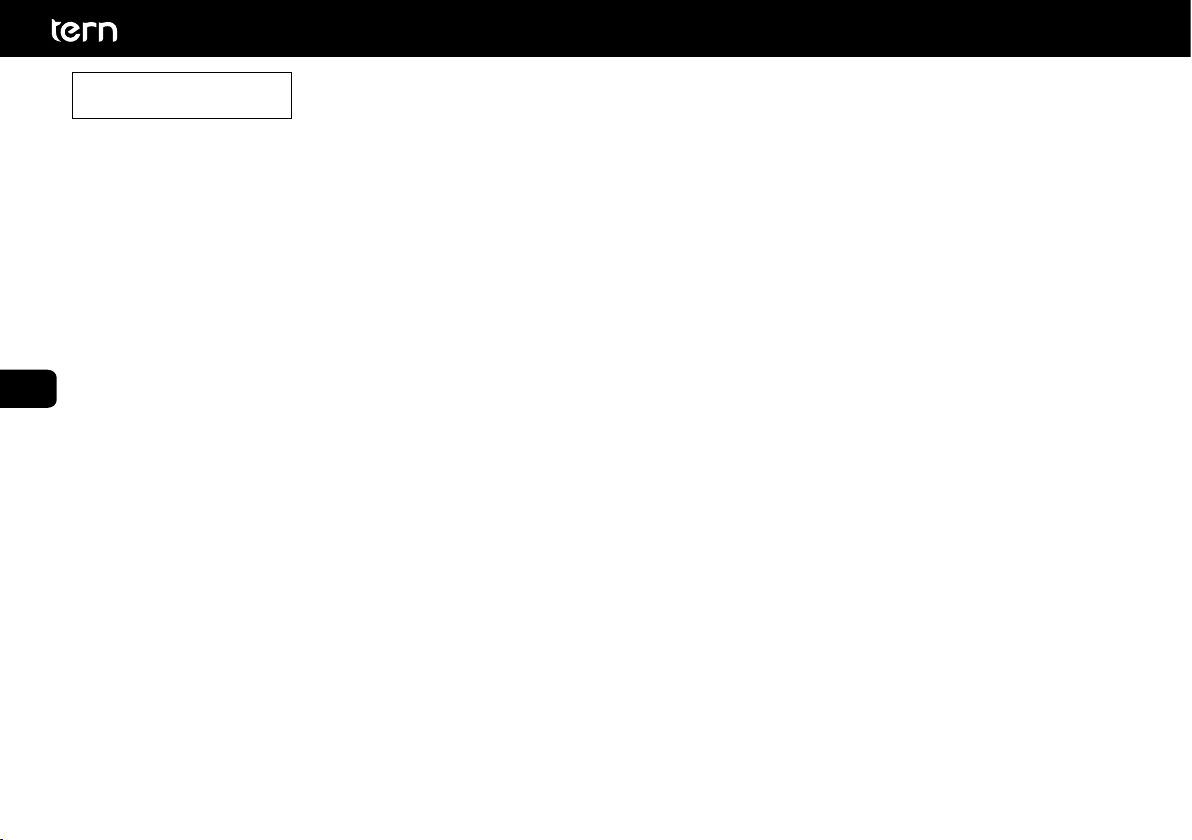
Nomenclature of Parts
1. Atlas H Rack
2. Atlas H Dropouts
3. Frame Lock
4. Battery
5. Andros Stem
6. Physis Handlepost
7. Combo Mount
8. Wheel Stabilizer
9. Fork
10. Atlas Wheels
11. Motor Drive
12. Kickstand
13. Vertical Parking
Contact Points
4
EN
ES
FR
IT
DE
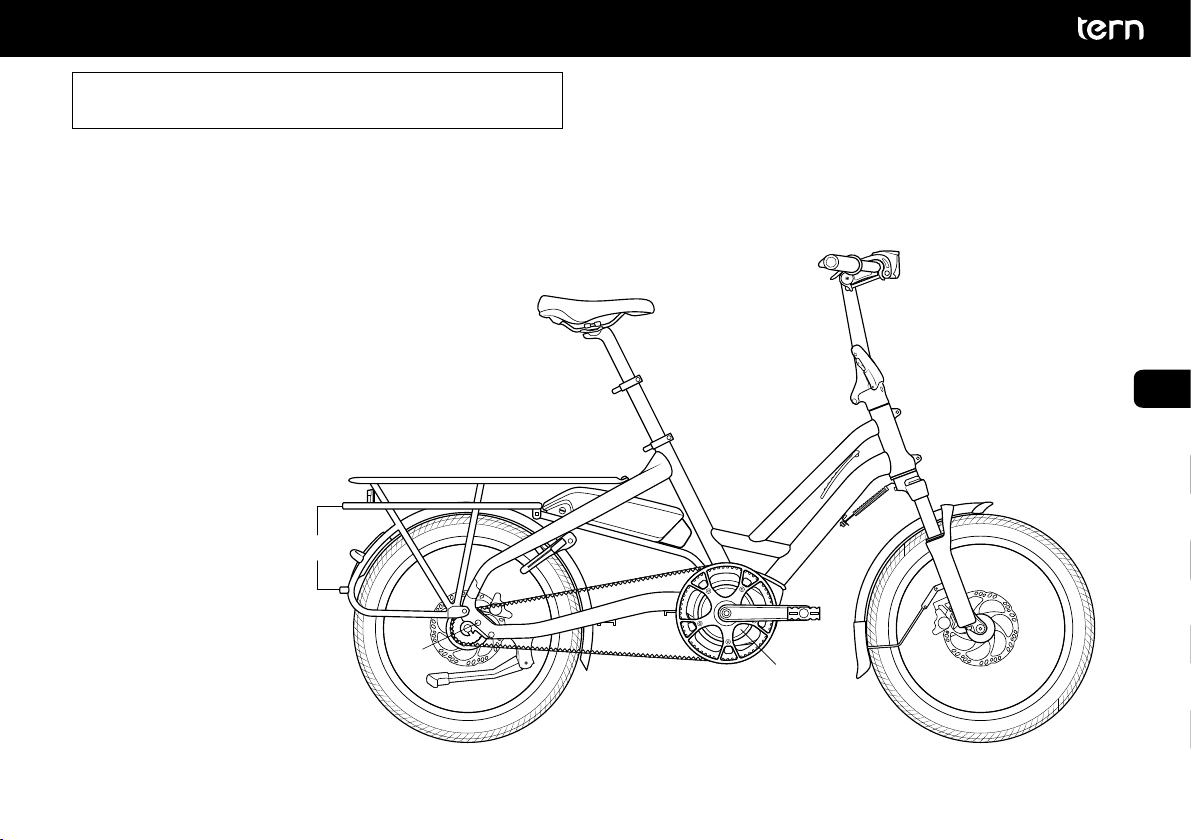
Meaning of Icons
Intended Use
The HSD is designed for up to two people riding with both wheels in contact with paved roads or graded and
maintained gravel roads. It is not intended for racing, jumps, hops, wheelies, stunts or anything of the kind.
Failure to follow the intended use described above may result in serious injuries.
The manufacturer and dealer are not liable for any direct or consequential damages resulting from misuse.
The warranty will be void if your HSD is not used in accordance with the intended usage.
Please refer to the HSD warranty card included in the box for specifics.
Indicates how to use the product or
items that require special attention.
Incorrect action could result in
damage to the equipment.
Life-threatening danger if instructions
are not followed or preventive
measures are not taken.
Possible non-lethal injuries, if
instructions are not followed.
You must have the proper tool, such as
a torque wrench for items that require a
specific torque. A torque that is too high or
too low can cause parts to fall off or break
and can lead to serious accidents and injuries.

5
EN
ES
FR
IT
DE
2. Weight and Loading
The Tern HSD is designed to carry cargo. In addition to meeting EN 15194 standards for ebikes, the HSD has
undergone additional testing to ensure that it is capable of carrying up to 60 kg (132 lb). Rear cargo can be one child
in an approved child seat or panniers and baskets or a combination of both. However, restrictions do apply and
there are considerations for loading the HSD in a way that maximizes comfort and stability for the rider.
Total laden weight, excluding rider, at all attachment points should not exceed 60 kg.
HSD Limits:
• Maximum rider weight shall not exceed 120 kg (265 lb) when using non suspension seatpost. If your
HSD is equipped with suspension seatpost, refer to the limits given by its manufacturer.
• Maximum load limit for the HSD is 170 kg (375 lb) which includes rider, passenger(s), accessories, and any additional cargo.
• Maximum weight on each tire should not exceed 95 kg (209 lb) when inflated to the maximum allowable pressure of 65 psi (4.5 bar).
Overloading and/or under-inflating a tire causes premature wear. Approximately 65% of the total weight should be on the rear wheel.
• Maximum weight for a rear passenger is limited to 60 kg (132 lb).
HSD is NOT designed to carry adult passengers. Observe above limits and do not overload.
Rider Weight (kg) 50 60 70 80 90 100 110 120
Max Cargo (kg)* 60** 60** 60** 60 50 40 30 20
Rider Weight (lb) 110 132 154 176 198 220 243 265
Max Cargo (lb)* 132** 132** 132** 132 109 87 65 43
Numbers based on average vehicle weight of 30 kg, including panniers/racks.
* Make sure to follow the limits and recommendations in the Weight and Loading section. Total weight is limited by maximum allowed
weight on each tire and a 60% weight distribution on the rear wheel
**Exceeds 80% of rider weight recommendation as described on page 7. Only carry what you can comfortably handle.
6
EN
ES
FR
IT
DE
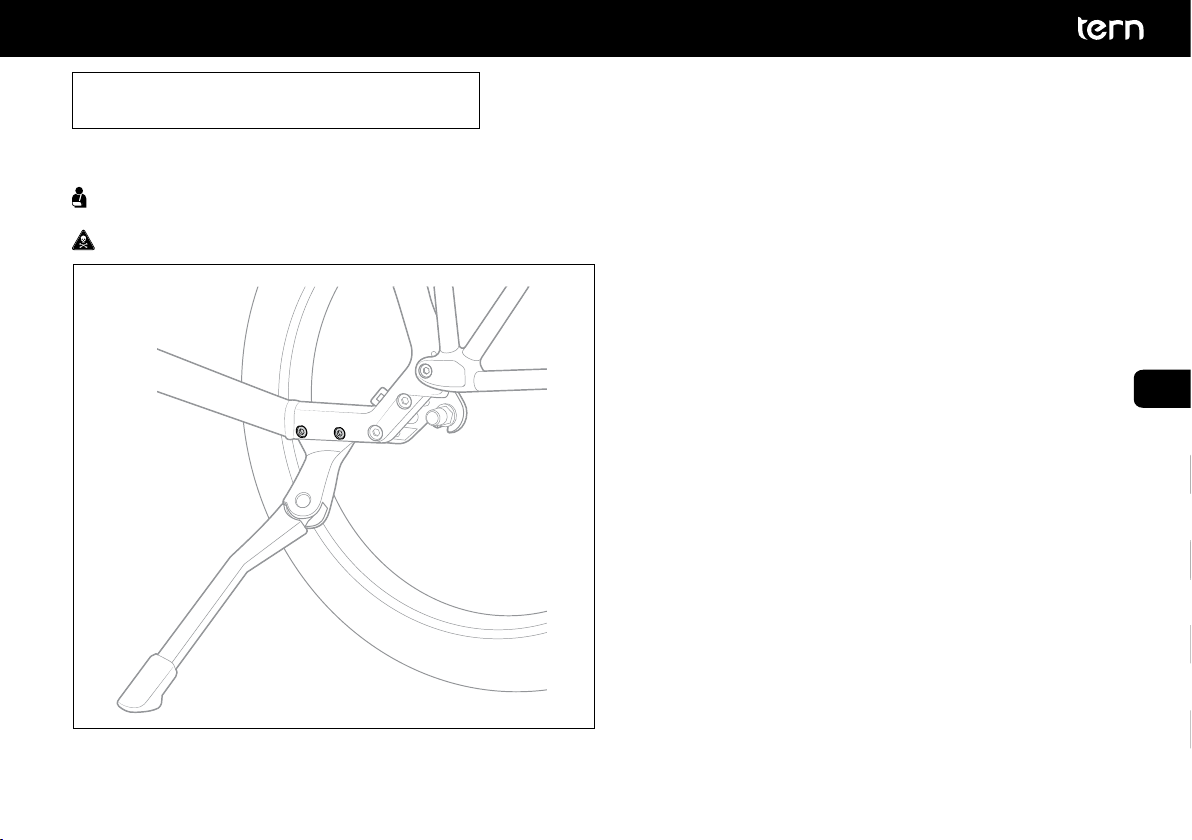
Kickstand Weight Limit
Unless otherwise stated, the rear-mounted kickstand has a load capacity of 25 kg (55 lb). With the kickstand lowered, the full weight of the HSD
is shared among the wheels and kickstand. Follow these rules:
• The kickstand is designed for light cargo only.
• The kickstand is not designed to support a fully loaded HSD.
• If you are carrying a passenger, hold and help steady the HSD to reduce kickstand load while loading and unloading.
NEVER allow children to climb onto the HSD by themselves even if the kickstand is lowered unless an adult is steadying the bike.
HSD Attachment Limits
• Maximum weight on the Combo Mount (Head Tube) is 20 kg (44 lb).
• Maximum weight on a pair of foot support, if installed, is 25 kg (55 lb) on each side.
• Maximum weight on the top of the Rear Rack is 50 kg (110 lb).
• Maximum weight on the side of the Rear Rack is 20 kg (44 lb). Keep the weight balanced between left and right sides for optimal stability.
• Individual accessory load limit may be lower than mounting location limit. Please refer to the instruction manual included with the accessory
for maximum load limits.
The above load limits pertain to individual mounting area. Total cargo load should remain less than 60 kg (132 lb).

7
EN
ES
FR
IT
DE
Recommendations for Safe and Happy Riding
• Check your local regulations: Some countries do not allow the carrying of passengers on the
back of a bicycle. Others may require specific accessories to do so legally.
• Check the well-being of your passenger: These are recommended guidelines for usage. As always, you must
determine if your passenger is strong and alert enough to be transported as a passenger on this bicycle.
• Handling: Most riders can comfortably carry 80% of their weight. You should determine if you are comfortable carrying that much weight.
• Practice, practice, practice: Rider size and strength will affect how easily a loaded bicycle can be
handled. Always practice in an open, car-free area before carrying a passenger.
• Road type: The HSD should only be used on paved roads or graded and maintained gravel roads.
• Cargo: Place as low as possible and strapped firmly to the HSD. Items not securely fastened may
compromise the handling and endanger yourself and others on the road.
• Pay attention: NEVER ride with hands off the handlebar. NEVER operate a handheld device such as a mobile phone when in motion.
Example Showing Proper Loading of the HSD
15 kg x2
10 kg
27 kg
20 kg40 kg
33 lb x2
22 lb
27 kg
44 lb88 lb

8
EN
ES
FR
IT
DE
Passenger Considerations
To safely carry a rear passenger, please make sure the HSD is equipped with the proper equipment that are installed and fastened securely:
• Proper location: The only location for carrying a passenger should be the rear rack. No other location is allowed.
• Proper seating: For children ages 6 and below, always use an approved child seat. The Thule Yepp Maxi and Nexxt child seat has been tested
and approved for use with the Tern HSD. For older children and adults less than 60 kg* (132 lb), install a seat cushion to protect against bumps.
• A pair of foot supports: The rear passenger’s feet need to lie flat on foot support during the ride. Foot support are
strictly for passenger use when SEATED. Standing on them is unsafe and may permanently damage the frame.
• Handholds: Ensure the rear passenger has something to hold during the ride. Whenever the HSD is in motion, the
passenger who is not in a child seat must keep a grip on something stationary such as the Sidekick™ Bars.
• Foot and leg protection: Install wheel guards or Cargo Hold 37 Panniers folded flat on both sides of the bike.
• Wear a helmet: All passengers should wear approved helmets.
• Check for dangling straps and loose-fitting clothing on passengers: Ensure skirts, pants, shoelaces,
etc. are tucked away or tied down to avoid being caught when the bike is in motion.
While HSD frame and rack are strong, they are not intended to carry a passenger in excess of 60 kg (132 lb).
Getting Off and On the Bike
• When a child or adult passenger is getting onto the rear rack, ALWAYS hold the bike: NEVER allow
children to climb onto the HSD by themselves unless an adult is steadying the bike.
• Use the kickstand when buckling in children: Because the kickstand will keep the bike stable,
you can use two hands to securely buckle children into a child seat.
Do not leave children unattended on the back of the HSD: NEVER, ever, ever leave children unattended on the back of the HSD,
even if it is on the kickstand. Wriggling children can upset the balance of the bike and a fall may result in serious injuries.

9
EN
ES
FR
IT
DE
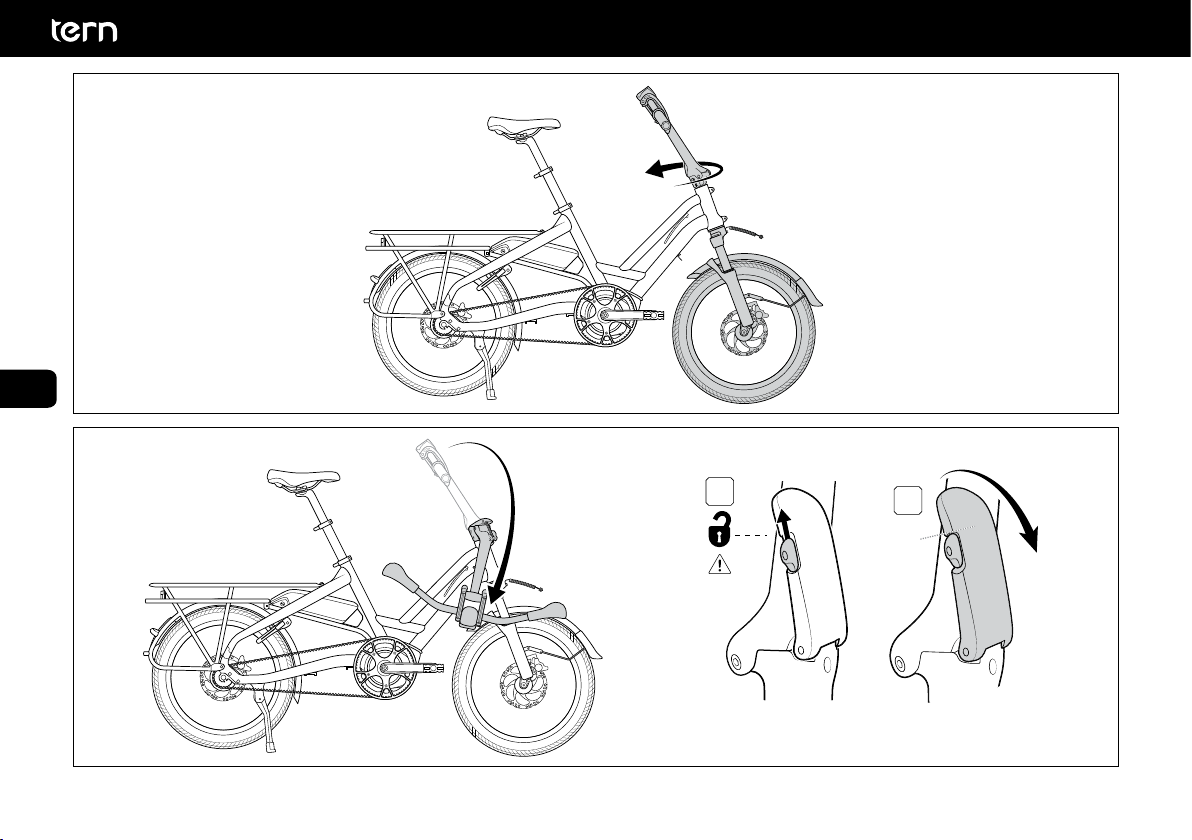
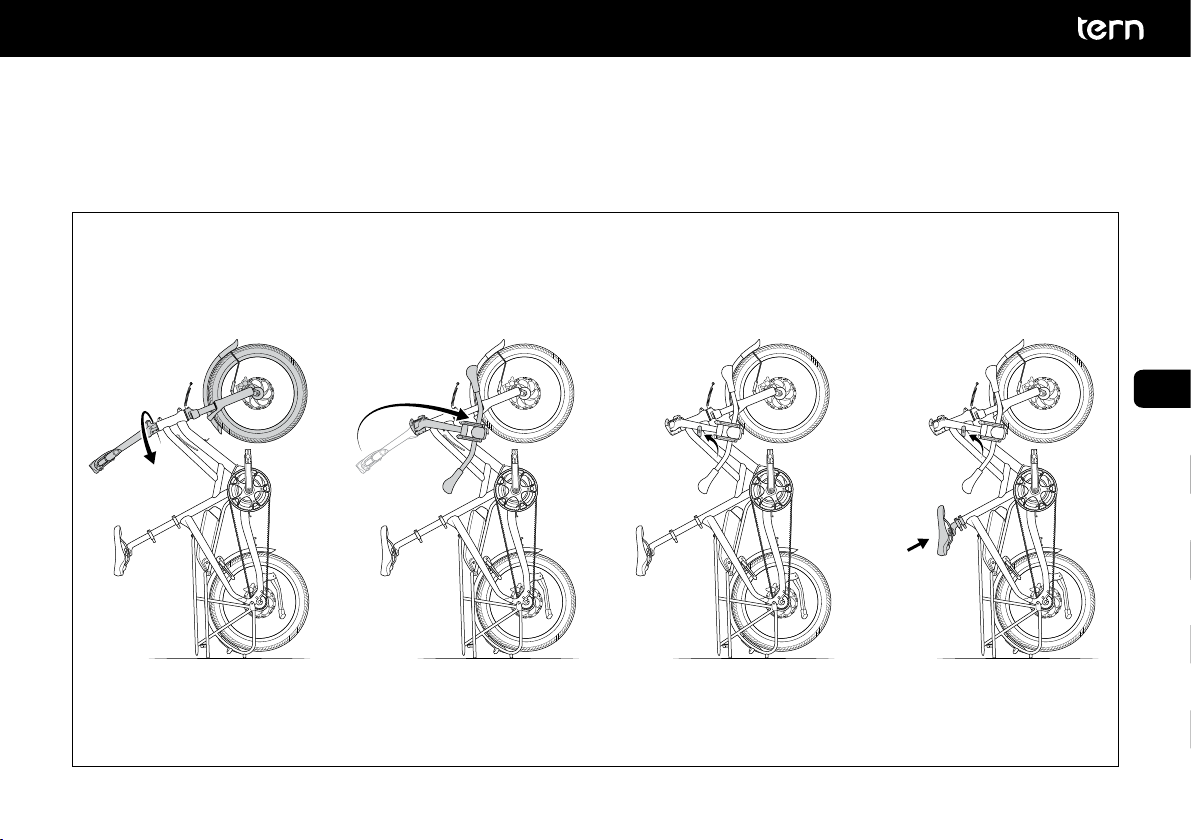
3. Flat Fold
The Tern HSD can be flat-folded to reduce its size. To do so, follow the steps below:
A
C
B
1
2 *
* Wheel Stabilizer is not on all HSD models
10
EN
ES
FR
IT
DE
AB
A
B
3
4

11
EN
ES
FR
IT
DE
A
B
A
B
5
6
12
EN
ES
FR
IT
DE
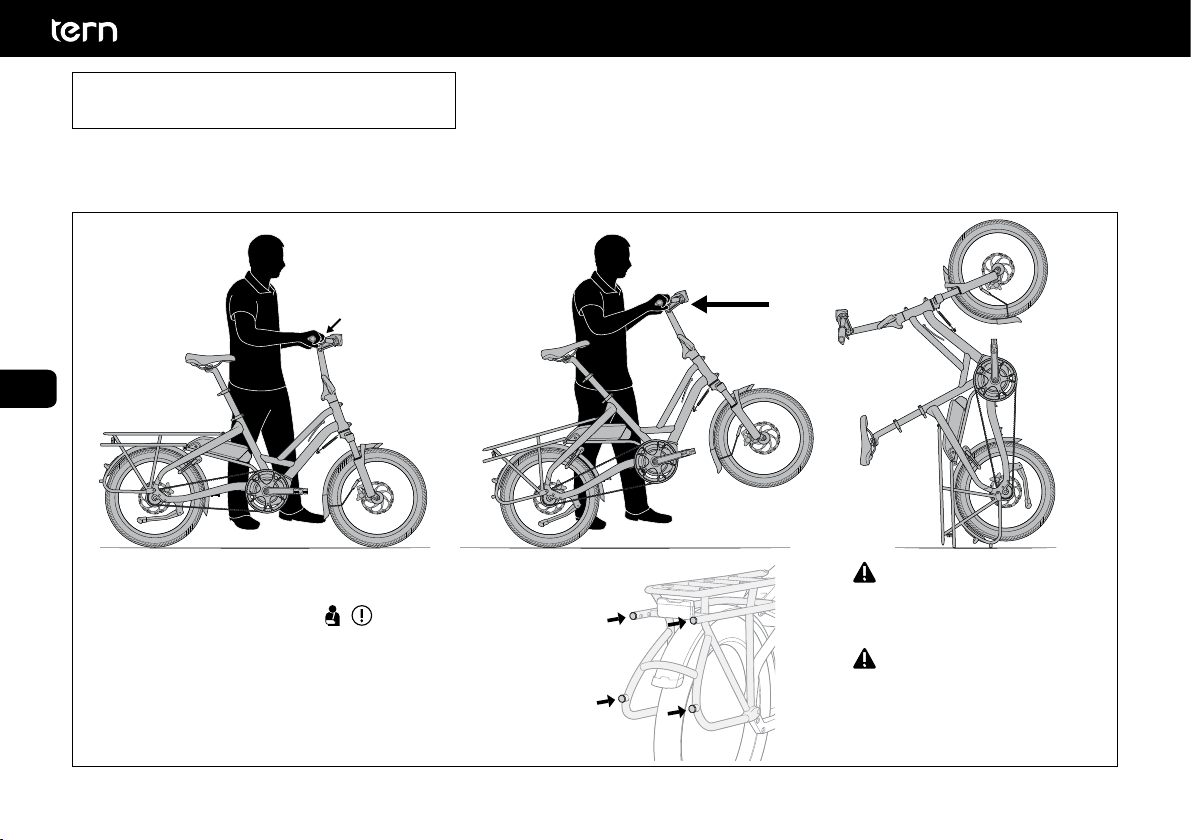
4. Vertical Parking
The Tern HSD is designed to stand on four contact points on the rear rack. In this configuration, the bike
takes up a small footprint, which is very useful in tight spaces, such as in an elevator or in a storage area.
Apply rear
brake
Pull up on handlebar
and walk backwards
Make sure all four contact
points touch the ground
In public areas, hold the
bike to prevent it from
accidentally falling over.
If the vertical parked bike is
to be left unattended, always
strap the bike to a fixed
object to prevent falling.
13
EN
ES
FR
IT
DE
14
EN
ES
FR
IT
DE
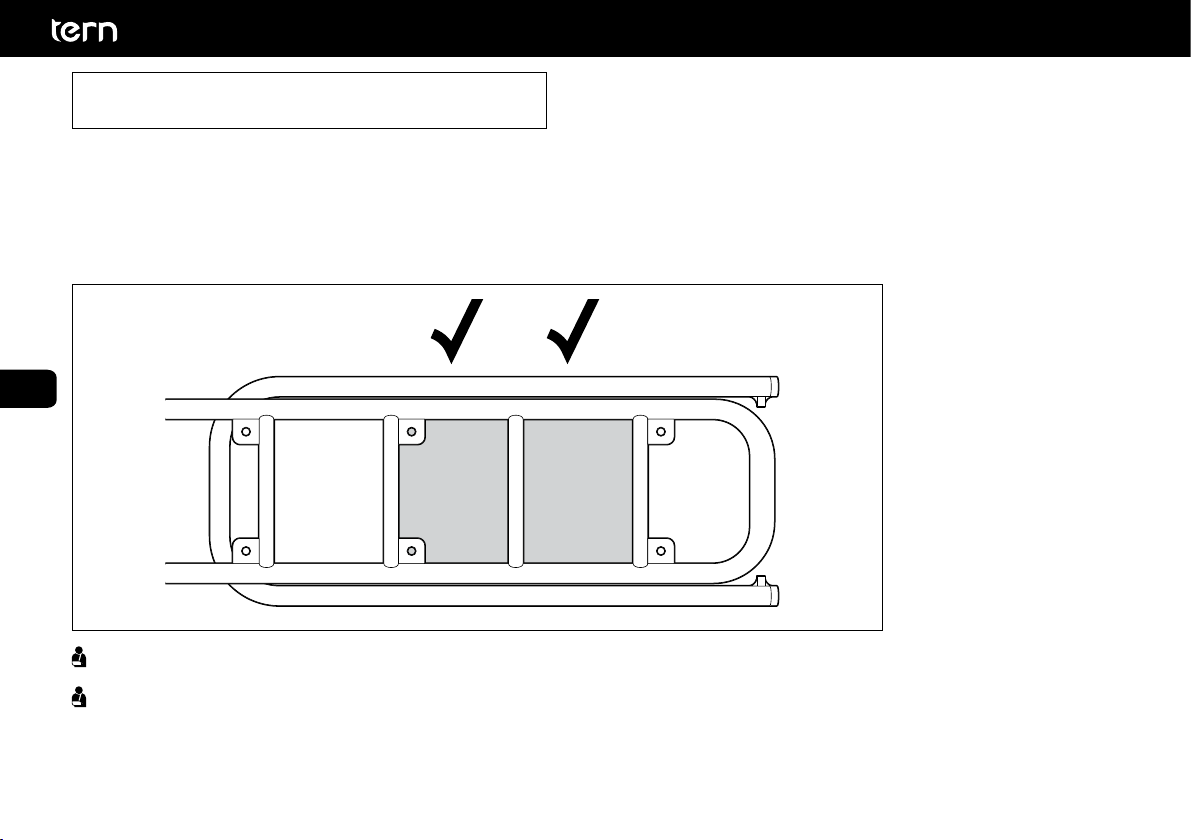
5. Child Seat Mounting
The HSD Rack is designed to mount a single approved child seat, such as the Thule Yepp Maxi or the Thule Yepp Nexxt Maxi.
As a general rule, place the child seat as forward as possible. Ensure the rider’s heel does not strike the child seat while pedaling.
The preferred placement for the Yepp Maxi child seat is Windows 1 on the Rack. If heel strike occurs, use Window 2. The
Nexxt Maxi child seat can be mounted along the length of Windows 1 and 2 in as forward position as possible.
Follow the installation instructions from the child seat manufacturer.
Do not accelerate hard, especially when going up steep hills to avoid front wheel lifting off ground
1 2
15
EN
ES
FR
IT
DE
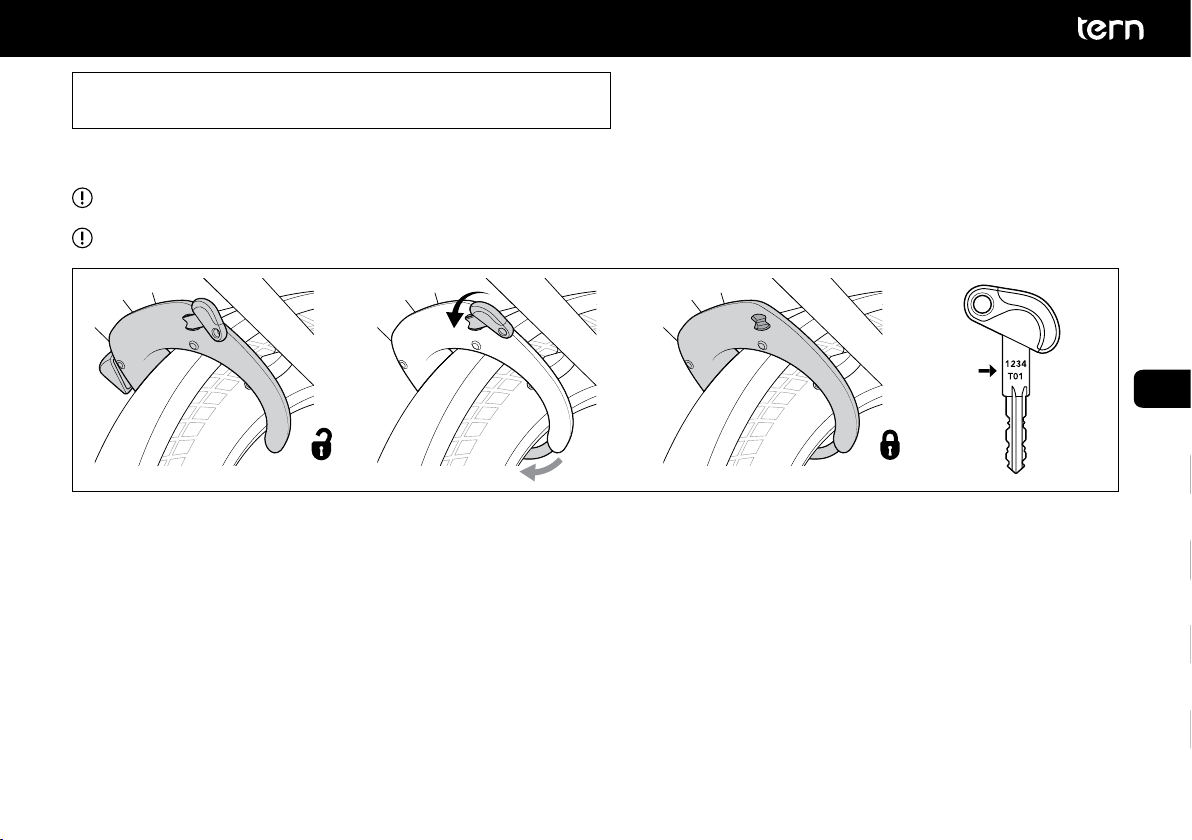
6. Frame and Battery Lock
This section applies to you if your model is equipped with a frame lock.
While frame locks can protect against unauthorized use of the bicycle, the use of a second lock is highly recommended.
Key cannot be removed from the frame lock while it’s unlocked.
The frame and battery locks are keyed alike, meaning the same key works for both locks. The key code
is written on a card that was originally supplied with the lock and on the key itself.
Please record the key number and/or store the key code card in a secure location in case you need to order a
replacement from the lock manufacturer. You will not be able to recover your locks if this information is missing.
Certain lock manufacturers allow registration of your locks online to provide better replacement service.
In case you are unable to retrieve your key and key code, you may take your HSD to the local Bosch dealer to retrieve
the key code from the Bosch controller. Note this information may not always be possible/available.
16
EN
ES
FR
IT
DE
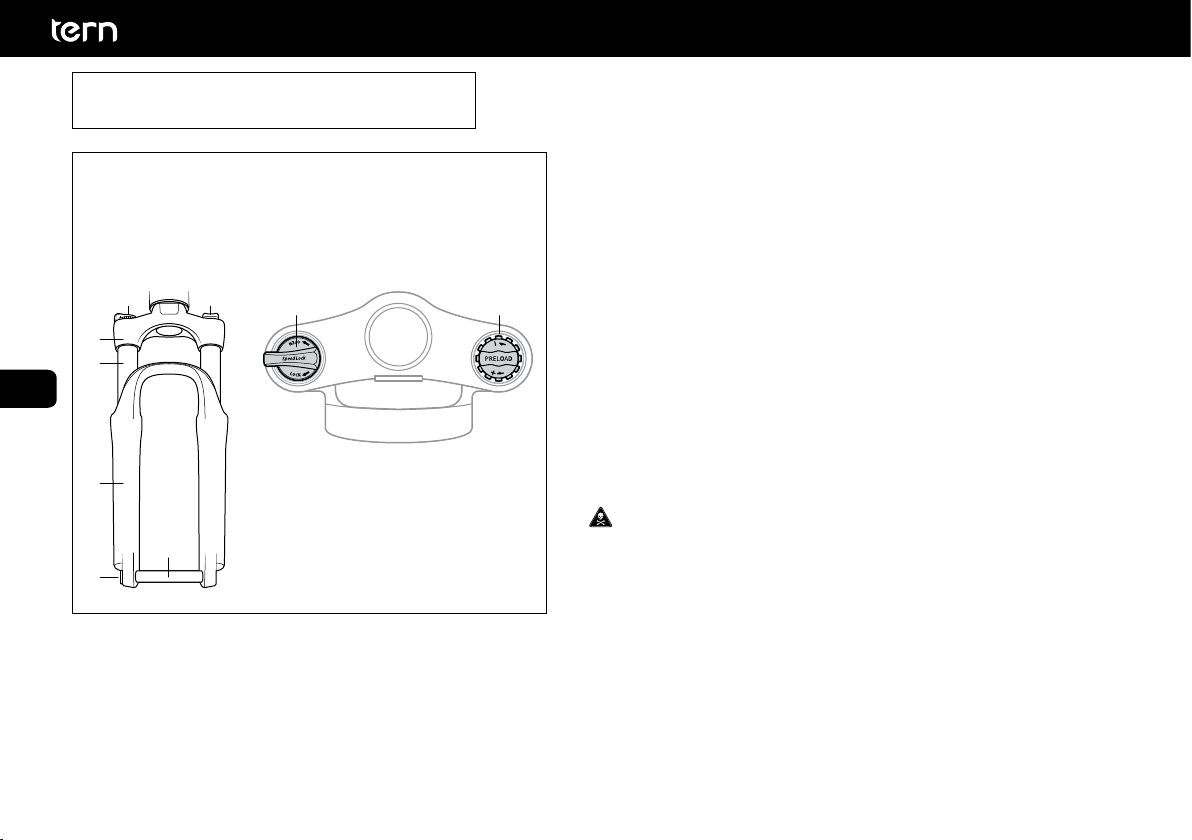
7. Suspension Fork Preload Adjuster
• The suspension can be tuned to the rider’s weight and
preferred riding style through the Preload Adjuster (2).
• This dial sets the preload compression of the
spring to the rider’s weight on the fork.
• Turn the Preload Adjuster knob (2) clockwise to increase the
spring preload and turn it counter-clockwise to reduce it.
Speed Lock Adjuster
• Turn the Speed Lock Adjuster knob (1) toward the
LOCK direction to disable suspension.
• You may desire this adjustment when riding on paved/smooth
surfaces or to improve pedal efficiency during uphill riding.
• Turn the Speed Lock Adjuster knob (1) to the
OPEN direction to enable suspension.
Tire Clearance
Your tire should not touch the fork under any circumstances.
Do not change your tires to a smaller or larger size. Inadequate
tire clearance will result in sudden and unexpected
loss of bicycle control, personal injury or death.
If your HSD is equipped with Suspension Fork, there are two
adjustments available.
3
6
1 2
4
5
7
1 2
1. Speed Lock Adjuster
2. Preload Adjuster
3. Crown
4. Stanchion
5. Slider
6. Thru Axle
7. Thru Axle Cap
Nomenclature of Parts

17
EN
ES
FR
IT
DE
Wheel Removal
The Tern HSD uses a thru-axle for the front wheel. Unscrew and pull out the thru-axle to release your wheel.
Tool required: M5 Allen Key
1 32
Loosen Thru Axle cap (7) on the drive
side with a 5 mm Allen wrench.
Remove wheel.Remove nut and pull out axle.
Do not press brake lever when the wheel is removed.
18
EN
ES
FR
IT
DE
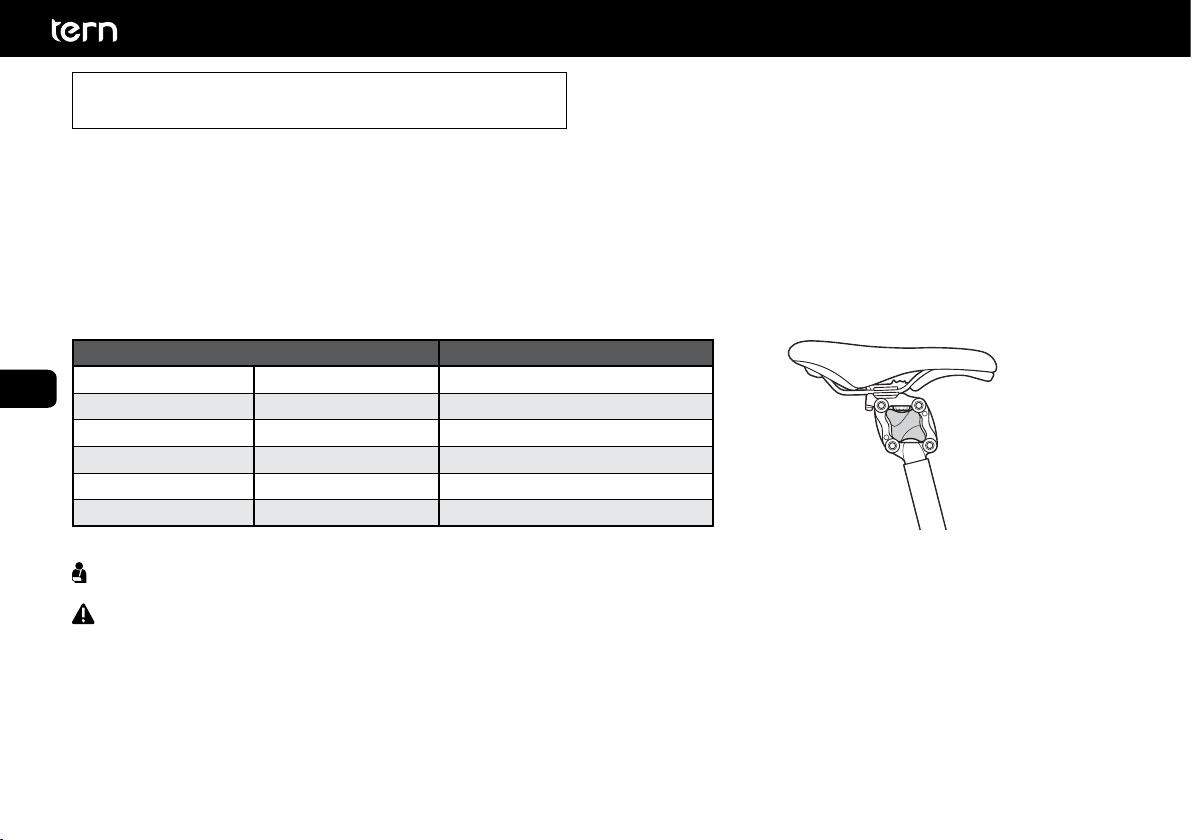
8. Suspension Seatpost
This section is for models equipped with the Thudbuster ST Suspension Seatpost.
The Thudbuster uses elastomers as a suspension element within a parallelogram
housing where the distance from the seat to pedal never changes.
Selecting Elastomers
The elastomer is made from natural rubber for its favorable damping characteristics and completely silent operation. To identify the
stiffness of elastomer, locate the number on the small dial that is molded into one side. 1 is extra-soft, 9 is extra firm and 5 is medium.
Cane Creek offers various elastomers for replacement. The Thudbuster must be set-up with appropriate elastomer before riding.
Rider Weight Minimum Elastomer Recommendation
(Kilograms) (Pounds)
Under 45 Under 100 Extra Soft - #1
45-64 100-140 Soft - #3
64-86 140-190 Medium - #5
86-114 190-250 Hard - #7
Over 114 Over 250 Exceeds post limit
Maximum allowable rider weight is 114 kg (250 lb). Never use a softer elastomer than recommended for your weight.
Periodically check elastomer for excessive wear and replace if necessary.
For details about changing elastomer, maintenance and precautions, refer to the Thudbuster instructions included with your HSD.
19
EN
ES
FR
IT
DE
9. Trailer Mounting
The kickstand mount on the chainstay has a 40 mm screw spacing and is compatible with aftermarket trailer kits, such as the Weber EH coupling.
Follow instructions given in all owner’s manuals provided with trailer kit.
Observe all load and speed limits provided by the trailer kit manufacturer.
20
EN
ES
FR
IT
DE
10. Belt Drive System
This section is for models equipped with the Gates Carbon Drive belt drive system.
Your HSD comes with Sliding Dropouts that offers 20 mm of adjustment. Once adjusted properly,
it’s possible to remove and slot back the rear wheel at the perfect tension.
The Positive Tension Screw prevents the Sliding Dropout from moving forward unintentionally.
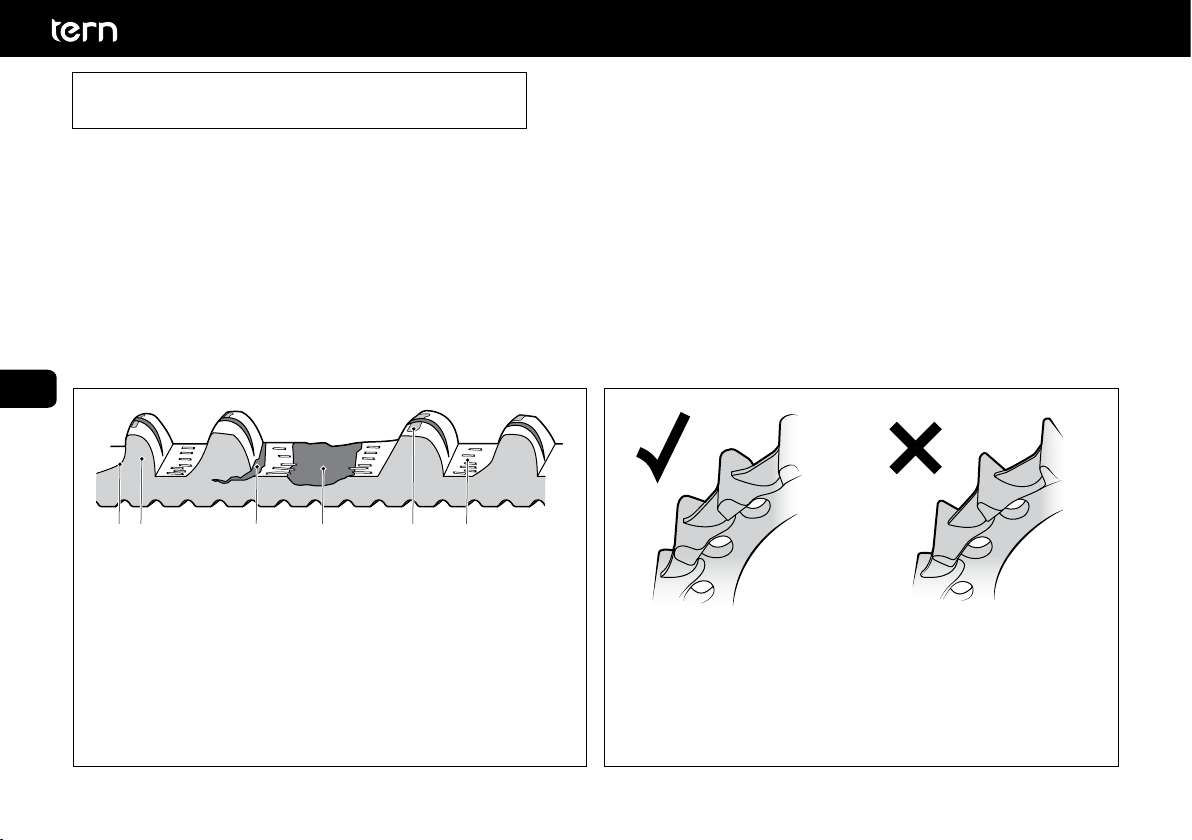
Visual Inspection
Periodically inspect the belt and sprocket for wear and tear. Take it to your dealer for a replacement if parts are worn as shown below.
2 3 4 5 61
1. Shark tooth
2. Not symmetrical
3. Cracks
4. Missing tooth
5. Fabric work with exposed polymer body
6. Carbon cords are exposed
This CenterTrack
Sprocket is in excellent
condition.
Replace your
CenterTrack Sprocket
when the teeth become
worn, as shown in the
illustration above.
Illustration source: Gates tech docs
Table of contents
Languages:
Other Tern Bicycle manuals


