VIVI Grandstream GXP2130 User manual

Grandstream GXP2130/2140/2160/2170 &
2135
User Guide

Contents
Connecting your new handset 4
How to add the feet to the phone
How to connect the network cable to the phone
How to connect the receiver to the handset
How to connect the power supply
Getting to know your new handset 7
Handset layout for 2130/2140/2160/2170/2135
Keypad buttons
LCD Coloured Display
Icons
How to make calls with your new handset 19
To dial from your new handset
To redial a number
To call a number from call history
Calling from the phone book
How to answer calls on your new handset 20
When a call comes in to your phone
Incoming Multiple calls
Putting the phone on DND mode
Phone function during a call 23
Call Waiting / Call Hold
How to mute the microphone
To transfer a caller
How to add BLF to your phone 28

Bluetooth 29
How to setup your Bluetooth Headset to the handset
How to use your Bluetooth Headset to make and receive calls
How to connect your handsfree device (mobile phone) to your handset and access
your mobile phone book from the handset
The Phone menu system 32
The Phone menu system - Keypad Conguration Menu
To Access the Web conguration
Faulty Handset and Replacement Part 36
Fault and Solutions 37

Connecting your new handset
When your phone arrives, please make sure that everything listed below is included.
GXP 2130/2140/2160/2170/2135 phone In the box
Base unit
Receiver
Curly Cord
Power Adaptor
Ethernet Cable
Base Stand
Grandstream Quick Start Guide
Firstly, insert the stand into the highlighted slots on the back of the phone. You can have the
stand two different ways. Either slide the hooks into the slots highlighted in red, or for a more
upright position, insert them in the slots highlighted in blue. Once you’ve inserted the stand, slide
it up to lock it in place
4

Now you need to connect the Ethernet cable from your Router/Switch to the LAN port on the
back of the phone, highlighted in red below. If you are limited on network ports, and need a con-
nection for your computer, then you connect an ethernet cable from the PC port of the phone to
your PC. The phone will then pass it’s connection through to your computer.
Next, connect the receiver to the red highlighted handset port. If you are connecting a headset
then use the port highlighted blue. The receiver and headsets ports use the same connector, so
make sure you use the correct ports otherwise they won’t work.
5

Once the receiver is connected you can power up your new handset. Insert the power cable into
the base unit and plug it in. The handset will power up and show a loading screen on the display.
6
Getting to know your new handset
There are three different versions of this handset, with slight changes in where the keys are on what
they do.. Below is the layout of the GXP 2130, on the next page the layout for the 2140, and on page
9 there is the layout for the GXP2160.
7
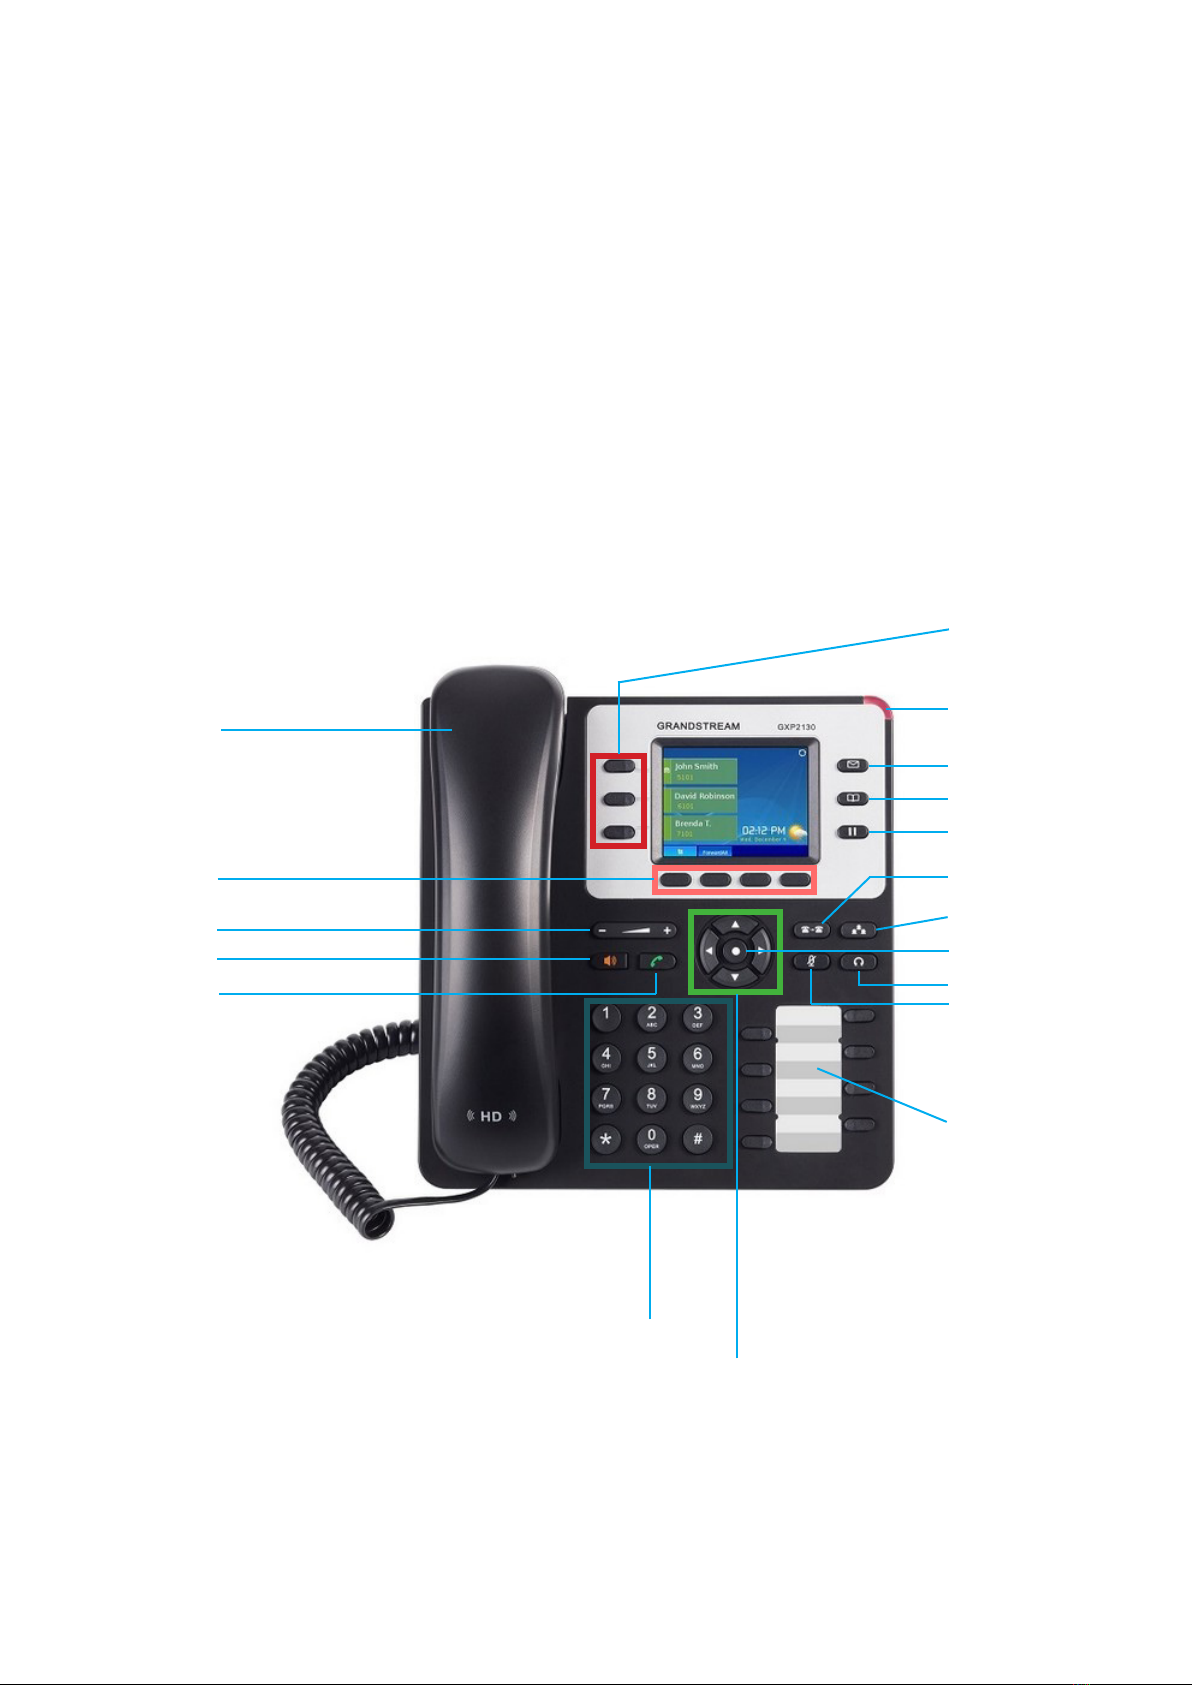
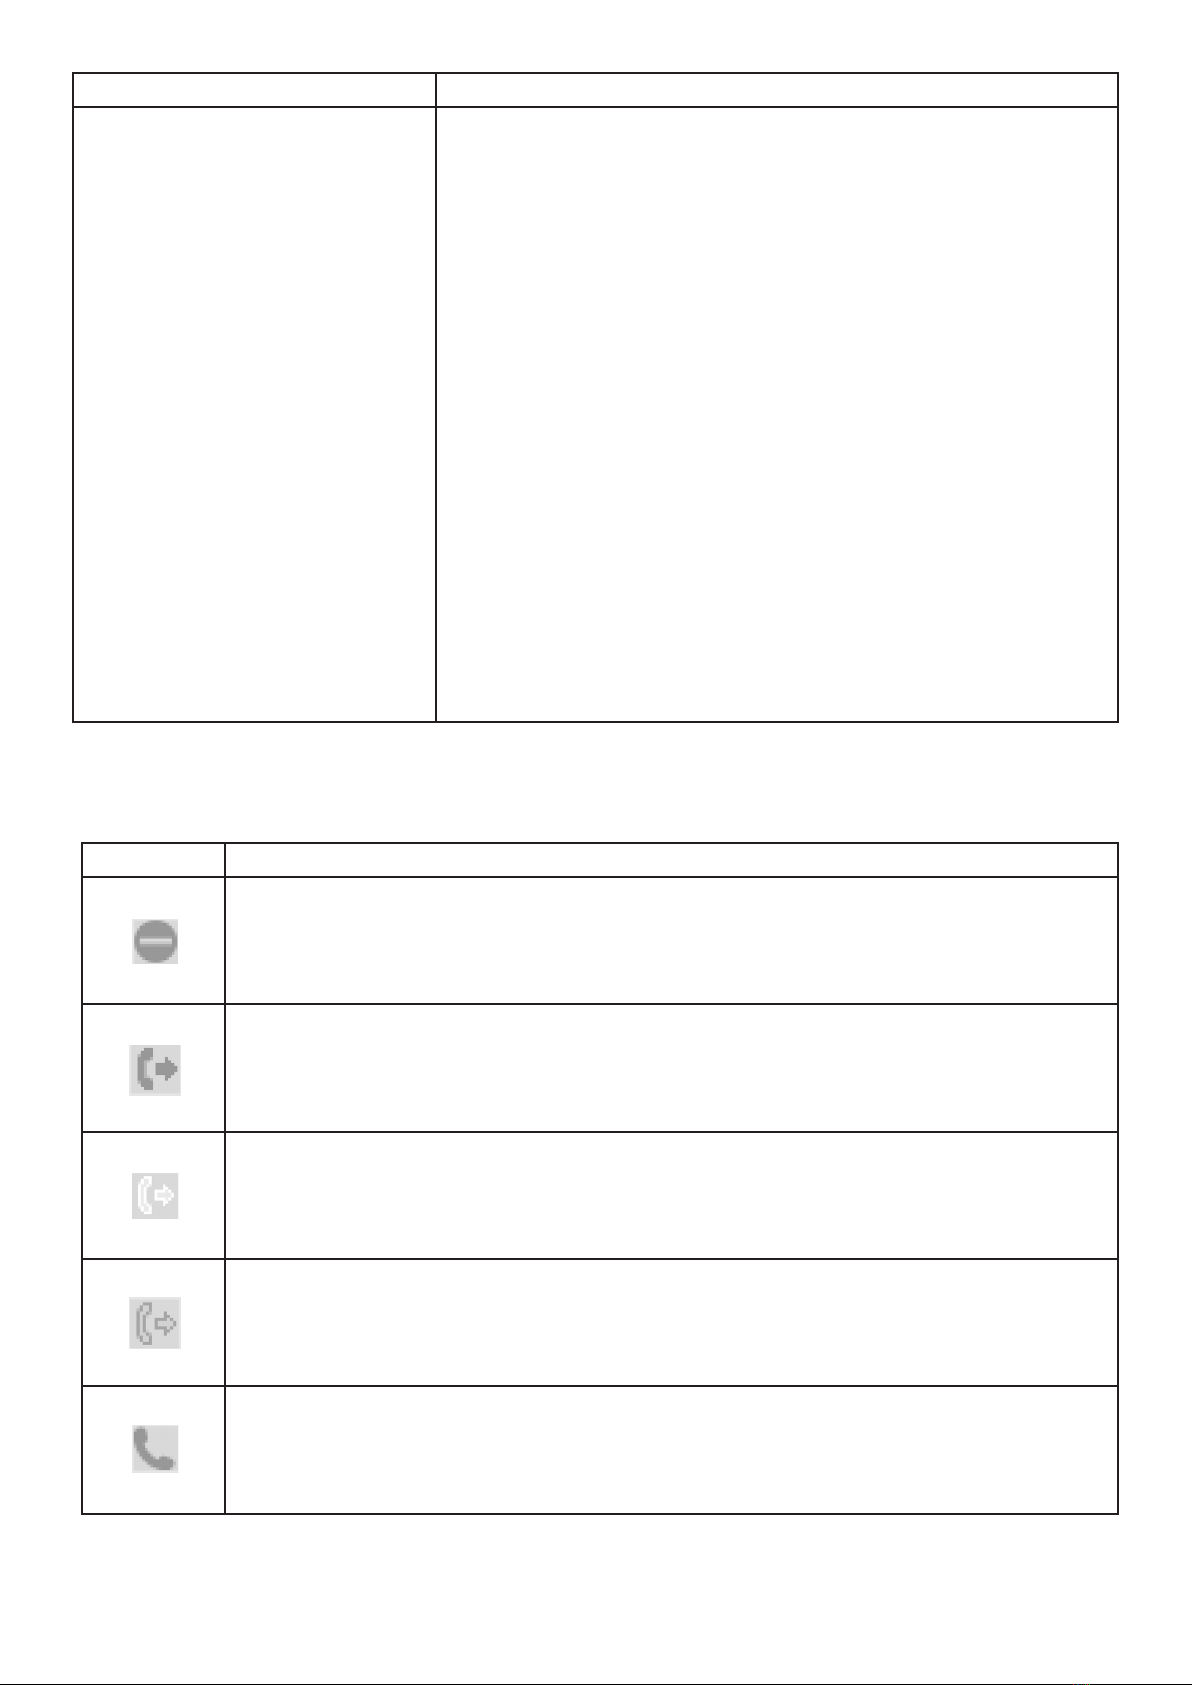
The Grandstream GXP2130 layout
Line Keys
Message Waiting
Indicator
Voicemail
Phone book
Soft keys
Conference
Receiver
Transfer
Hold
Menu/OK Key
Navigation Key
Volume
Keypad
Mute
Headset
Send the call
Speaker
BLF
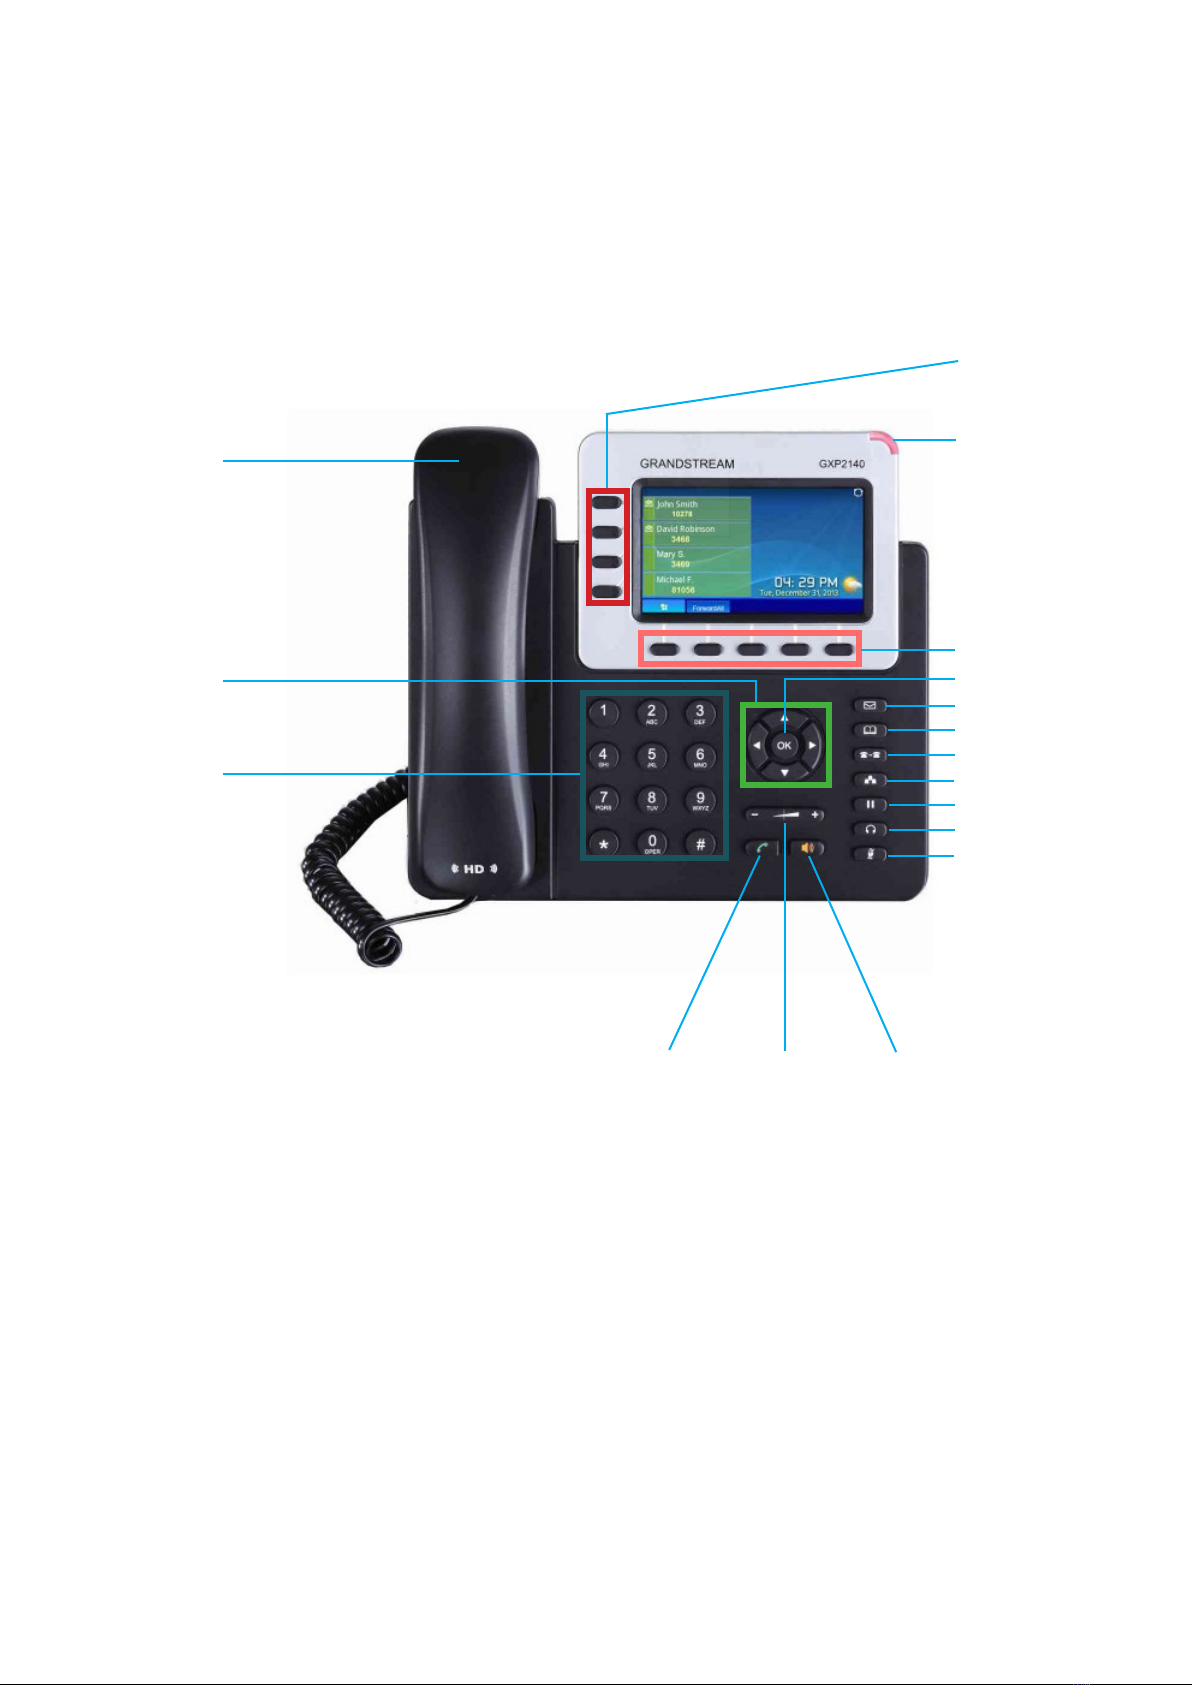
The Grandstream GXP2140 layout
8
Line Keys
Message Waiting
Indicator
Voicemail
Phone book
Soft keys
Conference
Receiver
Transfer
Hold
Menu/OK Key
Navigation Key
Volume
Keypad
Mute
Headset
Send the call Speaker

Line Keys
Message Waiting
Indicator
Voicemail
Phone book
BLF
Conference
Receiver
Transfer
Hold
Menu/OK Key
Navigation Key
Volume
Keypad
Mute
Headset
Send the call Speaker
The Grandstream GXP2160 layout
9
Soft keys
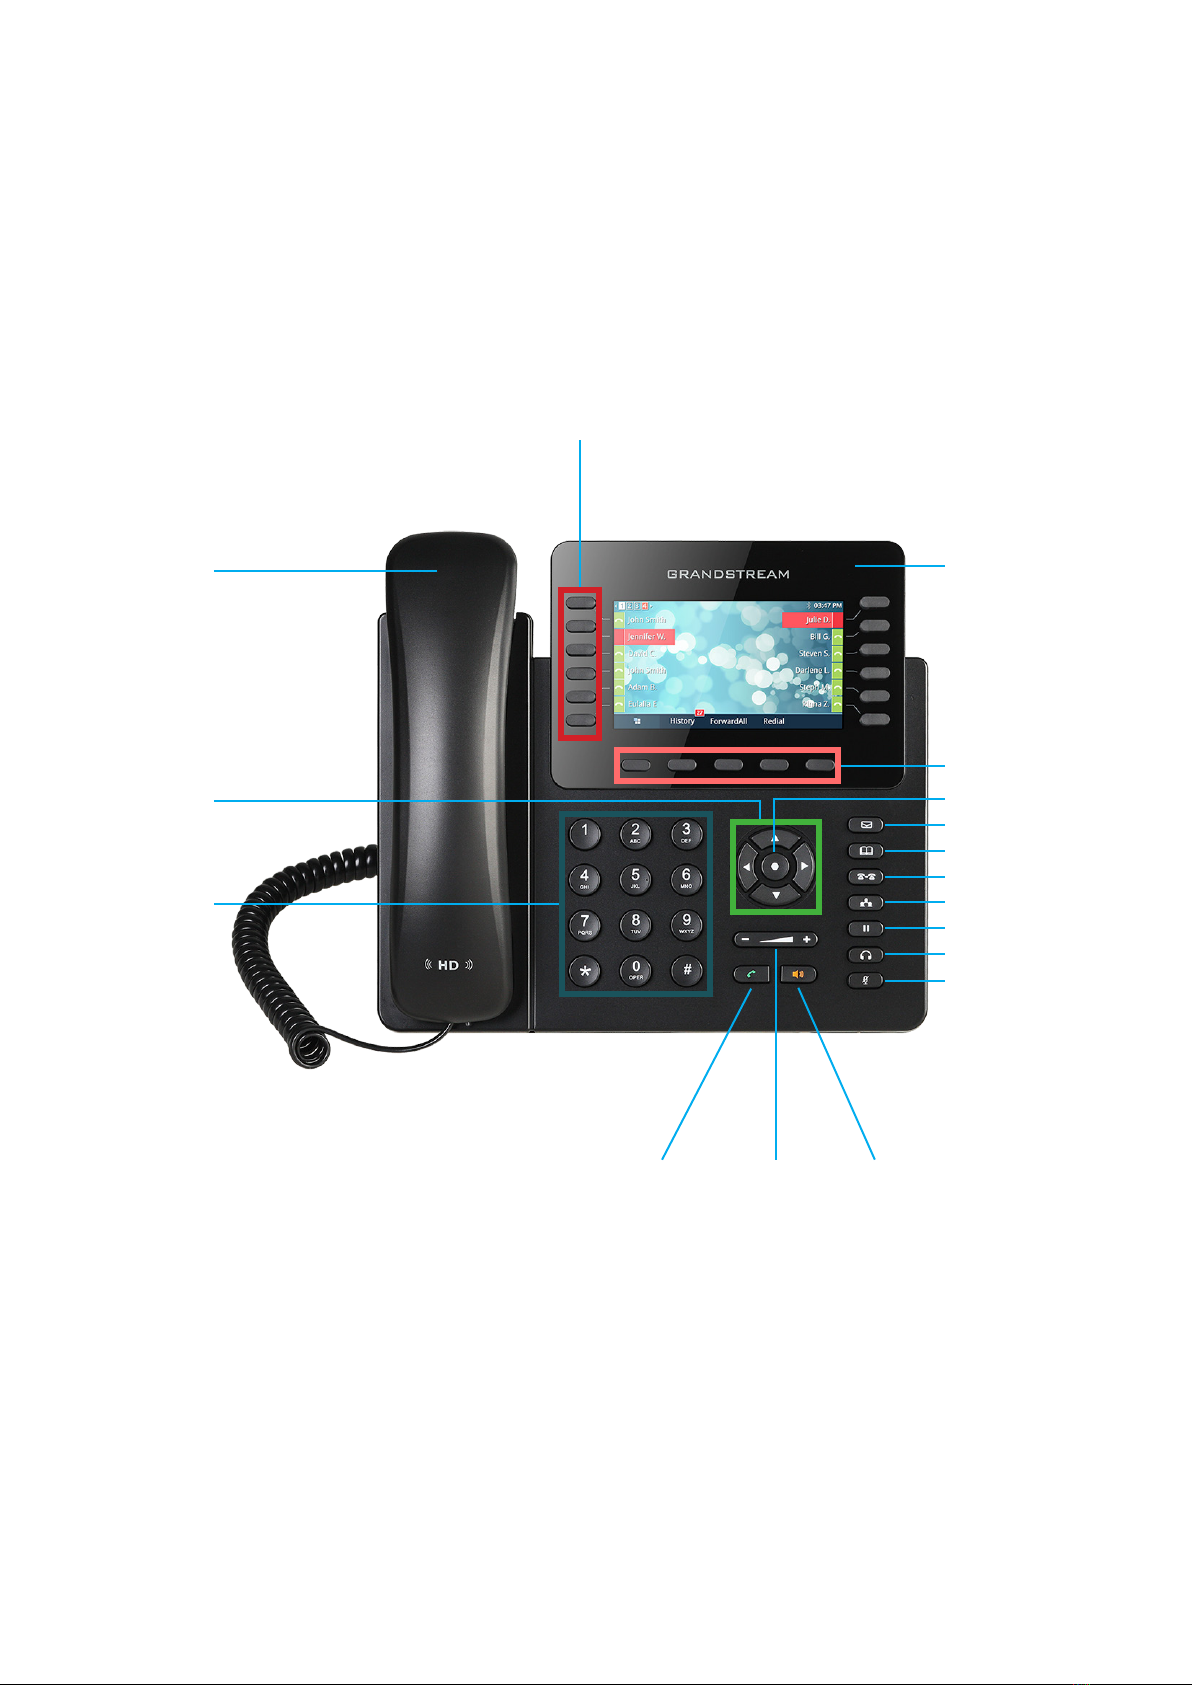
Line Keys
Message Waiting
Indicator
Voicemail
Phone book
Conference
Receiver
Transfer
Hold
Menu/OK Key
Navigation
Key
Volume
Keypad
Mute
Headset
Send the call Speaker
The Grandstream GXP2170 layout
Soft keys
10

Line Keys
Message Waiting
Indicator
Receiver
Navigation Key
Volume
Keypad
Send the call
Speaker
The Grandstream GXP2135 layout
Voicemail
Phone book
Conference
Transfer
Hold
Menu/OK Key
Mute
Headset
11

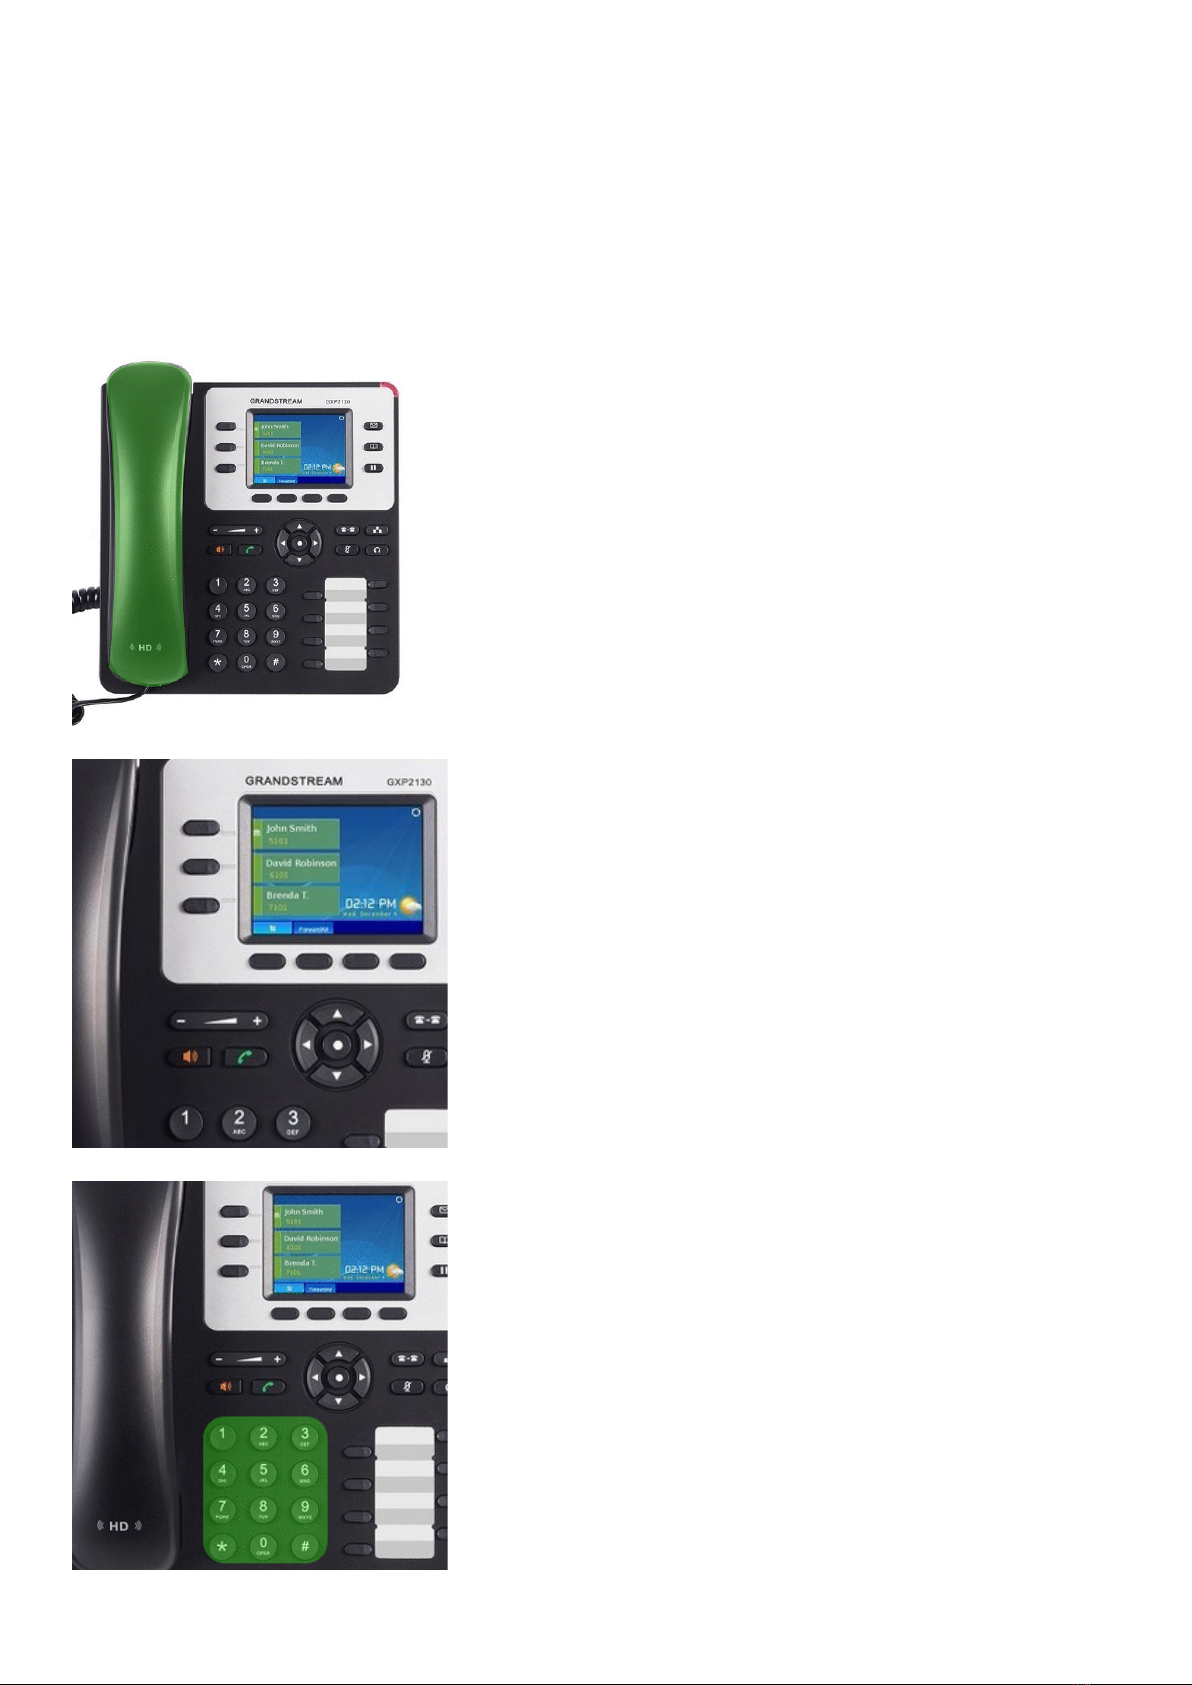
What do the keypad buttons do
Key Button What it does
0 - 9, * & # Standard phone keypad, You can use # to start a call after dialling a num-
ber.
Line Keys 2 Line keys with LED lights can be congured with your SIP accounts
Places the active call on hold
Transfer an active call to another number/handset
Press CONF to initiate a conference call
Check your Voicemail (if message waiting indicator is ashing)
Access the saved phonebook
Volume; increase or decrease the volume on an active call either on a re-
ceiver/speaker phone/headset, or the ring volume when not on a call
If using a headset press this key to answer or hang up calls. This also allows
the user to toggle between using a headset and the speaker.
Mute the active call
Enable/Disable hands-free speaker
Enable/Disable receiver mode - this mode can be used to dial
Menu. When you are not in active call press on the Menu/OK button to
access the menu.
While in the menu;
Press the UP/DOWN key to scroll through the options.
Press the LEFT key to go back to the previous menu
When phone is idle you can use the Navigation keypad to access missed
calls, dialled calls and answered calls:
Press the UP key to view IP address
12

13
Handset, Speaker phone and Headset mode
The Grandstream GXP 2130,2140,2160, 2170 and 2135 series has the ability to make/receive calls
via handset, speakerphone or headset mode. When on a call, you can switch from using the receiver
to speaker phone by pressing the speaker button. If you are using the speaker already, press the
button again with the receiver off the hook to switch back to using the receiver.
Sip Accounts and Lines
Your new Grandstream phone will have between 3 and 6 active lines on your handset, depending on
the model you have. If you take the phone off the hook the LCD display will show you which account
is active.
You can press the relevant line key before making a call to specify which line you would like to make
the call from.
If you have accounts on both lines, when an inbound call comes through the line that is ringing will
ash red. When you answer the call, the line will then turn solid red. The other line will remain open
for you to start another call or begin a transfer.
14
The LCD Coloured display
Your new Grandstream phone has a colourful LCD display which each series has a different screen
display depending if your phone is idle or active, your new Grandstream phone does have few icons
that you may want to get familiarise to yourself and also a few soft key menus that may help you if you
need to redial or if you need to nd IP address for your handset etc.
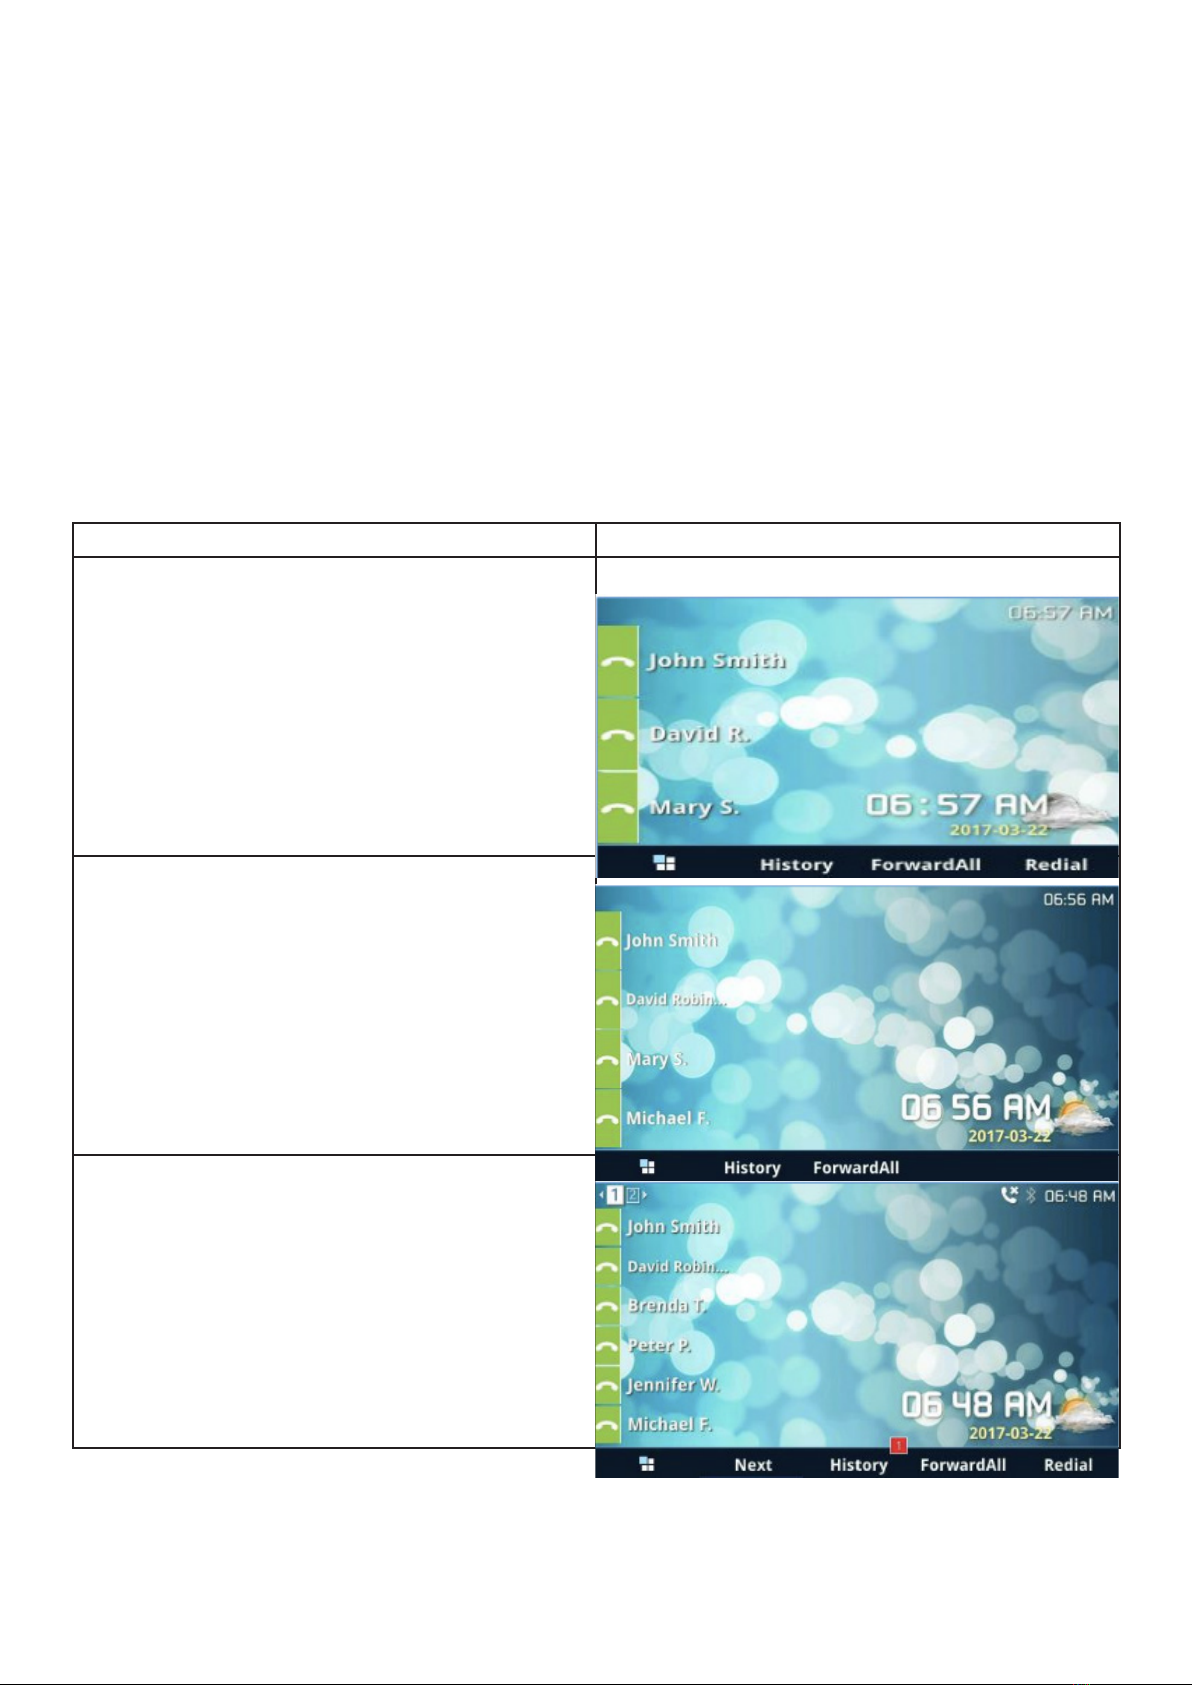
Below is what your screen would look like when the phone is idle. Please note that the line keys on the
right hand will show your active accounts, If the account is connected it will show green on the screen
and if it’s disconnected then it will show red. Also at the bottom are the softkey options for each hand-
set when the phone is idle.
Phone Model Idle Screen
2130
2140
2160

Phone Model Idle Screen
2170
2135
LCD Buttons Denition
Date and Time This will show the date and time when the phone is Idle - The phone
date and time will be congured to your web server on your system.
Name On the left hand side you should see your name of your handset
Network/Phone Status The network status will show of the status if the handset is down or has
an issues. If you received a missed call this will show on here also.
Status Bar This will show the status of the phone please look at LCD Icons table to
identify the issue with your handset
Soft keys when phone is Idle
The soft keys on the bottom of the screen will change if the phone is
active on a call or in idle, Some of the menus you will be able to choose
form are:
ForwardAll - This makes all calls that come to your handset be forward-
ed to another number or handset
History - This will show all call history and all answered calls, dialled
calls, missed calls and transferred calls.
NextSCR - On all Grandstream 2100 series phones this will show you
your IP address on the handset, account information and weather infor-
mation etc and upcoming events.
Redial - This will redial the previous number
15
LCD Buttons Denition
Soft keys when on a call
Please note the soft key is context sensitive and will change deepening on call
status
Redial - This will redial the previous number
Dial - Dials the call out when off hook and entering the number
Answer - Answers the inbound call when phone is ringing
Reject - If phone is ringing it will reject incoming call and will go to
voicemail
End Call - This will end the active call that you are on
Transfer - This show when you are on a active call, pressing the TRAN
button and dial the number. Once you have added the number you can
press the key again to do a blind transfer.
Split - This will redial the previous number
ConfCall - This will redial the previous number
Backspace - Will delete the last digit
On the next page are the LCD icons that may appear on your phone,
LCD Icon Denition
DND - ‘Do Not Disturb’ is enabled and no calls will come to your handset
Call Forward All Status- All calls that come to your handset be forwarded to
another number or handset
Call Forward Busy Status- All calls that come to your handset be forwarded to
another number or handset when your phone is busy (for example, on another call).
Call Forward No Answer Status- All calls that come to your handset be forwarded
to another number or handset if not answered
Handset Status - If you answer a call with the handset, this icon will show on the
right hand side of the screen. If the phone is idle this icon will show if the receiver is
off the hook
16
LCD Icon Denition
Headset Status - If you answer a call with a headset, this icon will show on the right
hand side of the screen. If the phone is idle this icon will show if the headset is off the
hook
Network Status - Your internet connection is down. You may need to reboot the
handset/router/network switch to get the handset to connect again.
Missed Call - You’ve had a missed call. Press the soft key to see who called you
Mute - if you press the mute button on the phone, the mute icon will show. This will
only work when you are on a call.
Bluetooth - Please see page 26 to connect a bluetooth device to the handset, If
bluetooth is on the icon will appear, and will then be highlighted once it connects to a
device.
USB Status - This is for models 2140 and 2160, If the USB is connected this icon will
show
Incoming and Outgoing Call - If you have an incoming call then the icon in top left
will appear and if you make an outgoing call the icon in top right will show
Call on Hold - if you press the hold button on the phone the call on hold icon will
show. This will only work when you are on a call.
LCD Brightness - If you increase the brightness then the icon in the top left will be
displayed, and if you decrease it, the icon in the top right will show.
Speaker Volume - If you press the volume key while on a call using the speaker-
phone, this indicator will show.
Handset Volume - If you press the volume key while on a call using the handset, this
indicator will show.
17

LCD Icon Denition
Ringtone Volume - If you press the volume key while not on a call, this indicator will
show the volume incoming calls will ring on the handset.
Turn over the page to see how to make calls with your new handset.
18
How to make calls with your new hand-
set
To dial from your new handset
First pick up the receiver
Once the receiver is picked up the rst line will go active - If
you need to dial from the second VOIP account then press
the second line button below
Dial the number and then press the send key or dial key to
start the call.
19

To redial a number
First pick up the receiver by taking off the hook.
Press the redial softkey and the number or extension you last dialled will start to ring.
20
This manual suits for next models
4
Table of contents
Other VIVI IP Phone manuals

Popular IP Phone manuals by other brands

Yeastar Technology
Yeastar Technology Fanvil Configuration guide

Cisco
Cisco 7902G - Unified IP Phone VoIP quick start guide

Yeaster
Yeaster N720 DECT IP Multicell System Configuration guide

Cisco
Cisco 7931G - Unified IP Phone VoIP Administration guide

Cisco
Cisco 7925G - Unified Wireless IP Phone VoIP Installing guide

Cisco
Cisco 7945 Series quick start guide


