VM EMOVE RoadRunner Pro User manual

EMOVE RoadRunner Pro Seated
Electric Scooter User Manual
High Performance Vehicle Designed by VoroMotors
Product Contents
The package will include:
●EMOVE RoadRunner Pro (1)
●Foot pegs (2)
●Stem adapter (1)
●Charging adapter (1)
●Toolkit (1)
Product Dimensions and Details
Distributed by and property of VoroMotors 1

Weight and Dimensions (Length x Width x Height)
Scooter dimensions: 56.7" x 30.7" x 43.3" / 144 cm x 77.9 cm x 109.9 cm
Scooter weight (with battery): 114.4 lbs / 51.9 kg
Standalone battery weight: 21 lbs / 9.4 kg
Seat dimensions: 20” x 7.8” x 3.5” / 51 cm x 20 x 9 cm
Handlebar width: 30.7” / 77.9 cm
Ground to handlebar height: 43.3” / 109.9 cm
Distributed by and property of VoroMotors 2

Scooter Cockpit Introduction
The VoroMotors TFT display is controlled by the rubber button console on top of the
handlebars. There is an M (Mode) button, directional (+/-) buttons, and a power
button. This is the main button console that powers on the scooter.
The headlight, turn signals and horn are controlled by the rubber button console
facing the seat. There are green indicator lights beneath the left and right buttons to
remind you the signals are engaged. The taillight includes LEDs that act as both the
turn signals and brake light. Please keep in mind that when the brakes are applied,
turn signals will not also respond (e.g., only brake light or turn signals will display).
The Domino twist grip throttle is mounted on the right handlebar and is
cable-operated. The throttle is the full width of the handgrip, which you twist to
accelerate. The brake lever on the left engages the rear hydraulic brakes; the lever
on the right engages the front hydraulic brakes.
Adjustable handlebar height: The RoadRunner Pro has a unique stem adapter with
height rings, that allow you to set the handlebars slightly higher or lower. To make the
handlebars lower, remove the rings. To keep the handlebars at their tallest height,
keep all rings installed.
Distributed by and property of VoroMotors 3

Product Use
How to Assemble the EMOVE RoadRunner Pro
Tools: Multitool, scissors, stand (optional)
Parts: Scooter, foot pegs, stem adapter, battery, multitool
Unbox the Scooter
1. Remove the foam inserts on top to make it easier to pull the scooter out of the box.
2. The foot pegs (2), stem adaptor (1), and multitool (1) are enclosed in one of the
foam inserts. The battery will also be separately packaged in the box.
3. We suggest that you get assistance from one other person to help you lift the
scooter out of the box rather than cutting it open.
a. NOTE: You should save the box and packing materials. These will come in handy if
you need to store or ship the scooter.
4. Stand the scooter upright on its kickstand or place it on a scooter stand.
5. Locate the stem adaptor. Using the multitool, remove the two screws at the
bottom of the adapter.
Assemble the Scooter
1. Slide the stem adapter over the stem on the frontend. Position the adapter so the
logo is facing outward. Replace the two screws and tighten the adapter in place.
2. From the center, remove the long metal post and stem adapter cap. Around the
adapter, you’ll notice solid metal rings (black). You can remove some of these
rings if you want to position the handlebars lower on the stem.
3. Next, use scissors to cut the zip tie securing the handlebars to the scooter.
4. Slot the handlebars over the stem adapter with the display facing the seat.
5. Slide the long metal post down the center of the stem, and secure the stem
adapter cap in place with your multitool.
6. Make sure the handlebars are centered (not askew to left/right from seated
position).
7. Using the multitool, tighten the two screws that secure the handlebars to the stem.
8. Now that the handlebars are attached, you can reposition the TFT display so that
it’s easy for you to see from a seated position.
9. Using the multitool, loosen and retighten the two screws on the frontside of the
handlebars to rotate the screen up or down. Check that the screw on the rear of
the display is tight.
10. Using scissors, cut the zip ties along the handlebars to remove the protective
foam.
Distributed by and property of VoroMotors 4

11. Using the multitool, check the screws for the throttle, brake levers, and button
consoles to make sure they are secure and the components are in the position
that you like for riding.
12. Remove protective coverings from the display and seat.
Install the Foot Pegs
1. Locate the foot pegs (2). Find the bolt and nut on either side of the frame.
2. Remove the locking plate from the pegs by removing the two screws.
3. Loosen the nut and remove the locking pin (this can be thrown away), and slide
the foot peg over the peg axel.
4. The foot peg should be attached so that it folds up at the joint (not down).
5. Put the nut on and tighten in place.
a. Note: you may need a secondary 14mm wrench to to tighten the nuts in place.
6. Take the locking plate and install it on the peg, like it was originally from the box.
7. Repeat the process on the other side.
How to Remove/Replace the Battery
1. First, locate the battery (with keys) in the center of the frame.
2. Unlatch the locking pin to unlock the top battery door. Make sure the door is clear
of the battery, so you can slide it free.
3. Grab the battery by the handle and brace your other hand on the scooter for
leverage.
4. Slide the battery on the track and out through the back to remove it from the
scooter.
5. Lock the locking mechanism.
a. Note: this will be tight the first few times until it settles with the battery.
6. To replace the battery, reverse the process.
7. When sliding onto the track, make sure the battery is fully seated against the plug
at the bottom.
8. The top battery tray should snug up against the battery.
9. Use the keys to lock it in place.
a. NOTE: The keys secure the battery in place and do not act as a security measure for
the entire scooter (no alarm or electrical features). The keys are scooter/battery
specific; if you purchase a spare battery, you’ll have two unique sets of keys.
b. Please take care of the keys as we will not be providing any duplicate keys. If you
are extra cautious, please have spare keys made post-purchase to ensure that
you have a spare.
Distributed by and property of VoroMotors 5

How to Charge
Once your scooter is assembled, start charging.
1. Plug the charging adapter into a power supply, preferably a grounded electrical
socket. When powered, the indicator light on the adapter will glow green.
2. Locate the charging port on the right side of the battery (near the rear right spring
suspension).
a. Note: You can keep the battery mounted in the scooter or remove it for
charging.
3. Open the charging port cover. Firmly press the plug into the port.
4. When the adapter is connected, the indicator light on the adapter will glow red.
5. When the device has reached full charge, the indicator light will glow green.
6. Remove the adapter upon full charge.*
7. Replace the charging port cover.
8. Unplug the adapter from the power supply.
9. Get ready to ride!
*NOTE: It is very important to properly charge and care for the battery in your scooter as it is the
most volatile component; misuse can have destructive consequences. However, the EMOVE
RoadRunner Pro battery and charging adapter have a very safe configuration and BMS, so you can
leave the scooter plugged into power even when it is fully charged without worrying.
How to Power On/Off
1. To power on the scooter, press the Power button on the top of the button console.
2. When on, the TFT display will light up and the twist throttle will respond to
movement.
3. To power off the scooter, press the Power button. The display should turn off.
NOTE: The key in the battery does NOT control power; it locks the battery in place only.
Distributed by and property of VoroMotors 6

How to Use the VoroMotors TFT Display
The VoroMotors TFT display is controlled by the button console on the top of the left
handlebar. This console has a mode (M) button, directional buttons (+/-) and a power
button.
1. Power on the display and the scooter by pressing the power button on the button
console. When you power on the scooter, this is what the primary display will look
like.
2. On the primary display, you can view the time, remaining battery power and
voltage, temperature for the front and rear motors, status of motors (on/off),
wattage of the motors, speedometer, and assist parameter settings or speed
settings.
Distributed by and property of VoroMotors 7

3. When you press the mode button, the readout will shift to the secondary display,
which provides cumulative details, like trip mileage, total mileage, trip duration,
average speed, and max speed.
4. To access the main menu settings, double-click the mode button.
5. The screen will display the following options:
a. Brightness (1: dimmest, 5: highest)
b. Clock (date, time (24-hr military time only))
c. System
■Unit system (Metric / Imperial)
■Power system (60V)
■Temperature protection (Celsius only (℃))
■Zero Start (Yes: zero start / No: kick start)
■Power indicate (Voltage: battery voltage / Percent: battery bar)
d. Auto off (1-60 mins)
e. Wheel (14.0 inch, do not change)
f. Advance settings (password protected, see next section)
g. Battery (displays current information for battery)
■Voltage
■Capacity
■Cycle Time
■Temperature
■Last Uncharge Time
■Remain Capacity
■Full Capacity
h. Factory setting (returns scooter to factory settings)
Distributed by and property of VoroMotors 8

i. Password (setting password protection)
j. Informations (displays information from trip)
■Average Speed
■Max Speed
■Trip (record)
■Odometer
■Hardware version
■Software version
6. Update settings using the button console. Use the directional buttons to toggle
through features, and press mode to select the feature. You can tell which feature
you are on because the icon will be green (otherwise blue). You cycle through the
icons from left to right.
a. Once you have selected the feature you want to change, use the
directional buttons to increase/decrease values.
b. Press the mode button to save and exit back to the main menu.
7. From the main information screen, you can reset the trip information displayed
on the screen. To reset the Average Speed, Max Speed, and Trip details, long-press
the directional buttons (+/-) simultaneously.
8. From the main information screen, long-press the mode (M) button to switch
between single and dual motor modes. When dual motor mode is engaged, you’ll
see a red rocket icon on the display and the interface colorways will shift.
a. For single motor mode, the display will show a single color around the
speedometer
b. For dual motor mode, the display will show colored rings to indicate the
increasing speed (green: low, orange: mid, red: high).
Distributed by and property of VoroMotors 9
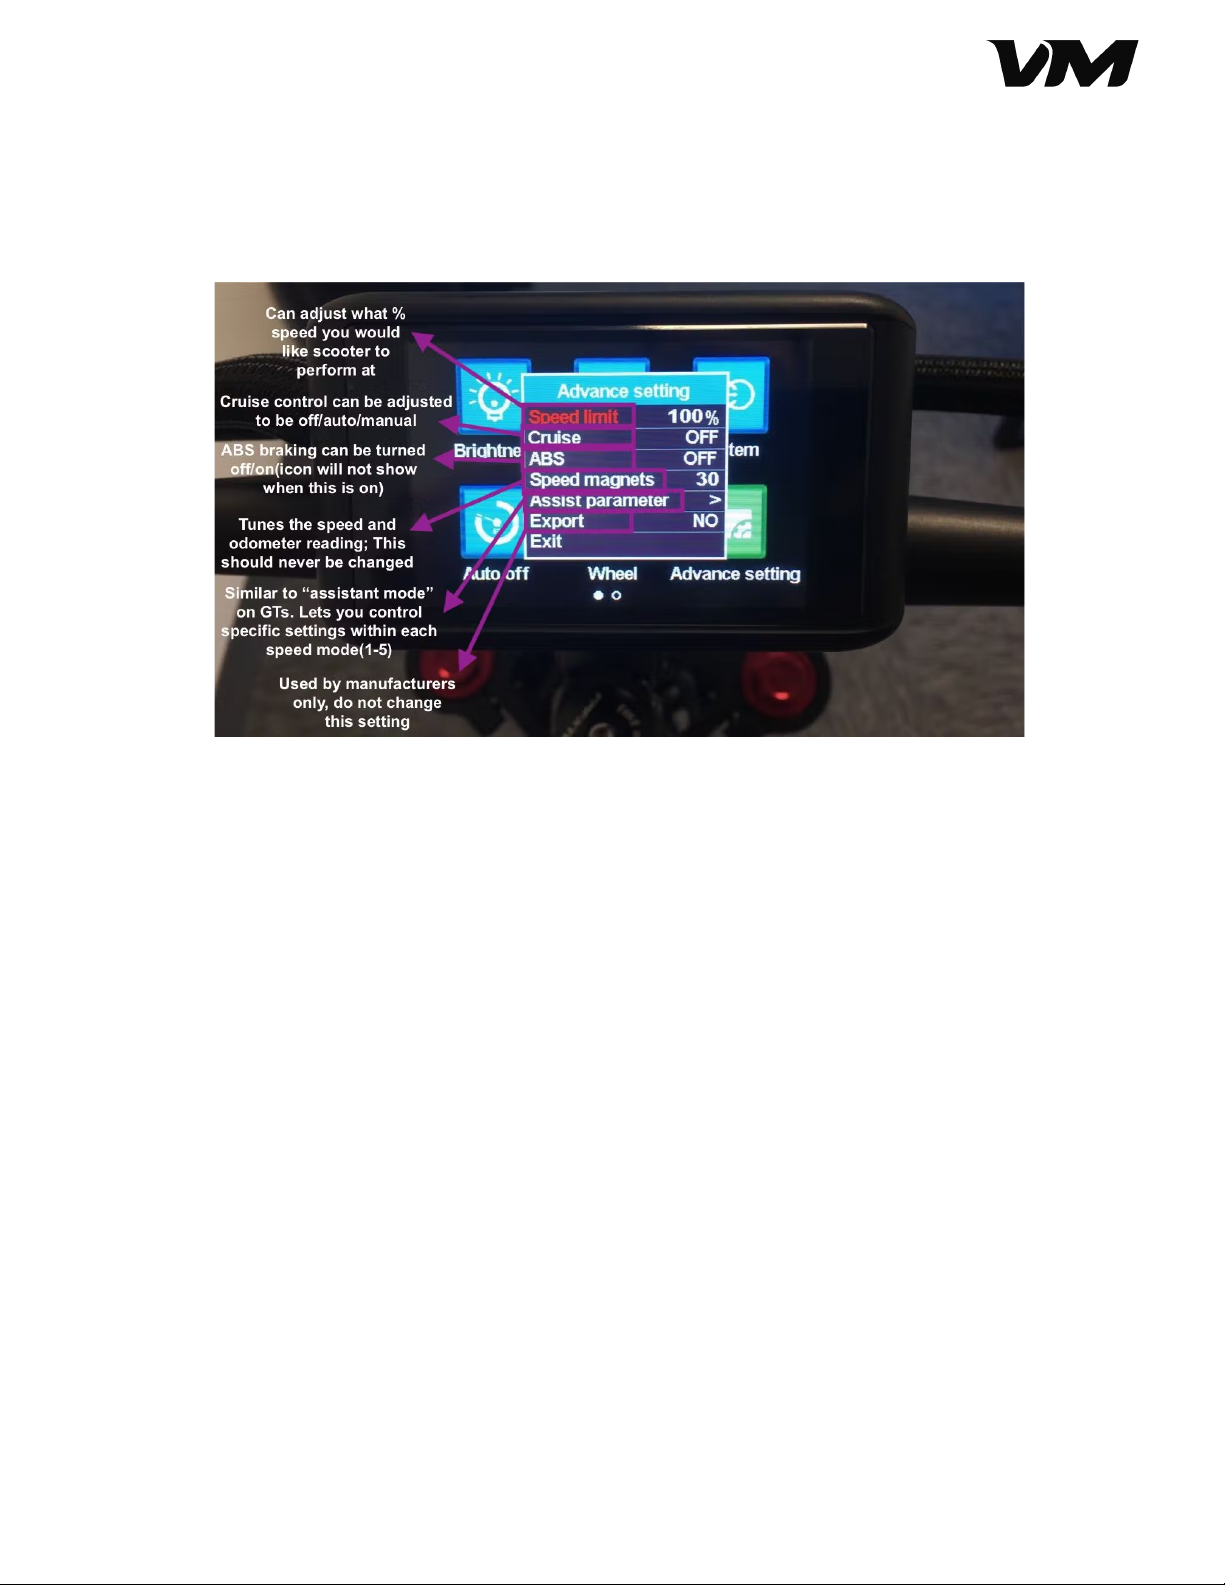
VoroMotors Advance Settings
The advance settings (also known as performance or p-settings) allow you to customize
the display and configuration of the device.
1. To access the P-settings, start with the display on.
2. Double-click the mode button to access the main menu.
3. Scroll through the features using the directional buttons until you find Advance
setting.
4. Press the mode button to select Advance setting.
5. A password interface will pop-up. You must enter a 4-digit password to continue.
a. The default password is 2112.
6. In the Advance setting, you can access the following:
a. Speed limit (0-100%, default 100%)
b. Cruise control (On/Off)
c. Anti-lock braking ABS (On/Off)
d. Speed magnets (30, do not change)
e. Assist parameter (Riding Profile settings)
f. Export
7. To toggle between settings, use the directional buttons. Use mode to select the
Advance setting, directional buttons to adjust the value, and mode to save and
exit.
Distributed by and property of VoroMotors 10

Assist Parameter/Speed Mode Settings
In Advance setting, you can select from five profiles, which have default parameters for
speed, braking, and power to the motors. Try the default settings first to see how they
feel, then you can customize these Assist Parameters or Speed Modes to your preference.
Speed Limit: 20% (very limited speed) / 100% (unlimited speed)
EABS level: 1 (lowest response) / 5 (highest response)
Start level: 2 (lowest start power) / 5 (highest start power)
Current level: 15 (lowest) / 45 (highest)
Here are the default values for the Assist Levels.
Level
Settings
Assist 1
Walking Mode
Speed limit: 20%
EABS level: 1
F start level: 2
R start level: 2
F current: 15
R current: 15
Assist 2
Snail Mode
Speed limit: 40%
EABS level: 2
F start level: 2
R start level: 2
F current: 20
R current: 20
Assist 3
Cruise Mode
Speed limit: 60%
EABS level: 3
F start level: 3
R start level: 3
F current: 30
R current: 30
Assist 4
VORO Mode
Speed limit: 80%
EABS level: 4
F start level: 4
R start level: 5
F current: 35
R current: 35
Assist 5
Rage Mode
Speed limit: 100%
EABS level: 5
F start level: 5
R start level: 5
F current: 45
R current: 45
Distributed by and property of VoroMotors 11

Error Codes
The following are common error codes and solutions.
Error Code
Error
Solution
Error 1
Motor phase wire fault
Check motor phase wires from the motor axle all the
way to the controller. Check that there are no exposed,
loose or damaged connections or cabling.
Error 2
Motor hall sensor fault
Check motor hall sensor wires from the motor axle all
the way to the controller. Check that there are no
exposed, loose or damaged connections or cabling.
Error 3
Throttle fault
Check the throttle cable for a loose connection or
damage and see if the error goes away. If not, the
sensor box may be faulty and need replacement.
Error 4
Under voltage fault
Check the battery voltage and the system settings to
ensure they are set correctly. If it is below working
voltage range, you may receive this error.
Error 5
Controller fault
Check the display to determine which controller is
faulty. Will likely require replacement.
Error 6
Instrument fault
Check if the TFT display, button console, cables and
connections are not damaged and seated correctly.
Error 7
Over temperature fault
Immediately stop using the scooter and let it cool for
awhile until the error subsides. This is a temperature
over-protection feature to ensure the scooter doesn’t
get too hot.
Distributed by and property of VoroMotors 12

Riding Safety Guidelines and Restrictions
1. Comply with local laws. Research and follow the rules related to electric scooter
use in your region. It is illegal to ride on the sidewalk in most areas, so it’s
important to understand what’s allowable where you will be riding.
2. Practice in private before riding in public. It’s important to gain experience and
get comfortable with the controls before driving around other small electric
vehicles, bicycles, pedestrians, and large vehicles.
3. No impaired or tandem riding. Stability and center of gravity will be thrown off if
there is more than one person on the deck. Do not ride tandem and do not ride
when you are mentally or physically impaired beyond being able to control the
vehicle.
4. Do not brake suddenly. To avoid flying over the handlebars accidentally, avoid
slamming on the brakes in the event of an emergency. Instead, gradually
compress both brakes and give yourself ample stopping room when driving.
5. Do not accelerate down steep slopes. To avoid losing control, avoid riding down
steep slopes and do not accelerate while going down hill. We recommend
covering the brakes with both hands so they’re at the ready if you need to stop.
Safety Precautions and Care
1. Avoid exposure to water. The product and components are not waterproof (even
when IP rated). Keep the product out of water. Do not use it if the road is wet due
to rain, snow, or hail. Do not ride in the rain. If washed with too much liquid, it can
impact and damage electrical components.
2. Don’t tune yourself. Be careful of tuning, swapping or adjusting any component
on the scooter for which you do not have experience. For example, do not attempt
to tune the tension on the throttle cable to make the response more/less sensitive.
If you do not reassemble correctly, it could result in damage to the product, your
property, and/or injury to you. Please take caution and seek guidance from our
team before attempting any modifications.
3. Beware of folding and spinning parts. Get familiar with your electric scooter and
how all the components work. Observe how the throttle, brake levers, battery and
other parts work, so you know how to avoid getting anything caught in areas that
would disrupt the scooter’s operation and/or harm you (like the throttle cable and
mechanism under the seat).
4. Take precautions when lifting. Learn how to safely maneuver your scooter
through spaces, up and down stairs, and so on. When lifting, keep in mind that you
may need assistance as it is over 100 lbs.
5. Store in dry and cool conditions. Avoid exposure to wet environments and
extreme temperatures.
Distributed by and property of VoroMotors 13

Li-Ion Battery Care
Unlike with other lithium ion batteries and charging adapters, you can safely leave your
electric scooter charging overnight without worrying. However, you should still keep these
tips in mind to maintain your battery health for as long as possible.
●Don’t rapidly charge or discharge the battery within 1 hour. Habitually using a
fast charger or riding at max speed until the battery is completely dead will
degrade your battery. For best battery health, use the standard charger and try
not to burn through your battery in under 1 hour.
●Don’t fully charge the battery before and after riding. Optimally, ride your scooter
when the battery is between 30% and 80%. Operating within this range can
elongate battery life dramatically. There’s no need to top your battery to 100% if
you have enough charge to get where you need to go.
●Don’t charge your battery in freezing temperatures. Charging your scooter
when temps are below 32℉ is not recommended as it can greatly reduce your
capacity. It’s ideal to charge when the temperature is between 33℉ and 113℉.
●Don’t store your scooter when the battery power is 0% or 100%. Store it at around
80% capacity for best long-term storage results. Make sure to check your scooter
periodically if you have electronics that slowly drain the battery (like security
features).
Distributed by and property of VoroMotors 14

VoroMotors Limited Warranty Policy
I. GENERAL TERMS. At VoroMotors (“VORO”), we offer standard limited warranties for our products in
addition to offering in-store service and self-guided maintenance options, so we can take care of
you and your electric scooters.
By purchasing a product through VORO and/or its dealers, you are confirming that you have read
and understood this limited warranty policy and understand your responsibilities to maintain the
electric scooter.
II. WARRANTY PERIOD. All new EMOVE, Kaabo, and Dualtron electric scooters purchased through
VORO and its dealers come with a standard one (1) year limited warranty.
All refurbished electric scooters come with a standard six (6) month limited warranty unless
otherwise stated on the product page.
If you prefer a longer warranty period, you can purchase an extended warranty policy to increase
your term for 1, 2, or 3 additional years.
We limit the duration and remedies of all implied warranties, including without limitation the
warranties of merchantability and fitness for a particular purpose to the duration of this express
limited warranty as stated above.
Some states do not allow limitations on how long an implied warranty lasts, so the above
limitation may not apply to you.
III. RIGHT TO AMEND WARRANTY POLICY. VORO reserves the right to adjust, amend, and update this
warranty policy at any given time without prior notice. The current revision of the Limited Warranty
Policy is effective December 1, 2021.
IV. RIGHTS UNDER STATE LAW. This limited warranty gives you specific legal rights and you may
also have other rights, which vary from state to state.
V. WARRANTY AVAILABLE ONLINE. The limited warranty can also be found online at
www.voromotors.com/pages/warranty and in the documentation we provide with the product.
VI. WEIGHT ALLOWANCES. We warrant that the VORO products are to be used expressly as electric
scooters supporting the following maximum weights: 330 lbs for EMOVE RoadRunner Pro electric
scooter.
VORO products cannot be used to support weight tolerances above those listed above. Our limited
warranty will be void if the VORO product is subjected to conditions outside of the weight tolerance
as a part of improper use.
VII. WHAT THIS WARRANTY COVERS. We warrant that during the warranty period, the product will
be free from defects in materials and workmanship starting from the time of purchase.This
limited warranty is based under the specific conditions that our products are used as directed in
its instructions. This coverage includes replacement or repair of the following original
manufacturer parts (OEM) with restrictions:
●Motor(s);
●Battery;
●Controller;
●Voltmeter;
●LCD display, only at initial receiving of the VORO product; or
●Throttle.
Distributed by and property of VoroMotors 15

You may only make a warranty claim for individual parts once during the coverage period. For
example, VORO will replace the motor under warranty the first time failure occurs, but subsequent
motor replacements within the warranty period are at the cost of the customer.
Additionally, all electric scooters have recommended use and max load restrictions, with
estimated performance using an average rider of 150 lbs. Although most scooters can carry 220
lbs or more, taller, heavier riders will experience limited performance ability and can tax the
scooter's system. If VORO discovers that components of the electric scooter are repeatedly failing
because it is overloaded, VORO reserves the right to refuse subsequent claims for the same
components.
VIII. WHAT THIS WARRANTY DOES NOT COVER.Both our 1 year limited warranty and 6 month limited
warranty do NOT provide coverage for replacement or repair of the following:
●Frame, lights, and button consoles
●Screws, nuts, bolts, safety pins, and other similar small components
●Products that are used as rental units, for commercial use, or in competition
●Damage or failure due to:
○Aging, normal use, wear and tear, or use of improper cleaning solvents or
chemicals;
○Overexposure to water, heat or cold (e.g., left outdoors);
○Improper use and damage from accidents;
○Negligence;
○Improper storage,
○Improper care during shipping.
●Damage or repair of any third-party accessories or parts.
Proper maintenance, use and storage are essential when owning an electric scooter. For
example, if the scooter is left in storage and the battery drains completely, it may degrade so
badly that it can no longer hold charge. If the scooter is not properly maintained or stored causing
components to fail, that is not covered by the warranty.
Additionally, the following actions will void the warranty:
●Unapproved modifications to the product*
●Weather-related damage (water, heat/sun exposure)
●Incorrect use, incorrect repairs or diagnosis made by the customer or a
non-VORO technician or any other third party.
*Electric scooter modifications include hardware and software changes to the product outside
the spectrum of basic maintenance and can be done by professional technicians or individual
owners. Modifications completed by VoroMotors do not void the warranty. Modifications
completed by the owner (DIY) with or without guidance from VoroMotors void the warranty.
Please note that the warranty does not cover labor costs, shipping costs or reimbursement for
inconvenience during repair or incidental damage of other property related to repairs unless
otherwise discussed in this warranty policy.
IX. UPGRADES.The warranty does not cover upgrades to parts during repair (for example, if the
original motor is 600W and you want to upgrade to 1000W, it would not be covered under warranty
and would be an additional charge).
X. RESPONSIBILITY FOR DEFECTIVE GOODS. OUR RESPONSIBILITY FOR DEFECTIVE GOODS IS LIMITED
TO REPAIR OR REPLACEMENT OR REFUND AS DESCRIBED BELOW.
Distributed by and property of VoroMotors 16

XI. WHO MAY USE THIS WARRANTY?VORO is located at 14350 Arminta Street, Panorama City, CA
91402 and VORO ("we") extend this limited warranty only to the consumer who originally purchased
the product ("you"). It does not extend to any subsequent owner or other transferee of the product.
XII. WHAT ARE YOUR REMEDIES UNDER THIS WARRANTY?With respect to any defective product
during the Warranty Period, we will, in our sole discretion either: (a) repair or replace such product
(or the defective part) free of charge or (b) refund the purchase price of such product.
XIII. WARRANTY CLAIM RESTRICTIONS.Both our 1 year limited warranty and 6 month limited
warranty on new and refurbished units respectively include the following restrictions, which limit
and/or void your ability to make a claim:
1. The warranty becomes active on the date of purchase of the product. If you
purchased a VORO product with a 1 year limited warranty on January 15, 2021, it
will be valid until January 15, 2022.
2. The warranty is non-transferable and non-renewable. If you acquire a VORO
product from a private seller, the warranty does not transfer to you. If you are a
private owner of a VORO product and sell it to someone else within your warranty
period, your warranty is void.
3. The warranty is void if the VORO product has been subjected to improper use
including but not limited to subjecting the VORO product above the maximum
weight tolerance for the product purchased and any of the issues listed in
Section VII of this warranty.
VORO reserves the right to determine eligibility of products for warranty claim. Claims for
manufacturing defects of parts will be solely determined by VORO’s professional technicians.
Claims may be denied if damages reported are not manufacturing defects but due to misuse
and/or improper care.
VORO reserves the rights to deny or void any new or existing warranty claims if VORO has provided
5 or more complimentary replacement parts/repairs and has provided reasonable care to the
customer throughout the warranty coverage period.
XIV. HOW DO YOU OBTAIN WARRANTY SERVICE?
VORO provides repair for products given they qualify for service:
1. To receive service under warranty, the product must be purchased directly from
the VORO website (www.voromotors.com). You must have a valid sales receipt. If
you purchased the product from one of our dealers, your warranty is registered
with them, and you should make warranty claims directly.
2. The product cannot have been used for rental, commercial, or competition
purposes.
3. Warranty claims made by customers in the continental United States within 30
days of delivery are eligible for replacement parts, cost of labor for repairs, and
outbound shipping at no additional charge.
4. Warranty claims made by customers in the continental United States after 30
days of delivery are eligible for replacement parts at no additional charge, but
customers are responsible for the cost of labor for repairs and any outbound and
inbound shipping fees.
5. Warranty claims made by international customers and customers in Alaska and
Hawaii within 30 days of delivery are eligible for replacement parts and cost of
Distributed by and property of VoroMotors 17

labor for repairs at no additional charge, but are responsible for any outbound
and inbound shipping fees.
6. Warranty claims made by international customers and customers in Alaska and
Hawaii after 30 days of delivery are eligible for replacement parts at no
additional charge, but are responsible for the cost of labor for repairs and any
outbound and inbound shipping fees.
7. If a chargeback is initiated on any purchase, VORO reserves the rights to deny or
void any new or existing warranty.
8. The product must be within warranty period and ridden less than 10,000 miles to
qualify for a warranty service claim.
XV. WARRANTY CLAIMS PROCESS. Visit the claims page. Attach relevant videos, images and order
information. It is important to be as detailed as possible. Failure to provide any supporting
documentation as requested may lead to a denied warranty claim.
Within 1-3 business days, you will receive instructions and/or follow-up questions for warranty
claims. Depending on the repair, you may be able to complete the service yourself with technical
guidance or will be instructed to ship the scooter to VORO for professional repair.
XVI. REPAIR PROCESS.We want your downtime to be as short as possible, so we offer two options
when you make a warranty claim: parts replacement (DIY) or repair service (professional).
Parts Replacement VORO will ship necessary replacement parts and
components to you and provide guided assistance through written tutorials,
videos, email, and phone/video calls. If the claim is made within 30 days of
purchase, all costs are absorbed by VORO (including shipping parts from us to
you (outbound) or of the scooter from you to us (inbound)). If the claim is
made after 30 days of purchase, shipping costs are transferred to the
customer.
Repair Service (at VORO) For customers in the continental United States, if
your warranty claim is deemed valid but you do not feel equipped to make the
repairs yourself within the first 30 days of purchase, VORO can arrange repair
service and will cover inbound/outbound shipping, labor cost and parts. You
are responsible for any incurred cost due to taxes, unforeseen part
replacements and/or other third party costs. If you are near either of our VORO
locations (Los Angeles, CA or New York City, NY), you can bring the product in
during operating hours for service to avoid shipping charges. If you arrange
repair service after the first 30 days of purchase, VORO will cover cost of parts
but you are responsible for cost of labor, inbound/outbound shipping, any
incurred cost due to taxes, unforeseen part replacements and/or other third
party costs.
For international customers and customers in Alaska and Hawaii,if your
warranty claim is deemed valid but you do not feel equipped to make the
repairs yourself within the first 30 days of purchase, VORO can arrange repair
service and will cover the cost of parts and labor. You are responsible for
inbound/outbound shipping, any incurred cost due to taxes, unforeseen part
replacements and/or other third party costs. If you arrange repair service after
the first 30 days of purchase, VORO will cover cost of parts but you are
Distributed by and property of VoroMotors 18

responsible for cost of labor, inbound/outbound shipping, any incurred cost
due to taxes, unforeseen part replacements and/or other third party costs.
XVII. PURCHASER’S RESPONSIBILITY.As the device’s owner, you are responsible for the performance
and maintenance of your device. You may be denied a warranty claim if routine maintenance
cannot be determined. In particular, you may be denied warranty coverage if your device or a
component part has failed due to abuse, neglect, improper maintenance, or unapproved
modifications. Routine maintenance includes but is not limited to checking and replacing brake
pads, brake rotors, tires, inner tubes (when applicable), tightening and/or replacing screws, proper
charging and storage, and so on. Some of these component parts should be routinely checked
and replaced based on the owner's usage and are not constructed or intended to last the lifetime
of the device.
XVIII. LIMITATION OF LIABILITY
THE REMEDIES DESCRIBED ABOVE ARE YOUR SOLE AND EXCLUSIVE REMEDIES AND OUR ENTIRE
LIABILITY FOR ANY BREACH OF THIS LIMITED WARRANTY. OUR LIABILITY SHALL UNDER NO
CIRCUMSTANCES EXCEED THE ACTUAL AMOUNT PAID BY YOU FOR THE DEFECTIVE PRODUCT, NOR
SHALL WE UNDER ANY CIRCUMSTANCES BE LIABLE FOR ANY CONSEQUENTIAL, INCIDENTAL, SPECIAL
OR PUNITIVE DAMAGES OR LOSSES, WHETHER DIRECT OR INDIRECT.
SOME STATES DO NOT ALLOW THE EXCLUSION OR LIMITATION OF INCIDENTAL OR CONSEQUENTIAL
DAMAGES, SO THE ABOVE LIMITATION OR EXCLUSION MAY NOT APPLY TO YOU. PLEASE CONSULT
WITH VORO SHOULD YOU REQUIRE ADDITIONAL INFORMATION.
Distributed by and property of VoroMotors 19

EMOVE RoadRunner Pro Specifications
Feature
Specification
Notes
Motor
2000W (2) BLDC
8000W Max power
VM plug-and-play motor design
Battery
60V 30Ah LG M50LT
21700 battery
1800 Wh battery capacity
Standalone battery weight: 21 lbs / 9.4 kg
Controller
45A sine wave (2)
Product Weight
114.4 lbs / 51.9 kg
Max Load
330 lbs / 180 kg
Tested at 390 lbs load on flat ground and uphill
Charging Adapter
3.5A XLR
1 standard charging adapter included
Charging Time
10.4 hours
1 charging port
Max Speed
50 mph / 82 km/h
Mileage
50 miles / 82 km
Gradeability
30 degrees
Dimensions
56.7" x 30.7" x 43.3"
Height of handlebars is adjustable
Metal rings around stem adapter can be
added/removed to change height of handlebars
Instrument Panel
VoroMotors TFT display
3.5” screen
Not anti-glare, not touchscreen
Seat
Heat-wicking fabric
Seat dimensions:
20” x 7.9” x 3.5” / 51 cm x 20 cm x 9 cm
Tires
14” x 2.75” tubeless
Pneumatic, street profile
Recommended tire pressure: 40 PSI, rated for 330 LBS
Brakes
Dual-piston hydraulic (dual)
Zoom disc brakes, 160 mm rotor
Suspension
Front: Dual Crown Hydraulic
Rear: Dual Spring
Not adjustable
Horn
None
Lights
Moto headlight, U-shaped
taillight with turn signals
Lights controlled by button console
Headlight color: white
Taillight/Signal color: orange
Distributed by and property of VoroMotors 20
Table of contents


