VOLTA VM4 User manual

TRICYCLE USER MANUAL
www.volta.com.tr
Please, read this manual thoroughly before using your tricycle.

PREFACE
This product is designed environment-friendly. You will see advantag-
es and characteristics of the product in this manual. This manual has
safety, maintenance and storage instructions. The high-technology
tricycle you have purchased has the following parts:
• Ecient brushless DC motor
• Digital drive head with display protecting from high and low voltage
• Coast brake for safe drive
• High-capacity batteries for longer range and high performance
• Front and rear suspensions for a pleasing and comfortable drive
• Motorcycle equipment complying with European standards
This manual of your tricycle will be an indispensable part of it. Make
sure that you get it with your tricycle.
If, there is any problem with your tricycle, never use any part other
than originals provided by an authorized service.
This manual is prepared for electric tricycles of Volta Motor. Images
and technical specifications in the manual might not be identical with
your tricycle. Main purpose of this manual is to promote the product
and ensure safe operation.
Thank you for choosing our product. Wish you pleasing and safe drives
with your electric tricycle.

- Laws restrict driving electric tricycles with age and driver's license. Drivers with a driver's
license in any class can safely use the electric tricycle. Please, pay attention that the per-
sons to drive it have a driver's license. (In some European countries, they can be driven
with special certificates.)
- Do not change, remove or modify any part without notifying the authorized service.
Changes without authorization of the authorized service distorts originality of your prod-
uct and nullify product guarantee. Please, do all changes at authorized service locations.
- Modification is not legal. Main structure, performance of modified vehicles is influenced.
This will also shorten the life of your tricycle. Furthermore, modified tricycles will be out of
guarantee. Always use spare parts authorized by the distributor.
- This manual is supplied with the product.
CAUTION
WARNING - These headings are written for preventing fatal accidents and personal in-
juries.
ATTENTION -These headings are written for preventing you from severe personal inju-
ries and mechanical damages

www.volta.com.tr
4
TABLE OF CONTENTS
Preface ...................................................................................................................02
1. Devices and Accessories ..............................................................................05
2. Displays ............................................................................................09
3. Charging the Battery .....................................................................................13
4. Driving Instructions .........................................................................................15
5. Instructions for a Safe Drive ..............................................................................18
6. Maintenance and Care ..................................................................................21
7. Storage Guide .......................................................................................26
8. Troubleshooting ................................................................................................27
9. Technical Specifications .................................................................28
10. Authorized Service ·············································································29
11. Guarantee ·······························································································30
www.volta.com.tr 5
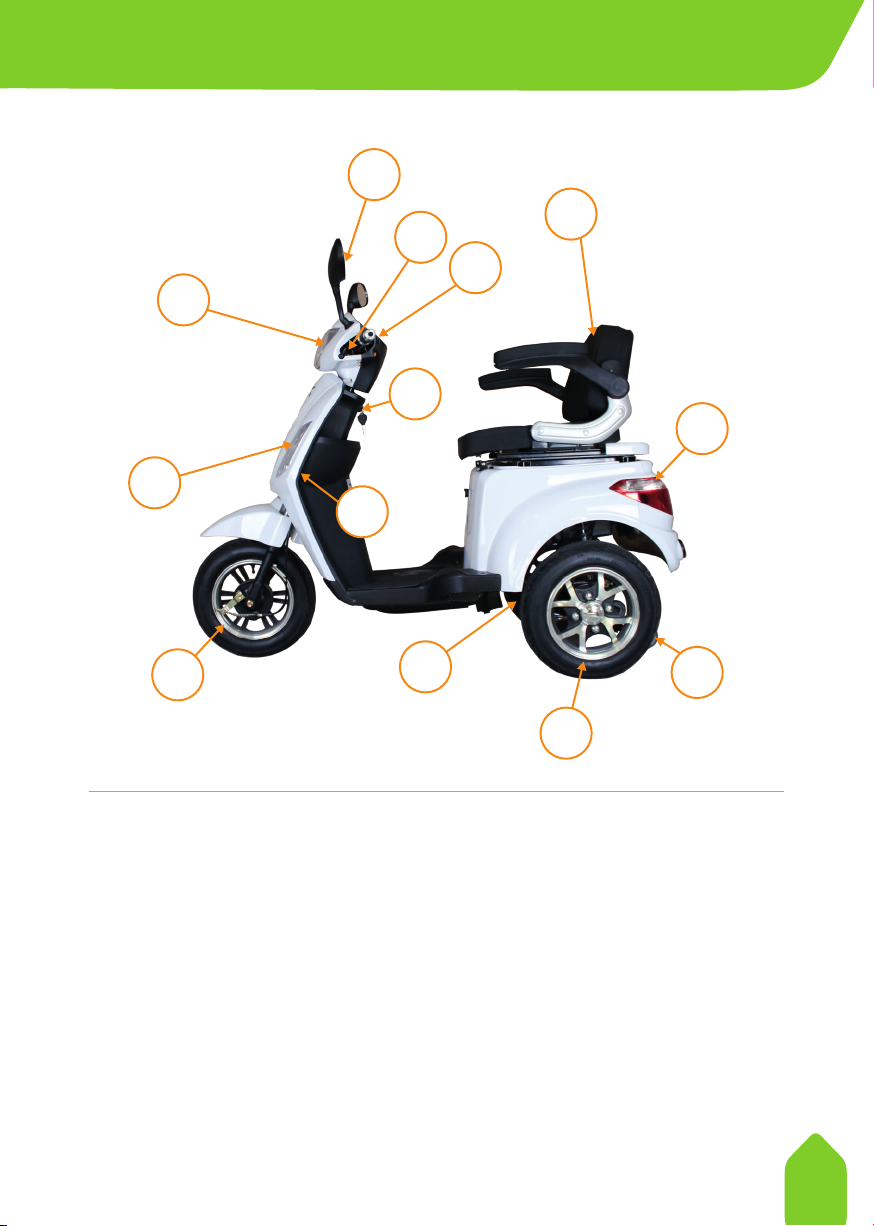
Vm4
1- Headlight
2- Mirror
3- Brake Handle
4- Display Panel
5- Starter
6- Seat
7- Rear Stop Light and Signals
8- Signals
9- Front Wheel
10- Wind Spoiler
11- Motor
12- Rear Wheels
13- Compensating Wheel
1
2
5
6
913
8
10
12
11
3
4
7
1. DEVICES AND ACCESSORIES
www.volta.com.tr
6
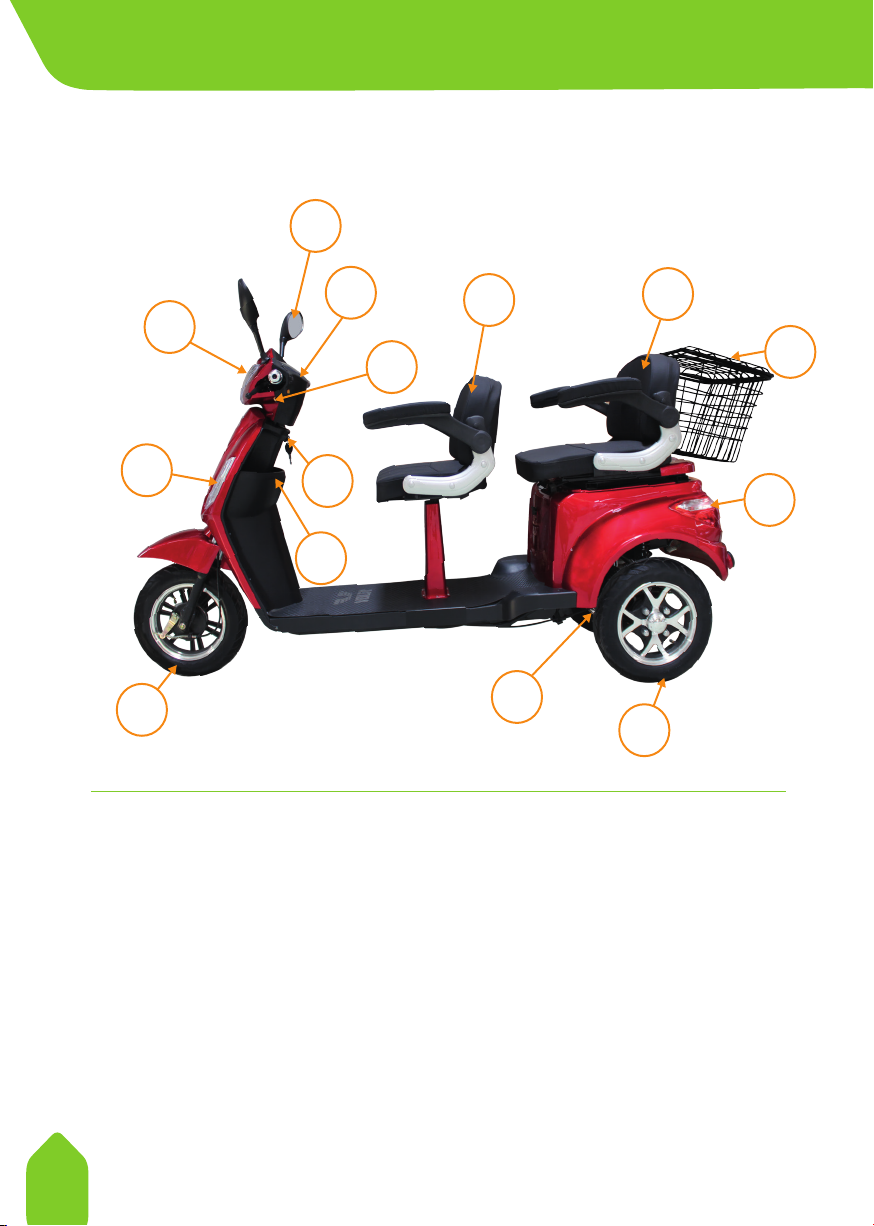
Vm4+
1- Headlight
2- Mirror
3- Display Panel
4- Brake Handle
5- Starter
6- Front seat
7- Backseat
8- Signals
9- Front Wheel
10- Wind Spoiler
11- Motor
12- Rear Wheels
13- Rear Stop Light and Signals
14- Rear Bucket
1
2
5
6
9
13
8
10
14
12
11
3
4
7
1. DEVICES AND ACCESSORIES
www.volta.com.tr 7
1
2
5
6
9
13
8
10
14
12
11
3
4
7
1. DEVICES AND ACCESSORIES
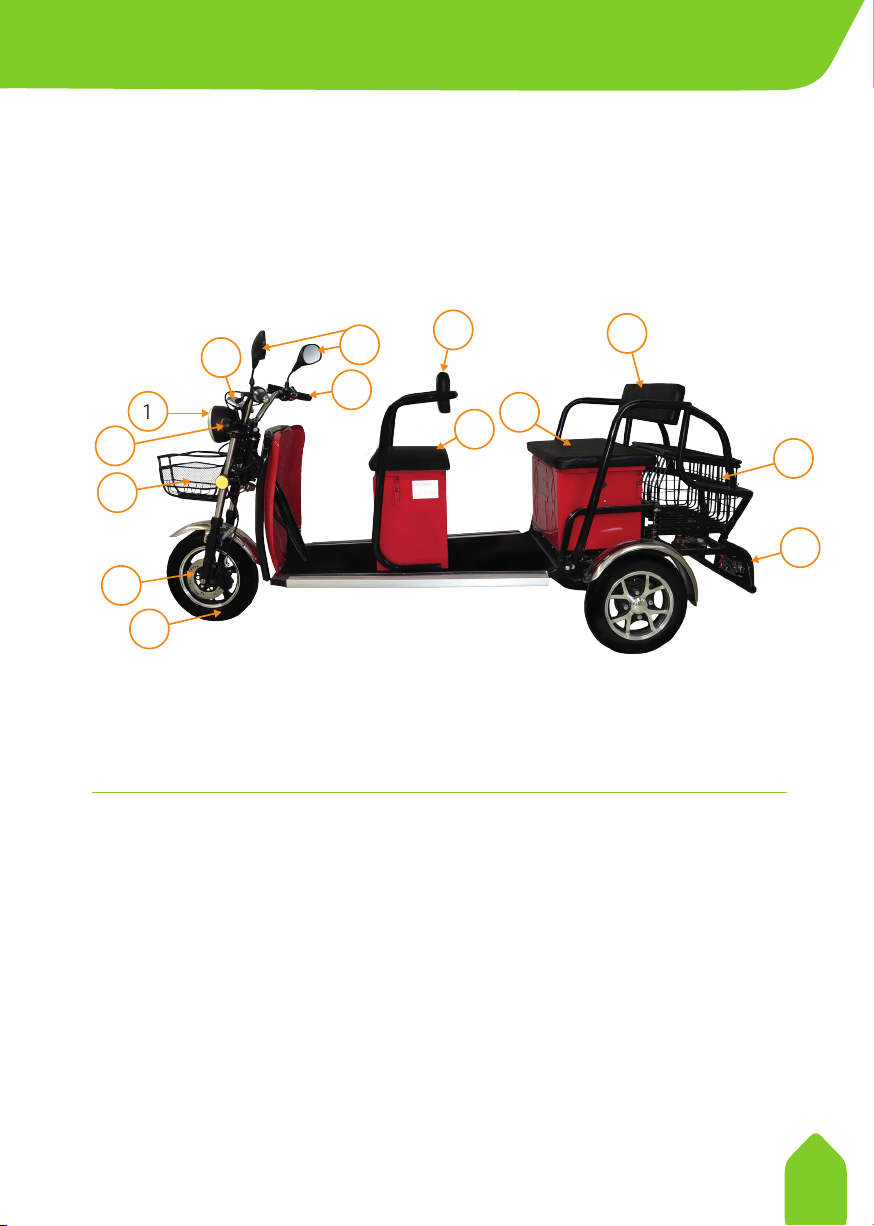
Vm5
1
2
3
4
5
6
7
12
13
14
10
8
9
11
1- Headlight
2- Front Signals
3- Front Bucket
4- Disk Brake
5- Front Wheel
6- Display Panel
7- Right-Left mirror
8- Throttle Lever
9- Backrest
10- Front Seat
11- Backseat
12- Backrest of the Backseat
13- Rear Bucket
14- Rear Stop Light and Signals
www.volta.com.tr
8
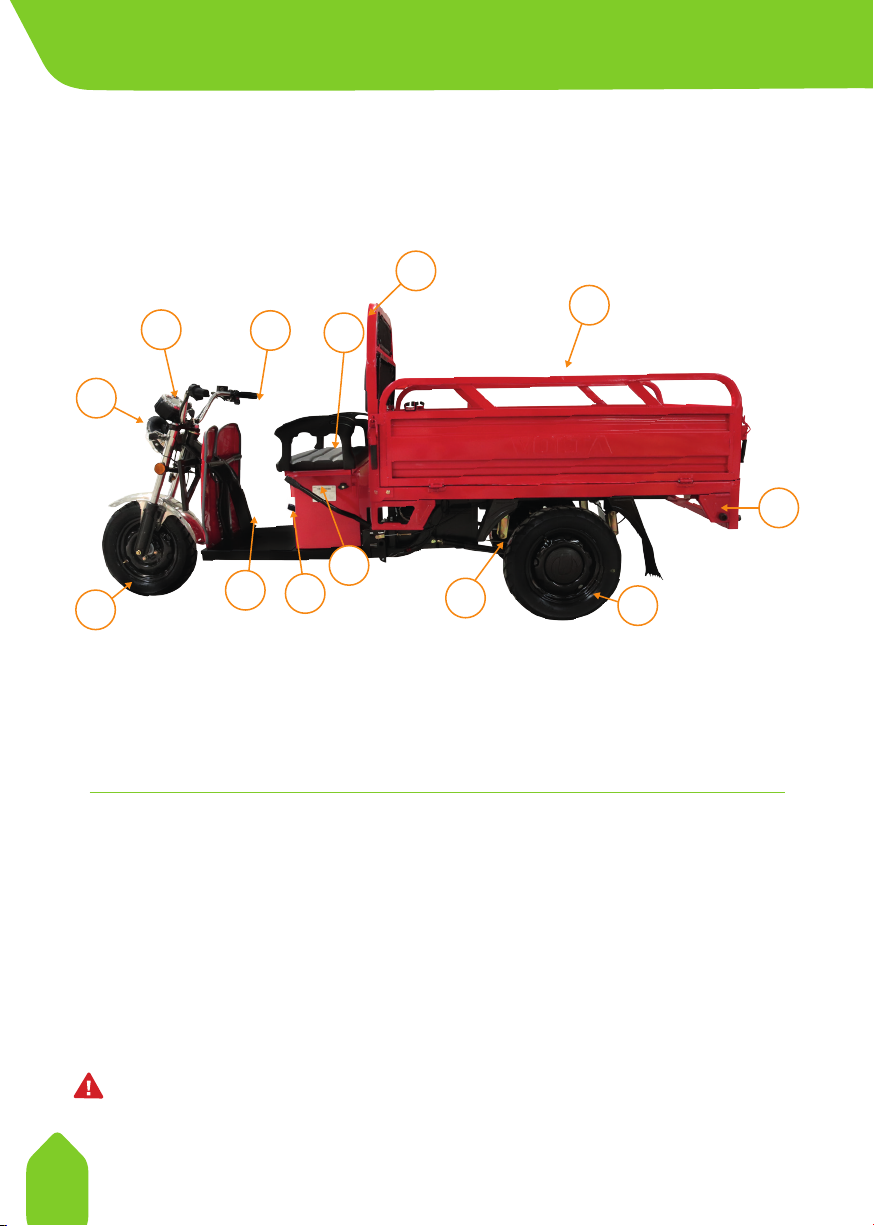
VT5
1- Headlight
2- Display Panel
3- Throttle Lever
4- Seat
5- Backrest
6- Safety Deposit Box
7- Front Wheel
8- Footbrake
9- Hand Brake
10- Stiener
11- Motor
12- Rear Wheels
13- Stop Light and Signals
1
2
5
12
7
9
8
13
10
11
34
6
1. DEVICES AND ACCESSORIES
- Please, do not pull the stiener while driving the tricycle.
WARNING
www.volta.com.tr 9
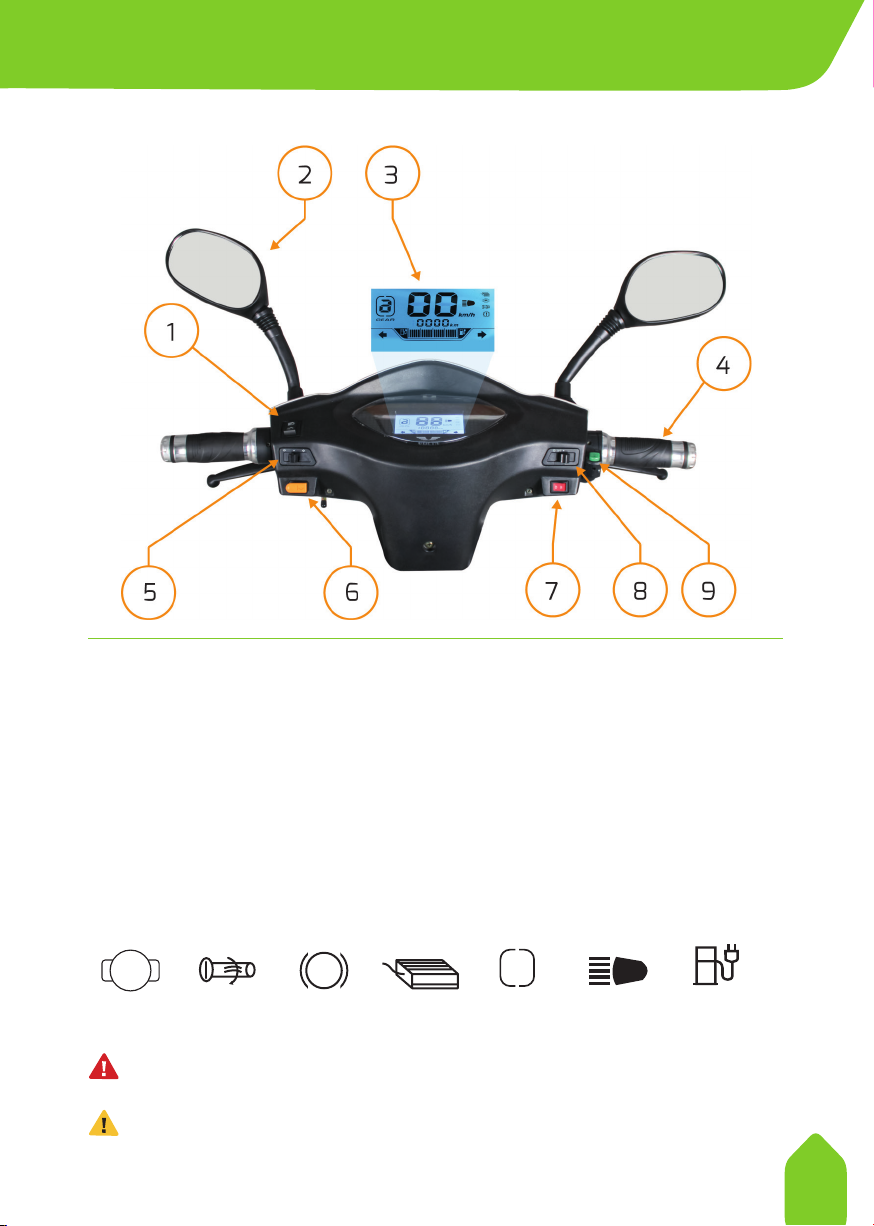
2. DISPLAYS
vm4 - vm4+
1- Main and dipped beam setting
button
2- Mirror
3- Display Panel
4- If, you turn the throttle lever counter-
clockwise while the starter is on, the vehi-
cle gains speed. Your speed is related with
the angle of throttle lever.
5- Signal button“◄” indicates left
turn, “►” indicates right turn.
6- Horn
7- Forward backward button
8- Light on-o button
9- Electronic transmission
M
!E C O
DISPLAY INDICATORS
Motor
Fault
Headlight Remaining
Power
Gear
Throttle
Lever Fault
Brake Fault Driver Fault
G E A R
1
WARNING
ATTENTION
- All parts listed in the manual are for reference purposes. Manufacturer firm can
change them without any notification.
- Do not use your horn in forbidden zones.

www.volta.com.tr
10
WARNING
ATTENTION
:- All parts listed in the manual are for reference purposes. Manufacturer firm can
change them without any notification.
- Do not use your horn in forbidden zones.
15
3
2
47
8
6
vm5
1- Main and dipped beam setting
button
2- Right-left signal: Signal button “◄”
indicates left turn “►” indicates right
turn
3- Horn
4- On-o button.
5- Forward backward button
6- Headlight on-o button.
7- If, you turn the throttle lever coun-
terclockwise while the starter is on,
the vehicle gains speed. Your speed is
related with the angle of throttle lever.
8- Electronic transmission
2. DISPLAYS
!
GEAR
Remaining
Power
Headlight Brake Fault Gear
DISPLAY INDICATORS
This manual suits for next models
3
Table of contents
Other VOLTA Bicycle manuals


