Vorwerk Thermomix TM5 User manual

THERMOMIX® TM5
INSTRUCTION MANUAL
ID: 20872-1716 AU V3

2 3Safety alert symbol and signal words
This is the safety alert symbol. It is used to alert you to potential physical injury hazards.
Obey all safety messages that follow this symbol to avoid possible injury or death.
Signal words
Note the use of signal words DANGER, WARNING and CAUTION with the safety messages.
The signal word for each message has been selected using the following guidelines:
DANGER
indicates a hazardous situation which, if not avoided,
will result in death or serious injury.
WA R N ING
indicates a hazardous situation which, if not avoided,
could result in death or serious injury.
CAUTION
indicates a hazardous situation which, if not avoided,
could result in injury.
NOTICE
is used to address practices not related to physical injury.
NOTICE
CAUTION
WARNING
DANGER
SAFETY ALERT SYMBOL
AND SIGNAL WORDS

4 5Important safeguards
IMPORTANT
SAFEGUARDS
Important safeguards
Read all instructions
WARNING
Electric shock hazard
• Unplug the Thermomix®TM5 from
outlet when not in use, and before clean-
ing. Do not put on or take off parts while
the Thermomix®TM5 is in operation.
• Do not put the Thermomix®TM5 in
water or other liquid. Clean with
a damp cloth only. No water or dirt
should enter the base unit.
• Do not operate the Thermomix®TM5
if the cord or plug becomes damaged,
if the appliance malfunctions, or if the
Thermomix®TM5 is dropped or
damaged in any manner. Return your
Thermomix®TM5 to the nearest
authorised service facility for
examination, repair or electrical or
mechanical adjustment.
WARNING
To avoid scalding, burn injury and
laceration hazard, do not try to
open the mixing bowl lid by force.
• Never force the mixing bowl lid open.
• Only open the mixing bowl lid when
the speed is set to “
O
” and the locking
mechanism has released it.
WARNING
If the hole in the mixing bowl lid is
blocked with food and the heating
is active, an overpressure can build
up in the mixing bowl and the hot
contents can erupt from it.
• While cooking, if you find the hole
in the mixing bowl lid blocked or if
the measuring cup is being pushed
up, unplug the Thermomix®TM5.
DO NOT touch the controls.
• Do not fill the simmering basket past
the max fill line.
• Do not fill the mixing bowl past the
max fill line (2.2 litres).
• Ensure that the hole in the mixing
bowl lid remains free of food.
• Never hold down or fix the measuring
cup when processing hot food.
WARNING
You may get burned or scalded by
escaping hot food or steam or by
touching hot surfaces.
• Remove the mixing bowl carefully to
help prevent contents from spilling or
splashing.
• Do not let the power cord hang over
edge of table or counter, or touch any
hot surface, such as a stove.
• Place Thermomix®TM5 on a clean,
solid, even surface to help prevent it
from slipping.
• Never use the Thermomix®TM5
in combination with parts or
equipment for older generations of
Thermomix®.
• The use of attachments or items not
recommended or sold by Vorwerk may
cause fire, electric shock or injury.
• To avoid injury when processing hot
food, place the measuring cup into
the opening of the mixing bowl lid.
Never touch, hold down or fix the
measuring cup when processing hot
food.
• Using the turbo mode or abruptly
increasing mixing speed with hot food
may result in scalding injury. When
processing hot food, increase the speed
gradually.
• Do not touch the surface of the mixing
bowl, the mixing bowl lid, the Varoma
and parts of the measuring cup as
they will become hot when processing
hot food.
• Touch only the handles on the sides of
the Varoma when the Varoma is hot.
• Do not not touch or fix the measuring
cup when processing hot food.
When using the Thermomix®TM5, basic safety precautions should
always be followed. Only use the Thermomix®TM5 in accordance
with this instruction manual.

6 7Important safeguards
IMPORTANT SAFEGUARDS
Important safeguards
• The Thermomix®TM5 can generate
a constant flow of steam while cooking
depending on the chosen settings.
Keep away from the steam. Hot steam
will continue to rise up through the hole
in the mixing bowl lid when removing
the entire Varoma. Hot steam may
escape at the sides and from the top of
the Varoma lid during operation.
• Do not use your Thermomix®TM5
with damaged accessories.
• Scalding due to food boiling over may
occur if heating large quantities of
food at high temperatures. If boiling
over occurs, push the selector (see p. 14)
to stop the machine.
• When removing the Varoma lid, tilt
the lid away from your face and body
to avoid escaping steam.
• Ensure that some slots of the Varoma
dish and tray remain uncovered of
food to avoid an uncontrolled escape
of steam.
• Position the Varoma correctly onto the
mixing bowl and Thermomix®TM5
to prevent the Varoma from becoming
detached.
• Unhook and remove spatula from
simmering basket after removing
simmering basket and placing it on
a level surface. If hooked to simmering
basket, spatula may cause simmering
basket to tip and spill hot contents.
• Contents of simmering basket may
splash during removal. Use care
when removing simmering basket.
• Do not disassemble the mixing knife
from the mixing bowl while it is hot.
WARNING
Fire hazard
• Your Thermomix®TM5 may catch fire
or be damaged if exposed to an outside
heat source. Do not place on or near
a hot surface or stove top.
WARNING
Laceration hazard
• BLADES ARE SHARP. HANDLE
CAREFULLY. Do not touch the blades.
Hold the upper part of the mixing
knife when removing or re-inserting it.
• Use care when removing the mixing
knife to prevent it from falling out
accidenta lly.
• Keep hands and utensils out of the
mixing bowl while it is in operation to
reduce the risk of injury to persons or
damage to the mixer.
WARNING
Not intended for use by children
• Close supervision is necessary when
the Thermomix®TM5 is used by or
near children.
• If the Thermomix®TM5 is used
around children consider using
a locking code, see page 45.
WARNING
The magnets in the recipe chip
may affect pacemakers
• The magnets in the Thermomix®
Recipe Chip and the Thermomix®
Recipe Chip interface may affect
pacemakers or internal defibrillators.
Keep Thermomix®Recipe Chips and
the Thermomix®Recipe Chip interface
away from pacemakers or internal
defibrillators. Warn people with
pacemakers or internal defibrillators.
CAUTION
Pinching hazard from moving
Thermomix®TM5 parts
• Avoid contact with moving parts.
Never touch the locking arms or
mixing bowl lid when opening or
closing the Thermomix®TM5.
• Keep hair and clothing away from
moving parts of the Thermomix®TM5.
• Make sure the Appliance is switched
off before taking off or putting on
accessories.
CAUTION
Damaged accessories may
cause injury
• If any Thermomix®TM5 accessories
are damaged by the mixing knife
during food preparation, discard food.
Contact Vorwerk for replacement
accessory.

8 9Important safeguards
IMPORTANT SAFEGUARDS
Safe minimum internal temperature chart
• Do not operate the Thermomix®TM5
with damaged parts or accessories.
CAUTION
You may suffer injury or damage
your Thermomix®TM5 or
proper ty.
• Do not modify your Thermomix®TM5
or any accessories.
• Never use the Thermomix®TM5 in
combination with parts or equipment
not provided by Vorwerk.
• Never leave the Thermomix®TM5
unattended while it is running.
(Note that some automated recipes
that use low mixing speeds and
low temperatures can be prepared in
the Thermomix®TM5 without
supervision. These exceptions will be
explicitly stated in the recipe.)
• An imbalance of the Thermomix®TM5
may develop when kneading dough or
chopping food and cause the device to
move along the counter. Keep your
Thermomix®TM5 away from the edge
to help prevent it from falling off.
• The Thermomix®TM5 must only be
repaired by an authorised service
facility. Improper repair works or
improper handling may result in a
serious risk of injury. Vorwerk accepts
no liability for any damages that may
arise after using a non-authorised
repairer.
NOTICE
• Leaks from around the mixing knife
may damage the Thermomix®TM5.
Ensure that the sealing ring of the
mixing knife is fitted to the knife
bearing. Ensure that the mixing knife
is locked into the bowl base correctly.
• To help prevent corrosion of your
Thermomix®TM5, ensure that the
contact pins of the mixing bowl
are thoroughly dried after cleaning
so that moisture does not enter the
Thermomix®TM5.
• Do not use outdoors.
SAV E T HESE
INSTRUCTIONS
Safe steps in food handling, cooking, and storage are essential in preventing food-
borne illness. You can’t see, smell, or taste harmful bacteria that may cause illness.
In every step of food preparation, follow the four guidelines to keep food safe:
• Clean – Wash hands and surfaces often.
• Separate – Separate raw meat from other foods.
• Cook – Cook to the right temperature.
• Chill – Refrigerate food promptly.
Cook all food to these minimum internal temperatures as measured with a food
thermometer before removing food from the heat source. For reasons of personal
preference, consumers may choose to cook food to higher temperatures.
SAFE MINIMUM INTERNAL
TEMPERATURE CHART
Product Minimum Internal Temperature & Rest Time
Beef, Pork, Veal & Lamb
Steaks, chops, roasts
60 °C (140 °F) and allow to rest for at least 3 minutes
Ground meats 70 °C (160 °F)
Ham, fresh or smoked (uncooked) 60 °C (140 °F) and allow to rest for at least 3 minutes
Product Minimum Internal Temperature
All Poultry (breasts, whole bird, legs, thighs, and
wings, ground poultry, and stuffing)
70 °C (160 °F)
Eggs 70 °C (160 °F)
Fish & Shellfish 60 °C (140 °F)
Leftovers 70 °C (160 °F)
Casseroles 70 °C (160 °F)

10 11
MANUAL
ManualManual
Safety alert symbol and signal words .................................................. 3
Important safeguards ............................................................................... 4
Save minimum internal temperature chart ....................................... 9
Technical data ............................................................................................. 12
Introduction ................................................................................................ 13
Your Thermomix®TM5 ............................................................................. 14
Before you start .......................................................................................... 16
How to insert the mixing bowl correctly ........................................................ 17
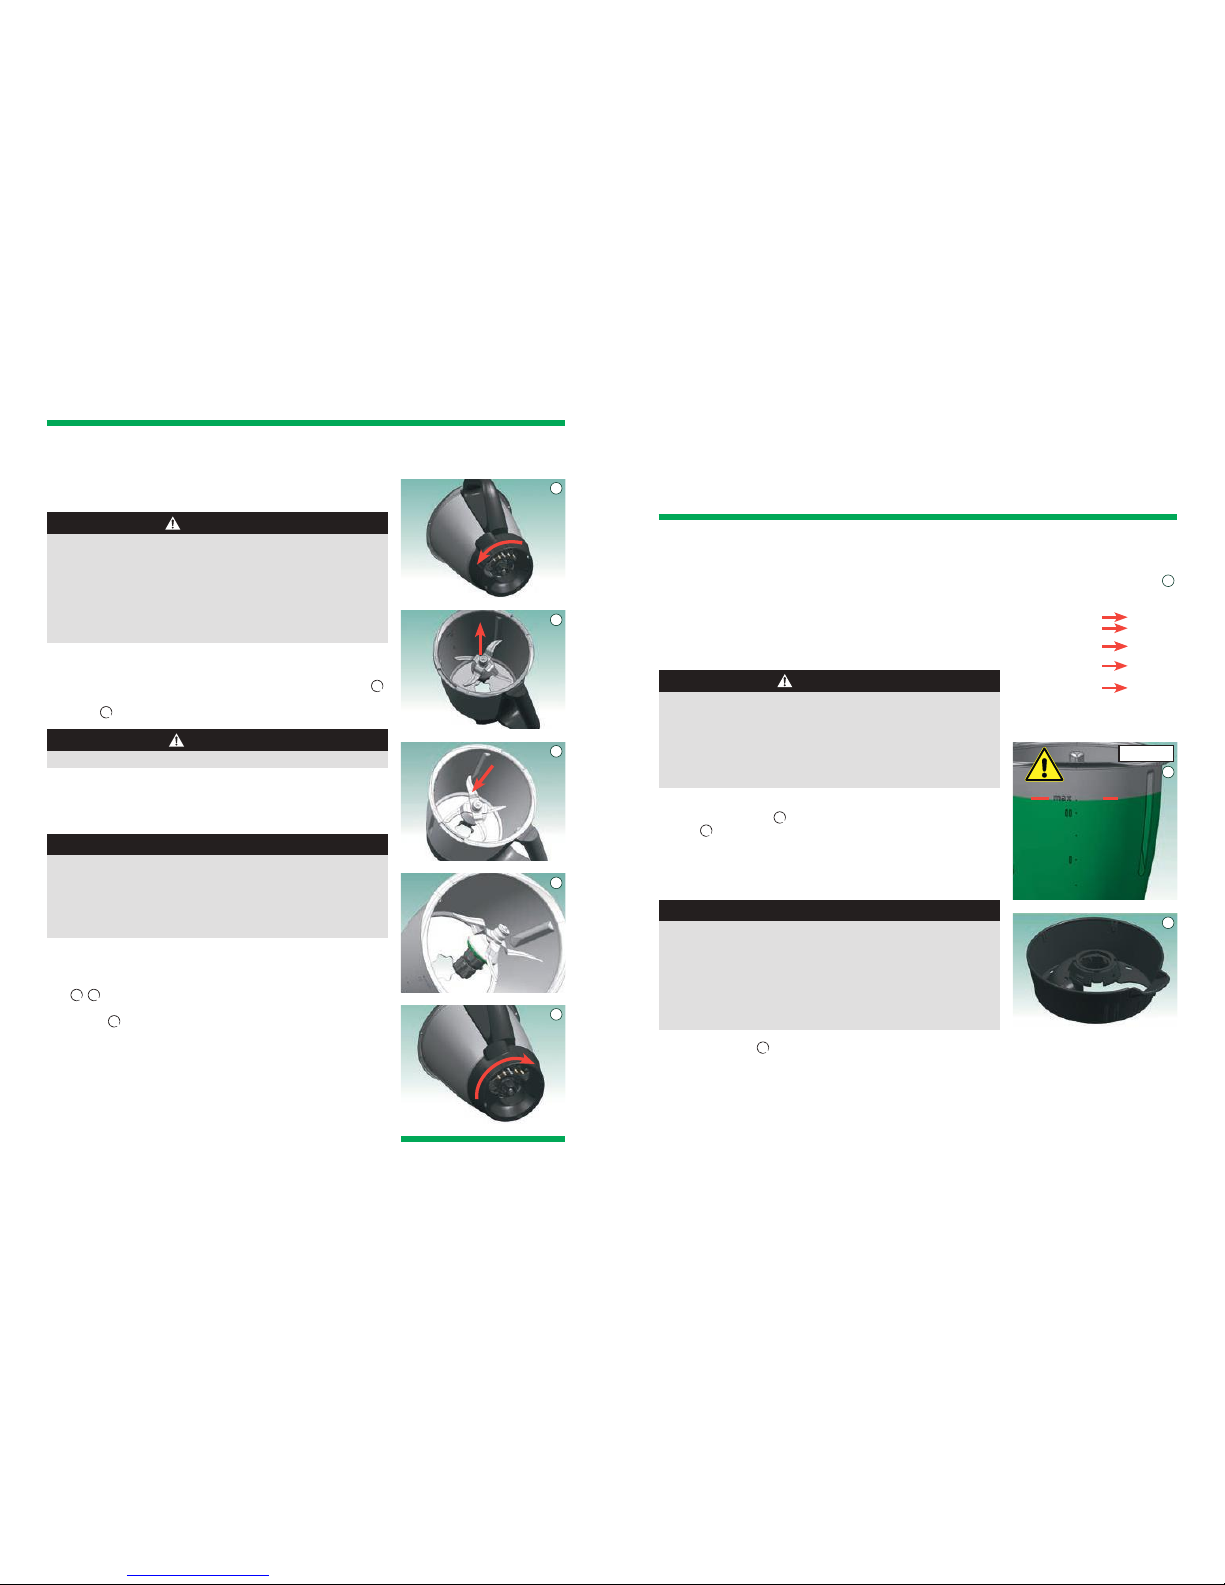
How to remove the mixing knife .................................................................... 18
How to insert the mixing knife ....................................................................... 18
Accessories ................................................................................................... 19
Mixing bowl ..................................................................................................... 19
Mixing bowl base ............................................................................................. 19
Mixing bowl lid ................................................................................................ 20
Measuring cup ................................................................................................. 21
Simmering basket ............................................................................................ 22
Spatula ............................................................................................................. 23
Butterfly whisk (Stirring attachment) ............................................................ 24
Varoma ............................................................................................................. 25
How to combine the Varoma parts ................................................................. 25
How to use the Varoma ................................................................................... 26
Practical work with the Varoma ..................................................................... 28
Working with the Thermomix®............................................................... 29
Starting the Thermomix®................................................................................ 29
Switching the Thermomix®off ....................................................................... 30
Security and safety messages ......................................................................... 30
Weighing ingredients with the Thermomix®.................................................. 31
Further information about weighing .............................................................. 31
Operating the Thermomix®from the Home screen ...................................... 32
Adjustment of preset time ............................................................................... 33
Temperature dial ..............................................................................................34
Soft heating at speeds 2 and 3 ......................................................................... 34
Varoma temperature setting ............................................................................35
Speed dial .........................................................................................................35
Gentle stir setting .............................................................................................35
Stirring ..............................................................................................................35
Mixing/blending ..............................................................................................36
Turbo mode .......................................................................................................36
Forward/reverse knife movement operation .................................................. 37
Dough mode .....................................................................................................37
Connecting a Thermomix®recipe chip ...........................................................38
Thermomix®Menu ...........................................................................................38
Favourite recipes .............................................................................................. 38
Recipes .............................................................................................................. 39
By category .......................................................................................................39
From A to Z .......................................................................................................39
Recently cooked ................................................................................................ 39
Cooking a recipe from a Thermomix®recipe chip
using the “guided cooking function” ...............................................................40
Parallel steps .....................................................................................................40
Automated recipes ............................................................................................41
Transportation mode .......................................................................................42
Settings ............................................................................................................. 42
Manage favourites ............................................................................................ 42
Language ..........................................................................................................43
Unit System ......................................................................................................43
About Thermomix®........................................................................................... 43
Reset to factory settings ................................................................................... 44
Background colour ...........................................................................................44
Locking your Thermomix®............................................................................... 45
Contact ..............................................................................................................46
Things to remember ................................................................................... 47
Automatic shutdown ........................................................................................47
Electronic motor protection ............................................................................. 47
First time use and high loads ........................................................................... 47
Cleaning .........................................................................................................48
How to clean the mixing bowl and its lid ........................................................48
How to clean the mixing knife .........................................................................49
How to clean the Varoma .................................................................................50
How to clean the main Thermomix®................................................................ 50
How to clean the area below the mixing bowl ................................................. 51
Additional information for cleaning ................................................................ 51
Changing the protection grid ...................................................................52
Changing the protection grid at the back ........................................................52
Changing the protection grid on the bottom ...................................................53
Notes for your own recipes .......................................................................54
Troubleshooting ..........................................................................................55
Legal regulations/Copyright .................................................................... 56
Warranty/Customer service ....................................................................57

12 13Technical Data Introduction
Dear Customer,
Congratulations on your purchase of the Thermomix®TM5!
During a Thermomix®TM5 demonstration, you experienced and tested with your five senses the benefits of your new
Thermomix®TM5. An experienced Thermomix®advisor helped you optimize the usage of all possible functions to
your individual needs.
Now you are ready to start enjoying the advantages of your own Thermomix®TM5. Preparing tasty and healthy food
becomes fast and easy. Cooking with Thermomix®TM5 saves you time for other activities.
This instruction manual will familiarize you step by step with your new Thermomix®TM5. Please read it carefully.
With each step you will experience that we have considered your interests and needs when we designed this high
quality product.
The easy to understand step by step design of our recipes will enable you to prepare your meals and dishes with great
success.
We wish you, your family and your friends a lot of fun with your new Thermomix®TM5!
Vorwerk Thermomix®
INTRODUCTION
Symbol of conformity/
Mark of conformity
Motor Maintenance-free Vorwerk reluctance motor 500 W rated power.
Speed continuously adjustable from 100 to 10,700 revolutions per minute
(Gentle stir 40 rpm).
Special speed setting (alternating mode) for dough preparation.
Electronic motor protection to prevent overload.
Heating system 1,000 W power consumption.
Protected against overheating.
Integrated scales Measuring range from 5 to 3000 g in 5 g increments (to max. 6.0 kg);
-5 to -3000 g in 5 g increments (to max. –6.0 kg).
Housing High-quality plastic material.
Mixing bowl Stainless steel, with heating system and temperature sensor integrated.
Maximum capacity 2.2 litres.
Connected load Only for 220 … 240 V 50/60 Hz (TM5-1).
Maximum power consumption 1,500 W.
Pull-out power cord, 1 m long.
Dimensions and weight
Thermomix® TM5
excl. Varoma Varoma
height 34.10 cm height 13.10 cm
width 32.60 cm width 38.30 cm
depth 32.60 cm depth 27.50 cm
weight 7.95 kg weight 0.80 kg
TECHNICAL DATA

$60AUD/$70NZD
www.thermomix.com.au
www.thermomix.co.nz
2ndedition, December 2014
ID2016 03 20535/2 AU/n
ONE THERMOMIX®, ENDLESS POSSIBILITIES
WELCOME TO YOUR CUSTOMER JOURNEY
Commence your Thermomix® story with this selection of
over 180 basic recipes from Thermomix® Recipe Developers
around the world. These are recipes for every day – from
breakfast, lunch and dinner ideas, to sweet and savoury
baking, sauces, conserves and drinks.
The Basic Cookbook is your guide to making the most
of your Thermomix®, converting your own recipes, and
creating those everyday surprises.
The Basic Cookbook
Creating everyday surprises®
THE
BASIC
COOK
BOOK
ISBN 978-3-03844-104-5
9 783038 441045
BC5_Cover_AU_n_20535_2016_03 1 19.02.16 09:06
14 15Your Thermomix® TM5
YOUR
THERMOMIX®TM5
2
3
45
117
15
14
16
Your Thermomix® TM5
1Thermomix®TM5
2Mixing bowl
3Mixing bowl base
4Seal ring for mixing knife
5Mixing knife
9Mixing bowl lid
10 Butterfly whisk
(Stirring attachment)
11 Spatula with safety disk
12 Simmering basket
13 Measuring cup
6
7
8
9
10
11
12
13
14 Thermomix®Recipe Chip
15 Lid sensor
16 Selector
Varoma
6Varoma lid
7Varoma tray
8Varoma dish
17 Handle
18 Cookbook
19 Instruction manual
19
18

16 17
BEFORE
YOU START
NOTICE
Leaks from around the mixing knife may damage the
Thermomix® TM5
• Ensure that the sealing ring of the mixing knife is fitted to the knife bearing.
• Ensure that the mixing knife is locked into the bowl base correctly.
• If liquid leaks or spills into Thermomix® TM5 base unplug the
Thermomix®TM5 and refer to the care and maintenance section (p.48)
for cleaning.
Congratulations on purchasing the
Thermomix®TM5!
Before using your Thermomix®TM5 (in the following simply called
“Thermomix”) for the first time it is recommended that you attend a
demonstration with a qualified Thermomix®advisor to familiarize yourself
with using your Thermomix®.
Before you start
WARNUNG
The use of attachments or items not recommended or sold by
Vorwerk may cause fire, electric shock or injury.
• Do not use your Thermomix® with damaged accessories.
• Do not modify your Thermomix® or any accessories.
• Never use the Thermomix® in combination with parts or equipment for
older generations of Thermomix®.
Damaged accessories may cause injury.
• If any Thermomix® accessories are damaged by mixing knife during
food preparation, discard food. Contact Vorwerk for replacement
accessory.
Before you start Before you start
Be sure to place your Thermomix®on a clean, solid and even surface so that it
cannot slip. It is recommended to keep your Thermomix®in a permanent
position in your kitchen so that you can operate it easily. Remove the Foil
from the Touchscreen and protective covering from the locking arms.
Clean your Thermomix®thoroughly before using it for the first time. Follow
the instructions in the chapter on cleaning (page 48).
How to insert the mixing bowl correctly
WARNING
To avoid scalding, burn injury and laceration hazard:
• Do not try to open the mixing bowl lid by force. Only open the mixing
bowl lid when the speed is set to “0” and the locking mechanism has
released it.
• Do not let the power cord hang over edge of table or counter, or touch
any hot surface, such as a stove.
• Do not touch the surface of the mixing bowl, the mixing bowl lid, the Varoma
and parts of the measuring cup as they will become hot when processing
hot food.
CAUTION
Locking arms may pinch you.
• Avoid contact with moving parts. Never touch the locking arms or mix-
ing bowl lid when opening or closing the Thermomix®.
• Make sure the appliance is switched off before taking off or putting on
accessories.
Insert the mixing bowl with the handle pointing to the front and place it
gently into position 1.
The mixing bowl has been inserted correctly if its handle is at the front,
as shown in picture 1, and if the bowl itself is securely fixed in the
Thermomix®. To close the mixing bowl place the mixing bowl lid horizontally
onto the mixing bowl 2. The lid will lock automatically when the speed
selector is activated.
1
2

18 19Accessories
Before you start using your Thermomix®we would like to present its
accessories in more detail. They are proof of a well thought out design.
Every part has been designed intelligently and serves several purposes.
Mixing bowl
WARNING
Overfilling may lead to scalding/burn injury
• Ensure that the hole in the mixing bowl lid remains free of food
• Do not fill the mixing bowl past the max fill line (2.2 litres).
• Remove mixing bowl carefully to help prevent contents from spilling
orsplashing.
• Never heat up the mixing bowl when it is empty.
• Only use the mixing bowl lid to close the mixing bowl.
On the inside and on the outside of the mixing bowl there are marks
indicating the filling level 6. The mixing bowl has a maximum capacity of
2.2 litres 7.
Mixing bowl base
NOTICE
• The mixing bowl base must be turned as far as it will go and locked.
Failure to fit the mixing bowl base and mixing knife correctly may result
indamage to other parts of the Thermomix®. If liquid leaks or spills
intoThermomix® base unplug the Thermomix® and refer to the care and
maintenance section (p. 48) for cleaning.
• To help prevent corrosion of your Thermomix®, ensure that the contact
pins of the mixing bowl are thoroughly dried after cleaning so that
moisture does not enter the Thermomix®.
The mixing bowl base 8is used to fasten and loosen the mixing knife within
the mixing bowl. The whole mixing bowl may be placed on any work surface.
ACCESSORIES
6
7
8
1
2
3
4
5
How to remove the mixing knife
WARNING
The blades of the mixing knife can cut
• BLADES ARE SHARP. HANDLE CAREFULY. Hold the upper part of
mixing knife when removing or re-inserting it.
• Keep hair and clothing away from moving parts of the Thermomix®.
• Use care when removing the mixing knife to prevent it from falling out
accidentally.
• Keep hands and utensils out of the mixing bowl to reduce the risk of
injury to persons or damage to the mixer.
To remove the mixing knife: Hold the mixing bowl with one hand so that
it’s opening points upwards. With your other hand turn the mixing bowl base
30 degrees counterclockwise and pull the mixing bowl base off downwards 1.
Carefully hold the upper part of the mixing knife and remove it together with
its seal ring 2.
CAUTION
Do not disassemble the mixing bowl while it is hot.
How to insert the mixing knife
NOTICE
Leaks from around the mixing knife may damage the Thermomix®
• Ensure that the sealing ring of the mixing knife is fitted to the knife
bearing.
• Ensure that the mixing knife is locked into the bowl base correctly.
• If liquid leaks or spills into Thermomix® base unplug the Thermomix®
and refer to the care and maintenance section (p. 48) for cleaning.
To re-insert the mixing knife place the mixing bowl base on an even and
clean surface, place the mixing bowl on top of it and hold it’s handle firmly.
Now push the mixing knife through the hole in the bottom of the mixing
bowl 34until it’s sealing ring touches the bottom of the mixing bowl.
Then turn the mixing bowl base 30 degrees counter-clockwise to lock the
knife in place 5.
Before you start
BEFORE YOU START
Maximum
capacity
of mixing
bowl
2.2 litres
2.0 litres
1.5 litres
1.0 litre
0.5 litre
2.2 litres

20 21
Mixing bowl lid
WARNING
• To avoid scalding do not block or cover the hole in the mixing bowl lid.
• Avoid pinching hazard from contacting moving parts. Never touch
thelocking arms or mixing bowl lid when opening or closing the
Thermomix®.
• To avoid scalding, burn injury and laceration hazard, do not try to open
the mixing bowl lid by force. Only open the mixing bowl lid when the
speed is set to “0” and the locking mechanism has released it.
• Only use the measuring cup to close the hole in the mixing bowl lid.
• Never cover the mixing bowl lid or measuring cup with any item inclu-
ding towels or dishcloths.
NOTICE
Only use your Thermomix® with a clean mixing bowl lid and sealing ring.
Ensure that the brim of the mixing bowl is clean at all times. Inspect the
sealing ring regularly for possible damage. The sealing ring is not remov-
able and attempting to do so may result in damage. In case of damage or
leakage replace the lid immediately and do not use your Thermomix® until
you have replaced the lid.
The mixing bowl lid 1is used to close the mixing bowl. For safety reasons
your Thermomix®will not operate unless the lid has been positioned and locked
correctly. Never try to force the lid open when the Thermomix®is locked.
The mixing bowl lid is being secured by the automatic locking mechanism. It
consists of two locking arms securing the lid and a sensor located on the upper
housing between the locking arms. Be sure to keep this sensor clean at all times.
Please note the delay between setting the motor speed to zero and the release
of the locking mechanism. It is dependent on the motor speed to prevent
spillage of ingredients, if the mixing bowl is filled to the maximum indicator.
Measuring cup
WARNING
Food escaping from the Thermomix® can cause burns or scalding.
• Do not fill the simmering basket past the max fill line. While cooking, if
you find the hole in the mixing bowl lid blocked or if the measuring cup
is being pushed up, unplug the Thermomix. DO NOT touch the controls.
If the hole in the mixing bowl lid is blocked with food and the heating
isactive, an overpressure can build up in the mixing bowl and the hot
contents can erupt from it.
• To avoid injury when processing hot food (temperature above 60ºC),
place the measuring cup intothe opening of the mixing bowl lid and do
not touch or fix the measuring cup.
• Using the turbo mode or abruptly increasing mixing speed with hot
food (temperature above 60ºC) may result in scalding injury. When
processing hot food, increase the speed gradually.
The measuring cup is a multi-purpose item: it is a closing cap for the hole in the
mixing bowl lid to avoid heat loss and it prevents ingredients from escaping.
The measuring cup can be used to measure ingredients. Besides the 100 ml
mark please note that a measuring cup holds up to 100 ml, and 50 ml when
filled to the notch. Place the measuring cup into the hole in the mixing bowl
lid with its opening showing upwards 2.
If you wish to add some liquid there is no need to remove the measuring cup.
Simply pour the liquid onto the lid. It will gradually trickle into the mixing
bowl. To add ingredients through the hole in the mixing bowl lid lift the
measuring cup and add them into the mixing bowl.
ACCESSORIES
Accessories Accessories
12

22 23
Simmering basket
WARNING
Food escaping from the Thermomix®can cause burns or scalding.
• Do not fill the simmering basket past the max fill line 1. While cooking,
ifyou find the hole in the mixing bowl lid blocked or if the measuring
cup is being pushed up, unplug the Thermomix®. DO NOT touch the
controls. If the hole in the mixing bowl lid is blocked with food and the
heating isactive, an overpressure can build up in the mixing bowl and
the hot contents can erupt from it.
Contents splashing or spilling may cause burns or scalding.
• Unhook and remove spatula from simmering basket after removing
simmering basket and placing it on a level surface. If hooked to simmering
basket, spatula may cause simmering basket to tip and spill hot contents.
• Contents of simmering basket may splash during removal. Use care
when removing simmering basket.
The simmering basket for the Thermomix®is made of high-quality plastic.
It is a multi-purpose item:
• Straining of fruit and vegetable juices. Chop and make a puree in the
Thermomix®, then insert the simmering basket into the mixing bowl and
use it as a strainer when pouring the juice out. When pouring the juice
use the spatula to hold the simmering basket 2.
• Delicate food such as meatballs or fishballs that are not suited to be prepared
in the mixing bowl as a whole should be put into the simmering basket.
To remove the simmering basket: place the hook of the spatula into the notch
of the simmering basket and lift the basket 3. The spatula can be removed at
any time.
• The feet at the bottom of the simmering basket 4allow liquid to drip off
the food in the basket.
• In case of wanting to reduce the liquid in the food (e.g. sauce) place the
simmering basket as a cover onto the mixing bowl lid 5instead of the
measuring cup 6.
Spatula
WARNING
The use of attachments or items not recommended or sold by Vorwerk
may cause fire, electric shock or injury.
Use only the Thermomix® spatula with safety disk for stirring food in the
mixing bowl. Never use other items or utensils such as spoons, whisks or
knives for stirring. These might get caught in the rotating mixing knife,
and could result in injury.
The spatula 7is another example of the intelligent design of the Thermomix®.
• The Thermomix®spatula is the only accessory you may use to mix or stir
the ingredients in the mixing bowl 8. Insert it from above into the mixing
bowl through the hole in the mixing bowl lid. The safety disk ensures that
the spatula is not caught by the mixing knife. This means that you can use
the spatula during chopping, cooking or simmering.
• The spatula should be used to scrape all ingredients from the mixing bowl.
The tip of the spatula is shaped to fit exactly between the mixing knife
assembly and the wall of the mixing bowl.
• The spatula has a specially shaped safety disk to make sure that it does not
roll off the work surface.
• When straining fruit or vegetable juices use the spatula to hold the
simmering basket in place 2.
• Removing the simmering basket is effortless with the spatula 3.
ACCESSORIES
Accessories Accessories
7
8
3
4
5
62
1

24 25
Butterfly whisk (stirring attachment)
NOTICE
• Do not select a speed higher than level 4 when using the butterfly whisk
if you do, there is a high likelihood of it being thrown off of the mixing
knife and destroyed.
• Never use the spatula when the butterfly whisk is fitted.
• Do not add ingredients that can damage or block the butterfly whisk
when it is attached to the mixing knife and the motor is running.
• The butterf ly whisk 1(here positioned on the mixing knife 2) will help
you to achieve the best results when whipping cream or beating egg whites.
It is also the perfect accessory for the preparation of creamy puddings or
cream mixtures.
• When boiling milk or preparing puddings or sauces the butterfly whisk
allows a constant movement of ingredients. This will help prevent the food
from sticking.
It is easy to insert and remove the butterfly whisk: Insert the butterfly whisk
as shown in picture 3and slightly turn it against the intended rotation
of the mixing knife. Afterwards gently pull up to ensure that it is securely
locked. Its ball-shaped end ensures that it can be removed easily. To remove
the butterfly whisk hold the ball-shaped end and pull it out with rotations
in both directions.
Varoma
WARNING
Scalding hazard
• The Thermomix® can generate a constant flow of steam while cooking
depending on the chosen settings. Keep away from the steam. Be
aware that hot steam will continue to rise up through the hole in the
mixing bowl lid when removing the entire Varoma. Be aware that hot
steam may escape at the sides and from the top of the Varoma lid
during operation.
• Touch only the handles on the sides of the Varoma when the Varoma
ishot.
• Tilt the lid away from your face and body to avoid escaping steam.
• Using the turbo mode or abruptly increasing mixing speed with hot
food may result in scalding injury. When processing hot food, increase
the speed gradually.
• Ensure that some slots of the Varoma dish and tray remain uncovered
of food to avoid an uncontrolled escape of steam.
• Position the Varoma correctly onto the mixing bowl and Thermomix®
toprevent the Varoma from becoming detached.
NOTICE
• Use the Varoma only with the Thermomix® (The Varoma is not suitable
for use with microwaves, ovens or other appliances).
• Ensure that there is sufficient clearance above and around the
Thermomix® and Varoma to help prevent damage from any released hot
steam.
• While cooking, always keep the Varoma lid on top of the Varoma 4.
The Varoma 4consists of three parts 5:
• Varoma dish (bottom)
• Varoma tray (middle)
• Varoma lid (top)
All parts are made of high-quality, food compatible plastic.
How to combine the Varoma parts
You can use your Varoma in either of the following two combinations:
Combination 1:
Varoma dish plus Varoma tray and lid 5.
Use this combination for cooking different foods, e.g. vegetables with meat
or fish, or a larger quantity of the same food, e.g. dumplings.
Combination 2:
Varoma dish plus Varoma lid 6.
Use this combination for cooking large quantities of the same food, e.g. vegetables,
potatoes or large pieces of meat or sausages.
ACCESSORIES
Accessories Accessories
4
5
2
3
1
6

26 27
How to use the Varoma
NOTICE
Never leave the measuring cup in the mixing bowl lid when using the
Varoma.
If the Varoma lid is not positioned properly, not enough steam will stay in
the Varoma. This will slow down the cooking process.
Your Thermomix® switches off heating at speeds higher than 6.
Your Varoma is an accessory designed for the Thermomix®and can only be
used with the Thermomix®. Before you can start steaming with the Varoma
you will need to set up your Thermomix®correctly:
Step 1: Set up Thermomix®
Place the mixing bowl into position. Pour at least 0.5 litre (500 g) of water
into the mixing bowl for up to 30 minutes steaming. If you steam with the
simmering basket, insert the simmering basket and fill it with ingredients,
e.g. potatoes or rice. Close the mixing bowl with the mixing bowl lid.
For a flavoursome variation you can use a vegetable broth or water-wine-mix
instead of water.
Step 2: Filling the Varoma
Place the Varoma lid upside down on your work surface 1and position the
Varoma dish on top – it fits precisely into the groove. Now loosely fill the
Varoma dish with food 2. Make sure that some slots remain unobstructed
so that the steam can spread evenly. As you fill the Varoma, place the food
requiring longer cooking at the bottom, and food requiring shorter cooking
at the top.
The Varoma lid underneath the Varoma dish will stop the liquid from washed
vegetables, ripe fruit, raw meat or fish from wetting your work surface.
When using the Varoma tray, insert it into the Varoma dish. Make sure the
Varoma tray is positioned loosely and evenly. Then place food onto it 3.
Place the Varoma upright into position onto the mixing bowl lid (without the
measuring cup) in such a way that it sits level 4.
Place the Varoma lid on top. It should be positioned loosely and evenly so that
it seals the Varoma well, allowing no steam to escape.
Step 3: Steaming with Varoma 5
All you need to do is select the time and Varoma temperature. The steaming
process begins when you turn the selector to a low to medium speed setting
(x– 6). The timer starts to count down. Water or waterbased liquid in the
mixing bowl is brought to the boil, producing 250 g of steam per quater hour
for steam cooking or reducing the liquid. The steam rises through the hole in
the mixing bowl lid of the Thermomix®into the Varoma. The food is cooked
gently by the hot steam. Please note that the maximum Varoma temperature
is 120 °C, depending on what ingredients you are using, e.g. oil.
When the ingredients are cooked or if you want to check whether they are
cooked, set speed to zero by tapping on the speed dial on the home screen and
turning the selector counter clockwise. In order to open the Varoma, slightly
incline the Varoma lid carefully to the front so that the steam can escape from
the back 6. Take care to let the condensation water drip into the Varoma dish
and tray by holding the Varoma lid above them. Then carefully remove the
Varoma lid and place it upside down on the work surface.
Lift the Varoma dish and tray up, wait some seconds so that the condensed
water drips onto the mixing bowl lid. Then place the Varoma dish and tray
onto the Varoma lid.
ACCESSORIES
Accessories Accessories
6
3
4
5
1
2

28 29
Practical work with the Varoma
NOTICE
30 minutes steam cooking requires 0.5 litres/500 g (2 cups/17.6 oz) of
water, for every additional 15 minutes add 250 g (8.8 oz) of water.
This description explains clearly how easy it is to use the Varoma. Observe
the following basic rules for using the Varoma:
• Place enough water in the mixing bowl.
• The bottom of the Varoma dish and tray are both designed with an even
pattern of small slots to guarantee an even distribution of steam in the
Varoma.
• The food should always be positioned so that as many slots as possible
remain unobstructed. Laying the food in “loosely” is usually enough to
ensure this.
• You can cook foods of different consistency and hardness at the same time.
Place food requiring longer cooking at the bottom and food requiring
less cooking at the top, e.g. vegetables in the Varoma dish and fish on the
Varoma tray.
• The vegetables will be evenly cooked if you cut them into similar-sized
pieces. The cooking times stated are approximate. Cooking time varies
depending on quality, ripeness and size of the ingredients as well as your
personal preferences.
• Grease the Varoma dish and tray to make sure that ingredients such as
meat, fish or dough do not stick.
• Do not thicken your sauces and soups until the steaming process is finished.
Thickeners may prevent steam from forming evenly in the mixing bowl and
slow down the overall cooking process.
• You can also turn the Varoma lid upside down and use it as a drip collector
for the Varoma dish and the Varoma tray 1. It can also be used as a tray to
serve food directly from the Varoma.
ACCESSORIES
Accessories Working with the Thermomix®
WORKING WITH THE
THERMOMIX®
Starting the Thermomix®
Time dial
Home icon
Scales icon
Temperature di al
Speed dial
Icon for forward/
backward operation
Modes icon
Status bar/Thermomix®Menu
Home screen
1
NOTICE
Emerging steam may damage property
Ensure that there is sufficient clearance above and
around the Thermomix® and Varoma to help prevent
damage from any released hot steam.
When the Thermomix® is used for the first time it
mayemit an odour.
WARNING
Your Thermomix® may catch fire if exposed to
an outside heat source.
Do not place on or near a hot surface or stove top.
Falling Thermomix® may lead to injuries
Place your Thermomix® on a clean, solid, even
surface to help prevent it from slipping.
Touching hot surfaces can lead to burns.
Do not touch the surface of the mixing bowl, the mix-
ing bowl lid, the Varoma and parts of the measuring
cup as they will become hot when processing hot food.
Pull the power cord lightly from the housing and connect
it to the mains power supply. You can choose whatever
length of power cord you need, up to 1 m. If you do not
need the whole length of the power cord the remaining
length can be kept inside the Thermomix®. Make sure
that there is no strain on the cable so that the scales can
work properly. Do not place the Thermomix®on the
power cord. If you do, the Thermomix®will not sit evenly
on the surface and the scales will not weigh accurately.
Now the Thermomix®is ready to operate.
Switch the Thermomix®on by pressing the selector.
The Home screen 2will then appear.
Press the Home icon to return to the Home screen from
the various menu options. On the Home screen, you
can reset the dials by touching and holding the home
icon. Find a permanent place in your kitchen for your
Thermomix®right from the start so that it is ready to use
whenever you need it.
2

30 31
WORKING WITH THE THERMOMIX®
Working with the Thermomix®
Weighing ingredients with the Thermomix®
NOTICE
When weighing, do not touch or lean anything against the Thermomix®
and make sure that there is nothing underneath the Thermomix®.
Also,make sure the power cord is without tension.
Press the scales icon to activate your Thermomix®’s integrated scales
function 2.
You can weigh ingredients directly into the mixing bowl and Varoma.
Proceed as follows to use the scales:
Step 1: Insert mixing bowl.
Step 2: Tap on the scales icon.
Step 3: Put in the first ingredient (3.0 kg max.) and check the quantity on the
display.
Step 4: If you wish to add more ingredients tap on the tare icon and add the
next ingredient 3.
Repeat these steps as often as required to the maximum weight (6 kg).
The variation for up to 3.0 kg is +/–30 g.
Further information about weighing
The scales function works from 5 g to 6.0 kg in steps of 2 times 3 kg. When
weighing and adding ingredients with the help of the scales function always
add ingredients slowly because two to three seconds are needed before the
scales show the correct weight.
If you remove an ingredient from the mixing bowl, the scales will indicate a
negative value according to the weight of the ingredient removed.
When using the scales function to add ingredients, do not add more than
3.0 kg at a time. If you add more than 3.0 kg at a time, an overload message
will appear.
Always tap on the scales icon first before weighing or using the scales function.
This will increase the accuracy of the scales. Please be careful not to move the
Thermomix®during the weighing process.
When the scales function is not being used for more than 15 minutes the
Thermomix®will switch off automatically. If you tap on the scales icon again
before this time out the 15 minutes will start again.
Weighing while stirring function: You may weigh in ingredients while the
motor is running up to speed 4. Please note that this function only works
when the contents of your Thermomix®allow a smooth, shake-free operation.
Working with the Thermomix®
12
3
Switching the Thermomix®off
To switch off your Thermomix®, press and hold the selector until a
message appears that the Thermomix®is switching off. You can then
release the selector.
Security and safety messages
Please read the security measures carefully when using the Thermomix®
for the first time. To review what you need to take into account, simply
select “Security measures” in the Thermomix®Menu 1.

32 33
Locking
mechanism
WORKING WITH THE THERMOMIX®
Working with the Thermomix®
Operating the Thermomix®from the
Home screen
WARNING
The locking mechanism can pinch your fingers
Avoid contact with moving parts. Never touch the locking arms or mixing
bowl lid when opening or closing the Thermomix®.
To avoid scalding, burn injury and laceration hazard, do not try to
open the mixing bowl lid by force.
Only open the mixing bowl lid when the speed is set to “0” and the
locking mechanism has released it.
NOTICE
Heating and cooking are only possible if a time period has been set.
Step 1: Set the timer
Tap the time dial and use the selector to set an operating time of up to
99 minutes.
Select a time between 0-1 minute in 1 second increments,
1–5 minutes in 10 second increments,
5–20 minutes in 30 second increments,
20–99 minutes in 60 second increments.
Step 2: Set the temperature
Tap the temperature dial and use the selector to set the desired temperature
to heat or cook the ingredients in the mixing bowl. If the dish does not need
heating, skip this step. Please note that the heating function of the Thermomix®
will remain inactive until a time is set.
Working with the Thermomix®
Step 3: Start the Thermomix®
Tap the speed dial and use the selector to set the desired speed. Once the speed
has been set, the locking mechanism 1will secure the lid and the preset time
will begin counting down to 00:00 in one second increments. In the cold mix-
ing mode, the mixing speed will switch off once the preset time has expired.
A sound will indicate the end of the process and that the lid can be removed.
Depending on the preset speed, the locking mechanism will only unlock the
lid after a few seconds to ensure that no liquid spills out.
In the warm mixing mode after heating and simmering, you will experience
a different behaviour of the Thermomix®than in the cold mixing mode.
Once the preset time has expired, the mixing knife continues to stir gently
for 8 seconds to help prevent burning on the mixing bowl base. After the
additional 8 seconds have expired, the Thermomix®motor will stop, a sound
will indicate the end of the process and that the lid can be removed. Please
note that it is not required to wait these 8 seconds and you may stop your
Thermomix®manually any time before the 8 seconds have expired.
Adjustment of preset time
The preset time can be changed at any time during preparation. Tap the time
dial (if it is not yet active) and turn the selector clockwise to increase the time
or counter-clockwise to decrease it. If the mixing knife is stopped before the
preset time has expired – for example, to add an ingredient – the timer will
be paused. The countdown will resume once a new speed has been selected.
To stop the mixing process before the preset time has expired, press the time
dial and turn the selector counter-clockwise until the time is set to 00:00 or
press the selector.
If no time has been preset and the speed selector is activated the Thermomix®
will automatically stop after a maximum time of 99 minutes. After this time,
a buzzer will sound.
1

34 35
Temperature dial
WARNING
• The Thermomix® can generate a constant flow of steam while cooking
depending on the chosen settings. Keep away from the steam. Hot steam
will continue to rise up through the hole in the mixing bowl lid when
removing the entire Varoma. Hot steam may escape at the sides and
from the top of the Varoma lid during operation.
• Scalding due to food boiling over may occur if heating large quantities of
food at high temperatures. If boiling over occurs, push the selector to
stop the machine.
The temperature can be set to between 37 °C and 120 °C. The desired temper-
ature will be indicated in the middle of the temperature dial in large numbers.
The temperature of the bowl will be indicated along the top edge of the
temperature dial on a colour scale from blue to red. The current bowl
temperature will also be displayed in smaller writing between the desired
temperature and colour scale 1. While the heating is active you will also
notice the “°C” pulsing inside the temperature dial.
The preset and current temperatures indicated are approximate values only.
Always ensure that the value for the preset temperature is set to “---” if you
do not wish to heat or cook food. Alternatively, switch off the heating function
by tapping on the temperature dial and turning the selector counter-clockwise
to “---”. This will prevent unwanted heating of the ingredients in the mixing
bowl if a time has been preset. The heating function will only be switched on
if a time is preset on the time dial.
The Thermomix®also uses LEDs on the housing to indicate whether it is
preparing cold dishes (flashing green) or hot dishes (flashing red as soon as
the mixing bowl has reached a temperature of 55 °C – 60 °C) 2.
Soft heating at speeds 2 and 3
Speeds 2 and 3 are designed for soft heating. When these speeds are selected,
the temperature will be increased slower than at the other speeds. This allows
for the gradual heating of sensitive ingredients (e.g. zabaglione).
Soft start (above 60 °C (140 °F))
If the Turbo mode is activated or the motor is started when the temperature
in the mixing bowl is 60 °C (140 °F) or higher, an electronic system will
help prevent food from escaping by delaying the speed increase. This soft
start will only work if the food has been heated in the Thermomix®. Only then
can the temperature sensor correctly gauge the current temperature and trigger
the soft start accordingly.
If you want to use the Thermomix®to process food that has not been heated
in the Thermomix®(e.g. preparing a gravy from hot meat juices), you should
only increase the speed slowly and gradually.
WORKING WITH THE THERMOMIX®
Working with the Thermomix®
Color scale Current bowl
temperature
Preset temperature
Working with the Thermomix®
Varoma temperature setting
NOTICE
With water the temperature of the mixing bowl content cannot exceed
100°C (212°F). Higher temperatures can only be reached with high salt
or sugar content or non water-based liquids like oil.
If the Varoma temperature setting 3is selected, temperatures of up to 120 °C
(250 °F) may be reached, depending on what ingredients you are using, e.g. oil.
Please note that the value for the current temperature will switch to “Varoma”
as soon as the mixing bowl has reached a temperature of 1oo °C (212 °F),
which is needed for steaming. The color scale will continue to show the current
mixing bowl temperature 1oo °C-12o °C (212 °F-25o °F). During 15 minutes
at Varoma temperature setting, 250 g. (8 oz) water or water based liquids
evaporate. The Varoma temperature setting is used for steam cooking (see
page 25-28) and reducing water based liquids. For sautéing ingredients
the temperature setting of 120 °C (25o °F) is recommended. 120 °C (250 °F)
can be reached only after most of the water content of the ingredients has
evaporated.
Speed dial
Tap on the speed dial and turn the selector to start the Thermomix®.
The following speeds are available:
Gentle stir setting x
The gentle stir setting 4can be selected using the speed dial. At this setting,
the food is stirred slowly in the same way as if you periodically stirred some
food in a saucepan. If this setting is selected, the food is not chopped and
large chunks remain.
Stirring
Use the lower speeds 1–3 for gentle stirring. This lower speed range is ideally
suited for delicious stews.
Designation Speed / mode Revolutions/min.
Gentle stir 40
Stirring 1–3 100–500
Mixing/blending 4 –10 1100 –10200
Turbo mixing Turbo 10700
1
2
3
4

36 37
Mixing/blending
WARNING
Keep hands and utensils out of the mixing bowl to reduce the risk of
injury to persons or damage to the mixer.
Use the speed range from 4 to 10 for coarse, fine and very fine chopping,
mixing and blending. Always be sure to adjust the speed slowly to the
desired value with the measuring cup inserted into the hole in the mixing
bowl lid. This will prevent the food to be chopped from escaping.
Turbo mode
WARNING
Scalding hazard
• Using the turbo mode or abruptly increasing mixing speed with hot
food (temperature above 60ºC) may result in scalding injury.
When processing hot food, increase the speed gradually.
• To avoid injury when processing hot food (temperature above 60ºC),
place the measuring cup intothe opening of the mixing bowl lid and do
not touch or fix the measuring cup.
• Do not fill the mixing bowl past the max fill line (2.2 litres). Remove mix-
ing bowl carefully to help prevent contents from spilling or splashing.
NOTICE
Your Thermomix® switches off the heating at speeds higher than 6.
Use the Turbo mode to operate the Thermomix®at maximum speed.
To activate the Turbo mode, tap on the modes icon 1and select Turbo 2.
On the Turbo screen 3select the desired blending time of 0.5 to 2 seconds
by tapping on respective touch area and turning the selector. For example,
if you want to coarsely chop larger quantities of food, activate the Turbo mode
3 to 4 times for 0.5 seconds (repeat as necessary). The outcome will be evenly
chopped food. The Turbo mode is also available while the motor is running
already; it is automatically deactivated when the temperature in the bowl
exceeds 60 °C or the dough mode is activated.
WORKING WITH THE THERMOMIX®
Working with the Thermomix® Working with the Thermomix®
Forward/reverse knife movement (
Touch (to reverse the rotating direction of the mixing knife from forward
(clockwise) to reverse (counter-clockwise) 4. You can reverse the direction
of the mixing knife at any speed. Reverse (Counter-clockwise) operation is
indicated by the according symbol on the speed dial. To revert to clockwise
(forward) operation, simply tap on (again, or wait until the set time has
expired and the rotation is automatically set back to forward knife movement.
Reverse operation is intended for gently stirring delicate food which is not to
be chopped.
Dough mode w
WARNING
Falling Thermomix® may lead to injuries
• Beware that an imbalance of the Thermomix® may develop when
kneading dough or chopping food and cause the device to move along
the counter. Keep it a sufficient distance from the edge.
• Never leave the Thermomix® unattended while it is running. (Notethat
some automated recipes that use low mixing speeds and
lowtemperatures can be prepared in the Thermomix® without super-
vision. These exceptions will be explicitly stated in the recipe.)
• Place your Thermomix® on a clean, solid, even surface to help prevent it
from slipping.
Use the dough mode to make heavy yeast dough or bread dough. To select the
dough mode, tap on the modes icon 5on the display and select the dough
mode icon 6. A message will appear at the top of the screen confirming your
selection. A wheat symbol will now be displayed on the speed dial, indicating
that the dough mode has been selected. You can activate the dough mode
by pressing on the speed dial and turning the speed selector with or without
presetting the time.
The alternating operation during which the dough is mixed clockwise and
counter-clockwise ensures even processing of the dough in the mixing bowl.
To deactivate the dough mode, tap on the modes icon again. A message will
appear at the top of the screen confirming your selection.
The dough mode is only available if the mixing bowl has cooled down after
cooking to a temperature below 60 °C (140 °F). If the temperature is higher,
the dough mode cannot be started and an error message will appear. Please
note that while the dough mode is active the heating system, the turbo mode
and the reverse mode are deactivated.
1
2
3
4
5
6

38 39
Connecting a Thermomix®recipe chip
WARNING
The magnets in the Thermomix® Recipe Chip and the Thermomix®
RecipeChip interface may affect pacemakers or internal defibrillators.
Keep Thermomix® recipe chips and the Thermomix® recipe chip interface
away from pacemakers or internal defibrillators. Warn people with
pacemakers or internal defibrillators.
To connect a Thermomix®recipe chip to your Thermomix®, attach it to the
port on the side of the Thermomix®. It will lock into place as soon as the
magnet is sufficiently close 1.
The display will indicate which Thermomix®recipe chip has been attached.
A Thermomix®recipe chip icon will appear in front of the “Recipes” menu
entry in the main menu. The recipes on the Thermomix®recipe chip may now
be selected and cooked from the “Recipes” and “Favorite recipes” submenu.
NOTICE
Never touch the Thermomix® recipe chip interface with any metal objects,
doing so could short-circuit the interface.
Thermomix®Menu
When you tap on “Menu”, it features a list of further useful Thermomix®
functions 2.
Favourite recipes
Selecting “Favourite recipes” is the quickest way to access the recipes that
you have tagged as favourites.
Important: Use the left arrow in the top left-hand corner of the screen to
return to the Thermomix®Menu step-by-step 3.
In case a menu entry exceeds the line space three dots at the end of the line
indicate that swiping the text will make the hidden characters visible.
WORKING WITH THE THERMOMIX®
Working with the Thermomix®
Recipes
Select “Recipes” from the list to search through all the recipes 4.
There are four different ways to search for your desired recipe:
by category, recipe name, favorite recipes or recently cooked recipes 5.
By category
When you search by category, the Thermomix®will suggest different categories
such as starters or main meat courses.
The recipes are ordered alphabetically within the category 6.
From A to Z
You can search for the recipe name in the alphabetical list. You can scroll
through the list by swiping vertically over the screen or by using the scroll bar
on the right side of the screen. Use the tab with the up arrow to enter a first
letter 7.
Recently cooked
Have you cooked something tasty recently and want to repeat this success?
The recipes prepared recently are displayed here 8.
Before the menu entries you will find symbols indicating the status of the
recipes when they where left. A pause icon indicates that the recipe had
been left during preperation. A Thermomix®recipe chip icon indicates that
the recipe was finished. A transparent Thermomix®recipe chip icon indicates
that the Thermomix®recipe chip containing the recipe is not attached to the
Thermomix®.
Working with the Thermomix®
1
2
3
4
5
6
7
8
Other manuals for Thermomix TM5
6
Table of contents
Other Vorwerk Kitchen Appliance manuals

Vorwerk
Vorwerk Thermomix TM5 User manual

Vorwerk
Vorwerk Thermomix TM5 User manual

Vorwerk
Vorwerk Thermomix User manual

Vorwerk
Vorwerk Thermomix User manual

Vorwerk
Vorwerk Thermomix TM6 User manual

Vorwerk
Vorwerk Thermomix User manual

Vorwerk
Vorwerk Thermomix TM6 User manual

Vorwerk
Vorwerk Thermomix BLADE COVER User manual

Vorwerk
Vorwerk Thermomix TM5 User manual

Vorwerk
Vorwerk Thermomix TM6 User manual