manuals.online logo
Brands
  1. Home
  2. •
  3. Brands
  4. •
  5. VPG
  6. •
  7. Accessories
  8. •
  9. VPG CR338 User manual

VPG CR338 User manual

©2022 Vanguard Protex Global
Customer Care | 1-877-477-4874
International | +1-813-855-9639
vanguardprotexglobal.com
12
345
6 7 8
TOOLS & PARTS NEEDED
CR338 Wireless Charging Sensor Installation Guide
Phone Security
ADHESIVE MOUNTING
ALL MOUNTING
NON-ADHESIVE MOUNTING
*For slot hole xtures not suitable for
adhesive mounting, use the K-1106
Mounting Ring Kit.
*For single hole xtures not suitable for
adhesive mounting, use the K-1140
Single Hole Adapter.
Screw the threaded rods
through the mounting ring
and into the pedestal. Mount to the
xture with the two thumb nuts.
Skip to step 6.
* = Optional | # = Substitute W for White
Arm the system with your IR Keyfob.
Point the key near the black receiver
above the LED.
Remove the adhesive
liner from the base of the
pedestal and adhere to
the xture. Skip to step 6.
Clean xture surface and wipe
dry. Thread the power cable through
the xture slot.
IMPORTANT: Ensure tamper
switch on the base of the pedestal is
fully depressed when attaching.
VP-1751#
V-T99
KF-1106
AD-239-5
AP-001-200
V-39
K-1106
K-1140
Option 1 - Slot Hole Fixtures
or
CORRECTINCORRECT
Side View
Tamper Switch
IMPORTANT: Hold rmly for 30 seconds
to ensure a strong bond.
Before adhering, nd the best placement
for the sensor to charge the device.
Clean the back of the
device with an alcohol
pad and wipe dry.
Adhere sensor to the
center of the device.
A. Thread the pedestal power cord
through the single hole
adapter plate and screw to
the bottom of the pedestal.
B. Place connected
pedestal and adapter through the
hole in the xture and tighten nut.
IMPORTANT: Fully remove both the
adhesive liner and the adhesive tape
from the bottom of the pedestal.
Adhesive
Tape
Adapter Plate
Mounting Ring
Threaded Rods
Thumb Nuts
Ring Nut
K-1106 Kit Includes:
Adhesive
Liner
VP-1742#
NON-ADHESIVE MOUNTING
Option 2 - Single Hole Fixtures
K-1140 Kit Includes:
Screws
Make sure the
text "TOP" and
"BOTTOM" on the
sensor is oriented with
the top and bottom of
the phone.
NON-ADHESIVE MOUNTING
Option 2 - Single Hole Fixtures
Attach the sensor
to the pedestal by
twisting the boot
into the sensor.
Attach the sensor
to the pedestal by
twisting the boot
into the sensor.
©2022 Vanguard Protex Global
Customer Care | 1-877-477-4874
International | +1-813-855-9639
vanguardprotexglobal.com
Additional Funtionality Click or scan QR code for
Keyfob video
Click or scan QR code for
Training video
Click or scan QR code for
Troubleshooting video
Click or scan QR code for
Sensor Removal video
CR338 Wireless Charging Sensor
Sensor Removal
Product Re-Merchandise
System Shut Down
Power-off CR338
1. Disarm the CR338
and remove the
sensor from the
pedestal with the
magnet tool.
2. Place the sensor
removal tool over
the sensor and
twist to break the
adhesive bond.
1. Unplug the CR338 from
external power.
2. Using the keyfob, hold
the green disarm button
for several seconds.
When the system is shut
down, you will hear a
descending tone, and
all the LEDs will be off.
Product Removal
Overnight Storage or Customer Interaction
IR Keyfob
1. Disarm the CR338 with the IR Keyfob aimed at the pedestal’s IR
window above the LED; press and hold the green unlock button
until a descending tone is heard.
2. Place the Magnet Tool into the larger notch on the side of the boot
while rotating the boot off the sensor.
3. After 3 minutes the CR338 will automatically rearm itself with a low
toned beep indicating the pedestal is secure and the sensor is not.
4. Store the device with the sensor attached overnight or staff can
provide customer interaction.
5. Sensor will automatically re-arm when reconnected to the pedestal.
The IR Keyfob allows for touchless control of the CR338. The security code in the IR Keyfob
is programmed to the CR338 the rst time the system is armed.
DIP Switch
Chisel Tool
Sensor Removal
Tool
How to change the security code:
1. Disarm the CR338 and open the keyfob
using the chisel tool found on the key ring.
2. Change the code on the DIP switch.
3. Press and hold the red lock button to rearm
the system. The sensor and pedestal are
now set to the new code.
©2022 Vanguard Protex Global
Customer Care | 1-877-477-4874
International | +1-813-855-9639
vanguardprotexglobal.com
Audible & LED Functionality
CR338 Wireless Charging Sensor
LED Behavior CR338 Status & Meaning
Steady solid red on sensor security LED,
pedestal LED off Unit armed, secured, and receiving power
Red and blue ash on pedestal and
ashing red on sensor security LEDs Alarming event - unit has been breached
Constant red ash on the sensor security
LEDs
Unit is disarmed and the product is properly depressing the sensor tamper
switch
Constant red ash on the pedestal Unit is disarmed and the tamper switch on the base of the pedestal is NOT
depressed
Red strobe (brief ash) every 10 seconds
on pedestal and sensor security LEDs
Unit armed, but not receiving power and running off internal back-up
battery
Alternating red/yellow ash on pedestal Factory reset mode - how the unit will arrive. It's ready to accept
programming from any VPG IR Keyfob
Both pedestal and sensor security LEDs
are off
Unit is shut down OR the unit is disarmed & powered, and the sensor
tamper switch is NOT depressed, but the pedestal is secured
Charging LED is solid white, ashing white
or off.
LEDs with the Lightning bolt symbol show charge status - solid white when
device is charging, off when not charging, or ashing when device is
partially charging (some phones may charge properly while sensor ashes;
see battery percentage on phone).
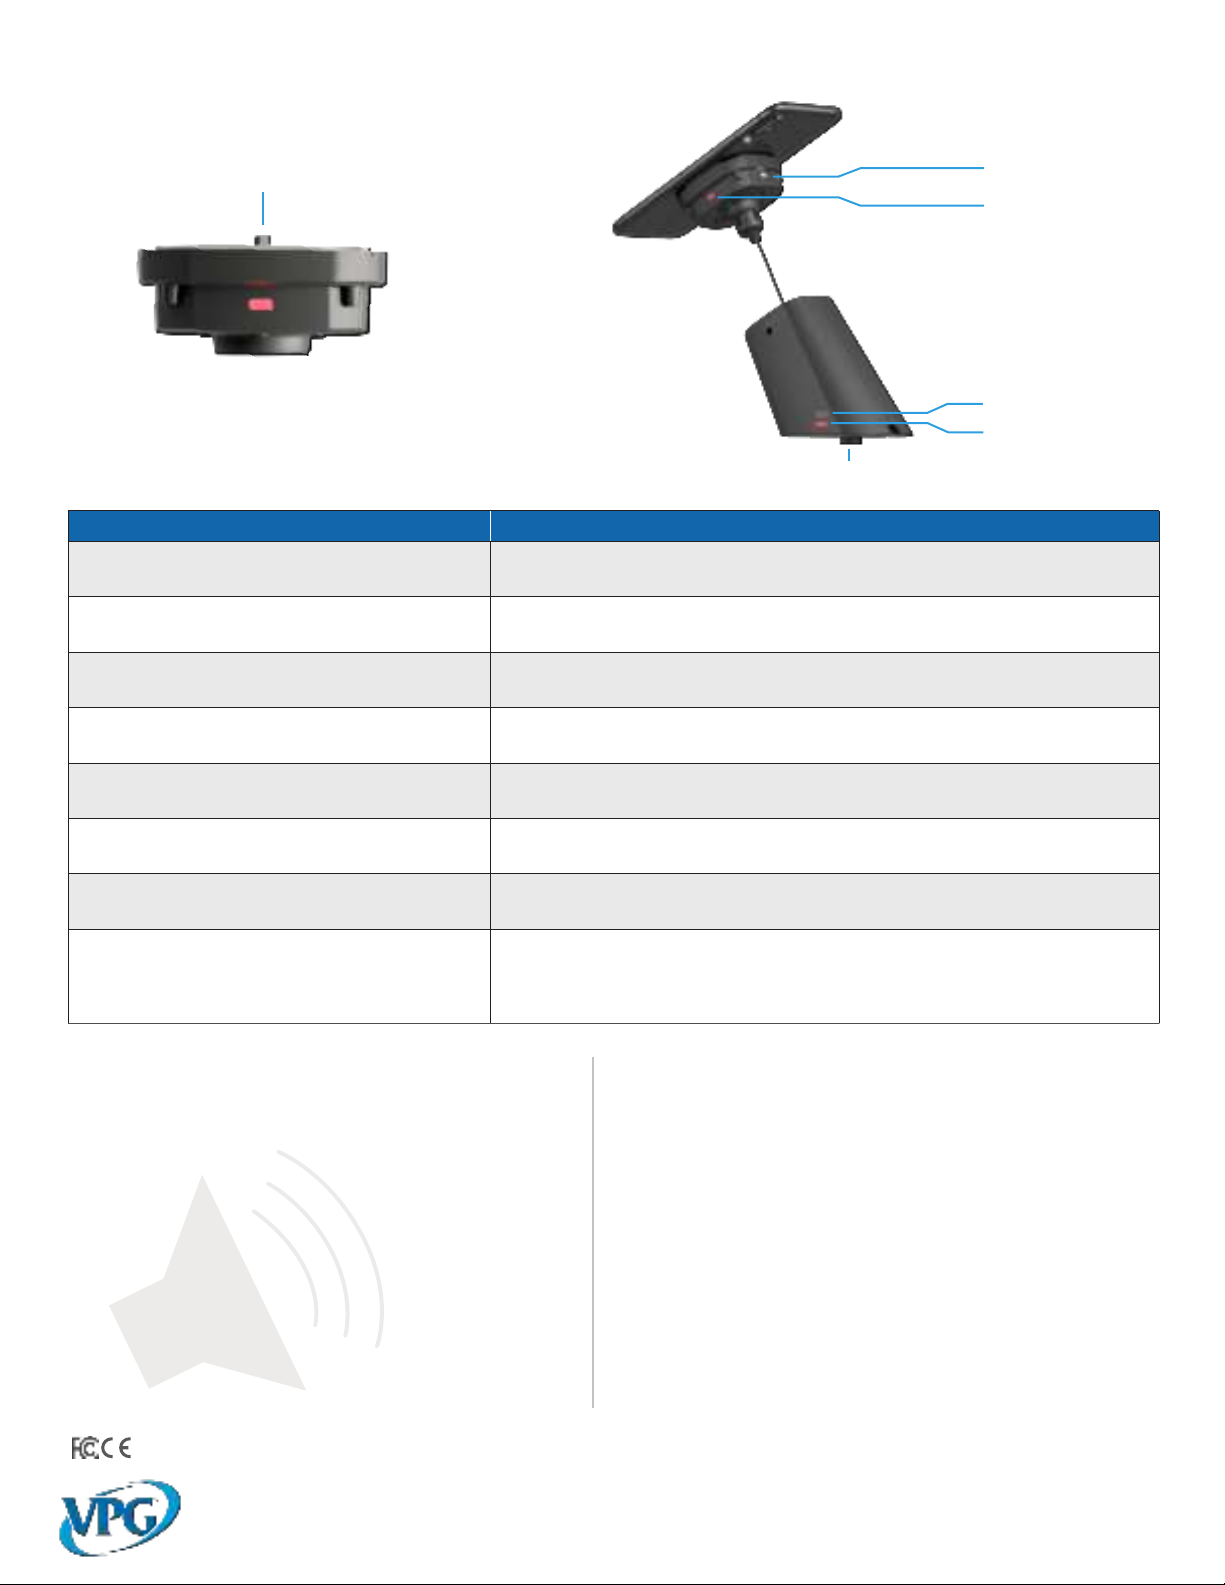
Sensor Security LED
Sensor Charging LED
Sensor Tamper Switch
IR Receiver
Pedestal LED
Pedestal Tamper Switch
Ascending tone followed by 2 conrmation beeps
Device is properly secured and armed.
Ascending tone followed by a low toned beep
Pedestal is secure, but one or more of the
following apply:
• Sensor is not attached
• Sensor tamper switch is not depressed
Once the sensor is reconnected, the tamper
switch is properly depressed, and/or the power
coupler is secured, the CR338 will rearm itself.
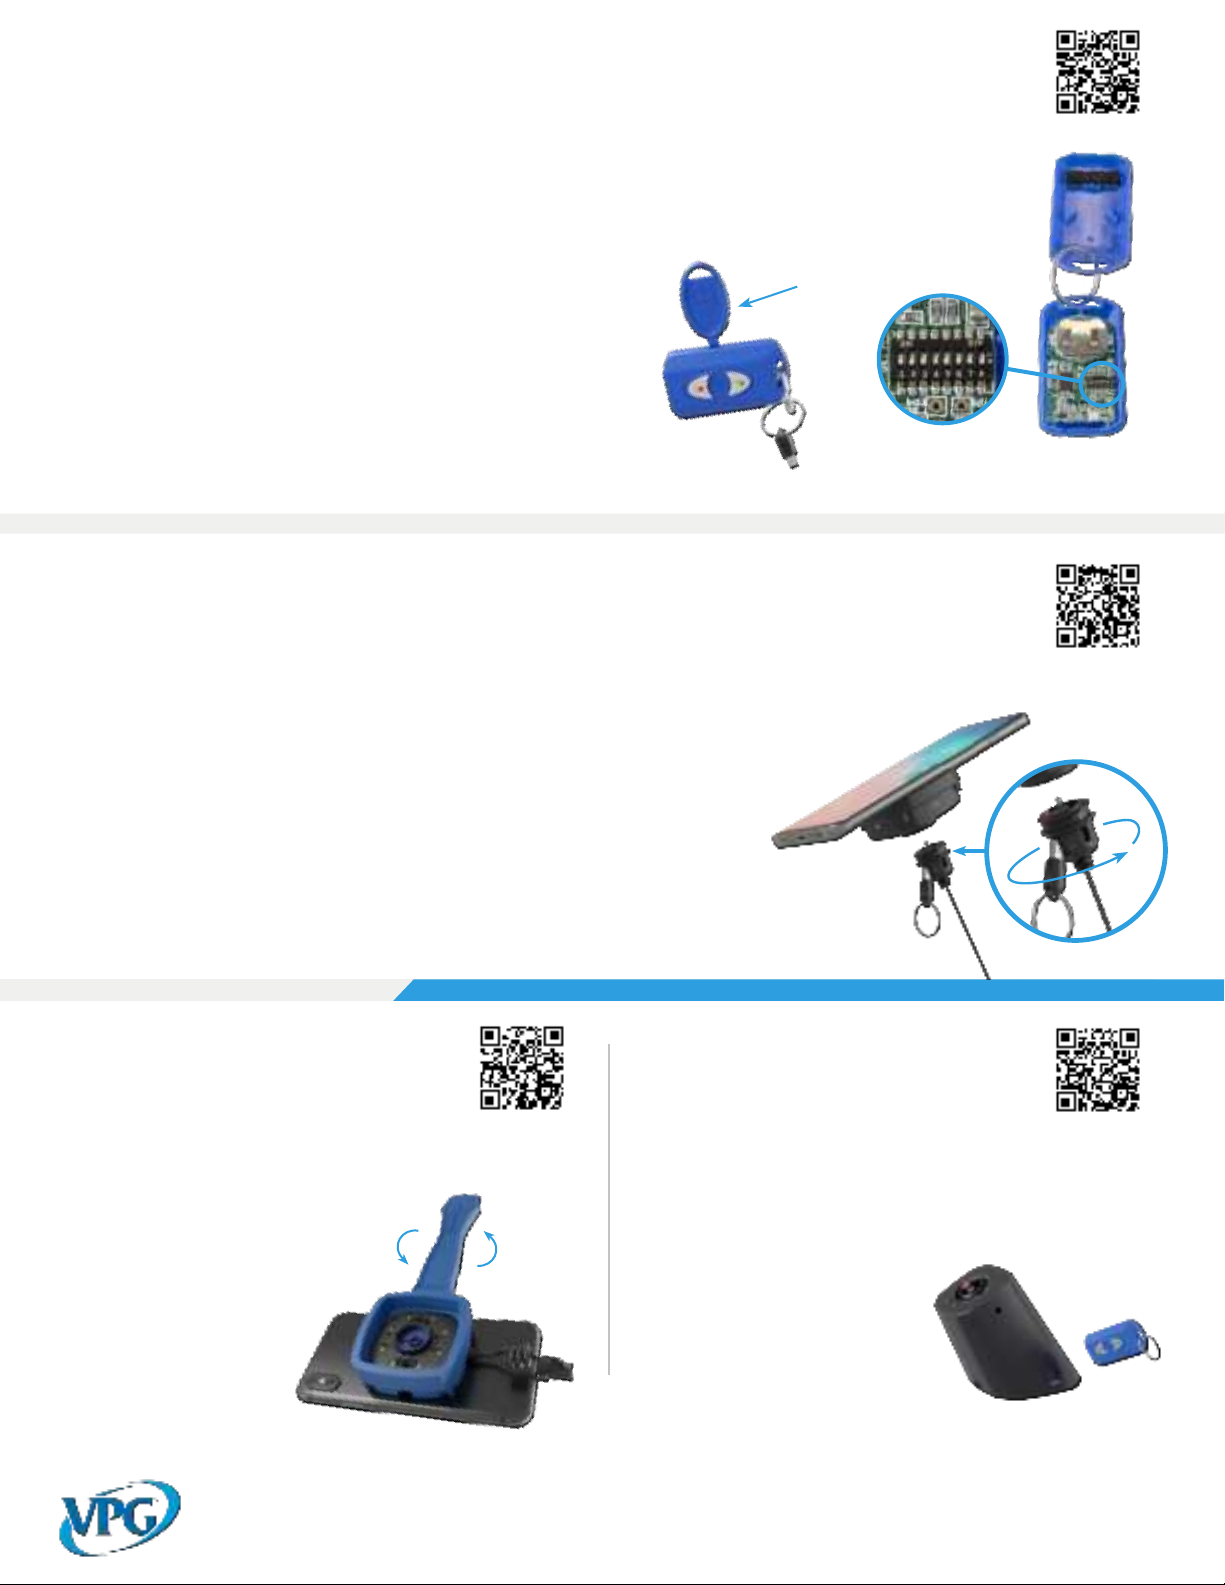
Factory Reset
Factory reset mode can be engaged by rst
triggering the alarm, then, using the SIM tool, press
the reset button in the small hole on the bottom of
the pedestal (3 beeps should be heard), afterwards,
any VPG keyfob can be used to disarm the unit.
Back Up Battery
If the CR338 has lost power, the unit will switch to
its internal back-up battery (3-5 day battery life);
and the IR Keyfob will only work when the alarm is
triggered or power is restored.
IMPORTANT: The tamper switches on the sensor
and the pedestal, detect if the security has been
breached. If either of the tamper switches are not
fully depressed, the CR338 will alarm.
Audible Signals Other Functionalities
FCC REGULATIONS - THIS DEVICE COMPLIES WITH PART 15 OF THE FCC RULES. OPERATION IS SUBJECT TO THE FOLLOWING TWO CONDITIONS: (1) THIS DEVICE MAY NOT CAUSE HARMFUL INTERFERENCE, AND (2) THIS DEVICE MUST ACCEPT ANY INTERFERENCE RECEIVED,
INCLUDING INTERFERENCE THAT MAY CAUSE UNDESIRED OPERATION.
NOTE: THE GRANTEE IS NOT RESPONSIBLE FOR ANY CHANGES OR MODIFICATIONS NOT EXPRESSLY APPROVED BY THE PARTY RESPONSIBLE FOR COMPLIANCE. SUCH MODIFICATIONS COULD VOID THE USER’S AUTHORITY TO OPERATE THE EQUIPMENT.

Other VPG Accessories manuals

VPG BLH NOBEL User manual

VPG

VPG BLH NOBEL User manual

VPG VanWeigh Use and care manual

VPG

VPG VanWeigh Use and care manual

Popular Accessories manuals by other brands

RIDGID TS2400LS Operator's manual

RIDGID

RIDGID TS2400LS Operator's manual

Panasonic KX-HNS101E installation guide

Panasonic

Panasonic KX-HNS101E installation guide

Goobay 53933 user manual

Goobay

Goobay 53933 user manual

TOTALCOOL 3000 user guide

TOTALCOOL

TOTALCOOL 3000 user guide

Lumina KEB 1920F manual

Lumina

Lumina KEB 1920F manual

SOMFY Soliris io manual

SOMFY

SOMFY Soliris io manual

Rechner Sensors EasyTeach instruction manual

Rechner Sensors

Rechner Sensors EasyTeach instruction manual

TEREN OS manual

TEREN

TEREN OS manual

Bell Tent Malu How to set up

Bell Tent

Bell Tent Malu How to set up

Aritech DD400AM installation manual

Aritech

Aritech DD400AM installation manual

Panasonic MA22D17 Specification sheet

Panasonic

Panasonic MA22D17 Specification sheet

Flexit CI 76 Installation and operation instructions

Flexit

Flexit CI 76 Installation and operation instructions

SECO-LARM RA-4961-MBQ manual

SECO-LARM

SECO-LARM RA-4961-MBQ manual

Novexx Solutions HDC user manual

Novexx Solutions

Novexx Solutions HDC user manual

iROCKER CRUISER Use and maintenance manual

iROCKER

iROCKER CRUISER Use and maintenance manual

BASETech 1382130 operating instructions

BASETech

BASETech 1382130 operating instructions

Dometic A&E Systems 8500 user guide

Dometic

Dometic A&E Systems 8500 user guide

Pepperl+Fuchs RMS-D manual

Pepperl+Fuchs

Pepperl+Fuchs RMS-D manual

manuals.online logo
manuals.online logoBrands
  • About & Mission
  • Contact us
  • Privacy Policy
  • Terms and Conditions

Copyright 2025 Manuals.Online. All Rights Reserved.