FRONT BUMPER & FRONT GRILLE
Mercedes Benz
G-class
(W463)
Recommend to paint protective coating
on the back side of WALD Over Fender.
2013/04
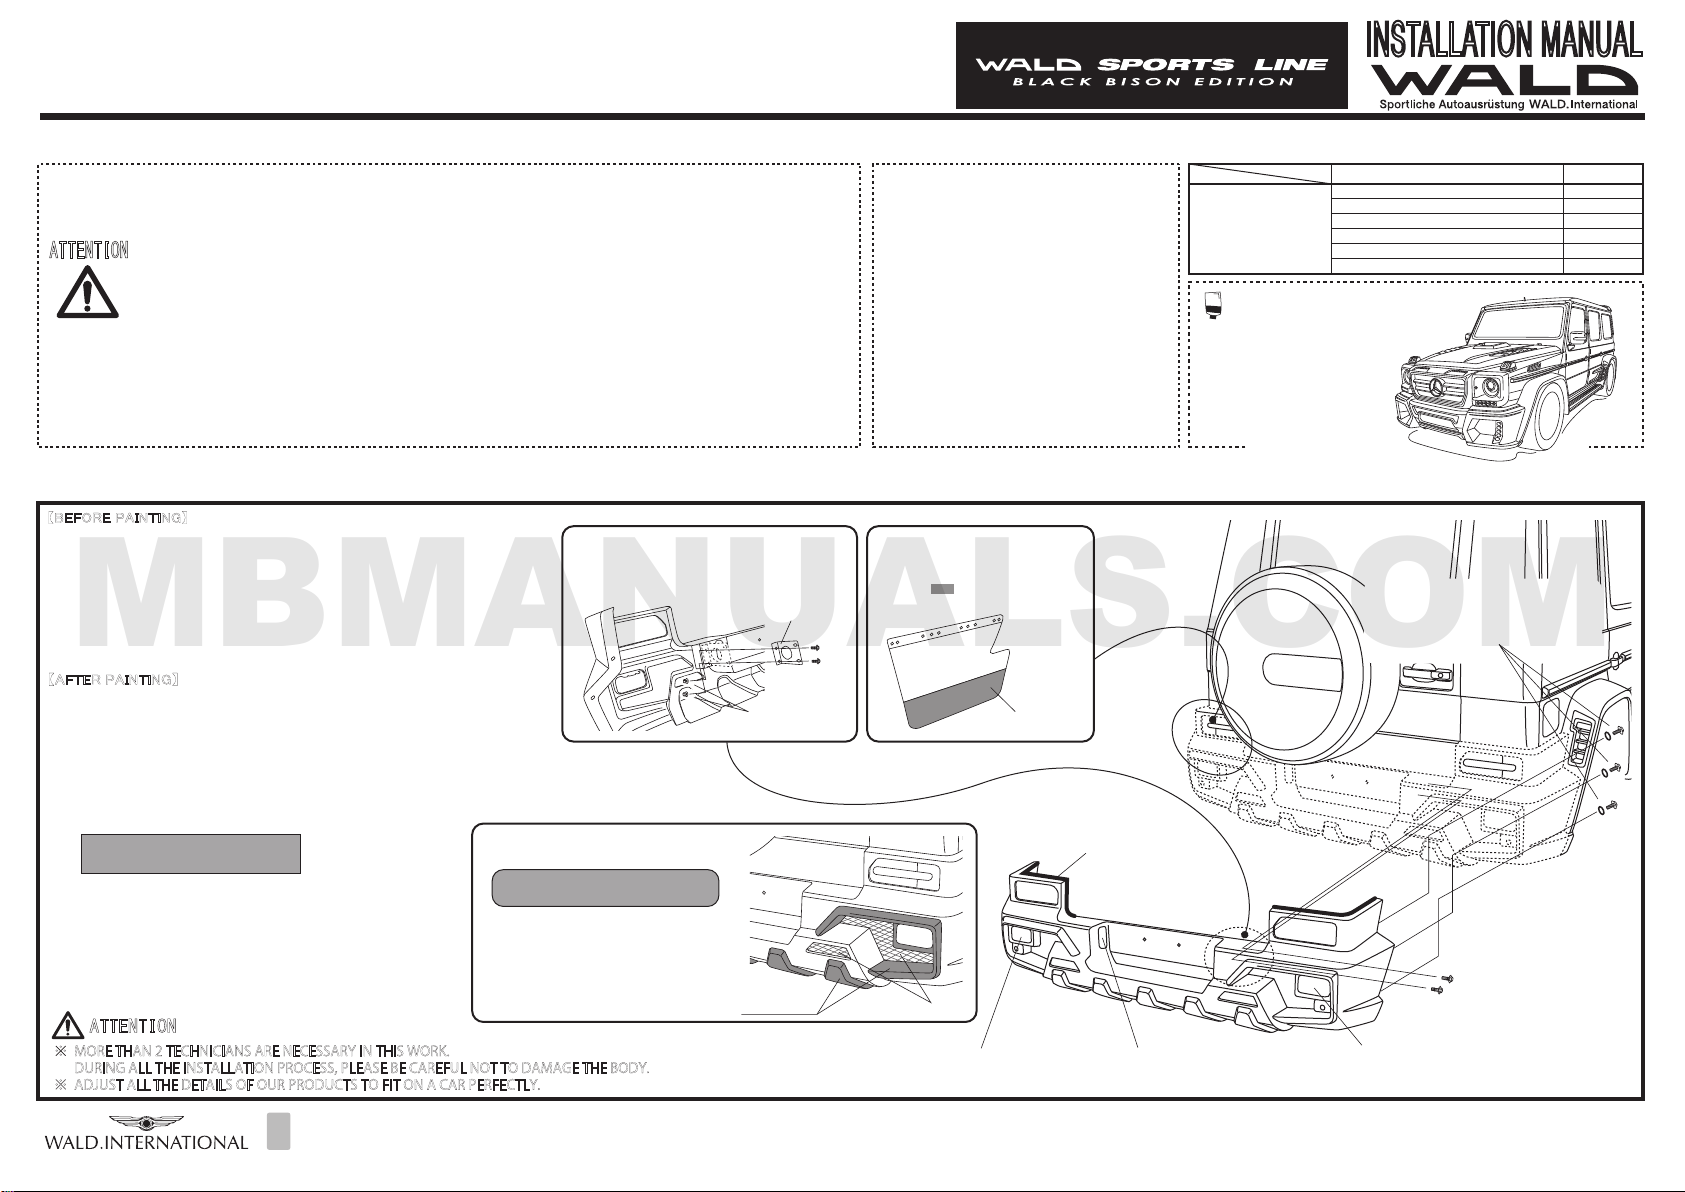
【
BEFORE PAINTING
】
1) Remove OEM front bumper according to the Mercedes-Benz service manual.
※Use the bracket (sold separately) to fix OEM intercooler to the body only for Turbo Model.
2) Relocate all the necessary OEM parts and WALD Front Grille to WALD Front Bumper.
※ Adjust the details of WALD Front Bumper to fit the body by rasps or sandpapers.
3) Paint WALD Front Bumper and Front Grille according to the picture.
【AFTER PAINTING】
4) Install the attached meshes to WALD Front Bumper and Front Grille with caulking glue.
5) Fix the attached LED lamps and WALD Front Grille to WALD Front Bumper.
※ Adjust optical axis, and make sure the LED lamps are fine to work before the installation.
6) Temporarily fix the attached rubber moldings to WALD Front Bumper.
7) Check all the balance of the location and fitting,then tighten all the OEM and attached bolts.
8) Cut the pins on the back of OEM front grille emblem,
and use the caulking glue to fix it on WALD Front Grille.
※ Leave it till completely fixed.
※ MORETHAN2TECHNICIANSARENECESSARYINTHISWORK.
DURINGALLTHEINSTALLATIONPROCESS,PLEASEBECAREFULNOTTODAMAGETHEBODY.
※ ADJUSTALLTHEDETAILSOFOURPRODUCTSTOFITONACARPERFECTLY.
ADD: 10-13 KYOGUCHI-CHO, TAKATSUKI, OSAKA, JAPAN
WALD. INTERNATIONAL ZIP: 569-0072 TEL: (81)-72-673-3000 FAX: (81)-72-673-3003
ATTENTION
ATTACHED LED LAMP
ATTACHED BOLTS (M6 x 12) & RUBBER WASHERS
※Fix WALD Over Fender and Front Bumper together.
OEM EMBLEM
※Cut the pins on the back.
OEM BOLTS
※Fix OEM bolts through the attached brackets
on WALD Front Bumper.
OEM BOLTS
※Fix OEM bolts with the OEM fixture.
WALD FRONT GRILLE
※Use the attached bolts (M6 x 12)
to fix from the rear of WALD Front Bumper.
ATTACHED
RUBBER MOLDING
INSTALLATION MANUAL
Completelydegreaseandpaintprimeronall
theinstallationpositionstoenhancetheviscidity
ofdoublesidedtape.
Usedryertowarmdoublesidedtapetoenhance
theviscidityinlowtemperature.
Keepthecarinadryconditionmorethan
24hoursaftergluing.
Donotwashthecarduringthistime.
THANKYOUFORPURCHASING.THISISTHEINSTALLATIONMANUALOFWALDFRONTBUMPERFORMERCEDES-BENZW463G-CLASS.
PLEASEREADTHISMANUALCAREFULLYBEFORETHEINSTALLATION.
※NORETURNSCANBEACCEPTEDBECAUSEOFIMPROPERINSTALLATIONORPAINTING.
※CHECKTHEFITMENT,ANDADJUSTALLTHEDETAILSBEFOREPAINTING.
Pleasepurchasedoublesidedtape,
primerandcaulkingglueat
autoaccessoryshoporhardwarestore.
Use caulking glue
to fill the gap
between the product
and the body.
※PLEASEBEAWAREOF:
■Youmaylosethewarrantyandalltheservicesfromthecarmaker,becauseofreplacingOEMparts.
■Reducedroadclearancemaycauseinconvenienceinusingparkingcurbsandgaragejack.
■FRP,ABSandPPEproductsareslightlyweakerthanOEMpartsincrashes.
■TheproductmaynotmatchthebodyandOEMcolorperfectly.
■Weassumenoresponsibilityforanydamageresultingfromimproperinstallation,painting,
modificationandanycutwoundinunsealing.
■ContactthecardealerwhenyouhaveanyquestioninremovingOEMparts.
■Duringalltheinstallationprocess,useparkingbrakeandstoptheenginecompletely.
■Useraspsorsandpaperstofittheproductstothebodyifthereisanindividualdifference.
■TheproductismadeofFRP.Handlewithcare.Donotgivetheexcessiveforce.
Graduallyfixtheboltsandnutsbycheckingthefitmentandbalanceoftheinstallation.
■Checkthefitment,andadjustallthedetailsofthefitmentsteadyandproper.
Pleasecheckthefitmentandallthedetailsregularly,fixtheboltsandnutsasnecessary.
■Theinstructionofpaintingisjustourrecommendation,pleasepaintitasyoulike.
PARTS
QUANTITIES
1
1
1SET
1
1SET
1SET
14
6
FRONTBUMPER
FRONTGRILLE
MESHESFORFRONTBUMPER
MESHFORFRONTGRILLE
LEDLAMPKIT
RUBBERMOLDING
BOLTS(M6x12)
RUBBERWASHERS
FRONTBUMPER
ATTENTION
ATTACHED MESH
MATTE BLACK
■HOW TO INSTALL THE ATTACHED MESHES
(STEP 4)
Use pins and caulking glue to install
the attached meshes to WALD Front Bumper
from the rear.
※Paint the inside of the ducts and pins in black.
■WALD SHOWCAR IS PAINTED LIKE THE PICTURE (STEP 3)
Make clear coating for the carbon parts
of WALD Front Bumper.
INTERCOOLER
OEM BOLTS OEM NUT
OEM PLASTIC NUT
BRACKET
■HOW TO FIX OEM INTERCOOLER TO THE BODY (Step 1)
BRACKET (SOLD SEPARATELY)