Wald GDJ150W User manual

2018/07
FRONT SPOILER
GDJ150W/TRJ150W
PARTS
QUANTITIES
FRONT SPOILER 1
4
2
2
1
1 SET
1
FRONT SPOILER
TAPPING SCREWS (M5 x 15)
BRACKET A WITH NUTS
BRACKET B
CHROME ACCENT FOR CENTER
CHROME ACCENT FOR RIGHT AND LEFT
RUBBER MOULDING (Black/Gray)
(2017y-)
LAND CRUISER PRADO
ADD: 10-13 KYOGUCHI-CHO, TAKATSUKI, OSAKA, JAPAN
WALD. INTERNATIONAL
ZIP: 569-0072 TEL: (81)-72-673-3000 FAX: (81)-72-673-3003
INSTALLATION MANUAL
Completelydegreaseandpaintprimeronall
theinstallationpositionstoenhancetheviscidity
ofdoublesidedtape.
Usedryertowarmdoublesidedtapetoenhance
theviscidityinlowtemperature.
Keepthecarinadryconditionmorethan
24hoursaftergluing.
Donotwashthecarduringthistime.
THANKYOUFORPURCHASING.THISISTHEINSTALLATIONMANUALOFWALDFRONTSPOILERFORTOYOTALANDCRUISERPRADO.
PLEASEREADTHISMANUALCAREFULLYBEFORETHEINSTALLATION.
※NORETURNSCANBEACCEPTEDBECAUSEOFIMPROPERINSTALLATIONORPAINTING.
※CHECKTHEFITMENT,ANDADJUSTALLTHEDETAILSBEFOREPAINTING.
Pleasepurchasedoublesidedtape,
primerandcaulkingglueat
autoaccessoryshoporhardwarestore.
Use caulking glue
to fill the gap
between the product
and the body.
※PLEASEBEAWAREOF:
■Youmaylosethewarrantyandalltheservicesfromthecarmaker,becauseofreplacingOEMparts.
■Reducedroadclearancemaycauseinconvenienceinusingparkingcurbsandgaragejack.
■FRP,ABSandPPEproductsareslightlyweakerthanOEMpartsincrashes.
■TheproductmaynotmatchthebodyandOEMcolorperfectly.
■Weassumenoresponsibilityforanydamageresultingfromimproperinstallation,painting,
modificationandanycutwoundinunsealing.
■ContactthecardealerwhenyouhaveanyquestioninremovingOEMparts.
■Duringalltheinstallationprocess,useparkingbrakeandstoptheenginecompletely.
■Useraspsorsandpaperstofittheproductstothebodyifthereisanindividualdifference.
■TheproductismadeofFRP.Handlewithcare.Donotgivetheexcessiveforce.
Graduallyfixtheboltsandnutsbycheckingthefitmentandbalanceoftheinstallation.
■Checkthefitment,andadjustallthedetailsofthefitmentsteadyandproper.
Pleasecheckthefitmentandallthedetailsregularly,fixtheboltsandnutsasnecessary.
■Theinstructionofpaintingisjustourrecommendation,pleasepaintitasyoulike.
ATTENTION
【
BEFORE PAINTING
】
1) Temporarily install WALD Front Spoiler to the body with the attached brackets A and B.
(Do not use the double sided tape at this moment)
※ Adjust the details of WALD Front Spoiler to fit the body by rasps or sandpapers.
2) Check the balance of the installation position of WALD Front Spoiler on OEM Front Bumper.
3) Paint WALD Front Spoiler according to the picture (As per enclosure).
【AFTER PAINTING】
4) Attach the rubber moulding on WALD Front Spoiler.
5) Completely degrease the installation position.
6) Use caulking glue and the double sided tape to install WALD Front Half Spoiler
with the attached brackets to OEM front bumper, then fix all the attached tapping screws tightly.
※ The ends of the release paper of the double sided tape must be fold to adjust the location.
7) Completely degrease the installation position for the attached Chrome Accents.
8) Use caulking glue and the double sided tape to fix the chrome accents on WALD Front Spoiler.
9) Leave it till completely fixed.
※ MORETHAN2TECHNICIANSARENECESSARYINTHISWORK.
DURINGALLTHEINSTALLATIONPROCESS,PLEASEBECAREFULNOTTODAMAGETHEBODY.
※ ADJUSTALLTHEDETAILSOFOURPRODUCTSTOFITONACARPERFECTLY.
ATTENTION
PICTURE 1
HOW TO INSTALL BRACKET (STEP 2, 9)
TAPPING SCREWS (M5 x 15) ATTACHED
BRACKET A
ATTACHED
BRACKET B
CHROME ACCENT FOR RIGHT AND LEFT
CHROME ACCENT
FOR CENTER
ATTACHED DOUBLE SIDED TAPE
DOUBLE SIDED TAPE
(Sold Separately)
DOUBLE SIDED TAPE
(Sold Separately)
RUBBER MOULDING
Adhesion Surface to
WALD Front Spoiler
■HOW TO ATTACH THE RUBBER MOULDING (STEP 5)
Apply primer on the adhesion
surface of
WALD Front Spoiler
before attaching
the rubber mouldings.
ATTACHED BRACKET A FIXED NUT
LONG HOLE
TAPPING SCREWS
(M5 x 15)
OEM
CLIP
OEM
BOLT
TAPPING SCREWS
(M5 x 15)
ATTACHED
RUBBER MOULDING
※Type of Adhesive : Use the Silicone Glue
※All the widths are only for a reference.
PICTURE 2
LOCATION OF
WALD FRONT SPOILER
Straight Line from the borderline
between OEM front bumper and
fender to WALD Front Spoiler.
About 313 mm

REAR SKIRT
GDJ150W/TRJ150W
PARTS
QUANTITIES
REAR SKIRT
OPTION PARTS
1
1
1 SET
1 SET
2
1
1 SET
1
1
1
REAR SKIRT with BRACKET
CHROME ACCENT FOR CENTER
CHROME ACCENT FOR RIGHT AND LEFT
REFLECTOR Right and Left
TAPPING SCREWS (M4 x 16)
SMOOTHING PANEL
(Not for installing LED Lamp)
RUBBER MOULDING (Black/Gray)
PATTERN PAPER
MUFFLER ADAPTOR
LED LAMP WITH TAPPING SCREWS
(2017y-)
LAND CRUISER PRADO
INSTALLATION MANUAL
Completelydegreaseandpaintprimeronall
theinstallationpositionstoenhancetheviscidity
ofdoublesidedtape.
Usedryertowarmdoublesidedtapetoenhance
theviscidityinlowtemperature.
Keepthecarinadryconditionmorethan
24hoursaftergluing.
Donotwashthecarduringthistime.
THANKYOUFORPURCHASING.THISISTHEINSTALLATIONMANUALOFWALDREARSKIRTFORTOYOTALANDCRUISERPRADO.
PLEASEREADTHISMANUALCAREFULLYBEFORETHEINSTALLATION.
※NORETURNSCANBEACCEPTEDBECAUSEOFIMPROPERINSTALLATIONORPAINTING.
※CHECKTHEFITMENT,ANDADJUSTALLTHEDETAILSBEFOREPAINTING.
Pleasepurchasedoublesidedtape,
primerandcaulkingglueat
autoaccessoryshoporhardwarestore.
Use caulking glue
to fill the gap
between the product
and the body.
※PLEASEBEAWAREOF:
■Youmaylosethewarrantyandalltheservicesfromthecarmaker,becauseofreplacingOEMparts.
■Reducedroadclearancemaycauseinconvenienceinusingparkingcurbsandgaragejack.
■FRP,ABSandPPEproductsareslightlyweakerthanOEMpartsincrashes.
■TheproductmaynotmatchthebodyandOEMcolorperfectly.
■Weassumenoresponsibilityforanydamageresultingfromimproperinstallation,painting,
modificationandanycutwoundinunsealing.
■ContactthecardealerwhenyouhaveanyquestioninremovingOEMparts.
■Duringalltheinstallationprocess,useparkingbrakeandstoptheenginecompletely.
■Useraspsorsandpaperstofittheproductstothebodyifthereisanindividualdifference.
■TheproductismadeofFRP.Handlewithcare.Donotgivetheexcessiveforce.
Graduallyfixtheboltsandnutsbycheckingthefitmentandbalanceoftheinstallation.
■Checkthefitment,andadjustallthedetailsofthefitmentsteadyandproper.
Pleasecheckthefitmentandallthedetailsregularly,fixtheboltsandnutsasnecessary.
■Theinstructionofpaintingisjustourrecommendation,pleasepaintitasyoulike.
ATTENTION
【
BEFORE PAINTING
】
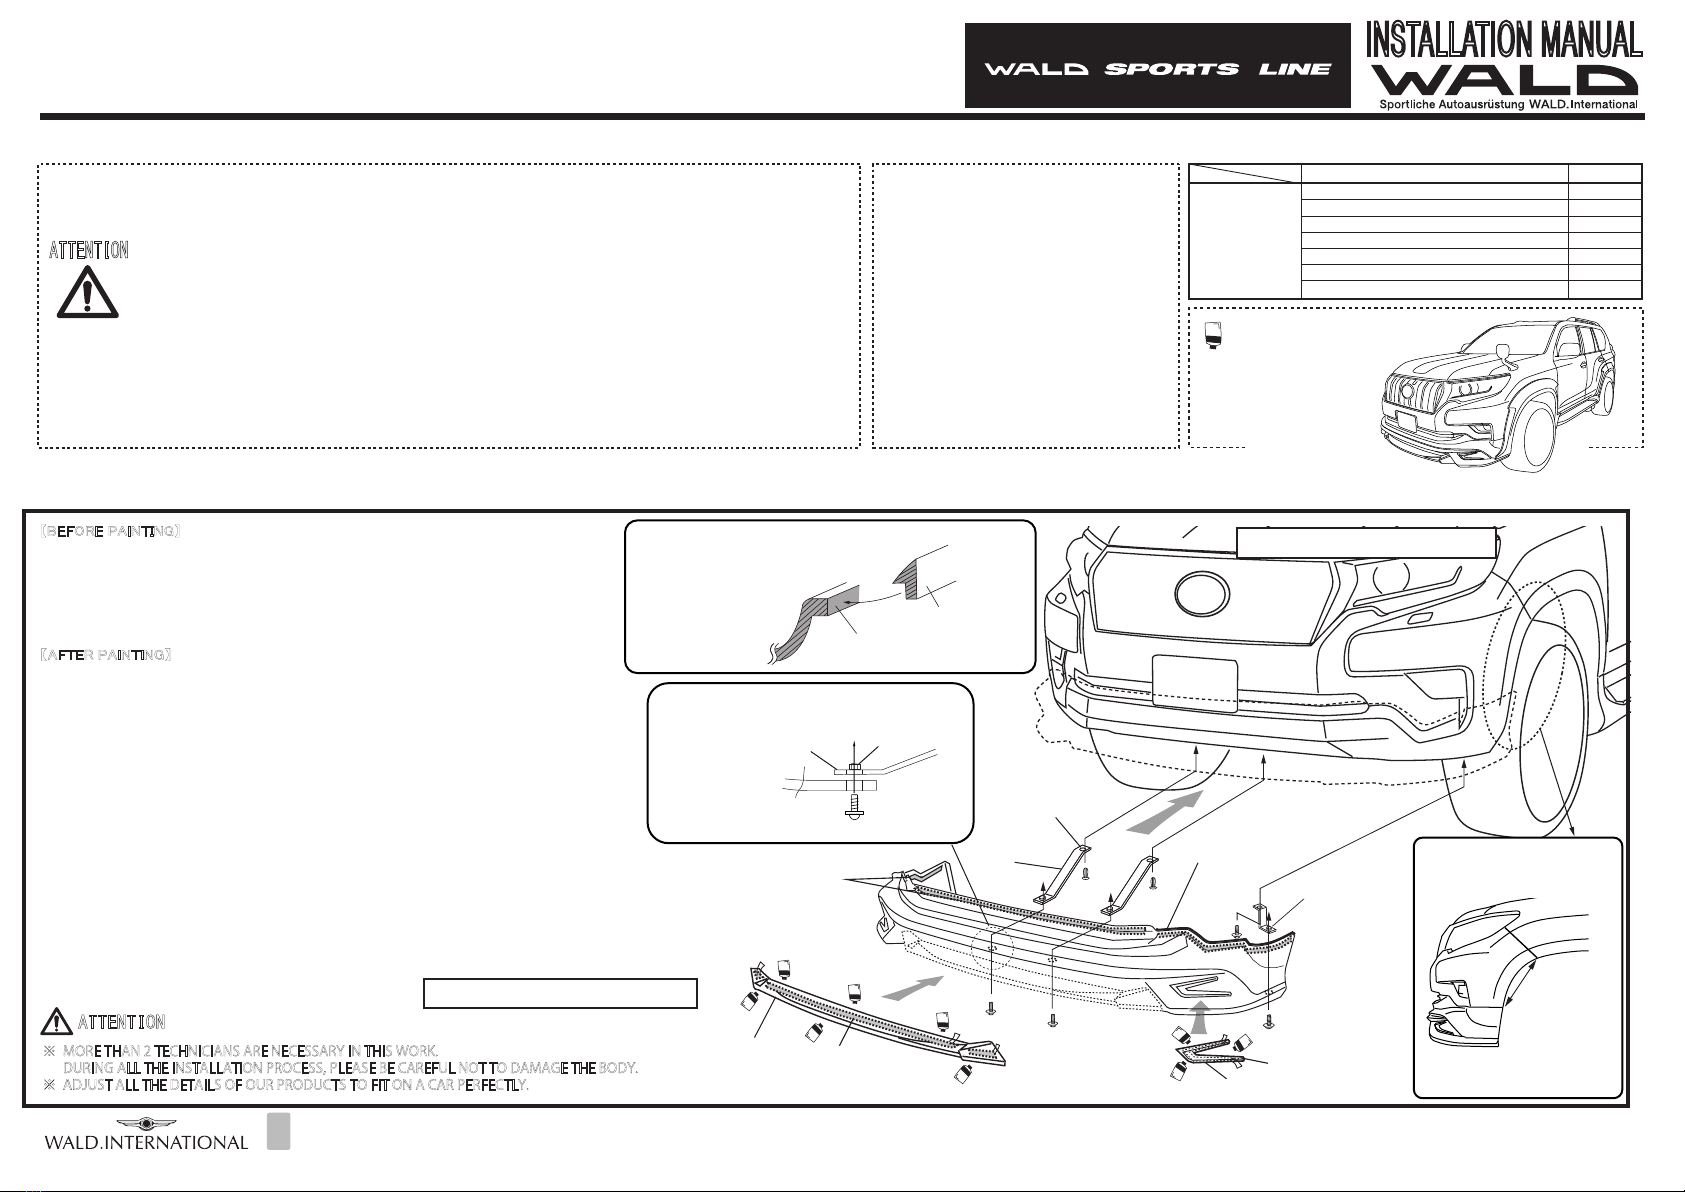
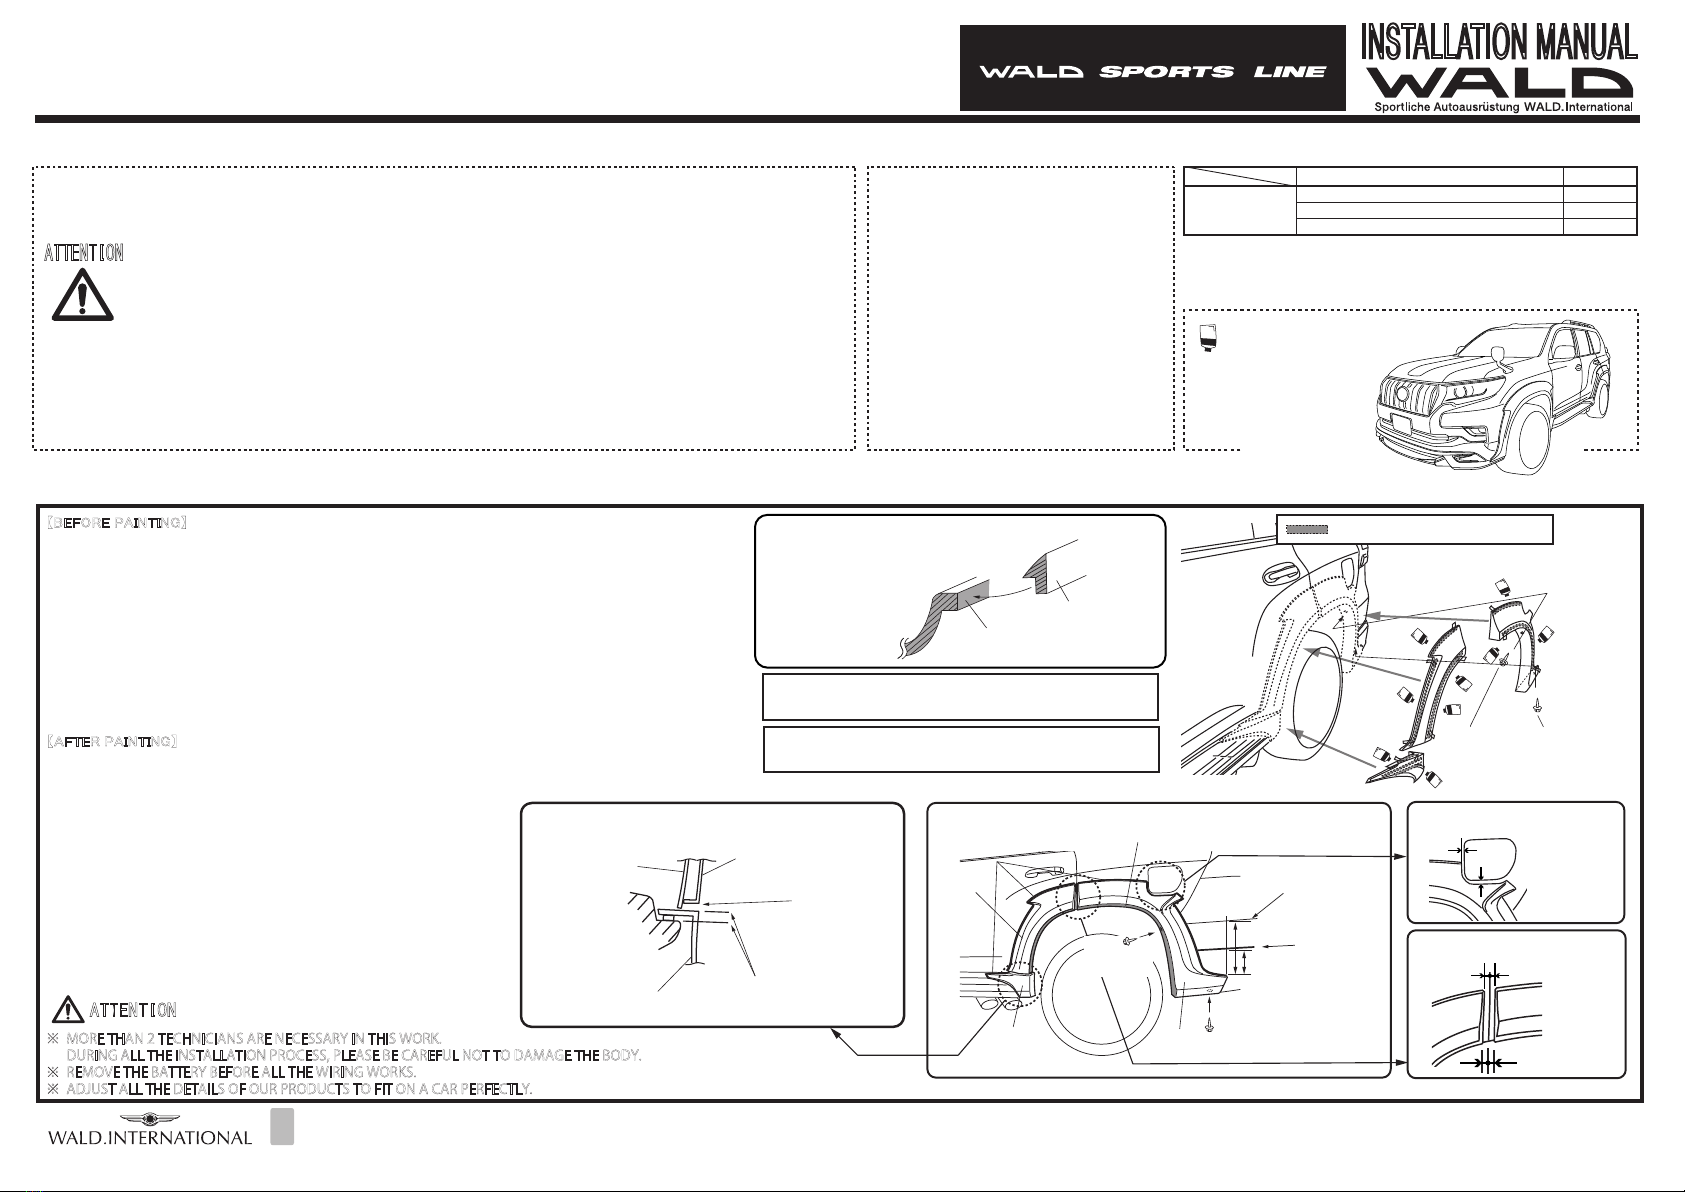
1) Mark the installation location (Height) with the attached pattern paper.
2) Temporarily install WALD Rear Skirt to the body with the attached brackets.
3) See Picture 2 for the installation location.
※ Adjust the details of WALD Rear Skirt to fit the body by rasps or sandpapers.
4) Check the balance of the installation position of WALD Rear Skirt on OEM rear bumper.
5) Make 24mm Diameter Holes according to the cutting line on WALD Rear Skirt for the car equipping PTS.
6) Paint WALD Rear Skirt according to the picture (As per enclosure).
【AFTER PAINTING】
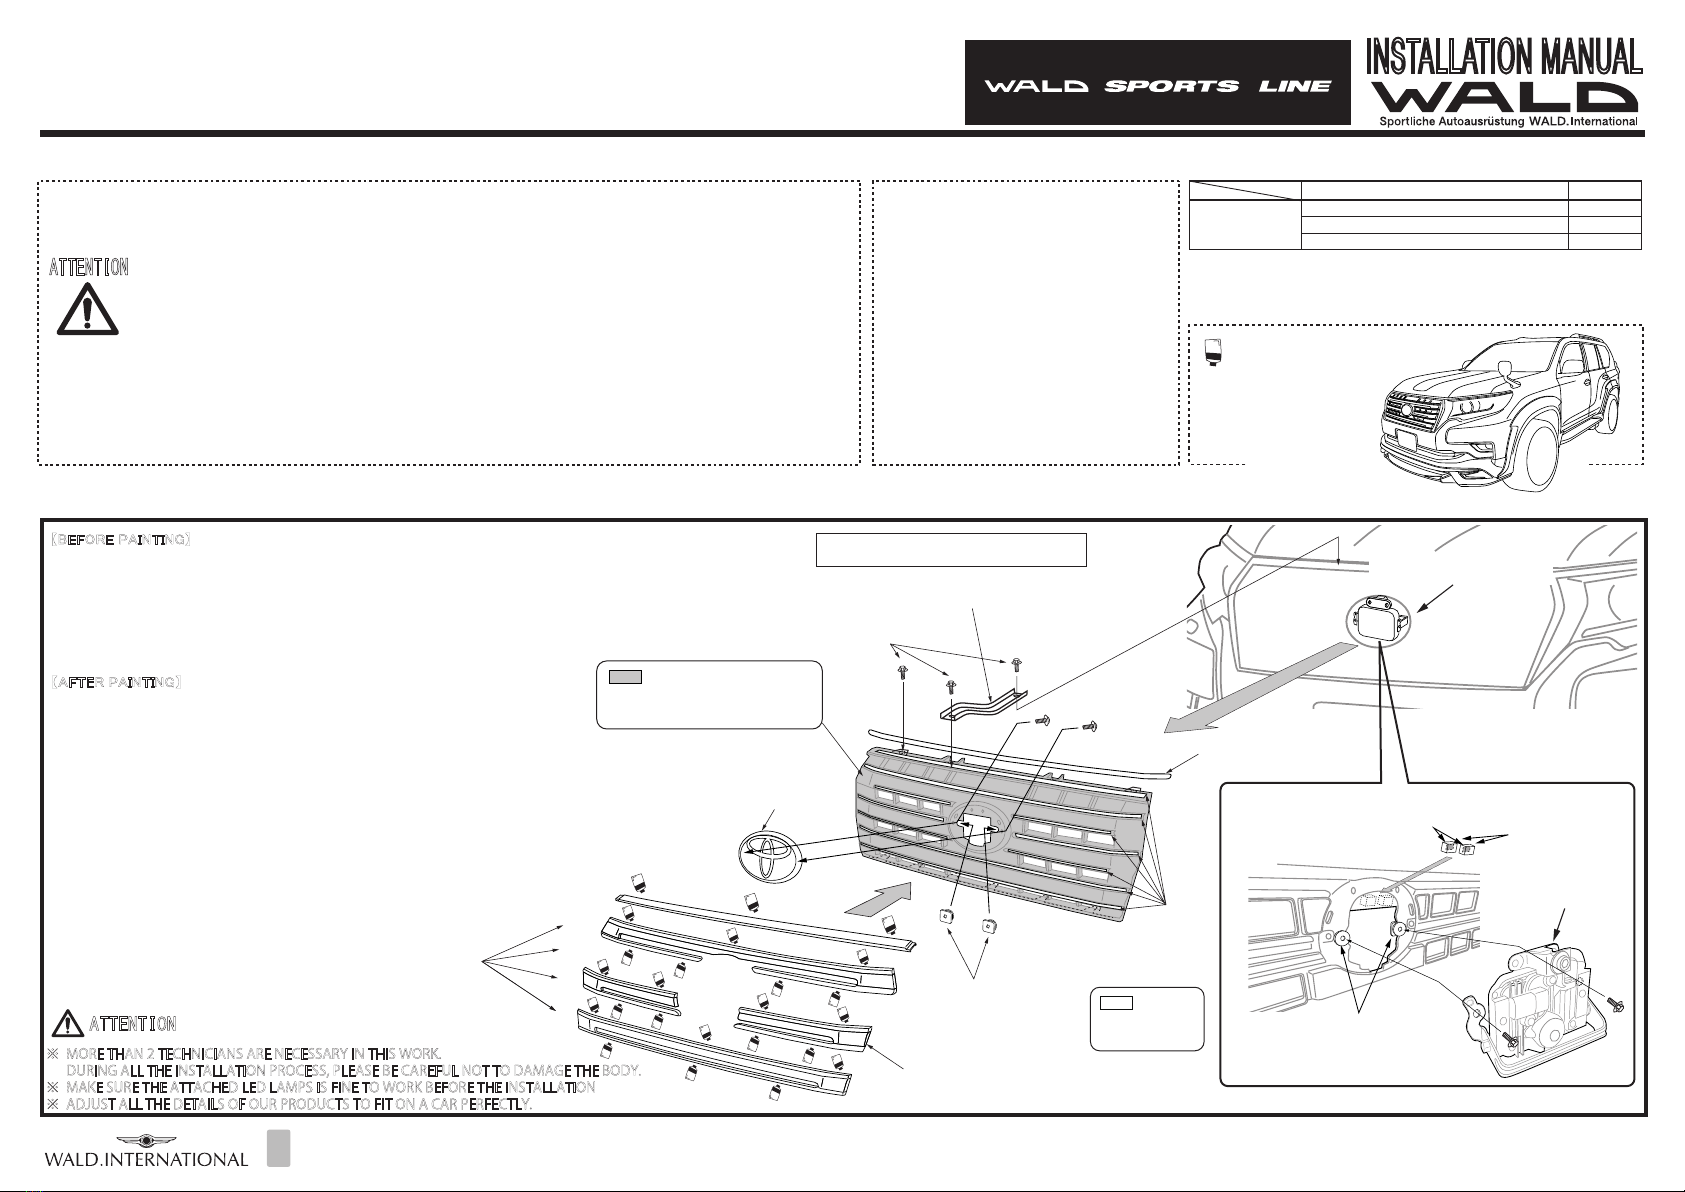
7) According the Picture 3, fix the attached Rubber Moulding and Reflectors on WALD Rear Skirt.
8) Completely degrease the installation position, then fix the attached Smoothing Panel with the caulking glue.
※ For a Car installed LED Stop Lamp, prepare the harness to use it as the Back Fog Lamp.
9) "Completely degrease the installation position of WALD Rear Skirt and OEM rear bumper."
10) Use calking glue and the attached double-sided tape to install WALD Rear Skirt to OEM rear bumper, then fix all screws and bolts tightly.
※ Fold the both ends of release paper of double sided tape to adjust the location.
11) Fix the attached Chrome Accent on WALD Rear Skirt with caulking glue and the attached double-sided tape.
12) Check all the details of the fitment.
13) Leave it till completely fixed.
RUBBER MOULDING
Adhesion Surface to
WALD REAR SKIRT
■HOW TO ATTACH THE RUBBER MOULDING (STEP 7)
Apply primer on the adhesion
surface of
WALD Rear Skirt
before attaching
the rubber mouldings.
※ MORETHAN2TECHNICIANSARENECESSARYINTHISWORK.
DURINGALLTHEINSTALLATIONPROCESS,PLEASEBECAREFULNOTTODAMAGETHEBODY.
※ MAKESURETHEATTACHEDLEDLAMPSISFINETOWORKBEFORETHEINSTALLATION
※ ADJUSTALLTHEDETAILSOFOURPRODUCTSTOFITONACARPERFECTLY.
ATTENTION
ADD: 10-13 KYOGUCHI-CHO, TAKATSUKI, OSAKA, JAPAN
WALD. INTERNATIONAL ZIP: 569-0072 TEL: (81)-72-673-3000 FAX: (81)-72-673-3003
ATTACHED
REFLECTOR
PICTURE 3
HOW TO FIX THE
ATTACHED REFLECTORS
STEP 8
ATTACHED SMOOTHING PANEL
LED LAMP (Sold Separately)
RUBBER MOULDING
PARKING SENSOR
※Type of Adhesive : Use the Silicone Glue
OEM BOLTS
ATTACHED
REFLECTORS
ATTACHED
TAPPING SCREWS
(M4 x 14)
DOUBLE SIDED TAPE
(Sold Separately)
DOUBLE SIDED TAPE
(Sold Separately)
CHROME ACCENT FOR RIGHT AND LEFT
CHROME ACCENT
FOR CENTER
OEM BOLT
ATTACHED DOUBLE SIDED TAPE
Peel off the release papers
from the center.
2018/07
CROSS SECTION OF
OEM REAR BUMPER
CROSS SECTION OF
WALD REAR SKIRT
210mm
19mm
PATTERN PAPER
MARKED POSITION
PICTURE 1 LOCATION OF WALD REAR SKIRT
Match the bottom of the pattern paper and top of the rubber moulding.
RUBBER MOULDING
PICTURE 2
LOCATION FOR THE
FENDER SIDE
WALD REAR SKIRT
※Need to adjust the proper location because of the individual difference of a car.
※All the widths are only for a reference.

FRONT OVER FENDER
2018/07
GDJ150W/TRJ150W
PARTS
QUANTITIES
FRONT OVER FENDER
1 SET
1
FRONT OVER FENDER
RUBBER MOULDING (Black/Gray)
(2017y-)
LAND CRUISER PRADO
INSTALLATION MANUAL
Completelydegreaseandpaintprimeronall
theinstallationpositionstoenhancetheviscidity
ofdoublesidedtape.
Usedryertowarmdoublesidedtapetoenhance
theviscidityinlowtemperature.
Keepthecarinadryconditionmorethan
24hoursaftergluing.
Donotwashthecarduringthistime.
THANKYOUFORPURCHASING.THISISTHEINSTALLATIONMANUALOFWALDOVERFENDERFORTOYOTALANDCRUISERPRADO.
PLEASEREADTHISMANUALCAREFULLYBEFORETHEINSTALLATION.
※NORETURNSCANBEACCEPTEDBECAUSEOFIMPROPERINSTALLATIONORPAINTING.
※CHECKTHEFITMENT,ANDADJUSTALLTHEDETAILSBEFOREPAINTING.
Pleasepurchasedoublesidedtape,
primerandcaulkingglueat
autoaccessoryshoporhardwarestore.
Use caulking glue
to fill the gap
between the product
and the body.
※PLEASEBEAWAREOF:
■Youmaylosethewarrantyandalltheservicesfromthecarmaker,becauseofreplacingOEMparts.
■Reducedroadclearancemaycauseinconvenienceinusingparkingcurbsandgaragejack.
■FRP,ABSandPPEproductsareslightlyweakerthanOEMpartsincrashes.
■TheproductmaynotmatchthebodyandOEMcolorperfectly.
■Weassumenoresponsibilityforanydamageresultingfromimproperinstallation,painting,
modificationandanycutwoundinunsealing.
■ContactthecardealerwhenyouhaveanyquestioninremovingOEMparts.
■Duringalltheinstallationprocess,useparkingbrakeandstoptheenginecompletely.
■Useraspsorsandpaperstofittheproductstothebodyifthereisanindividualdifference.
■TheproductismadeofFRP.Handlewithcare.Donotgivetheexcessiveforce.
Graduallyfixtheboltsandnutsbycheckingthefitmentandbalanceoftheinstallation.
■Checkthefitment,andadjustallthedetailsofthefitmentsteadyandproper.
Pleasecheckthefitmentandallthedetailsregularly,fixtheboltsandnutsasnecessary.
■Theinstructionofpaintingisjustourrecommendation,pleasepaintitasyoulike.
ATTENTION
【
BEFORE PAINTING
】
※ The picture shows for Left Side, and install on the Right Side as same as for Left Side.
1) Temporarily fix the attached WALD Front Over Fender according to the PICTURE 1, 2 and 3.
※ Adjust the details of WALD Front Over Fenders to fit the body by rasps or sandpapers.
2) Use the OEM Tapping Screws to install WALD Front Over Fenders on the body temporarily.
Check if opening the doors or not.
3) Use the masking tape to mark the location of WALD Front Over Fenders on the body.
4) Paint WALD Front Over Fenders according to the picture (As per enclosure).
【AFTER PAINTING】
5) Completely degrease the installation positions, then fix the attached rubber mouldings on WALD Front Over Fenders.
6) Completely degrease the installation positions, then use caulking glue to install WALD Front Over Fenders to the body.
7) Check all the details of the fitment, then tighten the OEM Tapping Screws..
8) Leave it till completely fixed.
RUBBER MOULDING
Adhesion Surface to
WALD Orver Fender
■HOW TO ATTACH THE RUBBER MOULDING (STEP 6)
Apply primer on the adhesion
surface of
WALD Over Fender
before attaching
the rubber mouldings.
※ MORETHAN2TECHNICIANSARENECESSARYINTHISWORK.
DURINGALLTHEINSTALLATIONPROCESS,PLEASEBECAREFULNOTTODAMAGETHEBODY.
※ REMOVETHEBATTERYBEFOREALLTHEWIRINGWORKS.
※ ADJUSTALLTHEDETAILSOFOURPRODUCTSTOFITONACARPERFECTLY.
ATTENTION
ADD: 10-13 KYOGUCHI-CHO, TAKATSUKI, OSAKA, JAPAN
WALD. INTERNATIONAL ZIP: 569-0072 TEL: (81)-72-673-3000 FAX: (81)-72-673-3003
※Type of Adhesive : Use the Silicone Glue
PICTURE 1
30mm
PICTURE 3
Not Including the Thickness
of Rubber Mouldings
PICTURE 2
LOCATION OF
WALD FRONT
OVER FENDER
OEM
TAPPING SCREWS
OEM
TAPPING SCREWS
CHECK IF
OPENING DOORS OR NOT.
BODY PRESS LINE
※All the widths are only for a reference.
55mm
190mm
BODY PRESS LINE
FROM DOOR
ATTACHED RUBBER MOULDING
Not Including the Thickness
of Rubber Mouldings
ATTACHED DOUBLE SIDED TAPE

REAR OVER FENDER
2018/07
ATTACHED
TAPPING SCREWS
(M4 x 14)
CROSS SECTION
OF THE DOOR
CROSS SECTION
OF PART B
CROSS SECTION
OF PART C
BODY SIDE
Bottom of
WALD Rear
Over Fender
must upper
than the
Bottom of Door
PART A
PART B
PART B
PART C PART A
Install Parallelly
with the Body Side
ATTACHED
TAPPING SCREWS
(M4 x 14)
GDJ150W/TRJ150W
PARTS
QUANTITIES
REAR OVER FENDER
1 SET
1
2
REAR OVER FENDER
RUBBER MOULDING (Black/Gray)
TAPPING SCREWS (M4 x 16)
(2017y-)
LAND CRUISER PRADO
INSTALLATION MANUAL
Completelydegreaseandpaintprimeronall
theinstallationpositionstoenhancetheviscidity
ofdoublesidedtape.
Usedryertowarmdoublesidedtapetoenhance
theviscidityinlowtemperature.
Keepthecarinadryconditionmorethan
24hoursaftergluing.
Donotwashthecarduringthistime.
THANKYOUFORPURCHASING.THISISTHEINSTALLATIONMANUALOFWALDOVERFENDERFORTOYOTALANDCRUISERPRADO.
PLEASEREADTHISMANUALCAREFULLYBEFORETHEINSTALLATION.
※NORETURNSCANBEACCEPTEDBECAUSEOFIMPROPERINSTALLATIONORPAINTING.
※CHECKTHEFITMENT,ANDADJUSTALLTHEDETAILSBEFOREPAINTING.
Pleasepurchasedoublesidedtape,
primerandcaulkingglueat
autoaccessoryshoporhardwarestore.
Use caulking glue
to fill the gap
between the product
and the body.
※PLEASEBEAWAREOF:
■Youmaylosethewarrantyandalltheservicesfromthecarmaker,becauseofreplacingOEMparts.
■Reducedroadclearancemaycauseinconvenienceinusingparkingcurbsandgaragejack.
■FRP,ABSandPPEproductsareslightlyweakerthanOEMpartsincrashes.
■TheproductmaynotmatchthebodyandOEMcolorperfectly.
■Weassumenoresponsibilityforanydamageresultingfromimproperinstallation,painting,
modificationandanycutwoundinunsealing.
■ContactthecardealerwhenyouhaveanyquestioninremovingOEMparts.
■Duringalltheinstallationprocess,useparkingbrakeandstoptheenginecompletely.
■Useraspsorsandpaperstofittheproductstothebodyifthereisanindividualdifference.
■TheproductismadeofFRP.Handlewithcare.Donotgivetheexcessiveforce.
Graduallyfixtheboltsandnutsbycheckingthefitmentandbalanceoftheinstallation.
■Checkthefitment,andadjustallthedetailsofthefitmentsteadyandproper.
Pleasecheckthefitmentandallthedetailsregularly,fixtheboltsandnutsasnecessary.
■Theinstructionofpaintingisjustourrecommendation,pleasepaintitasyoulike.
ATTENTION
【
BEFORE PAINTING
】
※ The picture shows for Left Side, and install on the Right Side as same as for Left Side.
1) Temporarily fix the attached WALD Rear Over Fender according to the PICTURE 1, 2, 3 and 4.
(In Order to Part A→B→C)
2) Put Part A of WALD Rear Over Fender on the body according to Picture 3.
※ Adjust the details of WALD Rear Over Fenders to fit the body by rasps or sandpapers.
3) Use the attached screws to install Mark the installation position,
then mark the holes for the attached tapping screws.
4) Take off the Part A from the body, and make holes according to the marked positions.
5) Use the masking tape to mark the location of WALD Rear Over Fenders on the body.
6) Paint WALD Rear Over Fenders according to the picture (As per enclosure).
【AFTER PAINTING】
7) Completely degrease the installation positions,
then fix the attached rubber mouldings on WALD Rear Over Fenders.
8) Completely degrease the installation positions,
then use caulking glue to install WALD Rear Over Fenders to the body.
9) Check all the details of the fitment, then tighten the OEM Tapping Screws..
10) Leave it till completely fixed.
ATTACHED
RUBBER MOULDING
PARTIAL CROSS
SECTION OF PART C
※ MORETHAN2TECHNICIANSARENECESSARYINTHISWORK.
DURINGALLTHEINSTALLATIONPROCESS,PLEASEBECAREFULNOTTODAMAGETHEBODY.
※ REMOVETHEBATTERYBEFOREALLTHEWIRINGWORKS.
※ ADJUSTALLTHEDETAILSOFOURPRODUCTSTOFITONACARPERFECTLY.
ATTENTION
ADD: 10-13 KYOGUCHI-CHO, TAKATSUKI, OSAKA, JAPAN
WALD. INTERNATIONAL
ZIP: 569-0072 TEL: (81)-72-673-3000 FAX: (81)-72-673-3003
OEM
TAPPING
SCREWS
AROUND FUEL PANEL
(Only on Left Side)
ATTACHED DOUBLE SIDED TAPE
4〜5mm 4〜5mm
5mm
6mm
※All the widths are only for a reference.
※Type of Adhesive : Use the Silicone Glue
PICTURE 1
PICTURE 4 PICTURE 2
PICTURE 3
(2)At Regular
Interval
(1)According to OEM Fender Arch Line
335mm
150mm
BETWEEN DOOR AND
REAR OEM FENDER
RUBBER MOULDING
Adhesion Surface to
WALD Over Fender
■HOW TO ATTACH THE RUBBER MOULDING (STEP 6)
Apply primer on the adhesion
surface of
WALD Over Fender
before attaching
the rubber mouldings.
BODY PRESS LINE
TOP OF
WALD
REAR SKIRT
OEM
TAPPING
SCREWS

FRONT GRILLE
2019/05
GDJ150W/TRJ150W
PARTS
QUANTITIES
FRONT GRILLE 1
EACH 1
1 SET
FRONT GRILLE
CHROME ACCENTS A, B, C, D, E
BLOCK SPACERS
(2017y-)
LAND CRUISER PRADO
INSTALLATION MANUAL
Completelydegreaseandpaintprimeronall
theinstallationpositionstoenhancetheviscidity
ofdoublesidedtape.
Usedryertowarmdoublesidedtapetoenhance
theviscidityinlowtemperature.
Keepthecarinadryconditionmorethan
24hoursaftergluing.
Donotwashthecarduringthistime.
THANKYOUFORPURCHASING.THISISTHEINSTALLATIONMANUALOFWALDFRONTGRILLEFORTOYOTALANDCRUISERPRADO.
PLEASEREADTHISMANUALCAREFULLYBEFORETHEINSTALLATION.
※NORETURNSCANBEACCEPTEDBECAUSEOFIMPROPERINSTALLATIONORPAINTING.
※CHECKTHEFITMENT,ANDADJUSTALLTHEDETAILSBEFOREPAINTING.
Pleasepurchasedoublesidedtape,
primerandcaulkingglueat
autoaccessoryshoporhardwarestore.
Use caulking glue
to fill the gap
between the product
and the body.
※PLEASEBEAWAREOF:
■Youmaylosethewarrantyandalltheservicesfromthecarmaker,becauseofreplacingOEMparts.
■Reducedroadclearancemaycauseinconvenienceinusingparkingcurbsandgaragejack.
■FRP,ABSandPPEproductsareslightlyweakerthanOEMpartsincrashes.
■TheproductmaynotmatchthebodyandOEMcolorperfectly.
■Weassumenoresponsibilityforanydamageresultingfromimproperinstallation,painting,
modificationandanycutwoundinunsealing.
■ContactthecardealerwhenyouhaveanyquestioninremovingOEMparts.
■Duringalltheinstallationprocess,useparkingbrakeandstoptheenginecompletely.
■Useraspsorsandpaperstofittheproductstothebodyifthereisanindividualdifference.
■TheproductismadeofFRP.Handlewithcare.Donotgivetheexcessiveforce.
Graduallyfixtheboltsandnutsbycheckingthefitmentandbalanceoftheinstallation.
■Checkthefitment,andadjustallthedetailsofthefitmentsteadyandproper.
Pleasecheckthefitmentandallthedetailsregularly,fixtheboltsandnutsasnecessary.
■Theinstructionofpaintingisjustourrecommendation,pleasepaintitasyoulike.
ATTENTION
【
BEFORE PAINTING
】
1) Check if all the parts are in a box or not.
2) Remove OEM Radiator Grille, Chrome Parts and Rubber Strip according to the TOYOTA service manual.
3) Remove OEM Emblem and Radar Unit from OEM Radiator Grille according to the TOYOTA service manual.
4) Temporarily install WALD Front Grille except the Attached Chrome Accents to the body.
※ Adjust the details of WALD Front Grille to fit the body by rasps or sandpapers.
5) Paint WALD Front Grille according to the picture.
【AFTER PAINTING】
6) According to HOW TO REPLACE OEM RADAR UNIT,
fix the attached Block Spacer on WALD Front Grille.
7) Temporarily install WALD Front Grille except the Attached Chrome Accents to the body.
8) Adjust the Angle, and Check the Functional Test at the local Toyota Dealer.
9) Fix the Attached Chrome Accents (A, B, C, D and E) on WALD Front Grille.
※ Completely degrease the installation position,
then fix them with the caulking glue and attached double-sided tapes.
※ Fold the both ends of release paper to adjust the location.
10) Check all the details of the fitment.
11) Fix all the OEM Parts taken at STEP 2 to the body.
ADD: 10-13 KYOGUCHI-CHO, TAKATSUKI, OSAKA, JAPAN
WALD. INTERNATIONAL ZIP: 569-0072 TEL: (81)-72-673-3000 FAX: (81)-72-673-3003
※ MORETHAN2TECHNICIANSARENECESSARYINTHISWORK.
DURINGALLTHEINSTALLATIONPROCESS,PLEASEBECAREFULNOTTODAMAGETHEBODY.
※ MAKESURETHEATTACHEDLEDLAMPSISFINETOWORKBEFORETHEINSTALLATION
※ ADJUSTALLTHEDETAILSOFOURPRODUCTSTOFITONACARPERFECTLY.
ATTENTION
Type of Adhesive : Use the Silicone Glue
REPLACE OEM RADAR UNIT
BACK SIDE OF
WALD FRONT GRILLE
REPLACE OEM BRACKET
OEM BOLTS
ATTACHED
CHROME ACCENTS
ATTACHED CHROME ACCENTS
※Paint in Black for the Basement
of WALD Front Grille
A
B
C
D
E
DOUBLE-SIDED
TAPE
DOUBLE-SIDED
TAPE
REPLACE OEM RUBBER STRIP
REPLACE OEM NUTS
REPLACE OEM NUTS
OEM BOLTS
ATTACHED
BLOCK SPACER
REPLACE OEM EMBLEM
OEM BOLTS
■HOW TO REPLACE OEM RADAR UNIT
RADAR UNIT
DOUBLE-SIDED TAPE

2018/07
HOW TO PAINT WALD BODY PARTS
STEP 4
STEP 4
STEP 6
STEP 5
MATTE BLACK
MATTE BLACK
SILVER
SILVER
FRONT SPOILER REAR SKIRT
FRONT OVER FENDER REAR OVER FENDER
GDJ150W/TRJ150W
(2017y-)
LAND CRUISER PRADO
INSTALLATION MANUAL
ADD: 10-13 KYOGUCHI-CHO, TAKATSUKI, OSAKA, JAPAN
WALD. INTERNATIONAL
ZIP: 569-0072 TEL: (81)-72-673-3000 FAX: (81)-72-673-3003
This manual suits for next models
1
Table of contents
Other Wald Automobile Accessories manuals
Popular Automobile Accessories manuals by other brands

Prorack
Prorack K138 Fitting instructions

Dometic
Dometic COOLFREEZE CDF16 operating manual

Great day
Great day UVFR751 Instructions for installation and use

2point5
2point5 spec.dock Audi TT v.2 installation instructions

Cruz
Cruz Airo Dark T Assembly instructions

Car-Interface
Car-Interface CI-RL3-MIB-TT-LA manual