manuals.online logo
Brands
  1. Home
  2. •
  3. Brands
  4. •
  5. Wald
  6. •
  7. Automobile Accessories
  8. •
  9. Wald SPORTS LINE C-HR ZYX10 User manual

Wald SPORTS LINE C-HR ZYX10 User manual

C-HR
FRONT HALF SPOILER
PARTS
QUANTITIES
FRONT HALF SPOILER 1
1 SET
1
4
2
2
FRONT SPOILER
CHROME ACCENTS
RUBBER MOLDING
TAPPING SCREWS (M5 X 16)
BRACKETS
BOLTS (M5 X 15)
(2017y )ZYX10
2018/01
RUBBER MOLDING
ADHESIVE SURFACE
■HOW TO FIX THE ATTACHED
  RUBBER MOLDINGS (STEP 6)
Priming the surface,
then fix the attached
rubber moldings.
ATTACHED
DOUBLE-SIDED TAPE
CHROME ACCENT
※USE CAULKING GLUE AND ATTACHED DOUBLE-SIDED TAPE
ATTACHED TAPPING SCREWS (M5 X 16)
OEM BOLTS
OEM BOLTS
ATTACHED BOLTS
(M5 X 15)
ATTACHED BOLTS
(M5 X 15)
NEED TO ADJUST WITH THE BODY LINE CAREFULLY
※WALD SHOWCAR IS PAINTED LIKE THE PICTURE (STEP 4)
MATTE BLACK
MATTE BLACK
BRACKET
INSTALLATION MANUAL
Completelydegreaseandpaintprimeronall
theinstallationpositionstoenhancetheviscidity
ofdoublesidedtape.
Usedryertowarmdoublesidedtapetoenhance
theviscidityinlowtemperature.
Keepthecarinadryconditionmorethan
24hoursaftergluing.
Donotwashthecarduringthistime.
THANKYOUFORPURCHASING.THISISTHEINSTALLATIONMANUALOFWALDFRONTHALFSPOILERFORTOYOTAZYX10C-HR.
PLEASEREADTHISMANUALCAREFULLYBEFORETHEINSTALLATION.
※NORETURNSCANBEACCEPTEDBECAUSEOFIMPROPERINSTALLATIONORPAINTING.
※CHECKTHEFITMENT,ANDADJUSTALLTHEDETAILSBEFOREPAINTING.
Pleasepurchasedoublesidedtape,
primerandcaulkingglueat
autoaccessoryshoporhardwarestore.
Use caulking glue
to fill the gap
between the product
and the body.
※PLEASEBEAWAREOF:
■Youmaylosethewarrantyandalltheservicesfromthecarmaker,becauseofreplacingOEMparts.
■Reducedroadclearancemaycauseinconvenienceinusingparkingcurbsandgaragejack.
■FRP,ABSandPPEproductsareslightlyweakerthanOEMpartsincrashes.
■TheproductmaynotmatchthebodyandOEMcolorperfectly.
■Weassumenoresponsibilityforanydamageresultingfromimproperinstallation,painting,
modificationandanycutwoundinunsealing.
■ContactthecardealerwhenyouhaveanyquestioninremovingOEMparts.
■Duringalltheinstallationprocess,useparkingbrakeandstoptheenginecompletely.
■Useraspsorsandpaperstofittheproductstothebodyifthereisanindividualdifference.
■TheproductismadeofFRP.Handlewithcare.Donotgivetheexcessiveforce.
Graduallyfixtheboltsandnutsbycheckingthefitmentandbalanceoftheinstallation.
■Checkthefitment,andadjustallthedetailsofthefitmentsteadyandproper.
Pleasecheckthefitmentandallthedetailsregularly,fixtheboltsandnutsasnecessary.
■Theinstructionofpaintingisjustourrecommendation,pleasepaintitasyoulike.
ATTENTION
【
BEFORE PAINTING
】
1) Temporarily install WALD Front Spoiler to the body.
※ Adjust the details of WALD Front Half Spoiler to fit the body by rasps or sandpapers.
2) Mark the location of the holes for the attached tapping screws after checking the balance.
3) Take off WALD Front Half Spoiler, then make holes according to the marked positions.
4) Paint WALD Front Half Spoiler according to the picture.
【AFTER PAINTING】
5) Completely degrease the installation position,
then use calking glue to install WALD Front Half Spoiler to the body.
6) Fix the attached brackets and rubber moldings on WALD Front Half Spoiler.
7) Temporarily install WALD Front Spoiler to the body with the attached double-sided tape.
※ Fold the both ends of release paper to adjust the location.
8) Check all the details of the fitment, then tighten the attached bolts.
9) Fix the attached chrome accents on WALD Front Half Spoiler with the double-sided tape and caulking glue.
10) Leave it till completely fixed.
※ MORETHAN2TECHNICIANSARENECESSARYINTHISWORK.DURINGALLTHEINSTALLATIONPROCESS,PLEASEBECAREFULNOTTODAMAGETHEBODY.
※ DEGREASEALLTHEINSTALLATIONPOSITIONS,ANDREMOVETHEBODYPROTECTIONCOATINGBEFORETHEINSTALLATION.
※ ADJUSTALLTHEDETAILSOFOURPRODUCTSTOFITONACARPERFECTLY.
ATTENTION
ADD: 10-13 KYOGUCHI-CHO, TAKATSUKI, OSAKA, JAPAN
WALD. INTERNATIONAL
ZIP: 569-0072 TEL: (81)-72-673-3000 FAX: (81)-72-673-3003
BRACKET A (LONG)
SIDE STEP
2018/01
RUBBER MOLDING
ADHESIVE SURFACE
■HOW TO FIX THE ATTACHED RUBBER MOLDINGS (STEP 6)
Priming the surface,
then fix the attached
rubber moldings.
ATTACHED
DOUBLE-SIDED TAPE
ATTACHED DOUBLE-SIDED TAPE
OEM TAPPING SCREW
OEM TAPPING SCREW
FRONT
■ HOW TO FIX THE ATTACHED
DOOR PANEL AERO COVERS
(STEP 7)
BRACKET A (LONG)
BRACKET B (SHORT)
GROMMET
OEM TAPPING SCREW
OEM TAPPING SCREW
OEM TAPPING SCREW
【
BEFORE PAINTING
】
1) Temporarily install WALD Side Steps to the body with the attached brackets.
※ Adjust the details of WALD Sides Steps to fit the body by rasps or sandpapers.
2) Mark the location of Door Panel Aero Covers to the body
with the masking tape after checking the balance.
3) Paint WALD Side Steps and Door Panel Aero Covers.
【AFTER PAINTING】
4) Completely degrease the installation position.
5) Fix the attached brackets on WALD Side Steps.
6) Fix the attached rubber moldings on WALD Side Steps.
7) Use caulking glue and the attached double-sided tape to install WALD Side Steps
and Door Panel Aero Covers to the body.
※ Fold the both ends of release paper to adjust the location.
8) Use OEM tapping screws and the attached bolts to fix WALD Side Steps tightly.
9) Leave them till completely fixed.
ATTACHED BOLT
(M5 x 15)
ATTACHED BOLT
(M5 x 15)
ATTACHED BOLT
(M5 x 15)
Keep the enough clearance to
Open/Close the doors
Fix along with the fender line
C-HR
PARTS
QUANTITIES
SIDE STEP 1 SET
1 SET
1 SET
4
2
3 SETS
6
SIDE STEPS
RUBBER MOLDING
DOOR PANEL AERO COVERS
BRACKET A (LONG)
BRACKET B (SHORT)
BOLTS (M5 X 15)
GROMMET
(2017y )ZYX10
INSTALLATION MANUAL
Completelydegreaseandpaintprimeronall
theinstallationpositionstoenhancetheviscidity
ofdoublesidedtape.
Usedryertowarmdoublesidedtapetoenhance
theviscidityinlowtemperature.
Keepthecarinadryconditionmorethan
24hoursaftergluing.
Donotwashthecarduringthistime.
THANKYOUFORPURCHASING.THISISTHEINSTALLATIONMANUALOFWALDSIDESTEPSFORTOYOTAZYX10C-HR.
PLEASEREADTHISMANUALCAREFULLYBEFORETHEINSTALLATION.
※NORETURNSCANBEACCEPTEDBECAUSEOFIMPROPERINSTALLATIONORPAINTING.
※CHECKTHEFITMENT,ANDADJUSTALLTHEDETAILSBEFOREPAINTING.
Pleasepurchasedoublesidedtape,
primerandcaulkingglueat
autoaccessoryshoporhardwarestore.
Use caulking glue
to fill the gap
between the product
and the body.
※PLEASEBEAWAREOF:
■Youmaylosethewarrantyandalltheservicesfromthecarmaker,becauseofreplacingOEMparts.
■Reducedroadclearancemaycauseinconvenienceinusingparkingcurbsandgaragejack.
■FRP,ABSandPPEproductsareslightlyweakerthanOEMpartsincrashes.
■TheproductmaynotmatchthebodyandOEMcolorperfectly.
■Weassumenoresponsibilityforanydamageresultingfromimproperinstallation,painting,
modificationandanycutwoundinunsealing.
■ContactthecardealerwhenyouhaveanyquestioninremovingOEMparts.
■Duringalltheinstallationprocess,useparkingbrakeandstoptheenginecompletely.
■Useraspsorsandpaperstofittheproductstothebodyifthereisanindividualdifference.
■TheproductismadeofFRP.Handlewithcare.Donotgivetheexcessiveforce.
Graduallyfixtheboltsandnutsbycheckingthefitmentandbalanceoftheinstallation.
■Checkthefitment,andadjustallthedetailsofthefitmentsteadyandproper.
Pleasecheckthefitmentandallthedetailsregularly,fixtheboltsandnutsasnecessary.
■Theinstructionofpaintingisjustourrecommendation,pleasepaintitasyoulike.
ATTENTION
※ MORETHAN2TECHNICIANSARENECESSARYINTHISWORK.
 DURINGALLTHEINSTALLATIONPROCESS,PLEASEBECAREFULNOTTODAMAGETHEBODY.
※ ADJUSTALLTHEDETAILSOFOURPRODUCTSTOFITONACARPERFECTLY.
ATTENTION
ADD: 10-13 KYOGUCHI-CHO, TAKATSUKI, OSAKA, JAPAN
WALD. INTERNATIONAL ZIP: 569-0072 TEL: (81)-72-673-3000 FAX: (81)-72-673-3003
REAR DIFFUSER
2018/01
THE COLD WEATHER SPECIFICATION VEHICLE
: Replace OEM Reverse Fog Lamp
Under Part of OEM Rear Bumper
ATTACHED BOLT (M6 x 15)
BRACKET A (LONG) BRACKET B (SHORT)
※PIC 3 WALD SHOWCAR IS PAINTED LIKE THE PICTURE (STEP 6)
※PIC 4 (STEP 2)
MATTE BLACK
OEM BLUE PIN
(TOTAL : 6 PINS)
ATTACHED
BOLTS (M5 x 15)
OEM CLIP
※PIC 2
HOW TO FIX OEM REAR FOG LAMP/PANEL PLATE
(STEP 4, 8)
ATTACHED
BOLT (M5 x 15)
ATTACHED
BOLT (M5 x 15)
ATTACHED
BOLT (M5 x 15)
REPLACE OEM TOW HOOK COVER
Make the Holes fitting with OEM Parking Sensor Size.
OEM BOLT
25mm
LEFT RIGHT
20mm
※PIC 1
HOW TO CUT OEM INNER PART
(View of the Bottom) (STEP 3)
REAR
ATTACHED NUT (M5)
ATTACHED
NUT (M5)
ATTACHED
NUT (M5)
ATTACHED
NUT (M5)
OEM PANEL PLATE
OEM REAR FOG LAMP
ATTACHED
ADAPTOR
ATTACHED
ADAPTOR
C-HR
PARTS
QUANTITIES
REAR DIFFUSER 1
2
2
3 SETS
4
REAR DIFFUSER
BRACKET A (LONG)
BRACKET B (SHORT)
BOLTS & NUTS (M5 x 15)
BOLTS (M6 x 15)
(2017y )ZYX10
INSTALLATION MANUAL
Completelydegreaseandpaintprimeronall
theinstallationpositionstoenhancetheviscidity
ofdoublesidedtape.
Usedryertowarmdoublesidedtapetoenhance
theviscidityinlowtemperature.
Keepthecarinadryconditionmorethan
24hoursaftergluing.
Donotwashthecarduringthistime.
THANKYOUFORPURCHASING.THISISTHEINSTALLATIONMANUALOFWALDREARDIFFUSERFORTOYOTAZYX10C-HR.
PLEASEREADTHISMANUALCAREFULLYBEFORETHEINSTALLATION.
※NORETURNSCANBEACCEPTEDBECAUSEOFIMPROPERINSTALLATIONORPAINTING.
※CHECKTHEFITMENT,ANDADJUSTALLTHEDETAILSBEFOREPAINTING.
Pleasepurchasedoublesidedtape,
primerandcaulkingglueat
autoaccessoryshoporhardwarestore.
Use caulking glue
to fill the gap
between the product
and the body.
※PLEASEBEAWAREOF:
■Youmaylosethewarrantyandalltheservicesfromthecarmaker,becauseofreplacingOEMparts.
■Reducedroadclearancemaycauseinconvenienceinusingparkingcurbsandgaragejack.
■FRP,ABSandPPEproductsareslightlyweakerthanOEMpartsincrashes.
■TheproductmaynotmatchthebodyandOEMcolorperfectly.
■Weassumenoresponsibilityforanydamageresultingfromimproperinstallation,painting,
modificationandanycutwoundinunsealing.
■ContactthecardealerwhenyouhaveanyquestioninremovingOEMparts.
■Duringalltheinstallationprocess,useparkingbrakeandstoptheenginecompletely.
■Useraspsorsandpaperstofittheproductstothebodyifthereisanindividualdifference.
■TheproductismadeofFRP.Handlewithcare.Donotgivetheexcessiveforce.
Graduallyfixtheboltsandnutsbycheckingthefitmentandbalanceoftheinstallation.
■Checkthefitment,andadjustallthedetailsofthefitmentsteadyandproper.
Pleasecheckthefitmentandallthedetailsregularly,fixtheboltsandnutsasnecessary.
■Theinstructionofpaintingisjustourrecommendation,pleasepaintitasyoulike.
ATTENTION
【
BEFORE PAINTING
】
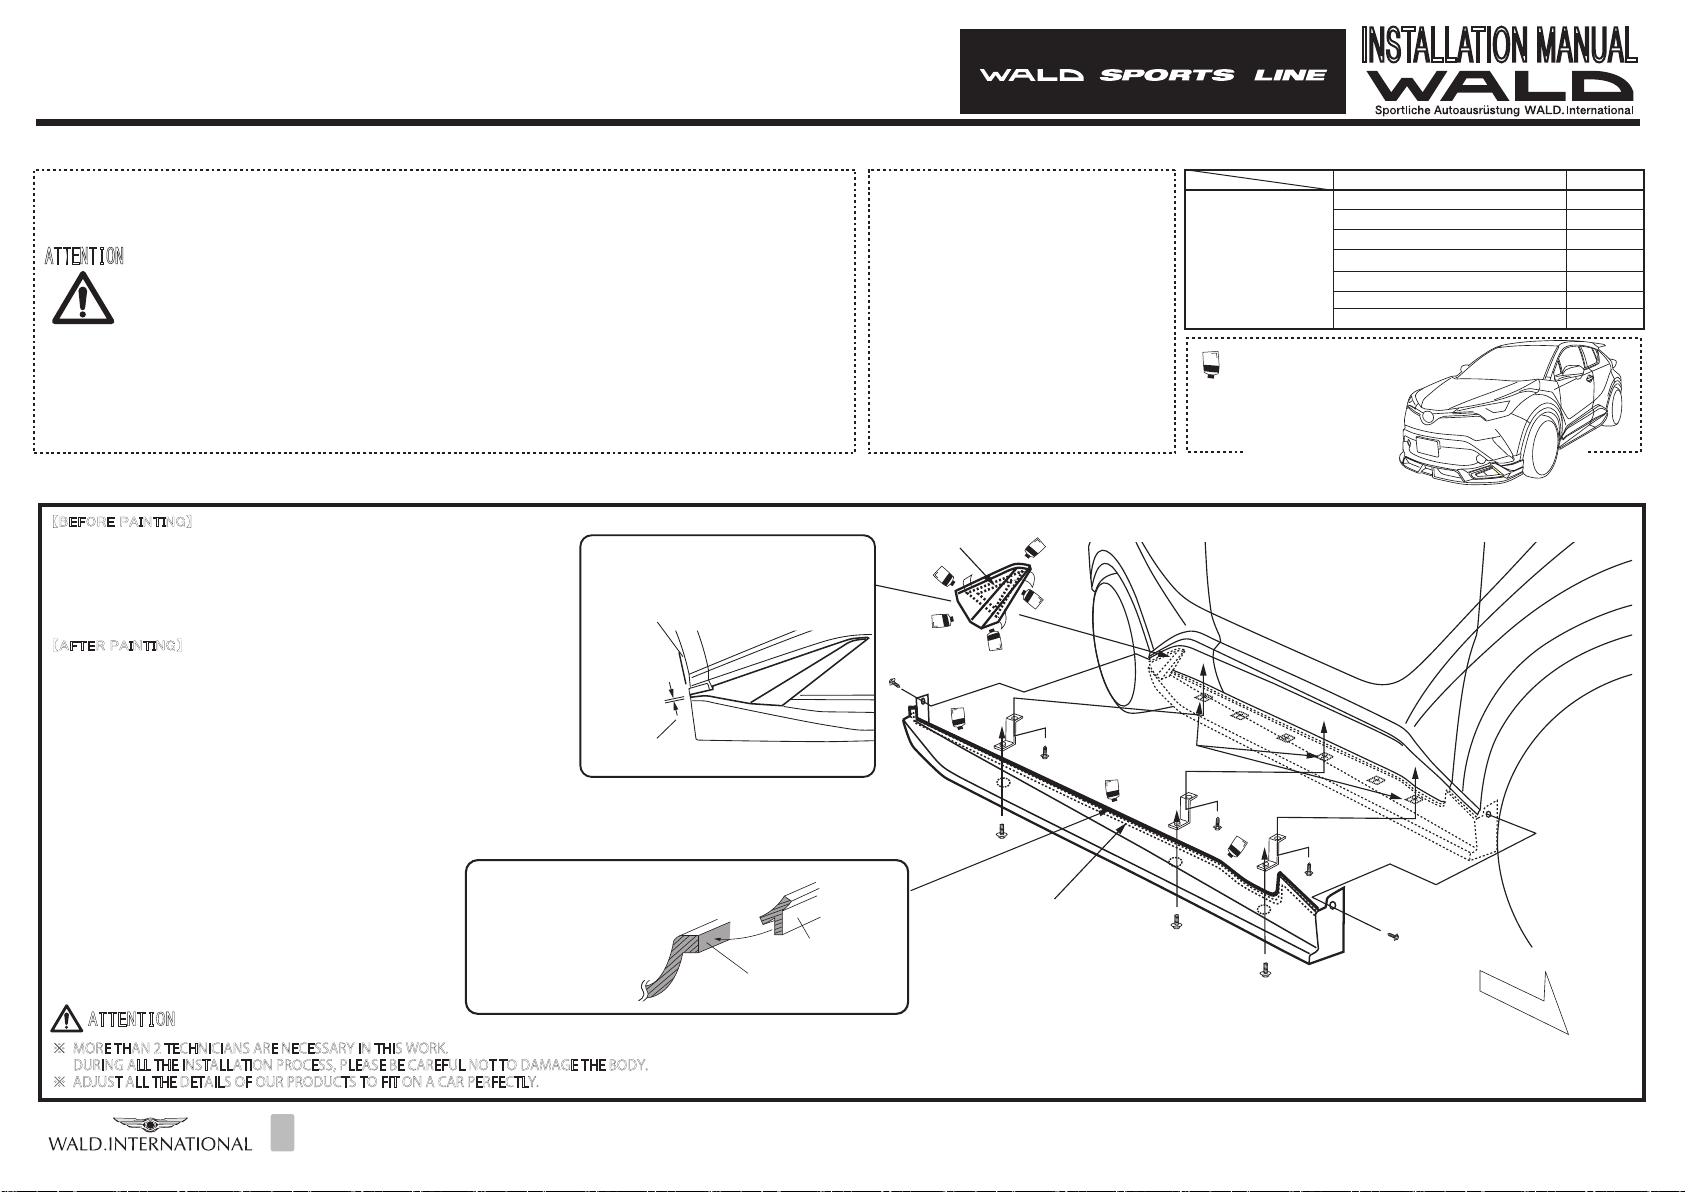
1) Take off OEM rear bumper according to the TOYOTA service manual.
2) Take of the lower part from OEM rear bumper according to the TOYOTA service manual.
3) Cut OEM inner part according to PIC 1.
4) Temporarily fix OEM rear fog lamp/panel plate on WALD Rear Diffuser with the attached adaptor according to PIC 2.
5) Temporarily install WALD Rear Diffuser to the body with the attached brackets.
※ Adjust the details of WALD Rear Diffuser to fit the body by rasps or sandpapers.
6) Paint WALD Rear Diffuser according to PIC 3.
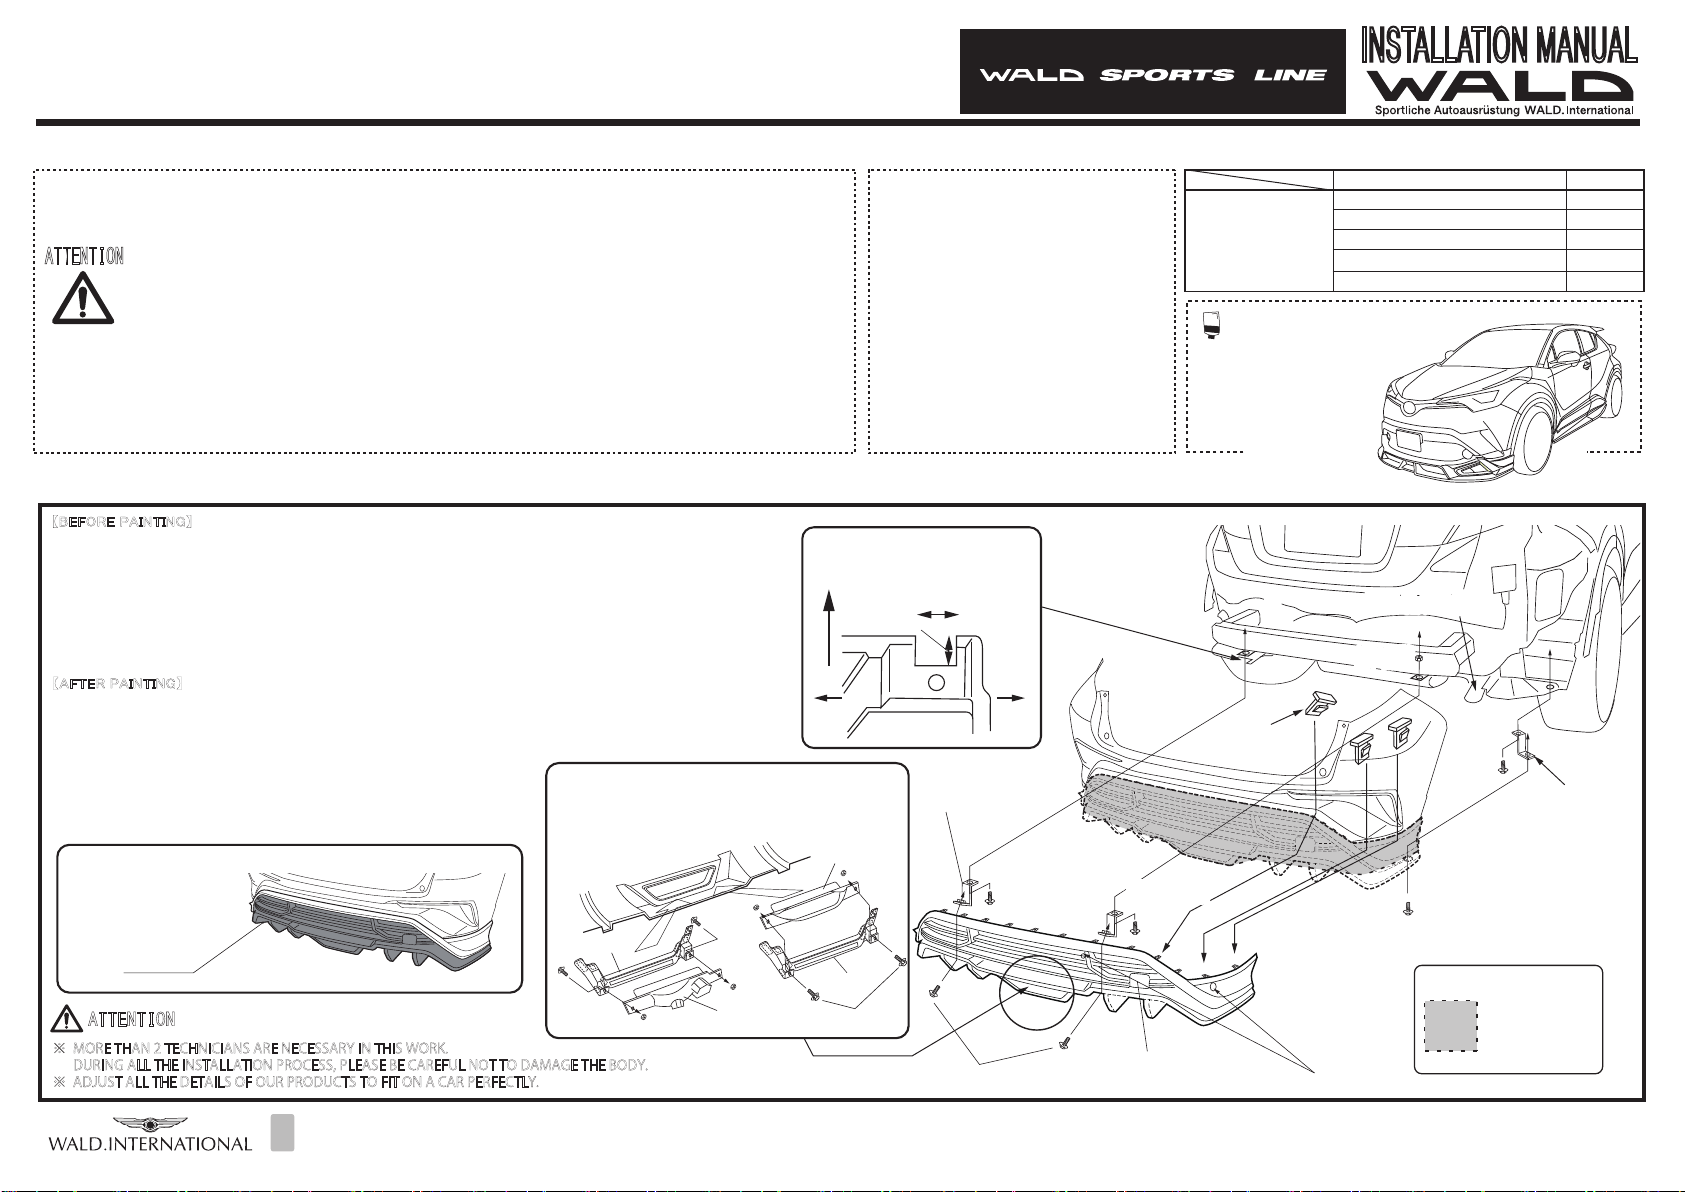
【AFTER PAINTING】
7) Replace OEM PTS Units to WALD Rear Diffuser.
8) Temporarily install WALD Rear Diffuser to the body with the attached brackets.
Replace OEM Tow Hook Cover on WALD Rear Diffuser.
Fix OEM rear fog lamp/panel plate on WALD Rear Diffuser.
※ OEM rear fog lamp of the cold weather specification car
: Fix with the attached Adaptor, then connect the harness.
9) Check all the details of the fitment, then fix the attached bolts and nuts tightly.
ATTACHED
NUT (M5)
※ MORETHAN2TECHNICIANSARENECESSARYINTHISWORK.
 DURINGALLTHEINSTALLATIONPROCESS,PLEASEBECAREFULNOTTODAMAGETHEBODY.
※ ADJUSTALLTHEDETAILSOFOURPRODUCTSTOFITONACARPERFECTLY.
ATTENTION
ADD: 10-13 KYOGUCHI-CHO, TAKATSUKI, OSAKA, JAPAN
WALD. INTERNATIONAL
ZIP: 569-0072 TEL: (81)-72-673-3000 FAX: (81)-72-673-3003
MUFFLER ADAPTOR
(SOLD SEPARATELY)

Other Wald Automobile Accessories manuals

Wald Black Bison Sports Series User manual

Wald

Wald Black Bison Sports Series User manual

Wald GDJ150W User manual

Wald

Wald GDJ150W User manual

Popular Automobile Accessories manuals by other brands

Romik 1014 installation instructions

Romik

Romik 1014 installation instructions

Beeper RW075LDV User& installer's manual

Beeper

Beeper RW075LDV User& installer's manual

LSD-Doors 50090003 installation instructions

LSD-Doors

LSD-Doors 50090003 installation instructions

Prorack K502 Fitting instructions

Prorack

Prorack K502 Fitting instructions

Safe Fleet Prime Design AR1407 manual

Safe Fleet

Safe Fleet Prime Design AR1407 manual

Parrot MKi9000 user guide

Parrot

Parrot MKi9000 user guide

Prorack K138 Fitting instructions

Prorack

Prorack K138 Fitting instructions

Dometic COOLFREEZE CDF16 operating manual

Dometic

Dometic COOLFREEZE CDF16 operating manual

Great day UVFR751 Instructions for installation and use

Great day

Great day UVFR751 Instructions for installation and use

2point5 spec.dock Audi TT v.2 installation instructions

2point5

2point5 spec.dock Audi TT v.2 installation instructions

Cruz Airo Dark T Assembly instructions

Cruz

Cruz Airo Dark T Assembly instructions

Car-Interface CI-RL3-MIB-TT-LA manual

Car-Interface

Car-Interface CI-RL3-MIB-TT-LA manual

Metra Electronics 95-7419 installation instructions

Metra Electronics

Metra Electronics 95-7419 installation instructions

Quadratec QRC installation manual

Quadratec

Quadratec QRC installation manual

METRON PC03T user manual

METRON

METRON PC03T user manual

Guardsman KIA NIRO #2 G1641 FITTING INSTRUCTION

Guardsman

Guardsman KIA NIRO #2 G1641 FITTING INSTRUCTION

Yakima Swing Daddy 4 instructions

Yakima

Yakima Swing Daddy 4 instructions

Thule 1040 instructions

Thule

Thule 1040 instructions

manuals.online logo
manuals.online logoBrands
  • About & Mission
  • Contact us
  • Privacy Policy
  • Terms and Conditions

Copyright 2025 Manuals.Online. All Rights Reserved.