1
3
2
4
Indications for Use of HEELIFT® Classic, HEELIFT® Glide, HEELIFT®
Glide Ultra, and HEELIFT® Traction Boots.
• Any person who is immobile or who has limited mobility who has an area at-risk for a pressure ulcer
to develop on the foot or ankle.
• Any person who is immobile or who has limited mobility who has a preexisting pressure ulcer on their
heel and/or ankle.
• Any person who has a Braden Score of less than or equal to 14 (<14).
Cautions
• The HEELIFT® offloading boot is a medical device used for the prevention and treatment of
pressure ulcers. It should only be used under the guidance of your healthcare provider.
• A HEELIFT® offloading boot with a convoluted interior should only be used on a person with good
skin integrity. If used on a person with poor skin integrity the convoluted texture can lead to
compromise of the skin.
• Make sure the HEELIFT® boot is of the appropriate size before applying. Always measure the calf
circumference and correlate the measurement of the calf circumference to the sizing chart to
determine the appropriate size of the HEELIFT® boot.
• Note: It is important to determine the appropriate size of the HEELIFT® boot for each individual
person so that the boot is not too small causing pressure on the skin leading to a pressure ulcer and
so that the boot is not too loose causing sheer and friction forces on the skin leading to a pressure
ulcer.
• Make sure straps never touches the skin to not cause pressure, shear, or forces on the skin which
could cause a pressure ulcer.
• Use the 2-finger test after securing the straps to make sure the boot is not too tight or too loose.
• The HEELIFT® offloading boot is a single patient only – limited multiple use medical device.
Warning
• All customization of the HEELIFT® boot should only be performed by the healthcare provider. If
the boot is not customized appropriately to properly offload an at-risk area or area of pre-existing
wound undue pressure can occur on the skin therefore leading to development of a pressure ulcer
or worsening of a pre-existing wound.
• Forefoot strap on HEELIFT® Glide boot should only by people with good skin integrity. If used on
a person with poor skin integrity can cause pressure or sheer and friction force on underlying skin
resulting in a pressure ulcer. Please seek opinion of healthcare provider before using.
• The leg should never move within the boot. If the leg moves within the boot, the boot is not
applied appropriately and injury to the skin from sheer and friction forces against the skin from the
boot can cause injury to the skin.
• Make sure adhesive side of extra foam pad never touches the skin to avoid any reaction from the
adhesive on the skin, or any compromise of the skin from the adhesive.
• SCD tubing should always carefully be placed into the groove built into the boot so that it never
touches the skin, to avoid compromise of the skin from the tubing.
• Ventilation holes are meant for air circulation within the boot. Do not place any tubing through the
ventilation holes in the boot.
• As per standard of care, remove HEELIFT® boot and inspect skin every 8 hours to ensure no
compromise of the skin has occurred.
• Discontinue the HEELIFT® offloading boot if you experience any pain, compromise of the skin or
skin break down, redness or other changes in skin color, abnormal swelling, or other issue while
wearing the boot and contact your healthcare provider immediately or go to your nearest
emergency room for immediate care and attention.
Technical Data
Contents of Package
• HEELIFT® offloading boot
• Extra foam pad for optional customization of
boot (should only be performed by your healthcare
provider)
• Instructions for use
• Anti-Rotation Wedges (optional)
•HEELIFT® Ultra models include an
Anti-Rotation Wedge
Size:Calf Circumference
• Petite: 15-25 cm (6-10 inches)
• Standard: 25-38 cm (10-15 inches)
• Bariatric: 38-58 cm (15-23 inches
Interior
• Smooth
• Convoluted (should only be used by people with
good skin integrity and without comorbidity)
• Ultra (lined with water repellant liner indicated for
draining wounds)
Instructions for Use
(Note: Review cautions and warnings related to HEELIFT® device before selection and use.)
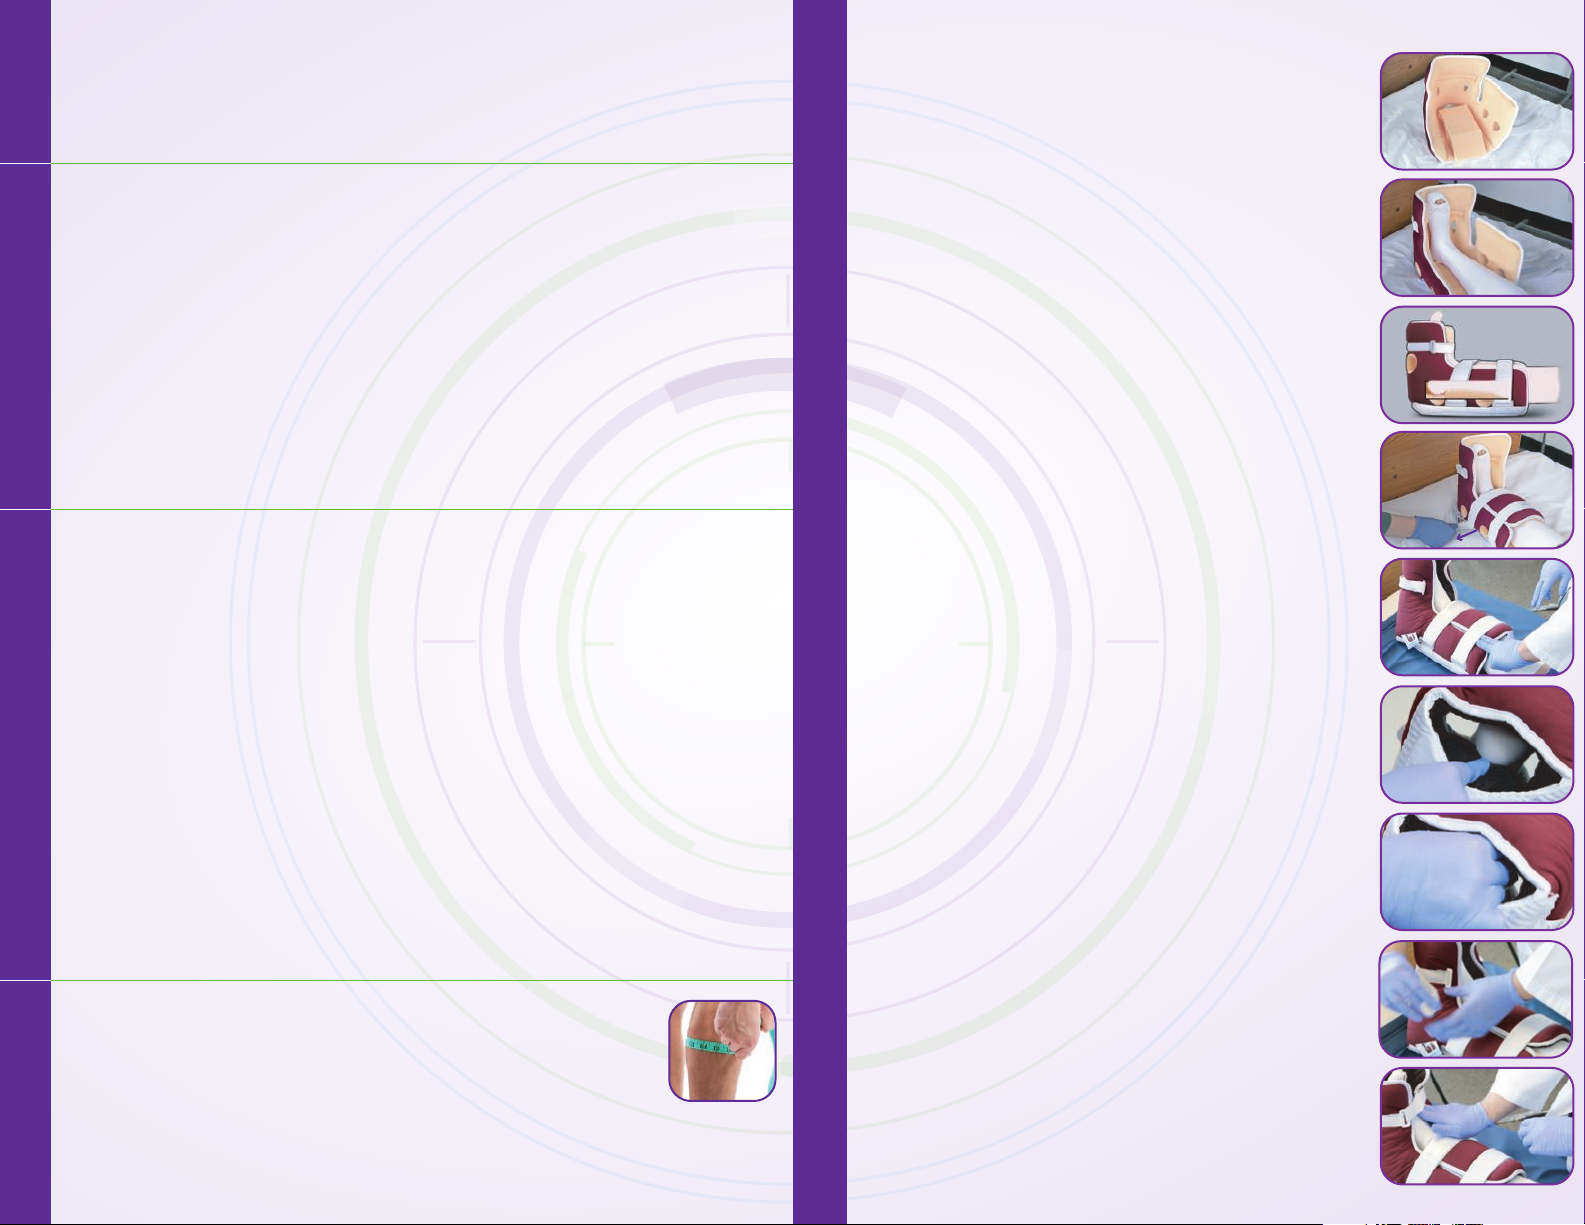
1. Determine appropriate size.
• Measure calf circumference. (see exhibit A.)
• Correlate the size of the calf circumference with the appropriate size
of the HEELIFT® offloading boot on sizing chart and determine the
proper size.
• Open the boot by undoing straps. (see exhibit B.)
• Set extra foam pad aside for optional customization. (Note: Customiza-
tion should only be performed by your healthcare provider)
• Place foot in boot. (see exhibit C.)
• Place the lower extremity in the boot with the leg resting on the fixed
elevation pad and the back of heel hanging off the fixed elevation
pad over the heel opening so that no pressure is on heel.
(see exhibit D.)
2. Secure the straps.
• Secure each strap. (see exhibit E.)
• Pull each strap over the foam pad of the boot over the leg and feed
through the respective D-ring and then fasten the strap Velcro back
onto itself. (see exhibit E.)
• Start with the top strap and work your way downwards with each
strap. (see exhibit E.)
• Straps should never be in contact with the skin. (see exhibit E.)
• Make sure each strap is fastened back onto itself with the Velcro
closure so that the hook & loop side of the strap is not exposed.
(see exhibit F.)
• Use the Two-Finger Test to check to make sure each strap is fastened
appropriately to ensure the boot is not too tight or not too loose and
does not contact the skin. (see exhibit F.)
3. Check to make sure the heel is completely offloaded by:
• Lifting the leg and looking in the heel opening to ensure heel is
completely offloaded and no pressure is on the back of the heel.
(see exhibit G.)
• Put hand through heel opening and cup heel to ensure heel is
completely offloaded and no pressure is on the back of the
heel. (see exhibit H.)
4. Use of the Forefoot strap (Note: Use of forefoot strap should only
be performed by your healthcare provider)
• The additional forefoot strap is only available on the Glide,
Glide Ultra, AFO, and AFO Ultra HEELIFT® boot.
• The forefoot strap should only be used on people with good skin
integrity.
• If not using the forefoot strap: Wrap strap around the underside of
the boot, pull the strap through the D-ring, and secure the hook&
loop to itself. (see exhibit I.)
• If using the forefoot strap: Secure the forefoot strap. (see exhibit J.)
• Pull the strap over the top of the forefoot portion of the boot and
feed through its respective D-ring and secure the Velcro to itself.
(see exhibit J)
• The forefoot strap should never be in contact with the skin.
(see exhibit J)
• Make sure each hook & loop strap is fastened back onto itself with the
D-ring closure so that the hook & loop side is not exposed.
(see exhibit J.)
• Use the Two-Finger Test to check to make sure each strap is fastened
appropriately to ensure the boot is not too tight or not too loose and
does not touch the skin. (see exhibit J.)
C.
D.
E.
F.
J.
I.
G.
H.
B.
A.
5
Dutch
French
German
Italian
Lithuanian
Norwegian
Polish
Portuguese
Romanian
Slovak
Slovenian
Spanish
Turkish


