Walkin’ Pets Large User manual

The Proven Leader In Pet Mobility
Large Frame
with Optional Full Support Front Wheel Attachment
Diesel

2www.WalkinPets.com
Thank you for purchasing a Walkin’ Wheels®Large dog wheelchair.
Questions or comments? Call us at:
(888) 253-0777 or email us at: HelpMe@WalkinPets.com
Contents
Quick Start Guide .............................................................................3
Parts of the Walkin’ Wheels®Rear Large Wheelchair ..............................4
Teach Your Dog How to Use Walkin’ Wheels®......................................5
Setting Up the Dog Wheelchair ..........................................................7
Use Snap Buttons to Adjust Length, Width, and Height..........................8
Adjusting the Length .........................................................................9
Is the Length Correct?........................................................................9
Adjusting the Width ........................................................................ 10
Attaching the Struts and Wheels ....................................................... 10
Adjusting the Height ....................................................................... 10
Clip the Leg Rings to the Wheelchair ..................................................11
Stirrups.......................................................................................... 12
Front Harness Attachment................................................................ 13
Is the Wheelchair Adjusted Properly? ................................................ 15
Optional Set Screws for Noise Reduction ........................................... 16
Belly Belt, if Needed ....................................................................... 16
Wheel Options .............................................................................. 17
Foam Wheels ................................................................................. 17
Air Tires ......................................................................................... 17
Walkin’ Wheels®Front Wheel Attachment.......................................... 18
In the Package ................................................................................ 19
Assembling Fully Supportive Wheelchair ........................................... 19
Putting Your Dog into the Fully Supportive (Quad) Wheelchair ..............22
Wear, Maintenance, Liability & Guarantee .........................................23
Optional Items and Accessories ........................................................24
Handicapped Pets Foundation ......................................................... 27

3
(888) 253-0777
Quick Start Guide
1. Set up wheelchair length (p.9), height (p.10), and width (p.10)
2. Attach Leg Rings to wheelchair (p.11-12)
3. Put on Front Harness on dog (p.13)
4. Put dog in wheelchair:
Now that your dog is wearing the front harness, he/she is ready to
get started. The wheelchair should be positioned with extenders on
the ground. Get behind the wheelchair, li back legs up, and place
dogs legs into the leg rings. When the legs are through the rings,
pull up extenders (side bars). Slide each extender through the
D-Ring on the front harness, and clip in place.
Video:
www.walkinpets.com/
all-sizes-dog-wheelchair-instructional-videos
5. How to fit dog (adjustments p.15)
Tips for adjusting length and width while dog is in wheelchair:
Rear toe pads just touch ground
Side extenders do not go past front leg
Rear width is same as chest width
Diva

4www.WalkinPets.com
Parts of the Walkin’ Wheels®
Rear Large Wheelchair
Aluminum
wheelchair frame; Width
Connector installed
Knuckle
(attached to frame)
One Belly Belt for
mid-section support
(use if needed)
Width Connectors.
The 9" connector is
installed in the frame
Tool kit with Allen wrench
and cup screws for noise
reduction (use if desired)
Stirrups to keep feet from
dragging (use if needed)
Length Extenders.
The 26" extenders are
installed in the frame
Leg Rings for
rear support
Front Harness with
comfort sleeves,
fully adjustable
Wheels attached to Struts
(one set for each wheelchair)
12" and 16" shown here
12"
16"

5
(888) 253-0777
Teach Your Dog How to Use Walkin’Wheels®
We created the Walkin’ Wheels® with the intention that you will
adjust the wheelchair, put your pet in it, and in a few moments
watch him or her running and playing again. It can happen that way,
but it doesn’t always. A wheelchair can be an adjustment for an
animal. To some, there is a strange device following him or her
around making odd noises and getting caught on furniture and
doorways. They will adapt to these changes, but need a little time.
We recommend you be calm, quiet, and slow when putting on the
wheelchair for the first time. Give your pet lots of stroking and
reassurance. Treats help, too! Let the dog get used to the harness
before attaching it to the wheelchair. It may take a few minutes or
a few hours for your dog to get used to the harnesses.
Maisy

6www.WalkinPets.com
Note: Keep in control of the dog’s movement at first. Keep the dog in
a clear area and keep him on a short leash. If the dog does become
frightened, then disconnect the harness from the wheelchair and try
again later.
Until your dog gets used to the Walkin’ Wheels®, limit the amount of
time spent in it. The Walkin’ Wheels®is designed to allow your dog to
get exercise and physical therapy. Dogs cannot lie down in the wheel-
chair but will be able to urinate and defecate while in the wheelchair.
Start with short periods and increase slowly. Make sure you don’t
overdo it the first day. Aer your dog gets used to the wheelchair,
he/she can be in it 1 hour at a time. Then you will need to take him/her
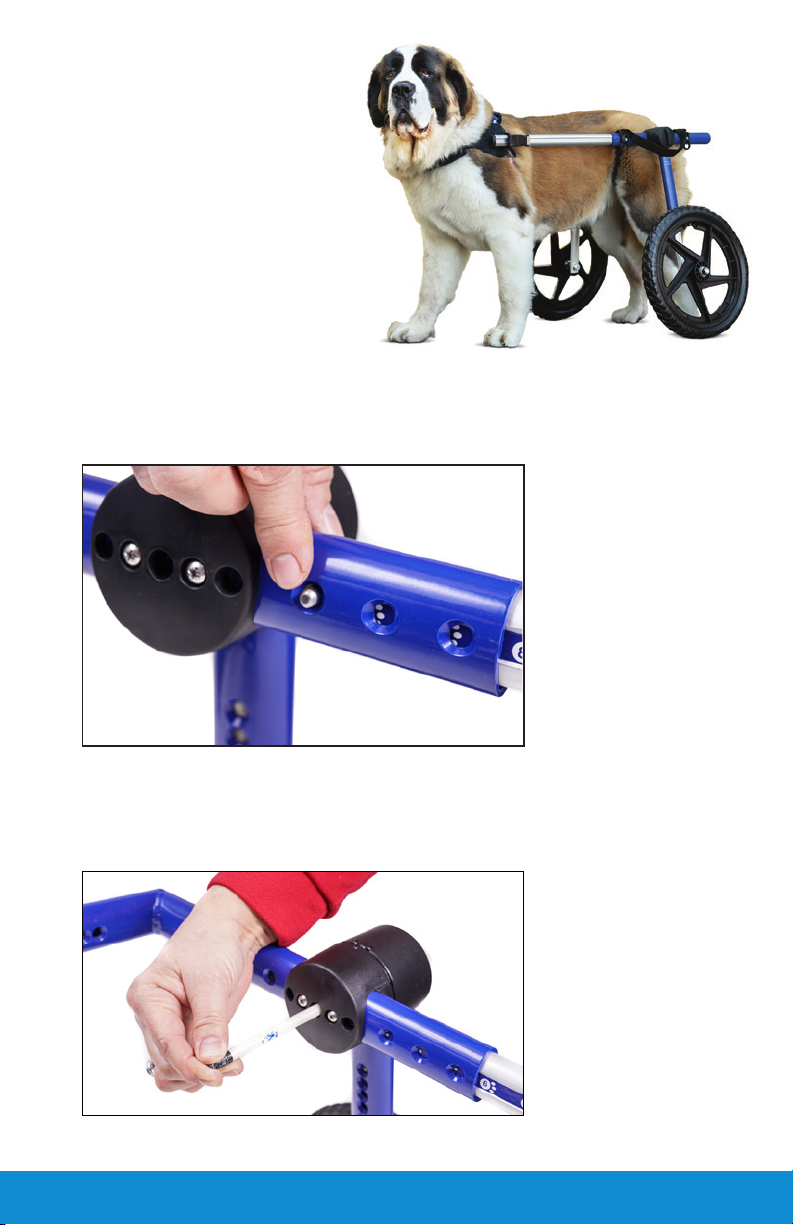
out to rest. Here is the video to watch on how to put the
wheelchair together:
www.walkinpets.com/
large-dog-wheelchair-instructional-videos
1. When starting this process we suggest that you use the dog’s favor-
ite treats to reward your dog for walking forward. You won’t need
to keep using these treats every day, just in the beginning of the
training process. A hungry dog is a motivated dog! Work with your
dog before you have fed him/her a meal. Pets are more eager to pay
attention and earn the food reward when they are hungry.
2. Do not immediately put your dog in the wheelchair. Assemble the
wheelchair and leave it in an area where your dog can see it, smell it,
and touch it.
3. Once the dog is comfortable near the wheelchair, put the front
harness on and leave him or her alone for a while. Let the dog get
used to the feeling of the straps.
4. When your dog is comfortable, try putting him/her in the leg ring
support system and attach the front harness to the wheelchair.
Give him a treat for positive association.
5. Aer your dog is in the wheelchair, hold the food reward right at
nose level. Feed him/her several pieces. Then you can move one
foot backwards, again holding the food reward in front of you. Your
pet should then walk toward you to get the treat. Before you know
it, he/she is walking in the Walkin’ Wheels®! Give a treat and
positive praise again.
6. Work in very short (5-10) minute sessions, several times a day. Give
your pet rest periods between each session.

7
(888) 253-0777
If only two raised
indicator marks are
visible, this means the
wheelchair is upside
down. Flip the leg 180
degrees.
Correct
Straight
Leg Position
Knuckle
Dial Cap
For active dogs, you can
angle the wheels back a
notch (see photo).
Don’t angle the wheels
too far back as it will put
too much pressure on
their shoulders.
Setting up the Dog Wheelchair
Adjusting the Knuckle
The frame is shipped flat. Take out of box with sticker saying
"THIS SIDE UP" showing. Set the legs perpendicular to the frame by
turning the dial caps counter-clockwise to loosen the knuckle assem-
bly. Don’t remove the dial caps. Move the leg to the correct position
using the raised indicators as your guide. The inside indicator should
be in the center of the two outside indicators as shown in the photo
below. Once the leg is in the correct position, tighten the dial cap by
turning clockwise. Reverse this when you want to fold flat for easy
storage or transport.
Right
Wrong
Indicator
Right

8www.WalkinPets.com
Angle the leg
Normally, the wheels are set
straight up and down as shown
on the black dog. Setting the
wheels back slightly, like the
tan and white dog, will offer a
bit more stability for stronger,
more active dogs, or dogs who
are shiing their weight back
toward their hindquarters.
The Push Buttons are an easy way to adjust the length, width, and
height of the Walkin’ Wheels®dog wheelchair. Use a pen to push
the Push Button when it is inside the knuckle to make adjustments.
Use Push Buttons to Adjust Length,
Width, and Height.

9
(888) 253-0777
26" Extenders
If the sides tilt up, then loosen the blue
strap on the front harness over the dog’s
back, and tighten up the red bottom
strap.
If the extenders tilt down, loosen the
front harness red bottom strap 2", and
then tighten the blue strap 2" over the
dogs back to raise extenders up and
parallel to the ground.
The side extenders should be parallel
to the ground and in the middle of the
dog’s body.
Is the Length Correct?
The end of the extenders (black cap) should be positioned at the
center of the dog’s shoulder blades. The extenders should be touching
the neoprene pads on the front harness and not pulling outward.
Incorrect
Incorrect
Correct
Adjusting the Length
Note: If you have the Front Wheel Attachment, remove the
extenders and skip to p.18.
The extenders are for length adjustments. The kit comes with one set.
To adjust the extenders, depress the push button and move to
desired length.

10 www.WalkinPets.com
Adjusting the Width
Use the push buttons on the width connector to adjust the wheel-
chair to the proper width. There should be at least ½" on each side
of the hips. The width adjustment will be determined by the widest
part of the dog which is usually the chest. The width connector that is
attached to the frame is 9" long and will extend to 14.5". If you need
additional width, call us to order the 13" connector.
Attaching the Struts
and Wheels
You received your wheelchair with the
correct size strut and wheel combina-
tion according to your dog’s rear leg
height measurement. Insert the strut
into the wheelchair leg and adjust to
the height needed. If you need a
different size wheel and strut,
contact us.
Adjusting the Height
The correct height setting is based on both the height and the
condition of the dog. If the dog has some use of his/her back legs,
then use the push buttons to adjust the height so the dog’s toe
pads are on the ground and the dog can participate in the walking
motion. If the back legs are very weak or paralyzed, and scraping
or knuckling under, put the legs in the stirrups or protect them with
Walkin’®Pet Boots.

11
(888) 253-0777
When the dog is in the Leg Rings, the wheelchair knuckle should be at
mid-hip level. The Leg Rings should look like two Cs, not two Vs, with
the center connector holding them together.
The Leg Rings support the dog’s hindquar-
ters. They will take the weight off the legs
while still allowing the dog to use its legs
to maintain muscle mass. The Leg Rings
should hang no lower than 3" below the
frame. This will create a supportive cradle.
Here is a link for how to adjust the strapping:
https://youtu.be/3CoSfPIMWC0
Legs go
inside
each ring
Rear Support Leg Rings
Shoulder
Socket screw
The Leg Ring straps go over the frame, and the black plastic harness clips
have a slot that fits over the Shoulder Socket screws. Put your thumb into
the round circle and push upward to lock (you will hear it click into place).
The round circle will face the ground. The dog’s legs go through each
ring. To release, put your thumb in the circle and pull downward. Now,
you can slowly lower your dog to the ground.
Here is the video link of how to adjust the straps:
https://www.youtube.com/watch?v=3CoSfPIMWC0
Clip the Leg Rings to the Wheelchair
Legs go inside each ring
Leg rings should hang
about 3 inches below
the frame

12 www.WalkinPets.com
The rubber tubing can be cut shorter if
needed (do not cut the strapping).
Try cutting about an inch off all four ends of
the rubber then adjusting the tri-glides on
the straps to tighten them up.
The excess Velcro®strapping will cross over the dog's back, or
Velcro®together to form handles (see photos below).
The Velcro®center connector can be moved forward or backward to
avoid putting pressure on the dog’s genitals (ideal for intact dogs).
In addition, the Velcro®connector can be wrapped loosely so there
is space between the rings. The Velcro®center connector MUST be
used. Adjust for best comfort and fit. See Adjusting Leg Rings Video
below: https://youtu.be/3CoSfPIMWC0
or
Excess Velcro®
strapping can criss
cross over rump.
Velcro®two
sides together
to form handles.
hock
Stirrups
Stirrups are optional for paws that are dragging
or knuckling under. The stirrups attach to the back
of the wheelchair on each silver metal loop (also
called “eye pads”). The rubber tubes on the stirrups
need to be above the dog’s hock. Use the push ball
lock to adjust to a snug fit. The dog’s leg should be
several inches off the ground. You can adjust the
length of the cord by re-tying the knot. If you use
the stirrups, use both. Using only one stirrup causes
the dog to feel unbalanced.
IMPORTANT: When taking the dog
out of the wheelchair, make sure
to release the stirrups FIRST.
Clip the Leg Rings to the Wheelchair, Continued
The dogs legs go through each ring
Velcro®connector

13
(888) 253-0777
• Take the 3 black comfort sleeves off the
harness so you can make sizing
adjustments.
• Pet’s head goes between the black strap
and the blue strap.
• Blue strap goes over the dog's shoulder.
• Red strap goes behind the front legs and clips into the side
of harness.
• Black strap goes under neck across front of chest.
• Side neoprene panels should be positioned over
the shoulder blades.
• Male prong points to the back and clips in.
• All three straps should be snug.
• Comfort sleeves can be cut for smaller dogs and excess straps
tucked in. This material will not fray.
Front Harness Attachment
Adjust the extenders so they reach the harness clips on the front har-
ness. The extender ends will go through each D-Ring and then clip
into the front harness. The D-Rings should be positioned just behind
the shoulder blades. Note: If the D-ring prong breaks, you can call for
replacement or order Medium D-Ring online:
www.walkinpets.com/wheelchair-dring-clip/
Adjusting the Front Harness:
The dogs legs go through each ring

14 www.WalkinPets.com
Side view Rear view Overhead view
Is the Wheelchair Adjusted Properly?
If you are still unsure about the fit, you can send a few pictures of your
dog in the wheelchair for fitting evaluation to: HelpMe@WalkinPets.com
Make sure you include order # or last name so we know who to contact.
We would like to see a Side view, Rear view and Overhead view of
your dog in the wheelchair like these samples
Check the items above to make sure the wheelchair is fitted properly.
When the wheelchair is adjusted properly, the dog stands in a natural
position. Here is what to check:
AKnuckle should be in line with hips and leg rings dropped down
about 3" from frame.
BFront harness D-Ring clips into extenders behind shoulder blade.
CExtenders are parallel to the ground and do not extend past the front
legs This side bar will be positioned in the middle of the pet's body
from front to rear and back is straight.
DToe pads touching the ground, or
EToe pads put into stirrups above the hock and cinched with the push
ball lock to hold in place.

15
(888) 253-0777
Optional Set Screws for Noise Reduction
Using the set screws will tighten up your wheelchair and reduce any
rattling noises. The set screws also keep the wheelchair tight aer it
has been adjusted for your pet. When you tighten up the wheelchair,
the side arms, called extenders, will be able to move up and down as
your pet turns corners. This is completely normal. The flexibility also
allows for ease of movement on uneven terrain. There are six places
to put the set screws using the Allen wrench. They are indicated
below with red arrows.
Note: Make sure the set screws shown below are loosened or
removed before making adjustments.
Kailua

16 www.WalkinPets.com
Belly Belt, if Needed
Some animals will need additional support under their belly. You can
determine if the dog needs additional support if their spine bows
downward. It is also helpful for overweight dogs or dogs with spinal
or disc issues. One end of the belly belt has a tri-glide (rectangular
with bar in the middle) attached and the other side has Velcro®
strapping. Both sides have a rope with a push button adjuster
(instructions on p.17).
Go here to see a video on how to attach the
Belly Belt
to your Walkin' Wheels: hpets.net/bellybelt
Figure A Figure B Figure C
A. Take the side with the tri-glide and put the extender through the
end of the loop.
B. Take the rope and put inside the harness clip on the extender (B).
Then, attach the front harness to the harness clip in order to secure
the rope. This will keep the belly belt from sliding backwards.
Now, adjust the belly belt so it is in the middle of the dog’s belly.
C. Secure the other side over the extender and Velcro to bottom of
belly belt. The purpose of the belly belt is to provide support for
your dog’s mid-section.
If your dog needs more
support, you can purchase
the Walkin' Belly Support:
www.WalkinPets.com
walkin-belly-support Hardekopf

17
(888) 253-0777
Air-Filled Foam
Wheel Options
• Foam wheels: 12" and 16" • Air tires: 12" and 16"
If you find out your RLH measure wasn't correct, you can purchase the
appropriate strut size. It would be either 9", 12", or 15"
www.walkinpets.com/struts/
Air Filled
vs Foam Filled
Maintenance Required:
Saltwater, mud, and sand can cause rust or erosion to the hardware and bear-
ings. We suggest hosing the wheels down aer exposure to prolong the life of
your wheelchair and periodically replacing wheels/struts or so goods that get
worn over time. Here is our Parts Listing: www.walkinpets.com/spare-parts
Fix it yourself: Sometimes things break down accidently. You might be able
to fix them yourself using these helpful videos
https://youtu.be/8jafFoGvijk
Maintenance videos:
https://youtu.be/nPAFroYIcRE
Foam Wheels vs Air Tires Comparison Chart:
Foam Wheels: 12” and 16” Air Tires: 12” and 16”
• Lightweight, high density foam
material that offers a smooth ride
• Wear extrememly well and will never
go flat
• Made for all terrain
• 12” and 16” wheels have 1/2” hub
with bearings
• True closed-cell techneology -
no water absorption
• Easy to clean
• For active dogs that do off-road hiking
• Offer more shock absorbency
• Similar to mountain bike tire with
deep treads
• Will need to replace tubes or wheels
if punctured
• Require 30 PSI air: use air pump at
gas station
• 12” and 16” wheels have 1/2” hub with
bearings
• Additional cost
MaintenanceFix it yourself

18 www.WalkinPets.com
If you already have the rear wheelchair and need more support in the front,
here is the instructional video to watch: www.walkinpets.com/instructional-
videos-large-fully-supportive-dog-wheelchair
This section is for assembling the Fully Supportive (Quad) wheelchair
Walkin' Wheels®Front Wheel Attachment
(additional cost)
The Walkin’ Wheels®Front
Wheel Attachment gives
mobility to dogs with front
leg weakness or weakness
in all four legs. It is ideal for
helping disabled pets get
exercise and for rehabilitation
while they are healing.
Like the rest of the Walkin’ Wheels® products, the
Front Wheel Attachment is adjustable so it will fit the
Walkin’ Wheels®wheelchair for any size dog from 70 to 180
pounds and can be easily removed at any time.
Nuska

19
(888) 253-0777
IMPORTANT: The LEFT and RIGHT Struts and Casters (B) must match the
LEFT and RIGHT Legs (C). If they are not installed correctly the wheelchair
will be extremely wobbly. We refer to L and R as if you are in the wheelchair.
A
H
B
C
E
F
G
D
THE PACKAGE CONTAINS:
Assembling Fully Supportive Wheelchair
Here is the video if you have purchased the quad wheelchair:
https://www.handicappedpets.com/
instructional-videos-medium-fully-supportive-dog-wheelchair/
The front leg will arrive already installed on the front extender but will
be loose. Using the Gold Screws, position the front leg on the Front
Extender. Do this by lining up the holes on the inside of the front leg and
the holes on the inside of the Front Extender
Tighten gold screws
Front leg
Extender
Step 1:
Positioning the Front Leg on the Front Extender
In the Package
The Front Wheel Attachment is easy to assemble and snap into the wheel-
chair. You will need a Phillips head screwdriver.
The package contains:

20 www.WalkinPets.com
Strut and Caster
assembly
Step 4: Adjust the Chin Bar (D)
Note: Use of the Chin Bar is optional.
The Chin Bar adds stability and rigidity to the front wheel attachment.
It needs to approximately match the width of the back of the Walkin’
Wheels. Use a Phillips head screwdriver to remove the two screws on
the Chin Bar and adjust it so that the width of the Chin Bar is
approximately the same as the width of the back of the wheelchair.
Insert screws to secure in place.
Front extenders with
front legs attached
Insert Strut and Caster assembly into the Leg.
These are marked with “L” and “R”. It is very important
that they are installed on the correct sides.
Insert Strut and Caster assembly into Legs
L or R is also engraved
on the bottom of block
Ledge
IMPORTANT!
Notice the ledge on the
Caster Connector. This
needs to be facing outward
in order for the front wheel
attachment to work
properly.
Step 2:
Step 3:
Remove the existing side extenders from
your Walkin’ Wheels Rear Wheelchair and
insert the Front Extenders with front legs
attached. Be sure the extenders are
attached so the legs are on the outside,
angling forward.
Removing the Side Extenders
Table of contents
Other Walkin’ Pets Pet Care Product manuals

Walkin’ Pets
Walkin’ Pets Dont Let the Dogs Out User manual

Walkin’ Pets
Walkin’ Pets B1 User manual

Walkin’ Pets
Walkin’ Pets Front Wheel Attachment User manual

Walkin’ Pets
Walkin’ Pets Walkin' Wheels Rear Medium Wheelchair User manual

Walkin’ Pets
Walkin’ Pets Walkin' Wheels Rear User manual

Walkin’ Pets
Walkin’ Pets Walkin' Wheels Rear User manual

Walkin’ Pets
Walkin’ Pets Mini Front Wheel Attachment B2 User manual

Walkin’ Pets
Walkin’ Pets Walkin' Wheels MINI User manual

Walkin’ Pets
Walkin’ Pets Wheels Medium User manual