manuals.online logo
Brands
  1. Home
  2. •
  3. Brands
  4. •
  5. Wasp
  6. •
  7. Handheld
  8. •
  9. Wasp WDT950 User manual

Wasp WDT950 User manual

Other manuals for WDT950

1

This manual suits for next models

1

Other Wasp Handheld manuals

Wasp DR2 User manual

Wasp

Wasp DR2 User manual

Wasp WDT 3200 User manual

Wasp

Wasp WDT 3200 User manual

Wasp WPA206 Installation and operation manual

Wasp

Wasp WPA206 Installation and operation manual

Wasp wdt60 User manual

Wasp

Wasp wdt60 User manual

Wasp WDT92 User manual

Wasp

Wasp WDT92 User manual

Wasp HC1 User manual

Wasp

Wasp HC1 User manual

Wasp WDT2200 Product information sheet

Wasp

Wasp WDT2200 Product information sheet

Wasp WPA 1000II User manual

Wasp

Wasp WPA 1000II User manual

Wasp WPA1200 User manual

Wasp

Wasp WPA1200 User manual

Wasp DR4 User manual

Wasp

Wasp DR4 User manual

Wasp WDT2200 User manual

Wasp

Wasp WDT2200 User manual

Wasp DR5 User manual

Wasp

Wasp DR5 User manual

Popular Handheld manuals by other brands

Panasonic CF-VST332U How-to

Panasonic

Panasonic CF-VST332U How-to

Hand Held Products Dolphin 9500 Software upgrade instructions

Hand Held Products

Hand Held Products Dolphin 9500 Software upgrade instructions

Honeywell Dolphin 9900 user guide

Honeywell

Honeywell Dolphin 9900 user guide

Intermec CK61 quick start guide

Intermec

Intermec CK61 quick start guide

Honeywell CN75 user guide

Honeywell

Honeywell CN75 user guide

Texas Instruments TI-Nspire user guide

Texas Instruments

Texas Instruments TI-Nspire user guide

Docomo F-04H instruction manual

Docomo

Docomo F-04H instruction manual

Armstrong Brain Wave Hardware & software installation

Armstrong

Armstrong Brain Wave Hardware & software installation

Unitech TB128 user manual

Unitech

Unitech TB128 user manual

Symbol MC9000-G Product reference guide

Symbol

Symbol MC9000-G Product reference guide

Ingenico IWL220 GPRS Quick reference guide

Ingenico

Ingenico IWL220 GPRS Quick reference guide

Intermec CK61 user manual

Intermec

Intermec CK61 user manual

Symbol c2000 user manual

Symbol

Symbol c2000 user manual

Toshiba e350 Series user manual

Toshiba

Toshiba e350 Series user manual

Palm Tungsten E2 supplementary guide

Palm

Palm Tungsten E2 supplementary guide

MiTAC Mio 168 user manual

MiTAC

MiTAC Mio 168 user manual

NCI Technologies NCI - 465 WMU user manual

NCI Technologies

NCI Technologies NCI - 465 WMU user manual

Symbol PDT 8100 Series Product reference guide

Symbol

Symbol PDT 8100 Series Product reference guide

manuals.online logo
manuals.online logoBrands
  • About & Mission
  • Contact us
  • Privacy Policy
  • Terms and Conditions

Copyright 2025 Manuals.Online. All Rights Reserved.

Product View
1 Scanner Window 6 Receiver
2 13m Camera & LED Flashlight 7 Pogo pin
3 LED Indicator 8 USB Type C Port
4 Scanner Trigger Key 9 Battery Release Latch
5 Keypad 10 Battery Cover
WDT950Android Handheld Terminal
(38 Keys)
What’s in the package?
Please make sure the following items are in the
WDT950box. If something is missing or
damaged, please contact your sales representative.
The package items include:
WDT950Terminal with bumper
Battery
Hand Strap
QuickStart Guide
Regulatory Compliance Statements
Optionalaccessories
USB Type C Cable
Terminal Power Adapter
Glass Screen Protector
1-slot Terminal & Battery Charging Cradle +Adapter
1-slot Ethernet & Battery Cradle +Adapter
1-slot USB & Battery Cradle + Adapter
Keypad View
Wasp WDT950 Quick Start Guide
Install the Battery and the Battery Cover
1. Slide and position the battery pack, making
sure the battery contacts are aligned with the
contacts in the battery compartment. Make
sure the battery release latch is in the
unlocked position.
2. Insert the battery cover up to 45 degrees
(45°), from bottom to top. Press the battery
cover down to secure in place and then slide
the battery release latch to the locked
position.
Checking LED Status
LED Description
Red Light ■Battery Charging
■Twinkling together to indicate battery
low status (less than 15%) when power on.
■Twinkling alternate to indicate battery is not
installed or not installed well when battery
charger was plugged-in.
Green Light ■Battery Fully charged
■Barcodescan good read
Blue Light Message
No LED (Red and Green) display when battery is out.
WARNING! There is a risk of fire and burns if the battery is handled improperly.
CAUTION!
DO NOT disassemble, crush, puncture, short external contacts, or
dispose the battery pack in fire or water. DO NOT attempt to open
or service the battery. Dispose of used batteries according to local
recycling guidelines in your area.
•
To ensure the unit worksproperly, please keep all connectors
away from contaminants such as dust, grease, mud, and water.
Negligence may cause the unit to lose communication, short
circuit, overheat, and so on.
•
Ifthe connector isdamaged, please ensure the connector is
fully repairedbefore using the unit to avoid causing a
short circuit.
Charging the battery
Remove the Battery Cover and the Battery
1. Make sure the battery release latch is in the
unlocked position.
2. Grab the battery cover from the two recesses and
gently lift upward, stop when you feel a resistive
force. Press the battery cover against the battery
and lift the battery upwards until you remove the
battery. (The process follows the principle of lever).
Using the terminal for the first time, you need to charge it for
about 24 hours. For theregular use, you can charge the
terminal with the USB type-C cable.Connect the type C USB
cable to the USB port on WDT950and connect the other end
of the USB cable to ACpower adapter. Then plug into the
electrical outlet. It is highly recommended that using the USB
type-C cable and AC power adapter to chargethe
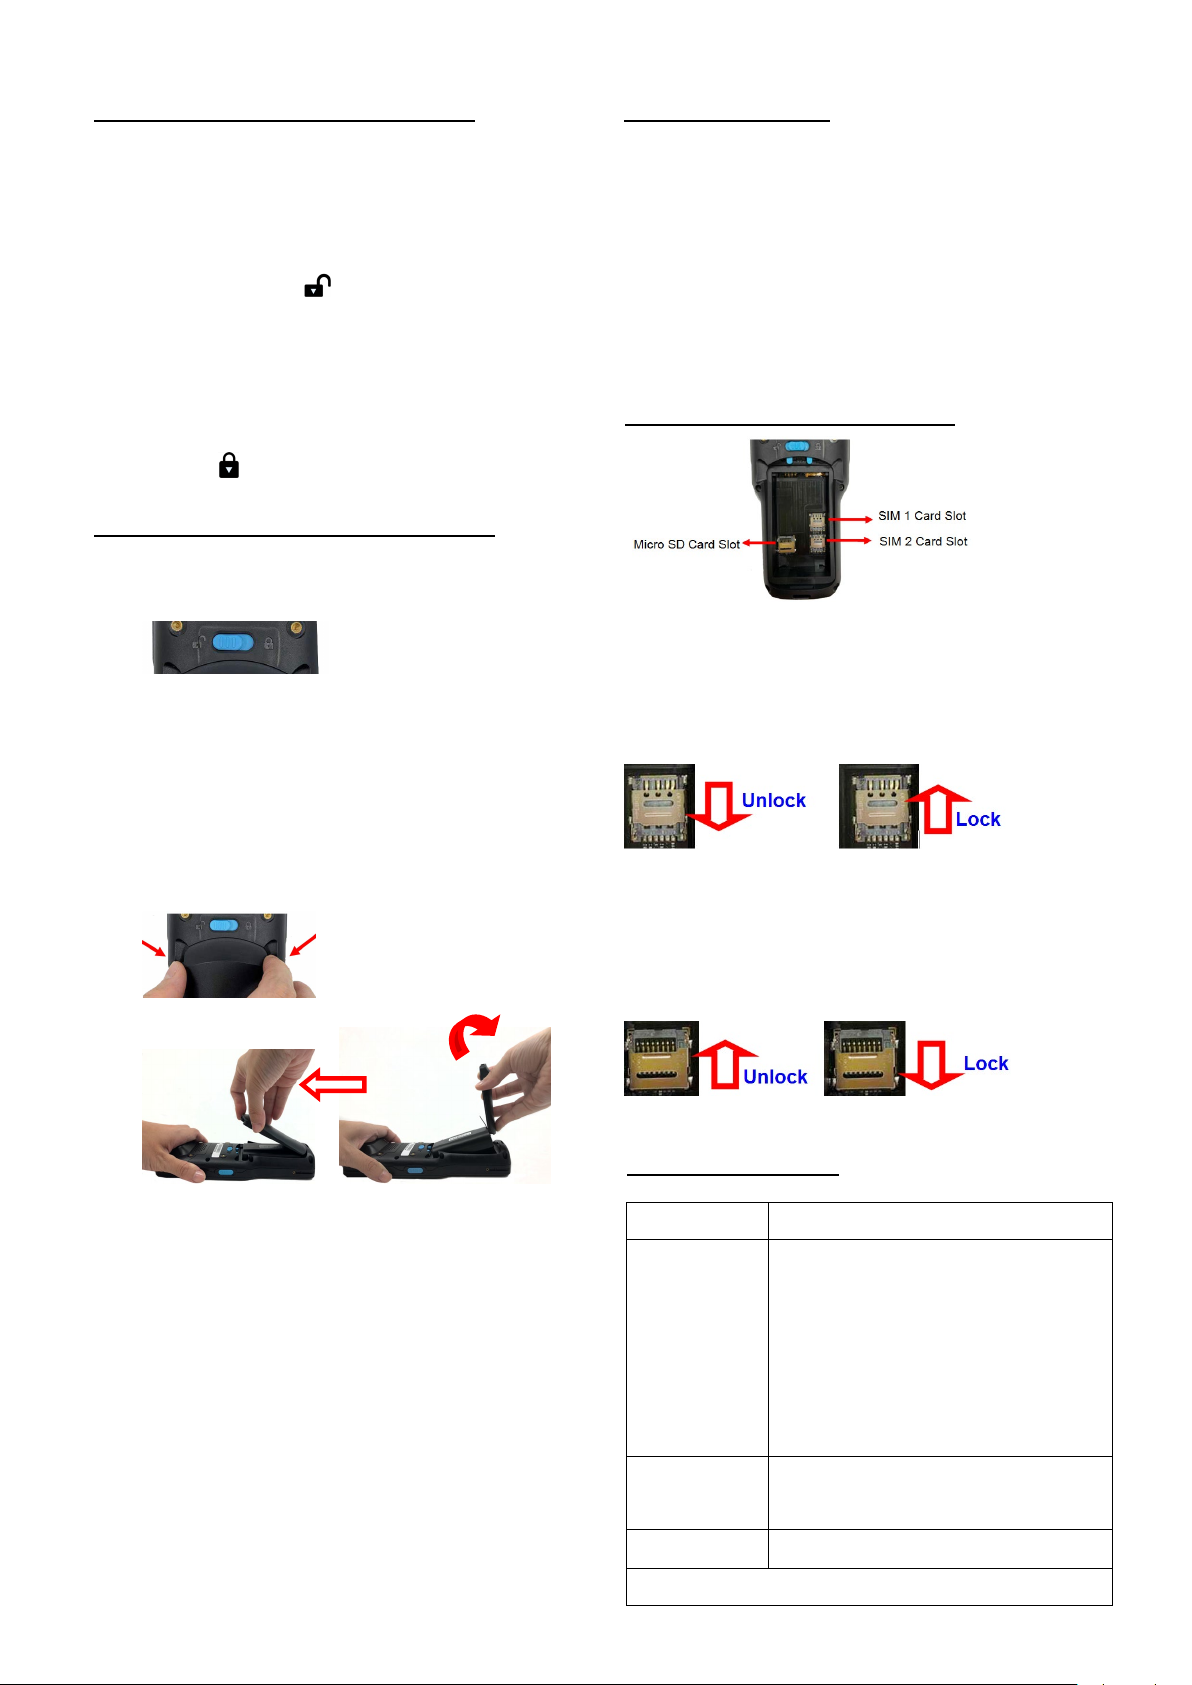
Inserting Micro SD/ Nano SIM Card
SIM 1 & 2 Card Slot
Push down SIM card holder to unlock and lift the card holder
to insert SIM card. Close the card holder and slide up to lock
position. Ensure that it is installed properly.
MicroSD Card Slot
Push up MicroSD card holder to unlock and lift the card
holder to insert MicroSD card. Close the card holder and slide
down to lock position. Ensure that it is installed properly.