manuals.online logo
Brands
  1. Home
  2. •
  3. Brands
  4. •
  5. WaterUps
  6. •
  7. Lawn And Garden Equipment
  8. •
  9. WaterUps Oasis 1680 Wicking Bed User manual

WaterUps Oasis 1680 Wicking Bed User manual

Before you start
Watch the full assembly guide video on our
YouTube page. You can go to it
using the
button or the QR code below.
Assembly Guide video
WaterUps®Oasis 1680 Wicking Bed
14050PEUC
14050SG/SG
14070WALL
14040WOOD
Assembly Guide
WaterUps®Getting Started page
Our Getting Started page contains lots of
helpful information. You can go to it using the
link or the QR code below.
Getting Started page
www.waterups.com.auWicking our WorldTM
Reservoir liner assembly guide
You can download a copy of the WaterUps®
1680 Reservoir Liner Insert assembly guide
by
using the button or the QR code below.
Reservoir liner
Contents
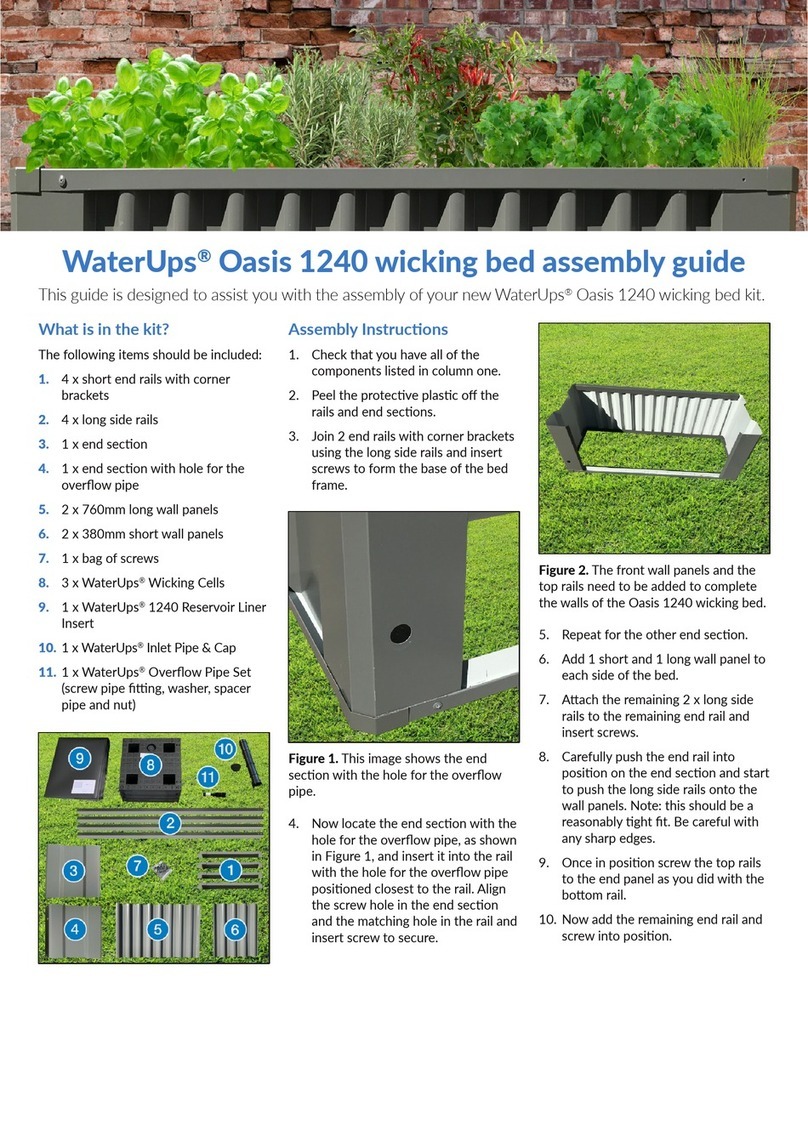
1 x WaterUps®1680 Reservoir Liner 6 x Wall Panels
8 x WaterUps®Wicking Cells
4 x Right-side Corner Rails 4 x Left-side Corner Rails 4 x End Rails4 x Connector Rails
1 x Corner Panel with the
hole for the overow pipe
3 x Corner
Panels
1 x Inlet Pipe and Cap 1 x Overow Pipe & spacer
1 x bag of screws
Approximately 3 square metres of
level ground to build on.
A sharp knife.
Approximately 136 litres of water.
1 x 20 litre bag of Perlite.
You will need
No. 2 Phillips head screwdriver.
16 x 25 litre bags of good quality
soil or potting mix.
1. Assembling the Oasis 1680
metal bed frame.
Open the box and lay the contents out
near the area you will be assembling
your wicking bed. Remove any protective
lm from the pieces as you lay them out.
Place the screws in a small container or
bowl so as not to loose them.
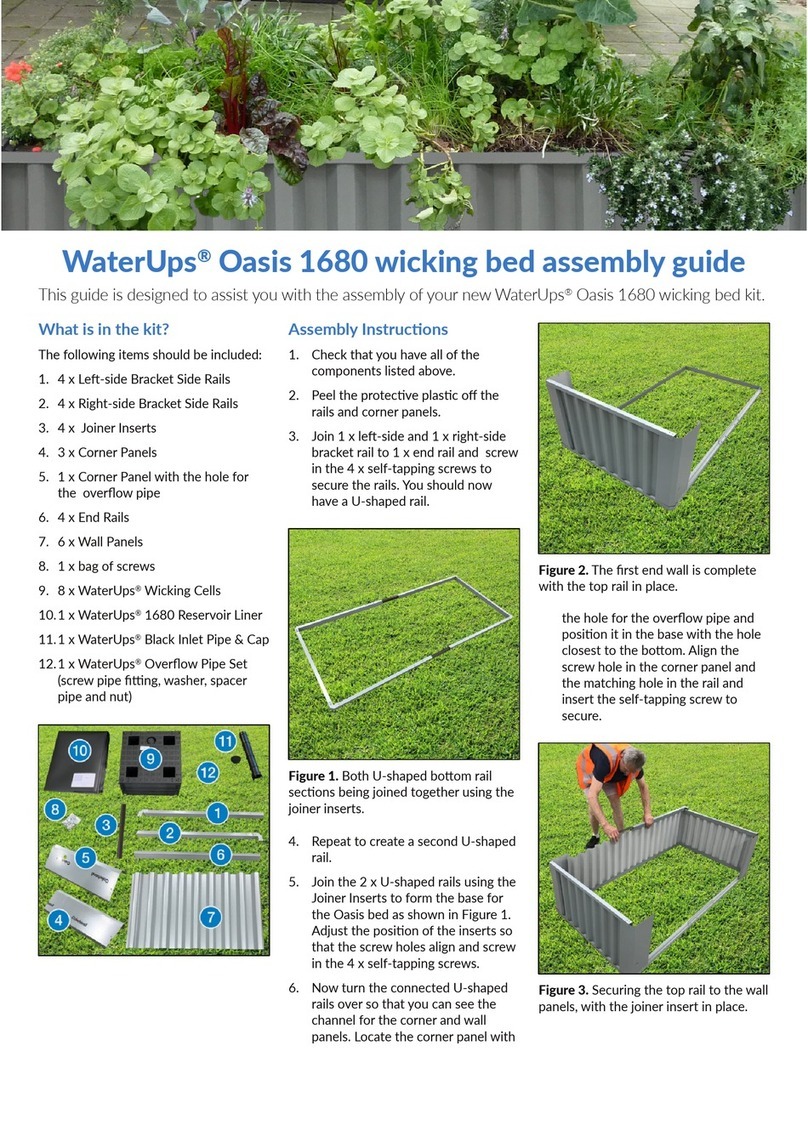
Join 1 x left-side corner rail and 1 x right-
side corner rail to 1 x end rail (with the
short side facing out and the longer side
facing in) to one end rail and screw in
the 4 x self-tapping screws to secure the
rails.
You should now have a U-shaped rail.
Repeat the process to create a second
U-shaped rail.
Join the 2 x U-shaped rails using the
Joiner Inserts to form the base for the
Oasis 1680 bed.
Adjust the position of the inserts so that
the screw holes align and screw in the 4
x self-tapping screws.
Now turn the connected U-shaped rails
over so that you can see the channel
for the corner and wall panels. Locate
the corner panel with the hole for the
overow pipe and position it (when
looking from the end of the bed) to the
base of the far left corner with the hole
closest to the bottom. Align the screw
hole in the corner panel and the
matching hole in the rail and insert the
self-tapping screw to secure.
Repeat for the opposite corner panel.
Insert the the end wall panel between
the 2 corner panels.
Place the end rail on top to keep the end
wall panel and the corner panel in the
correct position.
Insert the other 2 corner panels and
the end wall panel following the same
process as above.
Place 2 wall panels in position along one
side (Be mindful not to cover the panel
with the overow hole). When
overlapping the panels ensure the grey
lip ts under the adjoining panel.
Now add the matching right and left side
bracket side rails and screw into position.
Place the connector rails in position and
secure them with screws
Gradually slide the side rail into position
over the top of the corner and wall panels
and once done align the screw hole in
the corner panel and the matching hole
in the rail and secure it with screws.
Then repeat at the other end.
Repeat the above to add the other side
rails.
3.
Adding the WaterUps®Cells plus
the inlet and overow pipes.
Place a WaterUps®cell in the base of
the liner near the overow hole to work
out the correct position to attach the
overow pipe to the cell.
After attaching the overow pipe and
clicking it into position, add the rubber
washer to the overow pipe and push in
until it abuts the liner.
Now carefully place the cell with the
overow pipe in the base of the liner
positioning it so that the thread of the
overow pipe protrudes from the
external wall of the bed frame. Slide
on the white spacer pipe and push it
through the hole in the steel frame until it
abuts the wall of the reservoir liner. Now
screw on the nut and secure tightly in
position.
2.
Fitting the WaterUps®Reservoir
Liner Insert into the bed.
Refer to the WaterUps®1680 Reservoir
Liner Insert assembly guide for how to
install the reservoir liner. You can access
it by using the link or QR code on page 1.
Before placing the reservoir liner in the
base of the bed ensure that the base is
level and compacted and free from any
sharp objects such as stones.
Place the reservoir liner in the base
so that it sits inside the bottom railing,
making sure that the hole in the liner
for the overow pipe lines up with the
hole in the bed wall.
Note: Although the
WaterUps®1680
Reservoir
Liner Insert assembly guide
says to use Joiners, they are not really
needed for this wicking bed.
The WaterUps®website is owned and operated by
WaterWix Pty Ltd – ABN 58 166 973 011.
The information contained in this document is provided
as is and without any warranties of any kind, whether
expressed or implied. Users are advised to make their own
determination as to the suitability of this information
in relation to their particular purpose or specic
circumstances. No responsibility can be accepted by
WaterUps®, WaterWix Pty Ltd, or its staff for any loss
resulting from any action taken or reliance made by
you on any information contained in this document.
Copyright © 2022 WaterWix Pty Ltd. All rights reserved.
WaterUps, the WaterUps Logo and Wicking our World
are registered trademarks of WaterWix Pty Ltd.
Sales
Email: [email protected]
Phone: 1300 205 550
General Enquiries
Email: [email protected]
Account Enquiries
Email: [email protected]
Contact Us
Published: 5 April 2022
4. Adding perlite to the feet of the
WaterUps®Cell.
Adding Perlite to the ‘wicks‘ will improve
airow through to the soil. Both ne and
medium grain perlite work effectively for
this purpose.
The wicks, which are the 4 feet at the
base of each cell, should all be lled with
perlite.
You will need 20 litres of Perlite for your
Oasis 1680 Wicking Bed.
5. Add potting mix or soil to the
wicking bed.
You will now need 16 x 25 litre bags of
good quality potting mix or potting soil to
ll the Oasis 1680 Wicking Bed.
For more information please refer to our
Soil Considerations Guide
which you will
nd on our Getting Started page. You
can go to it using the link or QR code at
the bottom of page 1.
6. Watering your wicking bed.
To water your bed simply insert a garden
hose into the inlet pipe and ll the water
reservoir until water starts owing out of
the overow pipe. Replace the cap when
done.
The water reservoir of your bed will hold
140.8 litres of water. How often you need
to rell the reservoir will depend on what
plants you are growing, the time of year,
and the amount of natural rainfall that
you receive. However, in our experience,
periods of up to four weeks are
achievable before you will need to rell
your wicking bed.
It is recommended that you allow the
water level in the bed to go down to at
least 1/4 full before relling. This will
assist soil aeration.
To check how much water is in the
reservoir simply use a dipstick or set
up a moisture sensor system.
The three tabs on the bottom of the
water inlet pipe must lock into the three
holes in the top of the WaterUps®Cell.
Apply some pressure to the inlet pipe as
you insert it, until it clicks into place in
the WaterUps®Cell.
Place all remaining WaterUps®cells in
position and fold down the aps on top
of the reservoir liner.
To t the WaterUps®Inlet Pipe you must
rst cut a hole in the top of one of the
WaterUps®Cells.
Using a sharp knife cut along the circular
groove around the type on the top of the
WaterUps®Cell as shown in the image
below.

This manual suits for next models

4

Other WaterUps Lawn And Garden Equipment manuals

WaterUps 15090 User manual

WaterUps

WaterUps 15090 User manual

WaterUps Oasis 1240 User manual

WaterUps

WaterUps Oasis 1240 User manual

WaterUps Oasis 1680 User manual

WaterUps

WaterUps Oasis 1680 User manual

WaterUps Oasis 1240 User manual

WaterUps

WaterUps Oasis 1240 User manual

WaterUps 15090 User manual

WaterUps

WaterUps 15090 User manual

WaterUps Corro User manual

WaterUps

WaterUps Corro User manual

WaterUps Oasis Wicking Bed Manual

WaterUps

WaterUps Oasis Wicking Bed Manual

WaterUps Oasis 1240 User manual

WaterUps

WaterUps Oasis 1240 User manual

WaterUps Oasis 1680 User manual

WaterUps

WaterUps Oasis 1680 User manual

WaterUps Oasis 1680 User manual

WaterUps

WaterUps Oasis 1680 User manual

Popular Lawn And Garden Equipment manuals by other brands

Pubert CESAR 1800E instruction manual

Pubert

Pubert CESAR 1800E instruction manual

Plein Air EI-12 instruction manual

Plein Air

Plein Air EI-12 instruction manual

Victory FMM HD Series Operator's manual

Victory

Victory FMM HD Series Operator's manual

Parkside 282463 Operation and safety notes

Parkside

Parkside 282463 Operation and safety notes

GreenWorks GD48GTE33 Operator's manual

GreenWorks

GreenWorks GD48GTE33 Operator's manual

Winsome house WH100 instruction manual

Winsome house

Winsome house WH100 instruction manual

ATIKA VT 32 Original and safety instructions

ATIKA

ATIKA VT 32 Original and safety instructions

Agri-Fab 45-0260 owner's manual

Agri-Fab

Agri-Fab 45-0260 owner's manual

Taco SmartPlug Instant Hot Water Control instruction sheet

Taco

Taco SmartPlug Instant Hot Water Control instruction sheet

Gardigo 62303 instruction manual

Gardigo

Gardigo 62303 instruction manual

Echo EA-410 Operator's manual

Echo

Echo EA-410 Operator's manual

KoolScapes KSPK-84 installation manual

KoolScapes

KoolScapes KSPK-84 installation manual

Hitachi Koki DA300E Handling instructions

Hitachi Koki

Hitachi Koki DA300E Handling instructions

Craftsman 917.248950 owner's manual

Craftsman

Craftsman 917.248950 owner's manual

Makita BUR141 technical information

Makita

Makita BUR141 technical information

Lippert Solera 5000 Series owner's manual

Lippert

Lippert Solera 5000 Series owner's manual

AL-KO COMBI CARE 38E COMFORT operating instructions

AL-KO

AL-KO COMBI CARE 38E COMFORT operating instructions

Essential Garden 1099 instructions

Essential Garden

Essential Garden 1099 instructions

manuals.online logo
manuals.online logoBrands
  • About & Mission
  • Contact us
  • Privacy Policy
  • Terms and Conditions

Copyright 2025 Manuals.Online. All Rights Reserved.